We have been non-stop grilling this summer and it has been fantastic!!!
Burgers (all types!), skewers, seafood, ribs, veggies……
And with this crazy heat and humidity we’ve been having these past few weeks it’s been the perfect way to escape the hot kitchen.
Most of our BBQs have been in the backyard so I’ve been sorely missing out on all of the summertime beach and park picnics. Delish sammies, salads, and fried chicken. SOOOO GOOD!
But if you’re anything like me, I often can’t decide what I want to make to bring for picnics. I strive to fix up dishes that are a bit out of the norm but still delish at room temperature. And since they’re outdoor events, I try to think of items that don’t have ingredients that will spoil easily.
Thank goodness that onigiris and seaweed rice rolls are ALWAYS a hit when I bring them out. Onigiris (also often referred to as musubis) are a Japanese treat consisting of sticky rice shaped into balls or triangles and wrapped in toasted seaweed. They often are filled with seafood, pickled veggies or meat.
What’s my favorite onigiri? SPAM MUSUBIS!!!!!
Yes, the all-caps were a must.
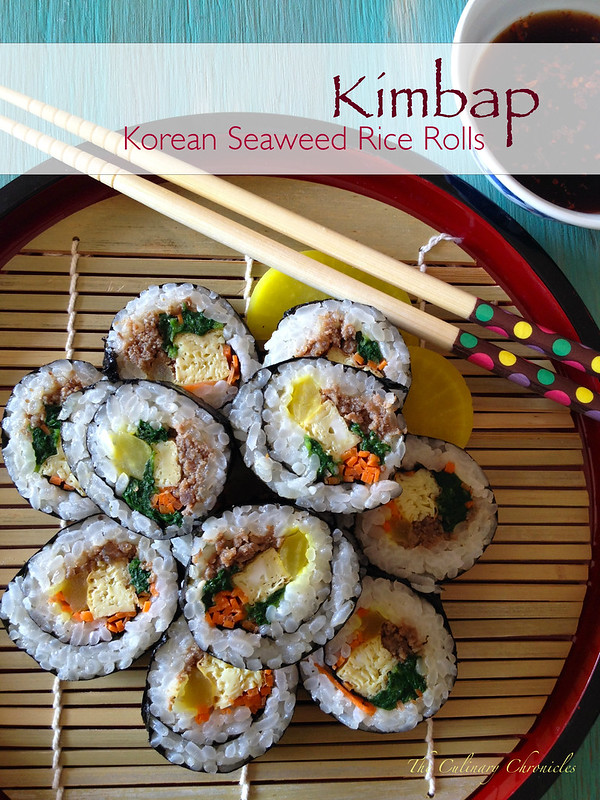
As for seaweed rice rolls — think of sushi maki rolls. But, if you opt to make them for outdoor events or if you don’t plan on serving them right away, I’d recommend staying clear of filling them with raw seafood. Korean style seaweed rice rolls, Kimbap, are perfect because of it.
Kim = Seaweed
Bap = Rice
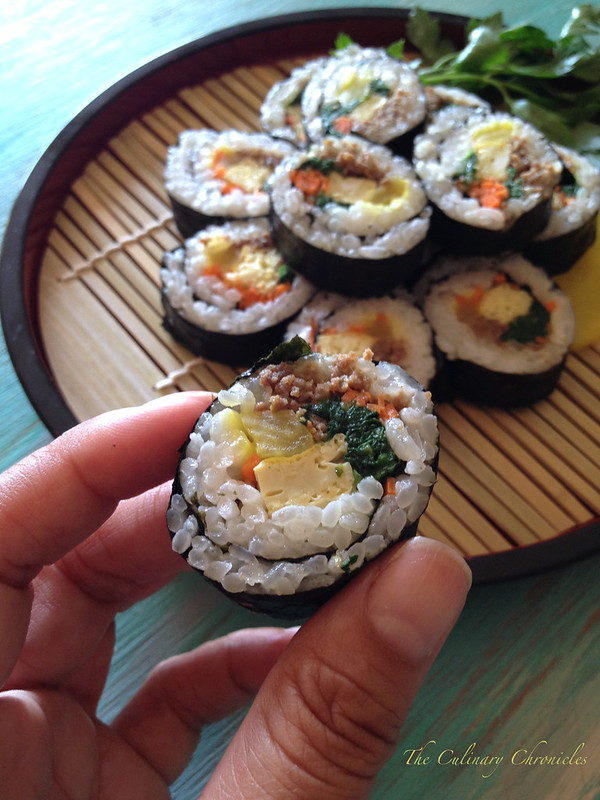
Ever since I was first introduced to kimbap in elementary by my Korean friends, I have been inhaling these little buggers like crazy. There are so many variations but the standard filling usually consists of bulgogi (or seasoned protein of your choice), shredded carrots, cooked spinach, strips of cooked eggs and danmuji (pickled daikon). However, you can really use just about anything you have in your fridge. I often swap out the daikon for cucumbers and use leftover meat I may have such as grilled chicken, shrimp or imitation crab.
The other distinct difference between kimbap and Japanese maki is the rice. Normally, kimbap will only have sesame oil seasoned rice whereas Japanese sushi rice will have sake, rice wine vinegar and some sugar. But since I like the flavor, I use a combo of sesame oil and rice wine vinegar for my kimbap.
So for my latest contribution to the Safest Choice™ Darling Dozen I thought I would share with you a basic version of Kimbap. Once you get all the pieces together, assembly takes barely any time at all. And since you don’t have to serve it right away, you can make it the morning of a picnic or outing and have it on hand whenever you’re ready for it.
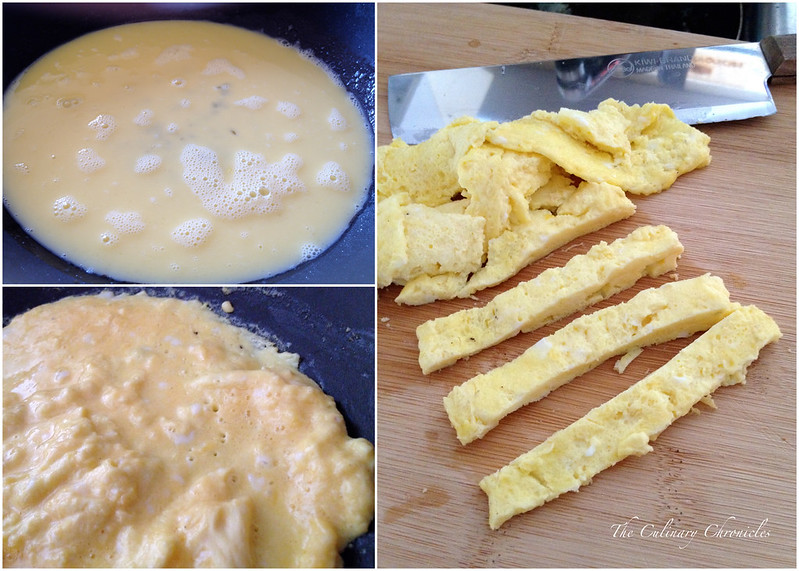
I’ve also included my recipe for the bulgogi marinade below but feel free to use a store bought marinade as there are TONS of great ones out there as well. However, keep in mind one note about the preparation of the eggs or “omelet”. Cook the eggs low and slow so that it doesn’t brown and retains its bright yellow color.
Much thanks to our friends at Safest Choice™ and to learn more about them and their pasteurization process to eliminate salmonella, please click here.
HAPPY PICNICKING!
_____________________________________________
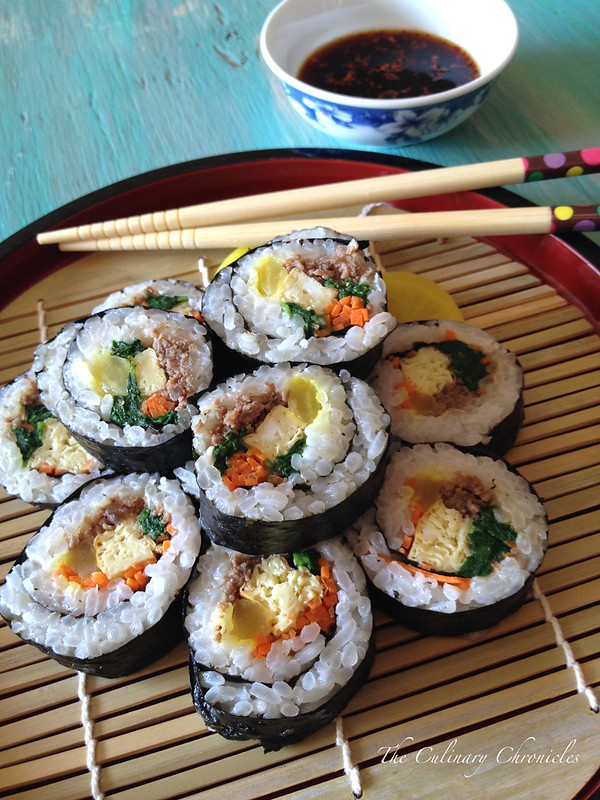
Kimbap – Korean Seaweed Rice Rolls
Makes 4 rolls
Ingredients:
½ cup bulgogi marinade, homemade* or store bought
¼ pound thinly sliced ribeye beef
1 tablespoon vegetable oil, divided
3 large Safest Choice™ pasteurized eggs, beaten
2 cups cooked short grain-sticky rice, heated
½ tablespoon sesame oil
½ tablespoon rice wine vinegar
4 toasted seaweed sheets
½ cup finely julienned carrots
½ cup danmuji – Korean pickled daikon (or cucumbers), cut into long strips
½ cup blanched spinach
In a small bowl, mix the bulgogi marinade and beef together. Cover and refrigerate for 30 minutes.
Heat a small nonstick skillet with ½ tablespoon vegetable oil over medium-low. Pour in the beaten eggs and turn down the heat to low. Cook the eggs until they have just set on top and you see tiny bubbles forming over the surface. Carefully flip over the “omelet”. Allow the eggs to cook for an additional minute and slide the omelet onto a cutting board. Cut the omelet into long strips approximately ½ inch wide. Set aside.
Use a damp paper towel and wipe the interior of the nonstick skillet. Heat the remaining vegetable oil over medium high. Add the marinated beef to the skillet and stir-fry until the meat has browned and cooked through. Set aside.
In a medium size bowl, combine the rice with the sesame oil and rice wine vinegar.
Place one piece of toasted seaweed (shiny side down) on a bamboo sushi mat or piece of parchment paper. Dip your hands into a bowl of water (to help keep the rice from sticking). Spread and press ¼ of the rice mixture into an even, thin layer on top of the seaweed. You’ll want to leave about 2 inches from the top and bottom of the seaweed sheet uncovered.
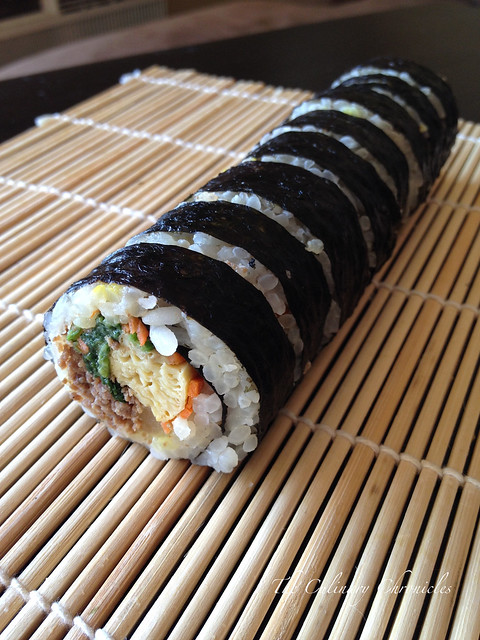
Place ¼ of the beef, eggs, carrots, daikon, and spinach horizontally along the center of the rice. Hold the bottom of the bamboo mat (or parchment), and use an upwards motion to roll the kimbap. As you’re rolling, you’ll want to gently squeeze the kimbap to ensure that it’s firmly sealed and enclosed into the shape of a log. Unroll the bamboo mat (or parchment) and set the rolled kimbap aside. Repeat the process with the remaining ingredients.
Using a sharp knife, cut each roll into ½ inch pieces. You may need to wipe down the knife periodically as the rice can cause the blade to become sticky. Serve the kimbap at room temperature.
*To make your own bulgogi marinade, add the following ingredients into a food processor/blender and puree. Makes approximately 1 cup.
1/3 cup low sodium soy sauce
1 tablespoon honey or agave
1 tablespoon mirin
juice of one small orange
1 tablespoon sesame oil
1 teaspoon Gochugaru (Korean red chili pepper powder)
½ teaspoon toasted sesame seeds
½ teaspoon kosher salt
¼ teaspoon black pepper
½ tablespoon brown sugar
½ small Asian pear, quartered
2 large garlic cloves
1 inch piece fresh ginger
2 scallions, cut into 2 inch pieces

*DISCLOSURE: As a brand ambassador for the Safest Choice™ Darling Dozen, I was compensated for the creation of this recipe and post. However, as always, all opinions are my own.*