Desserts/Pastries · Ice Cream · Sponsored

Welcome Summer in with Roasted Berries Ice Cream

Roasted Berries Ice Cream

HAPPY FIRST DAY OF SUMMER!!!

And here in San Diego, it came in full force today with a whomping 105 degree weather! Can you imagine what it’ll be like in July?!?

Luckily, I know of very few better ways to beat the heat than with lots and lots of ice cream. So this month I partnered again with our buddies at Safest Choice® Eggs  to whip up an ice cream that was an ode to SummerRoasted Berries.

Berries Ice Cream

Have you ever roasted berries? If not, please do so STAT because it’s a game changer! The berries become so wonderfully intensified in flavor and can be used in so many different ways. Over cakes, with yogurt, on top of meringues and in this case–in ice cream.

I chose strawberries and blackberries this time around but really, you could use any berry that tickles your fancy.

Roasted Berries Ice Cream3

Never attempted homemade ice cream before? No worries! It’s all quite simple and if you’ve got a trusty ice cream machine, it’s a breeze!

Head on over to Safest Choice® Eggs  to read my ice cream post this month and while you’re at it, click here for the recipe.

We’re ready for you Summer!!!

Davidsons-Dozen-Blogger-Badge


Desserts/Pastries · Drinks · Ice Cream

Almond Joy Milkshakes

Almond Joy Milkshakes

It’s been really hot these past few days.

How hot you ask?

HELLA hot.

Darn too hot to cook or even warm up food. So instead, I opted to make milkshakes for dinner the other night.

Almond Joy Milkshakes

I rummaged through the freezer and found some chocolate and coconut ice creams which I threw in the blender with some other goodies. And some how, I inadvertently made the most delicious milkshake with the flavors of Almond Joy. ‘Cause….

Sometimes you feel like a nut…
Sometimes you don’t…..

It was decadently yummy and helped keep me cool during the .5 seconds it took me to inhale the whole thing.

I love it when I make delish things by accidents.

____________________________________

Almond Joy Milkshakes
Serves 1

Ingredients:

1 heaping scoop chocolate ice cream
1 heaping scoop coconut ice cream
½ cup almond milk
½ teaspoon vanilla extract
¼ teaspoon coconut extract
1 ounce creme de cacao (optional)
2 tablespoons toasted coconut flakes
1 teaspoon toasted almond slices
1 teaspoon cacao nibs or chocolate chunks

In a blender, add both ice creams, almond milk, both extracts, creme de cacao (if using) and 1½ tablespoons coconut flakes. Blend until the shake is smooth and frothy. Pour the contents into a glass and sprinkle the top with the remaining coconut flakes, almond slices and cacao nibs (or chocolate).

Enjoy!


Desserts/Pastries · Ice Cream · Sponsored

Macadamia-Java-Chip Ice Cream for King’s Hawaiian

Macadamia-Java-Chip Ice Cream

I scream, You scream…

We all scream for Ice Cream!

With Summer in full effect, the heat has been blazing here in Southern California. Somewhat uncomfortable at times but it’s the perfect Ice Cream weather!

Channeling the flavors of the islands, I put together this onolicious Macadamia-Java-Chip Ice Cream for the King’s Hawaiian O’hana. The recipe is quite simple to pull together and is packed full of the balanced island flavors of coffee, chocolate, and rich macadamia nuts. Click here to find my post and recipe for the KH O’hana as this is the perfect way to end the week.

Happy Aloha Friday Friends!!!

Drinks · Ice Cream

Boozy Mint Chip Shakes — Happy St. Patrick’s Day!

Boozy Mint Chip Shakes

Need something green to help you celebrate St. Patrick’s Day? Well you’re in luck because I’ve got a super green, super delish and super boozy shake for you.

Boozy Mint Chip Shakes

Tons of mint chocolate chip ice cream blended with Baileys Mint Chocolate Irish Cream and topped with swirls of mint flavored whipped cream. Green, minty deliciousness!

HAPPY ST.PATRICK’S DAY!!!

_________________________________

Boozy Mint Chip Shakes
Serves 2

Ingredients

Mint Flavored Whipped Cream
½ cup chilled heavy cream
½ tablespoon sugar
2 drops mint extract

Shake
2 heaping cups mint chocolate chip ice cream
1 cup milk
1 tablespoon malt powder
2½ ounces Baileys Mint Chocolate Irish Cream
1-2 drops green food color (optional)
Sprinkles

Prepare the whipped cream. Using a standing mixer fitted with the balloon whisk attachment, whip the chilled heavy cream on high until it just holds stiff peaks. Slowly sprinkle in the sugar until you reach a thick consistency. Add in the mint extract and whip until combined.

In a blender, combine ice cream, milk, malt powder, Irish cream and food color (optional). Blend until the mixture is smooth and combined.

Pour the shake into two chilled glasses and top with swirls of whipped cream. Add sprinkles and enjoy!

Desserts/Pastries · Ice Cream · Sponsored

Godiva Coffee-Chip Ice Cream

Godiva Coffee-Chip Ice Cream

It’s no secret that I began drinking coffee at an early age…..like at 11 or 12.

But before you judge my upbringing, you’ve got to remember that I’m Vietnamese and cà phê (Vietnamese Coffee) practically runs in our veins. Well, that and nước mắm (fish sauce) of course 🙂

Godiva Coffee-Chip Ice Cream

So you can imagine my delight when a box arrived at my door with a few bags of Godiva’s new line of coffee to play around with. There were so may different routes I could have gone with but since July was National Ice Cream month, I decided to make a coffee flavored ice cream using Godiva Chocolate Truffle Coffee.   And of course, adding in chocolate was a must!

The end results were AH-MAY-ZING! The coffee flavor was the star but the chocolate shards were such great little bits of surprises throughout the whole thing.

And you want to know a secret?

I didn’t even use an ice cream machine to make this! Yup….totally old school! Thanks to David Lebovitz, all you need to make your own homemade ice cream is a few ingredients, a cold freezer, and a little patience.

Delicious!

And if you’re looking to make an adult version of this ice cream, throw in some Baileys Irish Cream Liqueur! Because after all, why the heck not? 🙂

____________________________________________

Godiva Coffee-Chip Ice Cream
Makes approximately 1 Quart

Ingredients:

1½ Cups Whole Milk
1½ Cups Heavy Cream
3 Large Egg Yolks
2 Large Eggs
½ Cup Sugar
½ Cup Strongly Brewed Coffee (I used Godiva Chocolate Truffle Coffee)
1 Teaspoon Instant Espresso
5 Ounces Dark Chocolate, roughly chopped
1/4 Cup Baileys Irish Cream Liqueur (optional)

Dissolve the espresso into the brewed coffee. Allow the coffee to cool to room temperature.

In a mixing stand, whisk the eggs, yolks and sugar in a bowl for 2 minutes until its pale yellow in color. Heat milk and cream in a medium saucepan until it is near-boiling and turn off heat. Turn the mixer on medium-high and gradually drizzle in ½ of the hot milk/cream into the egg mixture. Once the mixture has been tempered and combined, pour it back into the saucepan with the remaining milk/cream. Heat medium low, stirring constantly, for a few more minutes or until the consistency is thick enough to coat the back of a spoon when dipped in. Turn off heat. Whisk in the coffee/espresso and Baileys (if using). Pour the custard base into a bowl and chill over an ice bath.

Once the custard has chilled, pour it into a glass baking dish and place directly into the freezer for 45 minutes. Pull out of the freezer and use a rubber spatula to vigorously stir the mixture, breaking up any frozen bits. Place back in the freezer and continue to check the mixture every 30 minutes, stirring vigorously as it’s freezing.

When the custard is nearly frozen, take the chocolate and heat over a water bath. Take out the dish and drizzle the chocolate over the top of the custard. The chocolate should harden fairly quick and use the rubber spatula to break it up into small pieces. Transfer the ice cream to a covered storage container until ready to serve.

*If using machine, add the chilled custard base into the machine and follow manufacturer’s directions.

As part of the Foodbuzz Tastemaker Program, I received Godiva Coffee. However, all views and opinions expressed here are my own.

Desserts/Pastries · Ice Cream

Mango Gelato…and Our Grandma, Mệ

Mango Gelato


M was our paternal grandmother and by no stretch to the imagination was she your typical grandma. Yes–she was loving and caring but she was also quite feisty and sometimes “crass”. She chewed trầu cau (betlenut), drank beer, taught me black jack, and could build the most intricate and ornate Lego buildings that were freaking awesome.

And because of all of that, I loved her dearly.

As the youngest of 5 (with a fairly significant age gap between my next sibling), I spent a lot of my childhood with Ôn (our paternal grandpa) and M. They would play with me, sneak me extra candies, and shield me from my folks when I was about to get busted for doing something really stupid.


Mango Gelato


Lately I find myself reminiscing a lot on my times with M —especially the times that we would eat mangoes together. I would sit on the floor next to her watching her peel the long strips of skin off the mangoes. Then we would devour the fruit and gnaw on the seeds with the juices dripping down our faces. Of course she would tell me some type of funny story throughout the entire process, stopping only to open her mouth wide to let out a huge bellowing laugh. When we were finished, she would hurry me off to go wash my face before the juices left my skin itchy. They were wonderful times and I can’t help but to smile when I remember her this way.

Shortly after Ôn passed away, M moved back to Vit Nam and my frequent trips to the motherland began. With each visit, she and I would still sit on the floor and enjoy some special item together…..măng ct (mangosteens), mít (jackfruit), nhãn (longan) or whatever fruit that was in season. The roles changed a bit during those times as I prepared the fruit for us while she inquired about my day. She was obligated to remind me, her American-born granddaughter, to not eat the street foods or ride on the xe ôm (scooters). Of course I obediently said “yes” and then would later jump on a scooter & head to the nearest food stall with my cousins. But the small “white lie” was expected. She knew she had to caution me and I knew I would have to verbally comply. But inside, M knew that exploring the streets of Vit Nam was the only way for me to really become acquainted with my country.

My family says I inherited a lot of M’s features, which always makes me smile. I think it’s because of this and my memories of M that I feel I’ll always carry her spirit with me. And for the rest of my life, I know that every time I eat mangoes I will always think of her.


Ôn and M…..weren’t they so cute???

___________________________________

Mango Gelato
From Ice Cream & Sorbets: Cool Recipes
Makes One Quart

Ingredients:

½ Cup Sugar
½ Cup Water
2 Pounds Ripe Mangoes*
3 Tablespoons Freshly Squeezed Lemon Juice
2/3 Cup Heavy (whipping) Cream
Prepare a large bowl or pan of ice water.

In a medium saucepan, combine the sugar and water, bring to a boil while stirring, and cook until the syrup is clear. Immediately place the pan in the ice bath and stir the mixture occasionally until it cools to room temperature.

Peel and dice the mangoes, discarding the seeds, and purée the mangoes in a blender or food processor with the juice and syrup. Transfer to a container and stir in the cream. Cover and refrigerate until thoroughly chilled, about 3 hours.

Freeze in an ice cream maker according to the manufacturer’s instructions. Transfer to a container, cover, and freeze until firm, about 2 hours.

**It’s important to use really ripe, but not browned, mangoes for the fullest flavor. There are also many varietals of mangoes but I prefer the Ataulfos as I think they are the most fragrant and flavorful.

Desserts/Pastries · Ice Cream

Strawberry Ice Cream

Strawberry Ice Cream

Have I ever mentioned that I’m the youngest of 5?

Over the years, it’s really had its perks. Don’t let people tell you otherwise. 🙂

Sure, I’ve had my share of hand-me-downs. But by the time my parents got to me, they were way too worn out by my sibs…..so admittedly, I had it MUCH easier than them. My grandparents babied me and in fact, even my elder sibs were known to indulge me from time to time.

When I was in kindergarten, my sis P, would often meet me at my bus stop to walk me home. And on some occasions, she would make a pit stop at Dairy Queen on our way home to indulge me in some VERY special treats. I would fluctuate between ordering a Lime Mister Misty Float—a Peanut Buster Parfait-–or even a simple Dipped Cone. All of them were amazing delights!

Strawberry Ice Cream

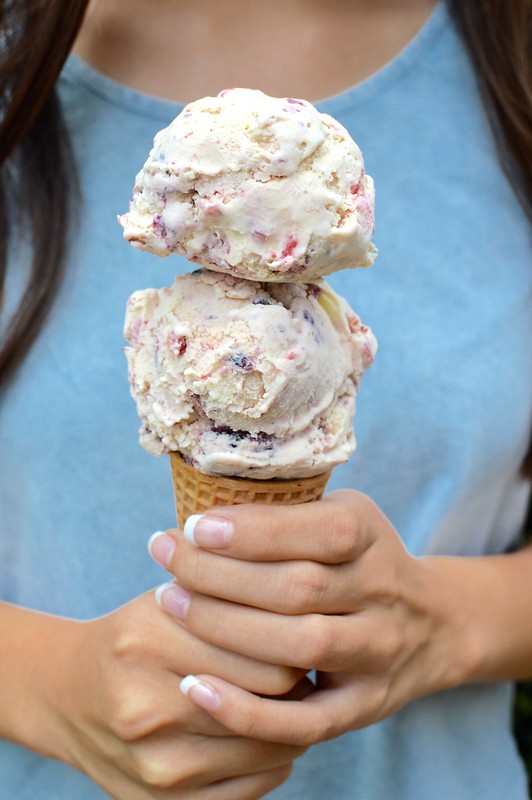
So when I began making a Strawberry Ice Cream the other day (due to our excess of berries from Tanaka Farms), my sis P said the house smelled like Dairy Queen.

Quite the compliment, if I do say myself.

Sweet. Tangy. Fragrant.

Just how strawberries should smell.

And the end result tasted even better than it smelled. Creamy and packed FULL of berry flavor. Due to our super fresh berries, I even halved the amount of sugar in the recipe. But if you find that your berries are slightly lacking in punch—by all means, go the full amount.

In my opinion, iconic desserts like this should always evoke childhood memories. But I do wonder, did Dairy Queen put vodka in their ice creams too? 🙂

_____________________________________

Strawberry Ice Cream
From America’s Test Kitchen

Ingredients:

1 ½ Cups Heavy Cream
1 ¼ Cups Whole Milk
1 Cup Sugar
6 Whole Egg Yolks
1 Quart Strawberries, hulled and sliced
Pinch of Salt
1 Teaspoon Vanilla Extract
1 Teaspoon Lemon Juice
3 Tablespoons Vodka

Set a fine mesh strainer over a medium sized bowl and set the bowl over a large container of ice water. Heat the cream, milk, and ¼ cup sugar in a medium size sauce pan over medium heat stirring occasionally to dissolve the sugar, until steam appears and the liquid is hot (175 degrees) about 5 minutes.

When the milk mixture is hot, in a separate bowl, whisk the yolks and remaining ¼ cup of sugar together until smooth. Slowly whisk about 1 cup of the hot milk mixture (temper) into the yolks. Then slowly whisk the tempered yolk mixture back into the remaining hot milk mixture. Continue to cook the custard mixture over medium heat until it is very hot but not simmering (180-185 degrees).

Strain the custard mixture into the bowl set in the ice bath and let cool, stirring occasionally, for about 10 minutes. Remove the custard mixture from the ice bath, cover tightly with plastic wrap and refrigerate for about 3 hours.

Meanwhile, bring the strawberries, salt, and remaining sugar to a simmer in a medium sized saucepan over medium-high heat. Cook, smashing the berries slightly, until they have released their juices and are broken down, about 5 minutes. Transfer to a small bowl, cover with plastic wrap, and refrigerate until needed.

Strain the berry mixture through a fine mesh strainer. Stir the strained juices, vanilla, and lemon into the chilled custard mixture. Pour the mixture into the ice cream canister and churn following the manufacturers instructions until the mixture resembles soft served ice cream. Toss the strained strawberries with the vodka and add to the machine when there is about 2 minutes remaining before the churning is complete.

Transfer the ice cream to an airtight container and press plastic wrap against the surface. Cover the container and freeze the ice cream until it is firm—about 3 hours.

Drinks · Ice Cream · Vietnamese

Sinh Tố Cà Phê (Vietnamese Coffee Shake)

Sinh Tố Cà Phê (Vietnamese Coffee Shake)


Vietnamese Coffee is a rich, dark roast that is slowly dripped through a small metal filter. More often than not, the coffee grinds are mixed with a chicory blend that gives the coffee a “woody” flavor profile. With a spoonful of rich condensed milk, it’s called Cà Phê Sữa and without it’s called Cà Phê Đen.

For this month’s Delicious Vietnam, I decided to utilize Cà Phê Sữa to make one of my favorite treats — Sinh Tố or Vietnamese Shake. In Việt Nam, Sinh Tố is usually made with fruits such as pineapples, mangoes, and avocados. It’s blended with milk, condensed milk, and ice to make a deliciously refreshing treat. But since I’m a major caffeine addict, I thought a Cà Phê flavored Sinh Tố would be the best of both worlds.

Instead of milk, I opted for Vanilla Ice Cream. And with the use of slow dripped Vietnamese coffee, this “shake” has a completely different flavor than any coffee shake you’ve ever tasted. It’s all in the chicory!

Don’t be surprised if your nearest mega-coffee-shop started offering Sinh Tố Cà Phê!

________________________________________

Sinh Tố Cà Phê (Vietnamese Coffee Shake)

Ingredients:

5 Ounces Freshly Brewed Vietnamese Coffee
2 Heaping Scoops Vanilla Ice Cream
1/2 Cup Crushed Ice
1 Tablespoon Condensed Milk

While the Vietnamese Coffee is slightly warm, stir in the condensed milk until it’s combined. Allow the coffee to cool to room temperature. Once cooled, pour coffee mixture into a blender and add ice cream and crushed ice. Pulse/blend the contents until smooth.

**This is my submission to Delicious Vietnam #12, a monthly blogging event celebrating Vietnamese cuisine which was started by Anh of A Food Lover’s Journey and Hong & Kim of  Ravenous Couple. For more information, please visit Delicious Vietnam**


Desserts/Pastries · Ice Cream

Toasted Coconut Gelato

Second Coconut recipe in one week?! Yes, I admit it…..I have a Coconut addiction.

In an attempt to keep up my goal of utilizing my ice cream maker throughout summer, I dabbled with a recipe to bring one of my favorite flavors into gelato form. Loosely basing it off my Mint Chip Gelato adventure, I took toasted coconut, coconut milk, and coconut extract to make this easy and delish gelato. And because of the three forms of coconut that I employed, the end result was truly packed full of coconut flavor.

For a little experiment, I took half of the gelato from the ice cream maker and swirled it with caramel and left the other half as is. I had hoped that the caramel would provide a luscious surprise in each bite but unfortunately the flavor was not able to hold its own. My sister later told me that Ben & Jerry’s had said on an episode of Unwrapped that Caramel Ice Cream was challenging because if you don’t make the caramel thick enough, it blends too much into the rest of the ice cream. Not going to lie—that made me feel better 🙂

Even though the caramel spin wasn’t as successful, the Toasted Coconut Gelato by itself was delicious and I’ll definitely make it again. Perhaps next time with the addition of fresh young coconut strips? Delish!

Until next time Friends, “Coconut Addict” signing off!

__________________________________________________________

Toasted Coconut Gelato

Ingredients:

2 Cups plus 3 Tablespoons Whole Milk
1¾ Cups Coconut Milk (I prefer this brand)
1 Cup loosely packed Toasted Unsweetened Coconut Flakes, plus additional for garnish
½ Cup Sugar
1 Teaspoon Coconut Extract
1 Teaspoon Vanilla Extract
1 Tablespoons Cornstarch
Pinch salt

In a heavy sauce pot, add 2 cups of milk, coconut milk, sugar, and salt. Bring to a low boil on medium low heat. Be careful not to scorch. With the remaining milk, add corn starch to make a slurry. When milk and coconut milk come to a boil, add the slurry and extracts. Cook on low and whisk often so that clumps do not form. The mixture is cooked when you can run a line on the back of a spoon without the mixture coming back together.  Cool the mixture to room temperature and then chill in the refrigerator for a minimum of 12 hours.

Add the mixture to your ice cream maker and follow the manufacturer’s directions. When half the time has elapsed, slowly add the toasted coconut allowing it to be thoroughly incorporated in the mixture.

Transfer to a storage container and freeze until desired firmness. Before serving, allow the gelato to sit on your counter for a few minutes for a better texture and because its easier to scoop. Serve with a sprinkle of toasted coconut flakes.

ENJOY!

Desserts/Pastries · Ice Cream

Mint Chip Gelato….Homage to National Ice Cream Month

July was National Ice Cream Month! And what better way to compliment the summer heat than with a big old bowl of your favorite ice cream flavor. My favorite flavor? Easy. Mint Chocolate Chip—-but not just any variety. This gal requires that her Mint Chocolate Chip not only taste good but have that bright green hue that only food coloring can bring 🙂 It just tastes better….True Story.

And although I realize traditional Gelato is different than Ice Cream, I thought that its Italian counterpart would be a great “lighter” alternative to celebrate this fun food month. I was inspired to try out the Mint Chip Gelato from Ravenous Couple as I liked their interpretation from David Lebovitz and Mark Bittman.

The recipe was straight and to the point—-and with my lovely Cuisinart Ice Cream/Sorbet Maker, it was a breeze! Because I added 1.5 bunches of fresh mint to my base, my gelato was MINT-A-LICIOUS—which was perfect for me. I think the only change I would make next time would be to reduce the cornstarch to 1 Tablespoon as 2 was just a little too much for my liking. And because of the high volume of fresh mint that I used, I was able to achieve a very pretty light green hue. Quite lovely with no food coloring needed.

And not only was my end product delicious but I knew exactly EVERYTHING that was in it and could control amounts, etc. No added preservatives or filler ingredients here.

There’s nearly two official months left until Summer ends and I intend to fully give my ice cream maker a work out 🙂

Until next time friends, stay COOL (pun intended).

______________________________________

Mint Chip Gelato
From Ravenous Couple

Ingredients:

2 Cups Whole Milk
1/3 Cup Sugar
2 Tablespoons Cornstarch
Pinch salt
1-2 Bunches Fresh Mint, washed, dried, and destemmed
5 oz. Dark Chocolate

Make a slurry with about 3-4 tbs of milk and corn starch in a bowl and set aside.  Add the remainder of the milk to a sauce pan, mint, salt, and sugar under medium low heat.  When mixture starts to bubble, turn off heat and allow mint to steep for about 1 hour.  Then pour mixture over a sieve and squeeze out the fluid from  mint and discard.

Reheat his mixture under medium low heat. When it begins to bubble, add your mixed slurry and stir making sure there are no clumps. Continue to heat until it thickens..when you can run a line on a back of a spoon without the mixture coming together it should be done.  Cool completely (preferably over night) and then add to your ice cream maker, follow it’s directions.

Place the container that you plan on storing the ice cream in the freezer.

In the mean time, coarsely chop the chocolate into small pieces and heat over a water bath.  When the ice cream maker is done, scribble the melted chocolate onto your cold container–it should freeze almost instantly. Scoop in a layer of ice cream and break up the chocolate. Scribble more chocolate and layer on more ice cream.  Continue until done and freeze until firm.  Before serving allow to thaw just slightly before scooping.