Appetizers/Small Plates · Vegetables/Vegetarian

Heirloom Tomato and Pesto-Ricotta Tart

September 2017 Fam Din
An heirloom tomato dish when we’re just days away from November?

I know, but work with me people…..this crazy heatwave has got all of us in California out of sorts. Monday it was 97 degrees, Tuesday it was 99 degrees and today is 92 degrees —and I live on the coast!

Mother Nature is not happy. So in the meantime, you’ll get some summer inspired recipes from me.

September 2017 Fam Din
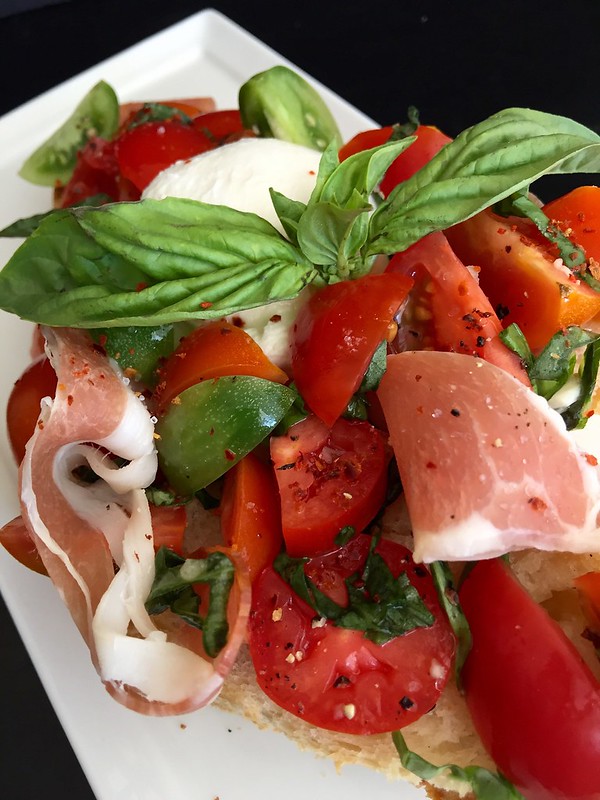
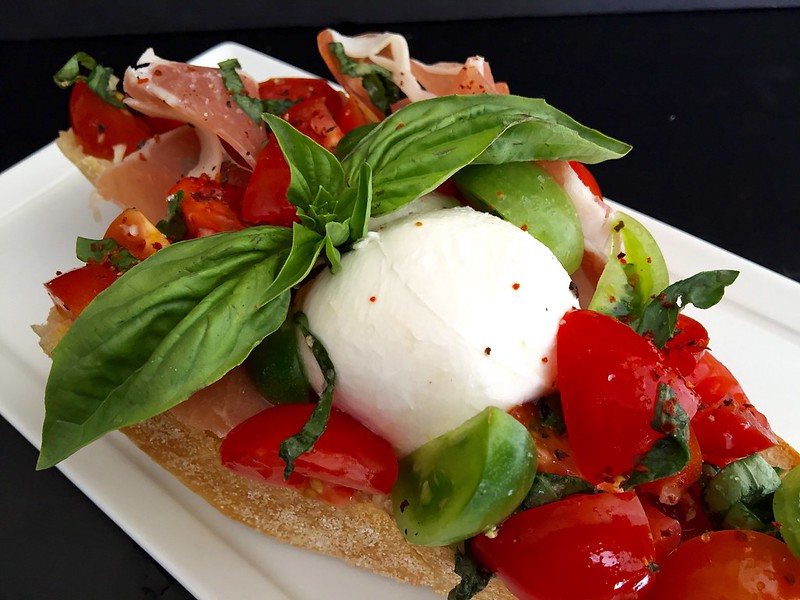
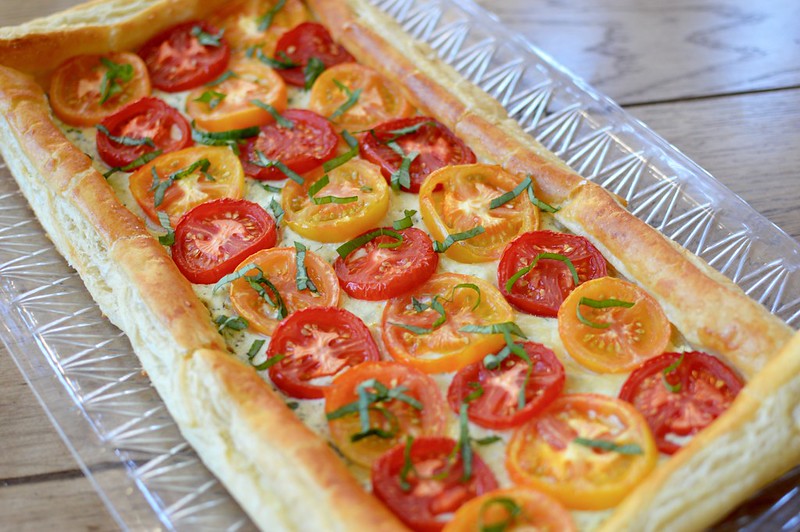
I made this beauty for last month’s family dinner as an appetizer but it could easily serve as a main course with a nice side salad. Perhaps a peppery arugula salad? And of course, a cold and crisp glass of white wine to go along is a must.

This stunning tart is quite easy to whip together. All you need is a few ripe heirloom tomatoes, store bought puff pastry, ricotta cheese, some basil pesto and just a couple of other kitchen staples. I used some pesto I had made a few days prior, but if you prefer, store bought is fine too. Just be sure to adjust for salt as needed.

September 2017 Fam Din
One thing to note is that since you’ll be baking the tomatoes (versus some other tomato tarts that bake the puff pastry first and then top fresh tomatoes on top), you’ll want to try and get as much moisture out as possible or else you’ll get a soggy mess. Just lay them out over a bunch of paper towels after they’ve been sliced and let them chill out for a bit while you take care of everything else.

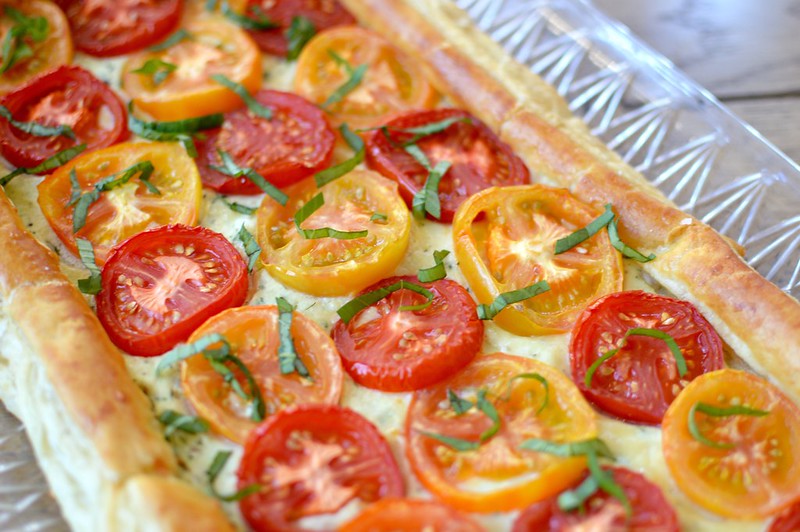
After some quick assembly and about 30 minutes in the oven, you’re done! Creamy textures from ricotta mixture, brightness from tomatoes and fresh basil–and flaky, buttery goodness from the pastry dough.

Now excuse me as I stick my head in the freezer to try and cool down…..

________________________________________________

Heirloom Tomato and Pesto-Ricotta Tart
Serves approximately 8

Ingredients:

1 pound ripe heirloom tomatoes
2 large eggs, divided
2 heaping tablespoons basil pesto (homemade or store-bought)
8 ounces ricotta cheese, room temperature
1 tablespoon grated parmesan cheese
1 teaspoon minced fresh garlic
¼ teaspoon fresh black pepper
¼ teaspoon red pepper flakes.
flour
1 package puff pastry dough (2 sheets about 10 x 15 inches each)
½ tablespoon water
kosher salt
4-5 fresh basil leaves, chiffonade

Cut the tomatoes into approximately ¼ – ⅓ inch slices. In a single layer, place the tomatoes on top of 2-3 layers of paper towels to remove excess moisture. Place another paper towel on top of the tomatoes and gently press. Set aside.

In a medium sized bowl, whisk 1 egg with the pesto. Fold in the ricotta, parmesan, garlic, black pepper and red pepper flakes until all items have been incorporated. Depending on your pesto, you may need to add some additional kosher salt. Set aside.

On a lightly floured surface, overlap one of the pastry sheets with the other by about ⅓ inch. Gently press the seams together and roll out the combined sheet to about ⅛ inch thick. You’ll want to keep the dough in the rectangle shape and then transfer to a baking sheet lined with parchment paper.

Cut a 1 inch strip off each of the four sides of the dough. Beat the remaining egg with ½ tablespoon of water in a small bowl. Brush the sides of the large piece of dough and lay each of the four strips on the corresponding side. Gently press the dough down. Once the tart bakes, the sides will puff up.

In the interior of the dough, evenly spread the pesto-ricotta mixture. Lay the sliced tomatoes on top of the mixture, slightly overlapping each slice. Brush the exposed dough with the egg wash mixture and sprinkle salt over the tomato tart.

Bake the tart in a preheated oven at 425 degrees F for about 25-30 minutes until the pastry dough has risen and becomes golden brown. Transfer to a cooling rack and allow the tart to set for a few minutes before sprinkling the basil on top. Serve warm or at room temperature.


Pizzas · Vegetables/Vegetarian

Ratatouille Pizza

Ratatouille Pizza
You may not know this about me but I’m a Disney freak.

For years my movie library was primarily filled with the clam-shell VHS cases of animated Disney films. Yes, you read correctly — VHS.

I can recite entire movies without effort, enthusiastically sing (albeit, in a tone deaf pitch) every song, and have a rather impressive “who’s-its and what’s-its galore” collection of Disney chotskies.

So it should be no surprise that my inspiration dish for National Pizza Month came while watching Disney’s Ratatouille the other week. The movie is now near 10 years old but if you haven’t seen it yet—drop everything and watch it!!

Oh that Remy……

Ratatouille Pizza
Ratatouille is a French Provençal dish that features veggies in a slow cooked stew. It was while Remy was layering the veggies for his remake of Ratatouille that I thought –HOT DAMN! Those flavors would be fantastic on a pizza! Eggplant, squashes, peppers, tomatoes, basil — perfect!!!

With those flavors in mind, I took to my beloved cast iron skillet method to fix up a gorgeous pizza. I smothered a generous layer of my homemade marinara that mimicked the stewed tomatoes of Ratatouille with its onions, garlic, oregano, and fennel. Next came a shingled layer of roasted eggplant, roasted zucchini and few slices of red bell pepper that I chose not to roast so that it could hold a bit of its crunch through the short cooking process. After the whole pizza broiled, I placed torn pieces of burrata on top because burrata makes everything better! And right before serving, I sprinkled the the whole thing with some sea salt, fresh cracked pepper, chili flakes and ribbons of fresh basil.

What do ya think? Isn’t it a beauty? And it tasted even better than it looked!

Remy would be proud.

HAPPY NATIONAL PIZZA MONTH!!!

_____________________________________

Ratatouille Pizza
Serves 2

Ingredients:

12-15 ¼-inch slices eggplant
12-15 ¼-inch slices zucchini or summer squash
olive oil, divided
kosher salt
5 ounces fresh pizza dough, rested and at room temperature
all purpose flour
1 teaspoon ground corn meal
¾ cup marinara
1 teaspoon minced garlic
leaves from 2 sprigs fresh thyme
10-12 thin slices red bell pepper
3 ounces fresh burrata cheese, torn into pieces
sea salt
fresh cracked black pepper
¼ teaspoon red chili flakes
2-3 large fresh basil leaves chiffonade

Preheat oven to 475 degrees F. Place the eggplant and zucchini on a baking sheet. Brush each slice with olive oil and sprinkle with kosher salt. Roast the vegetables in the oven for 10-15 minutes until they are soft and become golden. Remove the sheet and allow to cool.

Turn on the oven broiler and adjust one of the racks to the top of the oven to rest directly under the broiler. Place a seasoned cast iron skillet (12-14 inches in diameter) directly under the broiler for 8-10 minutes. It may begin to smoke but you need the skillet to be screaming hot.

While the skillet heats, roll out the pizza dough onto a floured surface–you’ll want it a tad smaller than the width of your skillet. If you have a pizza peal, sprinkle it with cornmeal and transfer the pizza dough onto it. If not, you can also use a wooden cutting board. Brush olive oil over the dough.

Once the skillet has heated for the appropriate length of time, quickly and CAREFULLY remove the skillet from the oven. Slide the dough into the skillet. Quickly spread the marinara over the dough and sprinkle the minced garlic and thyme leaves over. Layer with the slices of eggplant, zucchini and bell pepper. Carefully replace the skillet in the oven so it sits directly underneath the broiler. Close the oven door and allow the pizza to cook for about 60 seconds. Open the oven door and rotate the skillet 180 degrees. Close the door and allow another 60-90 seconds underneath the broiler. Once the crust and bell peppers are slightly charred, CAREFULLY remove the skillet from the oven and place it on a cooling rack for 3-4 minutes. While the pizza rests, top with burrata cheese and allow the heat to melt it.

After the pizza has fully rested, sprinkle the tops with sea salt, freshly cracked black pepper and red pepper flakes. Sprinkle the basil over the pizza and transfer to a cutting board, slice up and enjoy!

*If you don’t want to use the cast iron skillet method, assemble the entire pizza (with the exception of the basil and cheese) on a baking sheet. Bake in a 500 degree F oven for about 15-20 minutes until the crust becomes golden brown. Remove the sheet from the oven and follow the remaining steps of the above recipe.

Side Dish · Vegetables/Vegetarian

Toasted Israeli Couscous with Roasted Mushrooms Medley

July 2016 Fam Din
At our last Family Dinner, we fired up a bunch of lamb racks and chops per my brother-in-law’s bday request. I initially was going to make a side dish that had potatoes in it but it seemed kind of heavy for such a warm day.

I brainstormed with seester and decided to make some Israeli couscous. The pearls are larger than standard couscous and when toasted –like with risotto — it takes on a nutty flavor with a great texture.

July 2016 Fam Din
To flavor the couscous, I combined it with a medley of roasted mushrooms. I chose a combo of portabello, trumpets and beech ‘shrooms but anything goes. I also added dried porcinis as they have an earthy flavor and used the liquid that I reconstituted them in to deepen the profile.

To finish it off, I added some fresh herbs and lemon zest to brighten up the dish.

July 2016 Fam Din
The couscous paired quite well with the lamb providing just enough substance without being too heavy.

And since it’s delicious at room temperature, it would be a great dish to bring to a potluck or summer picnic event. ❤

___________________________________________________
Toasted Israeli Couscous with Roasted Mushrooms Medley
Serves 4-5

Ingredients:

½ ounce dried porcini mushrooms
1 cup hot water
3 cups sliced mixed mushrooms (I used portabello, trumpets, and beech)
olive oil, divided
kosher salt, divided
black pepper, divided
¼ teaspoon red pepper flakes
1 teaspoon garlic powder
10 sprigs fresh thyme, divided
½ cup white onion, finely diced
2 cups dried Israeli couscous
1 tablespoon minced garlic
2 cups vegetable broth, heated
1 tablespoon minced parsley
½ tablespoon lemon zest
1 tablespoon truffle oil or quality extra virgin olive oil

Combine the dried porcini with the hot water in a small bowl. Allow the mushrooms to soften and reconstitute for about 30 minutes. Remove the porcini from the bowl, squeezing out the excess liquid. Reserve the porcini liquid and set aside.

Preheat oven to 425 degrees F. Toss the fresh mushrooms with 3 tablespoons olive oil, ½ teaspoon salt, ½ teaspoon black pepper, red pepper flakes, and garlic powder. Pull the leaves from half the thyme sprigs and mix into the mushrooms. Spread the mushrooms on a lightly greased baking tray and roast for about 20 minutes, stirring every few minutes until they have browned. Set aside.

Heat 2 tablespoons olive oil over medium heat in a small pot. Add the white onions and cook for 3-4 minutes until they become translucent. Add the couscous—stir and cook until the pearls become toasted and golden brown. Stir in the garlic and cook for about 20-30 seconds before adding in the liquid that the porcini was reconstituted in–careful not to add in the mushroom grit/sand. Pour in the heated vegetable broth, add the remaining thyme sprigs and bring to a boil. Lower the heat to a simmer, cover the pot and cook until all the liquid has absorbed—about 10-15 minutes.

Once the couscous is done, take it off the heat and discard the thyme sprigs. Use a fork to fluff the couscous pearls and fold in the roasted mushrooms, porcinis, parsley, and lemon zest. Drizzle in the truffle oil and taste. Add additional salt and pepper as needed.

The couscous can be served immediately or at room temperature.

Pastas/Noodles · Vegetables/Vegetarian

Burrata Caprese Bucatini

Burrata Caprese Bucatini
Pasta makes this gal very, very, VERY happy.

Because, you know–carbs make the world go round.

Or does it make your belly go round?

Eh….it’s a gleeful thing either way.

Burrata Caprese Bucatini
As promised, here’s a scrumptious pasta dish that gives a big ol’ nod to my summer crush– Burrata Caprese.

It’s surprisingly light since it’s not laden with a heavy sauce and quite fresh from the heirloom tomatoes and basil. And can we talk about the burrata?

So dreamy….

Burrata Caprese Bucatini
Added bonus?

This beauty can be ready in under 15 minutes. A complete hero for weeknight meals.

Burrata Caprese Bucatini
Next up – Burrata Caprese & Prosciutto Skillet Pizza!

_____________________________________

Burrata Caprese Bucatini 
Serves 2

Ingredients:

kosher salt
1/3 pound dried bucatini pasta (or other long strand pasta of your choice)
3 tablespoons quality extra virgin olive oil, more to finish
1 heaping tablespoon minced garlic
½ teaspoon red pepper flakes–more to finish
1 heaping tablespoon anchovy paste or 2-3 anchovy fillets
¼ cup grated parmesan cheese–more to finish
black pepper
1½ heaping cup diced tomatoes*
10 large fresh basil leaves, julienned
3 ounces fresh burrata cheese

Boil the pasta for approximately 7-8 minutes in heavily salted water until al dente. Drain the pasta and reserve ¼ cup of the starchy water that the pasta was cooked in.

While the pasta cooks, heat the olive oil over medium heat in a large skillet. Add the garlic, red pepper flakes and cook for 1-2 minutes to infuse the oil. Add in the anchovies and stir until it melts into the oil.

Toss in the cooked bucatini and cheese — coating the pasta well. If you want a looser based “sauce”, add a tablespoon at a time of the starchy pasta water until you reach your desired consistency. Season with additional kosher salt and black pepper as needed. Toss in the tomatoes and basil. Plate the pasta and top with burrata. Sprinkle each dish with additional parmesan, red pepper flakes and a drizzle of olive oil.

Enjoy!

*If I can find them, I like using small heirloom tomatoes as they are often times sweeter but Romas or other ripe tomatoes are just as delish. 

Vegetables/Vegetarian

Burrata Caprese & Prosciutto Bruschetta

Burrata Caprese Crostini
If you pop by mi casa in the summer, you’ll always find the kitchen stocked up on fresh basil, sweet tomatoes, cheeses and charcuterie. They are my absolute go-to ingredients during the warmer months when produce is beautiful at my local farmers markets.

Summer Ingredients
That’s when I crave bright and fresh dishes that are relatively low fuss to make but still pack tons of flavor. Which means my summer lovin’ romance with Caprese kicks in again…..

Burrata Caprese Crostini
Typically caprese consists of sliced tomatoes, sweet basil and fresh mozzarella. But these days I’ve been swapping out my usual Mozzarella di Bufala with Burrata.

Burrata is also a soft Italian cheese that looks like fresh mozzarella but friends, it’s more—so much more! The exterior is made from mozz’ but then it’s formed into a round pouch and filled with a luscious mixture of cheese and cream.

It’s rich, decadent and yet somehow light at the same time. I know–magic, right?

Burrata Caprese Crostini
So magical that I’ll be sharing three different ways that you can enjoy this flavor combo. And you can be sure as heck that I added prosciutto to the party!

First up – Bruschetta.

This is the simplest of the three dishes that I’ll be sharing but I’ve got to be honest, I’ve made this at least 2-3 times a week for the past month. I’m a gal out of control but trust me–it really is that good!

Check out that cheesy goodness!

D-R-O-O-L-S.

Burrata Caprese Crostini
I like serving this on a large slice of baguette as a main dish—protein, veg, cheese and carb. Major food groups, right?

Though if you prefer to go with the appetizer routeserve them as crostini on smaller “crusts of bread”. That bite would definitely pack quite the punch.

Just be sure to have a chilled glass of vino to go along with it all.

Salute!

Burrata Caprese Crostini
Stay tuned—Burrata Caprese Bucatini  is up next!

_____________________________________
Burrata Caprese & Prosciutto Bruschetta
Serves 1

Ingredients:

1 heaping cup diced tomatoes*
1 small garlic clove, finely minced
2-3 pinches kosher salt
2-3 pinches black pepper
extra virgin olive oil, divided
5 large fresh basil leaves, julienned – more to garnish
1 large slice of baguette bread, approximately 1 inch thick and 5-6 inches long
2-3 ounces fresh burrata cheese
1 slice prosciutto, torn into pieces
2 pinches red pepper

In a small bowl, mix together the tomatoes, garlic, kosher salt, black pepper, ½ tablespoon extra virgin olive oil, and julienne basil. Set aside.

Brush both sides of the baguette slice with olive oil and broil in the oven until golden brown.

Taste the tomato mixture and add additional kosher salt and black pepper as needed. Pile the mixture on top of the toasted baguette slice. Top the with the burrata cheese and torn prosciutto.

Drizzle the bruschetta with additional extra virgin olive oil and sprinkle with red pepper. Garnish with additional basil leaves.

Enjoy!

*If I can find them, I like using small heirloom tomatoes as they are often times sweeter but Romas or other ripe tomatoes are just as delish. 

Appetizers/Small Plates · Condiments/Sauces · Vegetables/Vegetarian

Greek Zucchini Fritters {Kolokithokeftedes} with Tzatziki Sauce

June 2016 Fam Din
Kolokithokeftedes.

I know–it’s a mouthful right?

A delicious one.

They are Greek style zucchini fritters and are a perfect dish for summer. Especially if you’re lucky like me and have coworkers who regularly bring you in some of their GINORMOUS, homegrown zucchini.

June 2016 Fam Din
The fritters are filled with tons of fresh herbs, spices and of course, feta.

Mo’ Feta, Mo’ Bettah!

June 2016 Fam Din
I whipped up a batch of these golden beauties as appetizers for our most recent Mediterranean themed Family Dinner. But if you form the patties a bit larger, you could use them in Veggie Burgers or Sliders.

And of course, any leftovers would be brilliant for breakfast or brunch. Just poach up a few eggs and perch them atop a crispy zucchini fritter. Can you imagine that gorgeous yolk oozing over the golden Kolokithokeftedes?

To. Die. For.

June 2016 Fam Din
At dinner, I served them up with my favorite, cool and bright Tzatziki Sauce.

And do yourself a favor, make a double batch of Tzatziki as it stores well in the fridge for a few days. It’s great as a dip with veggies, over grilled meats or fish and as a condiment over sandwiches and burgers.

June 2016 Fam Din
Want a last tip?

The patties can also be formed ahead of time and refrigerated the day before you want to fry them up. Great time saver for casual get-togethers or dinners.

Kolokithokeftedes!!! Kolokithokeftedes!!! Kolokithokeftedes!!!

_____________________________________________________
Greek Zucchini Fritters {Kolokithokeftedes} with Tzatziki Sauce
Makes approximately 18 fritters

Ingredients:

Fritters
2-2½ pounds zucchini
kosher salt
¼ teaspoon ground cumin
½ teaspoon dried oregano
¼ teaspoon red pepper flakes
¼ teaspoon black pepper
2 sprigs fresh scallions, chopped
¼ cup chopped fresh dill, more for garnish
2 tablespoons chopped fresh mint
2 tablespoons chopped parsley
4 ounces crumbled feta
2 eggs, beaten
1 cup panko breadcrumbs, more if needed
vegetable oil

Tzatziki Sauce
2 cups Greek yogurt
½ cup sour cream
3 tablespoons minced fresh dill
2 large garlic cloves, finely minced
2 tablespoons lemon juice or red wine vinegar
1 teaspoon fresh lemon zest
2 tablespoons olive oil
1 cup finely diced English or Persian cucumbers
1 teaspoon kosher salt
½ teaspoon black pepper

Wash and trim the zucchini. Using a food processor or box grater, grate the zucchini. Place the zucchini in a colander over the sink and sprinkle salt over the squash. Toss to combine. Allow the zucchini to sit in the colander/sink for about 2 hours to allow the natural liquids to be drawn out. Every 15 minutes or so, toss and squeeze the moisture out of the squash.

While the zucchini drains, prepare the Tzatziki Sauce. Mix all the ingredients in a bowl. Taste and adjust with kosher salt and pepper as needed. Cover the bowl and refrigerate for at least one hour before use.

After the zucchini has properly drained, transfer it to a large mixing bowl. Fold in the cumin, oregano, red pepper, black pepper, scallions, dill, mint, parsley and feta. Taste and add salt if needed. Stir in the beaten eggs and panko. If the mixture seems too wet to form into patties, add additional panko. Cover and refrigerate the mixture for an hour.

Once chilled, form patties that are about 2½-3 inches in diameter. In batches, place the patties in a heavy bottom skillet that has been filled with about ½ inch vegetable oil over medium heat. Fry the patties for about 1-2 minutes on each side until golden brown. Remove and drain on a wire rack.

Garnish with fresh dill and serve warm with the Tzatziki Sauce.

Breakfast/Brunch · Sponsored · Vegetables/Vegetarian

Crispy Polenta Cakes with Poached Eggs & Asparagus

Polenta3
Spring has most definitely sprung!

The sun is shining, the days are getting longer, the flowers are in bloom (Aaaa-CHOO! My pollen allergies are terrible!) and everyone seems to be in a festive mood for celebrations and leisure meals. And why not? So many delicious items are coming back into season!

Polenta2
Asparagus is one of those beautiful produces that are coming back and are popping up all over at our Farmers Markets and grocery stores. And in my opinion, nothing pairs more lovely with asparagus than eggs. Eggs and Asparagus….what could be more “Spring-like” than that winning combo?!

Safe Eggs
To celebrate the comeback of my favorite season, Spring, I’m partnering with the makers of Safest Choice™ pasteurized eggs to create a quick and easy dish that would be perfect to make for breakfast or even a last minute brunch gathering and featured that winning pairing.

Polenta4

Veggies? Check!

Bright and sunny egg/protein? Check!

But what about a starch?

I’m not a gal to shy away from bread or potatoes — I’m unabashedly carbo-holic like that. Though for this dish, I thought I’d bring a little Italian slant to it by pan frying up some crispy polenta cakes by using a pre-made polenta roll.

Now before you yell at me for using a pre-made polenta, let me justify it by the following:

  1. One of my favorite stores carries a wonderful organic polenta roll that is extremely tasty and affordable.
  2. If I made the polenta myself, I would have to wait for it to cool before frying them up into crispy cakes.
  3. It’s QUICK! And who doesn’t need some short cuts every now and then?

But hey-if you prefer to make your own, I’m all over it! In fact, it would be a great opportunity to use up any leftover polenta you may have lingering in your fridge.

Polenta5
After roasting the fresh asparagus with simple S&P and lemon zest, I topped them with the crispy polenta cakes and a sprinkle of Parmesan cheese. And the pièce de résistance – a beautifully poached Safest Choice™ pasteurized egg. In my humble opinion, there are few other culinary beauties than seeing an unctuous egg yolk over a dish.

Perfection!

Poletna6
And not only is a beautiful but it’s functional. The yolk becomes a rich sauce for both the crisp polenta cakes and asparagus. I know some folks are wary of under cooked eggs but rest assured. Davidson’s Safest Choice® uses an all-natural egg pasteurization process to eliminate the risk of salmonella–all without changing that farm fresh flavor or nutrition. Plus their wonderful chicks are Hormone free, Antibiotic free, and Vegetarian-fed. You can learn more over at SafeEggs.com

Polenta

As for the next few months, I’m looking forward to all that Spring has to offer as well as fixing up more dishes fitting of the season. But in the meanwhile, you can find this quick and delectable recipe for Crispy Polenta Cakes with Poached Eggs and Asparagus here.

Davidsons-Dozen-Blogger-Badge

*DISCLOSURE: This recipe and post was created in partnership with Safest Choice™ pasteurized eggs. However, as always, all opinions are my own.*

Appetizers/Small Plates · Vegetables/Vegetarian

Crispy Greek Fries — Opa!!!

Greek Fries

I absolutely die for French Fries.

In fact, my headstone will likely read something along the lines of….

“Here lies Nam…
Loyal daughter, sister, friend…
Mother to puggle Bella…
Devotee of Jack Johnson…

And she LOVED French Fries.”

It borderlines obsession, People. But can you blame me? Crispy, crunchy exterior with a creamy, starchy interior.

Drools.

It goes without saying that if I see any variation of my beloved on a menu, I will order it. Truffle fries, poutine, carne asada fries….I love them all.

When I used to live in San Jose, I would often go to this little Greek restaurant in the neighborhood called Opa! They had these wonderful Mediterranean style fries on their menu with tons of Feta, garlic, and spices. Just sublime.

Since I’ve moved back down to SoCal, I often find myself with a hankering for those golden delicious, Greek inspired fries. And with just a few ingredients (and a little help from frozen French Fries), I can do a pretty bang up job recreating the Crispy Greek Fries in very little time.

While the potatoes crisp up in the oven, I whip up a simple vinaigrette that mirrors the flavors of a Greek salad. The vinaigrette adds a great flavor and acidity to help cut the richness of the fries and cheese. Once the fries are done, I toss them with a bunch of Feta, Mizithra (if I happen to have some), fresh herbs and bit of the vinaigrette.

And well…you can pretty much guess what happens then.

I black out in a French Fries frenzy and the next thing I know, the plate is empty with only a few specks of Feta as evidence that they ever existed.

I have no shame. Especially when fries are involved.

_________________________________
Crispy Greek Fries
Ingredients:

1 pound frozen French Fries
cooking spray
1 teaspoon minced garlic
1 tablespoon minced shallots
¼ teaspoon dried oregano
¼ teaspoon red pepper flakes
1 tablespoon Dijon mustard
¼ cup red wine vinegar
½ cup quality extra virgin olive oil
kosher salt
black pepper
6 ounces crumbled Feta cheese (I used a garlic-herb blend)
2 tablespoons grated Mizithra cheese (optional)
2 tablespoons minced parsley

Cover a large baking sheet with cooking spray and arrange the frozen French Fries into a single layer on top. Coat the top of the fries with additional cooking spray and bake according to package directions until crispy. Be sure to flip and turn the fries a few times during the baking process. I often like to turn the oven on broil for the last minute or so to get them extra crispy. If you want EXTRA CREDIT, fry the French Fries in peanut or vegetable oil that has been heated to 350 degrees F. And if you want to go ALL IN, peel and cut whole potatoes and then deep-fry them.

While the fries bake, prepare the vinaigrette. In a small jar, add the garlic, shallots, oregano, red pepper flakes, mustard, vinegar and oil olive. Add ¼ teaspoon kosher salt and 1/8 teaspoon black pepper. Secure the lid tightly on the jar and shake vigorously for a minute until the items have combined and emulsified. Taste and adjust with salt and pepper as needed. Set aside.

Once the fries have cooked through and are crisp, transfer them to a large bowl. Add the Feta, Mizithra (optional), parsley and a few tablespoons of the vinaigrette. Toss well and add additional vinaigrette if needed to lightly coat the fries. Plate and serve warm.

Condiments/Sauces · Salads · Vegetables/Vegetarian

Tropical Summer Salad with Sesame-Ginger Dressing

Tropical Summer Salad Main

When I used to live in San Jose, I used to go to a spot called the Sonoma Chicken Coop quite often. They had a pretty extensive menu with affordable prices…and the food was consistent. I used to always rotate between their Skillet Chicken Carbonara, Rotisserie Chickens and whatever specials they were offering for the day.

Yet, despite all of that goodness–what I miss the most is their Citrus Grove Salad. Essentially, it was a big ol’ plate of mixed greens, avocados, mangos, and various citrus fruits. But MAN—was it delicious! And there wasn’t even any meat!!! Which is a big deal for this carnivorous gal.

Sesame Dressing

Since I’m no longer in the Bay Area (and because I heard that many of their locations are now closed… #SadPanda), I like to make my own variation from time to time–especially when summer fruits are wonderfully sweet like they have been as of late.

I like to use whatever leafy greens I have on hand. I used baby spinach in the pics shown here but an arugula-kale mix would be lovely. I top the greens with slices of sweet mango, avocados cucumbers, kiwis, and pink grapefruit. In addition to all of that goodness, I add some goat cheese crumbles for a bit of richness and toasted macadamia nuts for a bit of crunch. Then the whole thing gets a drizzle of a Sesame-Ginger Dressing that I shake up in a mason jar.

Tropical Summer Salad

The end results in an incredibly bright and light dish that can be served as an appetizer or even a main course. But if you’re wanting something a tad heartier, some grilled prawns, chicken, or grilled fish on top of the salad would really send things to the next level.

With that friends…Have a wonderful week and enjoy the last few weeks of summer!

________________________________________________________

Tropical Summer Salad with Sesame-Ginger Dressing
Serves 2

Ingredients:

1 tablespoon toasted sesame seeds, roughly crushed
1 tablespoon finely minced shallots
1 garlic clove, finely minced
½ inch knob ginger, finely grated
1 heaping tablespoon Dijon mustard
1 tablespoon honey or agave
2 tablespoons rice wine vinegar
½ cup extra virgin olive oil
2-3 pinches red pepper flakes
2 pinches black pepper, plus more to plate
1/8 teaspoon kosher salt
5 cups greens (spinach, arugula, romaine, kale etc.)
½ small ripe mango, peeled and sliced
½ small pink grapefruit, “supremed”
1 small kiwi, peeled and sliced
3 inch piece of cucumber, peeled and sliced
1 small avocado, peeled and sliced
3 ounces goat cheese, crumbled
¼ cup toasted macadamia nuts

Prepare the dressing. In a jar, add the sesame seeds, shallots, garlic, ginger, mustard, honey, vinegar, olive oil, red pepper flakes, pepper and salt. Secure the lid tightly on the jar and shake vigorously for a minute until the items have combined and emulsified. Taste and adjust with salt and pepper as needed. Set aside.

Divide the greens between two large plates. Top each plate with the mangos, grapefruit supremes, kiwis, cucumbers, avocados, goat cheese and nuts. Drizzle 2-3 tablespoons of the Sesame-Ginger Dressing over each plate and serve.

Side Dish · Vegetables/Vegetarian

Elote {Grilled Mexican Style Street Corn} + 4th of July Menu Ideas

Elote {Grilled Mexican Style Street Corn}

Y’all got your BBQ grills all scrubbed down?

Coolers ready to be filled with frosty,cold beverages?

Menus all set?

Because it’s time to celebrate ‘MURICA!!!

Elote {Grilled Mexican Style Street Corn}

And since your grills will be nice and warmed up, I’ve got a perfect little number that will round out all of your BBQ bites…. ELOTES!!!

Elotes are a Mexican style grilled street corn that are slathered with butter, mayo (yup–MAYO!), a few spices and topped with cotija cheese. A quick squeeze of fresh lime juice and it’s perfection!

When I was living in LA for grad school, we used to have these nifty little trucks and carts that would cruise by our apartment. Produce trucks, paletas (popsicle) carts, fresh made tamales carts and we even had an elote man who would ring a bell on his cart signaling all of us to come running out for a delish and quick snack.

Elote {Grilled Mexican Style Street Corn}

Usually the corn ears are grilled for 10-15 minutes but I take a shortcut method by wrapping them in damp paper towels and heating them in the microwave for a few minutes. A quick char on the grill and they’re ready! But if you’re an anti-microwave person, just soak the ears of corn in water (husks on, silks removed) for about 15-20 minutes before grilling them. This prevents the husks from burning and creates a little steam bath for them.

Either method, you definitely have to make them for your Fourth of July spread…..trust me.

Speaking of which…in case your menus aren’t set yet–here are some other fantastic ideas:

While your peeps are mingling around, have a big dish of this Cilantro & Jalapeño Hummus for them to snack on. It’s fantastic with veggie sticks, chips, bread or even smothered on some BBQ proteins.

Cilantro & Jalapeño Hummus

Or how about some Oven-Roasted Tomato Salsa?

Oven-Roasted Tomato Salsa

What picnic is complete without deviled eggs? And these Sriracha Deviled Eggs fit that bill perfectly!

Sriracha Deviled Eggs

Now on to the grilling!

Chimichurri Ribeye Steaks can be a show stopping stand alone main dish or sliced thinly to be placed inside crunchy, toasted ciabatta bread.

Grilled Ribeye Steak with Chimichurri Sauce

Not feeling beef? Grab your goodies that you set aside for margaritas to make a big batch of Tequila Chili-Lime Chicken!

Tequila Chili-Lime Chicken

Or if you want to go with burger route, try these Double Jalapeno-Bacon Cheeseburgers with Poblano Aioli.

Double Jalapeno-Bacon Cheeseburgers with Roasted Poblano Aioli

And if there are burgers, there must be BUNS! The Perfect Brioche Buns are….well…perfect for the job.

Perfect Brioche Buns

Don’t feel like slaving away over the grill? Then bust out the slow cooker to make these Kalua Pig sliders and bring the islands to your Independence Day.

Kālua Pig

Got two slow cookers? FANTASTIC! Then use the other one to make these BBQ Pulled Chicken Sandwiches–you won’t believe how easy they are. Not to mention that it’s one of my go-to recipes to feed a crowd.

Slow Cooker BBQ Pulled Chicken Sandwiches

Need an alternative to potato salad or pasta salad? Try out this light but flavor packed Stone Fruit and Prosciutto Salad.

Stone Fruit & Prosciutto Salad

And because you know me, you know there must be cocktails.

Kick start your Fourth of July with a big batch of Bloody Marys. On second thought, make a double batch….you may need a hair of the dog on the Fifth of July 🙂

Hair of the Dog - Bloody Mary

Palomas, margaritas’ cousin, are another great cocktail to make in a big batch. Just pour the grapefruit soda (or soda water) over each glass before serving.

Palomas

Nothing screams summer like watermelon! Add an Asian twist on your cocktails with these light and fruity Watermelon Soju-tinis. 

Watermelon Soju-tinis

Planning to have any guests with a sweet tooth?

Fix up this wonderfully creamy and decadent Peanut Butter Cream Pie.

Peanut Butter Cream Pie

Or how about this beautiful Fresh Strawberry Tart?

Fresh Strawberry Tart

Or if you’re feeling a little tropical, some Mango Gelato. 

Mango Gelato

However you decide to celebrate and whatever you decide to serve, have an AWESOME FOURTH OF JULY, Friends!!

Just be sure to grill up some Elotes!!!

Elote {Grilled Mexican Style Street Corn}

______________________________________
Elotes {Grilled Mexican Style Street Corn}
Serves 4

Ingredients:

¼ cup mayonnaise
1 teaspoon garlic powder
¼ teaspoon cumin powder
¼ teaspoon black pepper
4 ears of corn, husk on
2 tablespoons olive oil
2 tablespoons melted butter
sea salt
½ -3/4 teaspoon chili powder
½ cup grated cotija cheese or parmesan cheese
¼ cup chopped cilantro
4 lime wedges
In a small bowl, mix together the mayonnaise, garlic powder, cumin powder and black pepper. Set aside.

Peel the husks of the corn back but do not remove them. Pull and discard the silk from each ear and fold the husks back over the cobb. Wrap each ear loosely with a damp paper towel. Microwave the corn on medium-high heat for 5 minutes.

Carefully remove the paper towels from each ear of corn. Pull the husks down to the base of each cobb. Using either kitchen twine or a piece of the husk, tie the husks together into a bundle to form a handle. Brush the olive oil over the corn kernels.

Place the corn on the grill over medium heat. Grill the corn for about 5 minutes, rotating every 1-2 minutes, until surface becomes slightly charred. Remove the corn to a large platter. Brush the melted butter over the corn and then spread a layer of the mayonnaise mixture on top. Sprinkle each ear with sea salt, chili powder, cotija cheese and cilantro. Serve with lime wedges to be squeezed over the corn.

Enjoy!