Side Dish · Vegetables/Vegetarian

Toasted Israeli Couscous with Roasted Mushrooms Medley

July 2016 Fam Din
At our last Family Dinner, we fired up a bunch of lamb racks and chops per my brother-in-law’s bday request. I initially was going to make a side dish that had potatoes in it but it seemed kind of heavy for such a warm day.

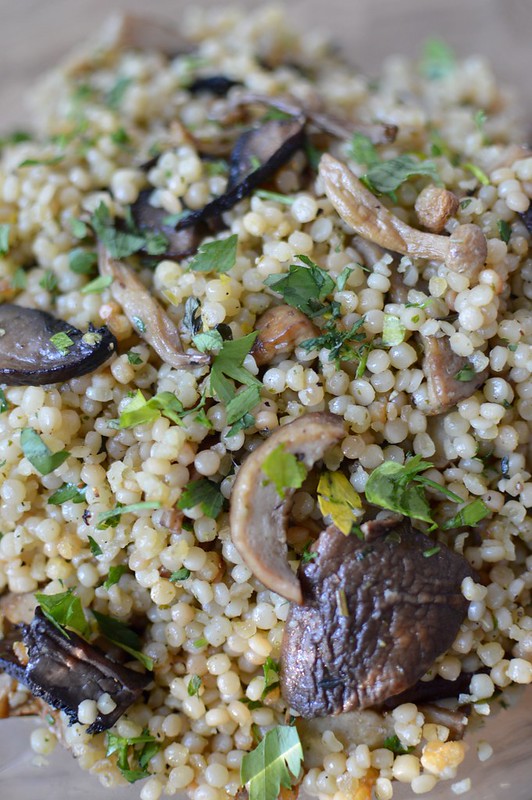
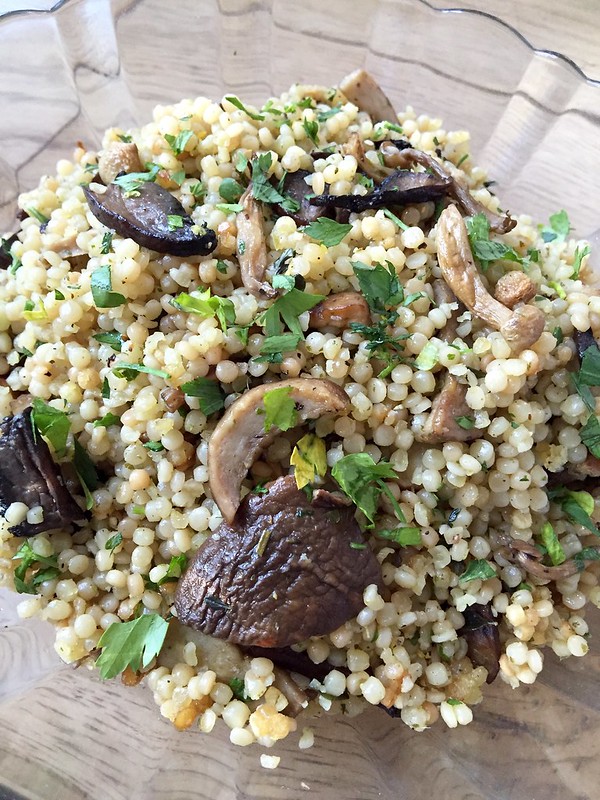
I brainstormed with seester and decided to make some Israeli couscous. The pearls are larger than standard couscous and when toasted –like with risotto — it takes on a nutty flavor with a great texture.

July 2016 Fam Din
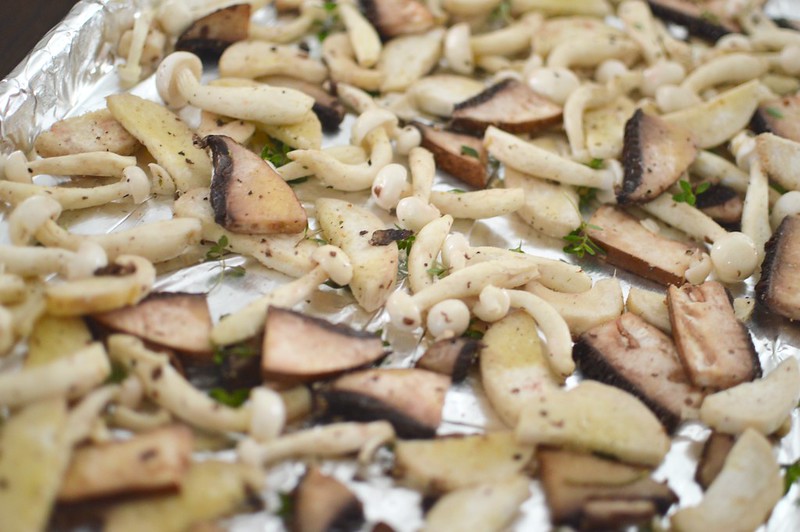
To flavor the couscous, I combined it with a medley of roasted mushrooms. I chose a combo of portabello, trumpets and beech ‘shrooms but anything goes. I also added dried porcinis as they have an earthy flavor and used the liquid that I reconstituted them in to deepen the profile.

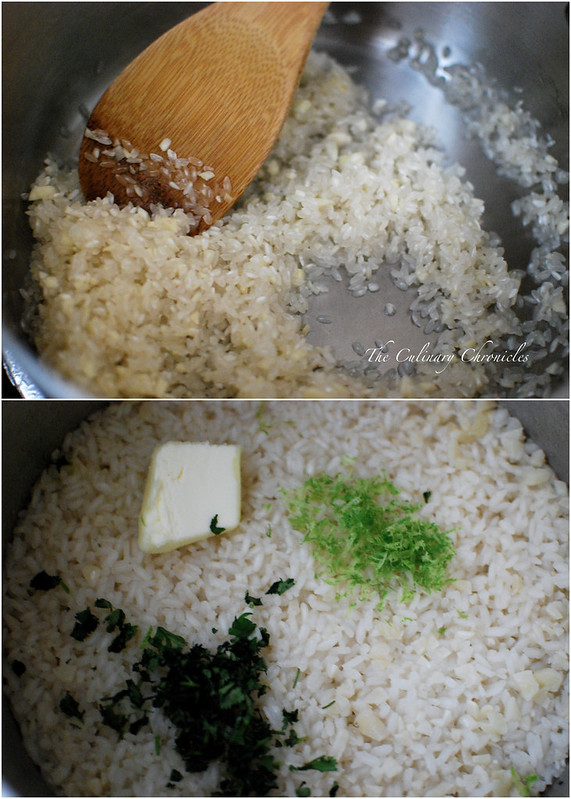
To finish it off, I added some fresh herbs and lemon zest to brighten up the dish.

July 2016 Fam Din
The couscous paired quite well with the lamb providing just enough substance without being too heavy.

And since it’s delicious at room temperature, it would be a great dish to bring to a potluck or summer picnic event. ❤

___________________________________________________
Toasted Israeli Couscous with Roasted Mushrooms Medley
Serves 4-5

Ingredients:

½ ounce dried porcini mushrooms
1 cup hot water
3 cups sliced mixed mushrooms (I used portabello, trumpets, and beech)
olive oil, divided
kosher salt, divided
black pepper, divided
¼ teaspoon red pepper flakes
1 teaspoon garlic powder
10 sprigs fresh thyme, divided
½ cup white onion, finely diced
2 cups dried Israeli couscous
1 tablespoon minced garlic
2 cups vegetable broth, heated
1 tablespoon minced parsley
½ tablespoon lemon zest
1 tablespoon truffle oil or quality extra virgin olive oil

Combine the dried porcini with the hot water in a small bowl. Allow the mushrooms to soften and reconstitute for about 30 minutes. Remove the porcini from the bowl, squeezing out the excess liquid. Reserve the porcini liquid and set aside.

Preheat oven to 425 degrees F. Toss the fresh mushrooms with 3 tablespoons olive oil, ½ teaspoon salt, ½ teaspoon black pepper, red pepper flakes, and garlic powder. Pull the leaves from half the thyme sprigs and mix into the mushrooms. Spread the mushrooms on a lightly greased baking tray and roast for about 20 minutes, stirring every few minutes until they have browned. Set aside.

Heat 2 tablespoons olive oil over medium heat in a small pot. Add the white onions and cook for 3-4 minutes until they become translucent. Add the couscous—stir and cook until the pearls become toasted and golden brown. Stir in the garlic and cook for about 20-30 seconds before adding in the liquid that the porcini was reconstituted in–careful not to add in the mushroom grit/sand. Pour in the heated vegetable broth, add the remaining thyme sprigs and bring to a boil. Lower the heat to a simmer, cover the pot and cook until all the liquid has absorbed—about 10-15 minutes.

Once the couscous is done, take it off the heat and discard the thyme sprigs. Use a fork to fluff the couscous pearls and fold in the roasted mushrooms, porcinis, parsley, and lemon zest. Drizzle in the truffle oil and taste. Add additional salt and pepper as needed.

The couscous can be served immediately or at room temperature.

Salads · Side Dish

Watermelon, Feta and Arugula Salad

June 2015 Family Dinner: Watermelon-Feta Salad

Y’all know what today is?

National Watermelon Day!

I swear–I can’t make this stuff up. My Hallmark calendar on the wall says it is— so it must be true.  And since I’m all about celebrating holidays, I wanted to share this delectable and light little number with you…

Watermelon, Feta and Arugula Salad.

June 2015 Family Dinner: Watermelon-Feta Salad

This type of salad appears to be all the rage this summer as I’ve seen various renditions all over the place. And how could it not be?

Peppery arugula leaves mixed with sweet watermelon cubes and piquant flavors of feta cheese. When we made this for our June’s Sunday Family Dinner, I opted to dress the greens with a Mint-Honey-Dijon Vinaigrette but it would also pair nicely with a thick balsamic reduction and extra virgin olive oil.

Need a couple other ways you could celebrate National Watermelon Day?

How about toasting the day with these bright Watermelon Soju-tinis? They are the perfect cocktail for warm summer nights.

Watermelon Soju-tinis

Want something booze-free? Then these Watermelon-Basil Aguas Frescas would be fantastic!

And if you’re looking for extra points, freeze some of it to make popsicles for your munchkins. Bright, refreshing, and you know exactly what’s in it.

Watermelon Basil Aguas Frescas

And with that dear friends, have a wonderful week and have a delicious National Watermelon Day!

_____________________________________________________

Watermelon, Feta and Arugula Salad
Serves 6

Ingredients:

1 tablespoon finely minced shallots
1 tablespoon chopped fresh mint
1 heaping tablespoon Dijon mustard
1 teaspoon honey or agave
2 tablespoons red wine vinegar
½ cup extra virgin olive oil
2 pinches black pepper, plus more to plate
1/8 teaspoon kosher salt
5-6 cups baby arugula leaves, washed and thoroughly dried
¼ cup thinly sliced red onions
15-20 fresh mint leaves, roughly torn
3 cups cubed seedless watermelon
10 ounces feta cheese, crumbled

Prepare the vinaigrette. In a jar, add the shallots, mint, mustard, honey, vinegar, olive oil, pepper and salt. Secure the lid tightly on the jar and shake vigorously for a minute until the items have combined and emulsified. Taste and adjust with salt and pepper as needed.

Place the arugula, red onions and torn mint leaves in a large bowl. Drizzle a few spoons of the vinaigrette over the greens and toss well. Try not to overdress the greens as it will wilt and become too soggy. Plate the dressed greens on a large platter. Top with the watermelon cubes and feta cheese. Sprinkle the platter with additional black pepper and serve.

Side Dish · Vegetables/Vegetarian

Elote {Grilled Mexican Style Street Corn} + 4th of July Menu Ideas

Elote {Grilled Mexican Style Street Corn}

Y’all got your BBQ grills all scrubbed down?

Coolers ready to be filled with frosty,cold beverages?

Menus all set?

Because it’s time to celebrate ‘MURICA!!!

Elote {Grilled Mexican Style Street Corn}

And since your grills will be nice and warmed up, I’ve got a perfect little number that will round out all of your BBQ bites…. ELOTES!!!

Elotes are a Mexican style grilled street corn that are slathered with butter, mayo (yup–MAYO!), a few spices and topped with cotija cheese. A quick squeeze of fresh lime juice and it’s perfection!

When I was living in LA for grad school, we used to have these nifty little trucks and carts that would cruise by our apartment. Produce trucks, paletas (popsicle) carts, fresh made tamales carts and we even had an elote man who would ring a bell on his cart signaling all of us to come running out for a delish and quick snack.

Elote {Grilled Mexican Style Street Corn}

Usually the corn ears are grilled for 10-15 minutes but I take a shortcut method by wrapping them in damp paper towels and heating them in the microwave for a few minutes. A quick char on the grill and they’re ready! But if you’re an anti-microwave person, just soak the ears of corn in water (husks on, silks removed) for about 15-20 minutes before grilling them. This prevents the husks from burning and creates a little steam bath for them.

Either method, you definitely have to make them for your Fourth of July spread…..trust me.

Speaking of which…in case your menus aren’t set yet–here are some other fantastic ideas:

While your peeps are mingling around, have a big dish of this Cilantro & Jalapeño Hummus for them to snack on. It’s fantastic with veggie sticks, chips, bread or even smothered on some BBQ proteins.

Cilantro & Jalapeño Hummus

Or how about some Oven-Roasted Tomato Salsa?

Oven-Roasted Tomato Salsa

What picnic is complete without deviled eggs? And these Sriracha Deviled Eggs fit that bill perfectly!

Sriracha Deviled Eggs

Now on to the grilling!

Chimichurri Ribeye Steaks can be a show stopping stand alone main dish or sliced thinly to be placed inside crunchy, toasted ciabatta bread.

Grilled Ribeye Steak with Chimichurri Sauce

Not feeling beef? Grab your goodies that you set aside for margaritas to make a big batch of Tequila Chili-Lime Chicken!

Tequila Chili-Lime Chicken

Or if you want to go with burger route, try these Double Jalapeno-Bacon Cheeseburgers with Poblano Aioli.

Double Jalapeno-Bacon Cheeseburgers with Roasted Poblano Aioli

And if there are burgers, there must be BUNS! The Perfect Brioche Buns are….well…perfect for the job.

Perfect Brioche Buns

Don’t feel like slaving away over the grill? Then bust out the slow cooker to make these Kalua Pig sliders and bring the islands to your Independence Day.

Kālua Pig

Got two slow cookers? FANTASTIC! Then use the other one to make these BBQ Pulled Chicken Sandwiches–you won’t believe how easy they are. Not to mention that it’s one of my go-to recipes to feed a crowd.

Slow Cooker BBQ Pulled Chicken Sandwiches

Need an alternative to potato salad or pasta salad? Try out this light but flavor packed Stone Fruit and Prosciutto Salad.

Stone Fruit & Prosciutto Salad

And because you know me, you know there must be cocktails.

Kick start your Fourth of July with a big batch of Bloody Marys. On second thought, make a double batch….you may need a hair of the dog on the Fifth of July 🙂

Hair of the Dog - Bloody Mary

Palomas, margaritas’ cousin, are another great cocktail to make in a big batch. Just pour the grapefruit soda (or soda water) over each glass before serving.

Palomas

Nothing screams summer like watermelon! Add an Asian twist on your cocktails with these light and fruity Watermelon Soju-tinis. 

Watermelon Soju-tinis

Planning to have any guests with a sweet tooth?

Fix up this wonderfully creamy and decadent Peanut Butter Cream Pie.

Peanut Butter Cream Pie

Or how about this beautiful Fresh Strawberry Tart?

Fresh Strawberry Tart

Or if you’re feeling a little tropical, some Mango Gelato. 

Mango Gelato

However you decide to celebrate and whatever you decide to serve, have an AWESOME FOURTH OF JULY, Friends!!

Just be sure to grill up some Elotes!!!

Elote {Grilled Mexican Style Street Corn}

______________________________________
Elotes {Grilled Mexican Style Street Corn}
Serves 4

Ingredients:

¼ cup mayonnaise
1 teaspoon garlic powder
¼ teaspoon cumin powder
¼ teaspoon black pepper
4 ears of corn, husk on
2 tablespoons olive oil
2 tablespoons melted butter
sea salt
½ -3/4 teaspoon chili powder
½ cup grated cotija cheese or parmesan cheese
¼ cup chopped cilantro
4 lime wedges
In a small bowl, mix together the mayonnaise, garlic powder, cumin powder and black pepper. Set aside.

Peel the husks of the corn back but do not remove them. Pull and discard the silk from each ear and fold the husks back over the cobb. Wrap each ear loosely with a damp paper towel. Microwave the corn on medium-high heat for 5 minutes.

Carefully remove the paper towels from each ear of corn. Pull the husks down to the base of each cobb. Using either kitchen twine or a piece of the husk, tie the husks together into a bundle to form a handle. Brush the olive oil over the corn kernels.

Place the corn on the grill over medium heat. Grill the corn for about 5 minutes, rotating every 1-2 minutes, until surface becomes slightly charred. Remove the corn to a large platter. Brush the melted butter over the corn and then spread a layer of the mayonnaise mixture on top. Sprinkle each ear with sea salt, chili powder, cotija cheese and cilantro. Serve with lime wedges to be squeezed over the corn.

Enjoy!

Side Dish

Zesty Cilantro-Lime Rice

Cilantro-Lime Rice

Usually when I make a side dish for tacos or fajitas, I whip up a version of my Spanish Rice. It’s a straight forward method with tomato sauce, chiles and a few other aromatic and spices.

But when I want a bit of a lighter flavor, I make a pot of Zesty Cilantro-Lime Rice.

Cilantro-Lime Rice

It also starts off with onions, garlic, and chicken stock for a rich flavor. But then it’s all finished off with bright citrus-y notes with lots of lime juice, zest of fresh cilantro.

Oh, and there may be a tab of butter or so for added richness.

Definitely a good thing.

Cilantro-Lime Rice

If you’re a bit shy about making rice on the stove top and prefer a rice cooker, just follow the initial steps below. Before adding in the stock, put the rice, cooked onions/garlic into the pot of your rice cooker. Pour in the stock, salt and then follow your machine’s directions. Once done, just follow the rest of the directions to finish it off.

Easy Peasy.

Happy Taco Tuesday!

________________________________________

Zesty Cilantro-Lime Rice
Serves 2-3

Ingredients:

1 tablespoon olive oil
2 tablespoons unsalted butter, divided
½ cup diced white onion
½ tablespoon minced garlic
1/8 teaspoon red pepper flakes
1 cup white rice (long grained preferred)
2 cups low sodium chicken stock or vegetable stock
¼ teaspoon kosher salt
½ cup chopped cilantro
2 tablespoons fresh lime juice
zest of 1 lime

In a small pot that has a lid, heat the olive oil and one tablespoon of butter over medium heat. Once melted add the white onions and cook for 2-3 minutes until softened. Add the garlic, pepper flakes and cook for an additional minute. Stir in the rice and cook for one more minute.

Add the chicken stock, kosher salt and bring to a boil. Cover the pot and reduce the heat to low. Simmer until all the liquids have evaporated and the rice is tender—about 18-20 minutes. Once done, remove the pot from the stove and let sit, covered for 5 minutes.

Remove the lid and add the remaining butter, cilantro, lime juice and zest. Use a fork to fluff the rice grains.

Enjoy!

Side Dish · Vegetables/Vegetarian

Chinese Broccoli {Gai Lan} with Oyster Sauce

Chinese Broccoli with Oyster Sauce

We went CRAY.

Four days with the Fam Bam celebrating Tết, my adorable niece Kaelani’s first trip to Southern Cali, and our monthly Sunday Family Dinner.

Yup…it was crazy and also delicious.

But really, that’s how my family (both immediate and HUGE extended) have always celebrated with each other. Through the process of cooking, eating and sharing our specialty dishes – we reminisce on old memories, loved ones who are no longer with us and just laugh…A LOT.

And since I indulged a bit much during the festivities, it’s time to add a bit more greens and light proteins back into the daily regiment. Gai Lan with Oyster Sauce is a quick and satisfying way to get those dark greens in and can be done in just a few minutes. Gai Lan is also known as Chinese Broccoli and incidentally, is eaten during the Lunar New Year for luck.

And although it has nothing to do with gai lan, you better believe I had to include pics of our little Kaelani Simone. WE’RE SMITTEN!  ❤

Kaelani

______________________________________________
Chinese Broccoli {Gai Lan} with Oyster Sauce
Serves 3-4

Ingredients:

2 tablespoons peanut oil
1 teaspoon minced garlic
½ teaspoon minced ginger
1 pound Chinese broccoli, washed and trimmed
½ cup vegetable stock
3 tablespoons oyster sauce
¼ teaspoon black pepper
¼ teaspoon red pepper flakes (optional)

Heat a wok or large skillet over medium heat and add the oil. Add the garlic and ginger and cook for 15 seconds. Add in the broccoli and cook for 1 minute before pouring in the vegetable stock. Cover and let simmer for 5 minutes or until broccoli is tender. Transfer the broccoli to a plate.

In a small bowl, whisk 1 tablespoon of the liquids from the wok with the oyster sauce, black pepper and red pepper flakes. Drizzle the sauce over the broccoli and serve warm.

Breads · Side Dish

{Cast Iron} Garlic Naan

Garlic Naan

Several years ago I got to spend a little bit of time in India—Chennai to be exact. And as luck would have it, I happened to have visited at the beginning of Diwali – the Hindu festival of lights. Nothing I had read or heard could have prepared me for the country. It’s vivid colors, intense – and I’m talking INTENSE heat, and sounds still replay in my mind as if I was just there. And although I only had a brief 5 days there, the city will forever be imprinted in my heart.

Good thing too because I had such a junky camera at that time — my photos were terrible! 🙂

Anywhoo….

Naan1

Since I only had a short time, I didn’t get to travel around the country too much and stayed primarily in Chennai. I did, however, manage to squeeze in a memorable home stay with a wonderful family –the Bhatts. They welcomed us into their homes, guided us through Chennai and gave us a glimpse of their culture.

Garlic Naan

Over those days, we meandered through the city in and out of markets, braved tuk-tuk rides, and ate—like SERIOUSLY ate. I came to find that Southern Indian food is often vegetarian and was so wonderfully spiced and fulfilling that this carnivore-lovin’ gal didn’t miss the meat. It was also the first time I had ever tried dosas– which I now LOVE.

Dosas are thin “crepes” served with a variety of chutneys. They can be filled or left plain. However, my favorite are the giant paper dosas that are extremely thin and crisp and rolled into a large cylinder. There’s something totally satisfying about breaking off a piece of paper dosa with your fingers and then dunking it into a masala or chutney.

Chicken Aloo Tikka Masala & Garlic Naan

Our home stay mom, Mrs. Bhatt, also did a good amount of cooking during our brief visit. And when she did, I hung around the kitchen trying to make mental notes of how she prepared things. I really wish I would have recorded her rolling out the dough for the parathas because she did it with such lightning speed!

Since my trip, I’ve tried to recreate the flavors I tasted in India –some attempts were definitely more successful than others. Channa Masala and Tikka Masala are on my usual rotation. But I always seemed to have had an issue with making a good naan–which in my opinion, is crucial when I’m devouring the aforementioned dishes. Some recipes turned out too dry or not tender….and others just didn’t taste well.

Garlic Naan

Until I stumbled upon Aarti Sequeira’s recipe–and my search was over. Her recipe uses a combination of both yeast and baking powder which gives it the perfect texture and lightness. I adapted her recipe a bit to make my favorite garlic naan and now there’s no going back.

But here’s the thing. Others will disagree with me but unless you have a tandoori oven (or maybe an outdoor brick pizza oven?), you must–and I mean MUST, use a cast iron skillet. There’s no replacing it. I’ve tried baking naan in a regular oven, in a standard skillet, in an easy-bake oven (PSYCH!) and nothing compares to a cast iron. Just add it to another reason why I adore cast iron skillets so much.

Oh- you better be sure that the next time I manage to get to India, I’ll pack two cameras just in case to capture everything. And although it’s been years, much love and thanks to the Bhatt family for their generous hospitality. ❤

_____________________________________

{Cast Iron} Garlic Naan
Makes 6

Ingredients:

1 teaspoon active dry yeast
2 teaspoons sugar, divided
¾ cup warm water
3 tablespoons plain yogurt
2 tablespoons extra-virgin olive oil
2 cups all-purpose flour, plus more for rolling
1 teaspoon kosher salt, more for finishing
1/8 teaspoon baking powder
2 tablespoons unsalted butter (or melted ghee)
1 heaping tablespoon minced fresh garlic, divided
1 teaspoon garlic powder
sea salt
2 tablespoons chopped cilantro

In a small bowl, stir together the yeast, 1 teaspoon sugar and water. Allow the mixture to sit for about 10 minutes until it becomes bubbly. Whisk in the yogurt and olive oil.

In a large bowl, whisk together the flour, kosher salt, remaining sugar, and baking powder. Pour in the yogurt mixture and use your hands to mix the ingredients all together. The dough will be very wet and sticky at first but continue to mix/knead until it becomes rather soft and pliable. Once it comes together, cover the bowl with plastic wrap and place it in a draft free place for 3-4 hours until it nearly doubles in size.

Place the butter and 1 tablespoon garlic in a small, microwave proof bowl. Heat in the microwave until the butter has melted.

Dust your counter (or other work place) with flour and place your naan dough onto it. Using a pastry cutter or sharp knife, divide the dough into 6 even portions. Lightly roll each of the dough balls into the flour to help them from sticking. Using a floured rolling pin, roll one of the dough portions into a circle about ¼ inch thick –it’s completely okay if it’s an imperfect circle. Sprinkle the top side with a bit of the garlic powder and remaining minced garlic. Use your fingers to press it into the dough and then pass the rolling pin over the top of it to ensure it’s secured. Repeat this method with the remaining dough.

Warm a large cast-iron skillet over medium-high heat until it’s nearly smoking. Be sure to have a lid large enough to fit the skillet and have the bowl of garlic butter with pastry brush nearby.

Carefully pick up one of the rolled out naan and gently lay it in the skillet, garlic side up, and cook for about one minute. The dough should start to bubble. After the minute, use tongs/spatula to flip the naan and cook for another 30 seconds to 1 minute. Flip it over again and cover the skillet for about an additional 30 seconds to 1 minute. The bread will look blistered and have blackened in a few spots.

Remove the naan from the skillet and generously brush the top with the garlic butter. Sprinkle the tops with a few pinches of sea salt and chopped cilantro. Repeat with the remaining 5 naan. Serve warm.

Slightly adapted from Aarti Sequeira

Pastas/Noodles · Side Dish · Vegetables/Vegetarian · Vietnamese

“You Know Whose” Copycat Asian Garlic Noodles

Garlic Noodles

You know who I’m talking about right?

The one who I probably shouldn’t name.

No, not Volde–DOH!  Man…that was a close one!

Oh to heck with it…… I’m talking about the An family. You know…the gatekeepers of the Thanh Long, Crustacean, ANQI (and more!) Dynasty!

Garlic Noodles

Oh how I love their butter dripping, garlic staggering roasted Dungeness crab and noodles. Many places have developed their own riff off of Mama An’s famed crab and noodles (including yours truly) but I’ll always have a soft spot for the old nostalgic and original Thanh Long in the Outer Sunset of SF. It’s where my seester first brought the family over 20+ years ago when the restaurant looked like a small mom and pop joint with mismatched plates and peeled painted walls.

Aromatic garlic perfumed the small restaurant with the constant sounds of cracking crab. But a lot has changed since then…..a boom of high-end sister restaurants and the creation of an empire.

But one thing remains the same…..those DAMN GARLIC NOODLES!!!!!!!!!!

Buttery, garlicky, decadent…..SOOO GOOD!

Garlic Noodles

So good that although I’ve posted my knock off recipe nearly 4 years ago, I believe they deserve a re-post. Especially with better pictures! Ugh…I cringe at how bad those earlier photos were.

These garlic noodles are so darn easy to make and are the PERFECT accompaniment to seafood—particularly shellfish. But like I said before, you cannot skip out on the magic ingredient – Maggi Seasoning Sauce. Don’t let anyone else lie to you…there’s really no substitute. It’s a couple of bucks and can be found in any Asian grocery store. It lasts a gazillion years so just pick up a bottle and keep it in your cupboard. Just trust me on this.

k2-_7811589a-cadb-480d-98d4-6f9d0287da02.v1

I whipped up these noodles the other week to accompany a quick Asian-style shrimp scampi. The meal was pretty much a BUTTER FEST so obviously it was a hit. But if you want to go vegetarian, sear up some tofu and throw them on a mound of these noodles. You’ll love them just the same.

Now back to trying to scheme–I mean “build” my own empire……

_______________________________

“You Know Whose” Copycat Asian Garlic Noodles
Serves Approximately 4

Ingredients:

1 pound chow mein noodles (fresh if possible)
2 tablespoons olive oil
¼ cup unsalted butter
3 tablespoons minced garlic
¼ teaspoon red pepper flakes
½ tablespoon light brown sugar
1 tablespoon Maggi Seasoning
¼ teaspoon freshly cracked black pepper
¼ cup grated Parmesan cheese
1 scallion, chopped
2-3 pinches toasted sesame seeds

Cook the chow mein noodles according to the direction on the package. Drain the noodles, reserving a few tablespoons of the starchy water.

In a wok or large sauté pan, melt the butter and olive oil over medium heat. Add the garlic and sauté until aromatic but not browned, approximately 1-2 minutes. Add the red pepper flakes, sugar and Maggi. Stir until the sugar is dissolved.

Remove the wok from the heat and quickly toss the noodles into the mixture. Sprinkle in the black pepper and cheese. Toss the noodles ensuring that it is thoroughly covered. You may add a tablespoon of the pasta water as needed to loosen the pasta.

Transfer to a serving dish and garnish with the scallions and sesame seeds. Serve immediately.

Pork · Salads · Side Dish · Vegetables/Vegetarian

Stone Fruit & Prosciutto Salad

Stone Fruit & Prosciutto Salad

Dear Summer,

Please don’t ever leave.

I love how you bring the bright, radiant sun out to warm us.

I love how you encourage me to wear flip flops every day (even to work).

And I love how you bring out the incredible sweetness and intense flavor to stone fruits. It makes me want to eat them all the time! Nectarines, peaches, plums, pluots….oh, the endless possibilities!

Stone Fruit & Prosciutto Salad

And Summer, you also inspire me to eat light and fresh dishes. So I decided to take your hint and threw some delectable stone fruits into some greens. A salad filled with all types of mixed greens to give that peppery verdant flavor, a needed savory element with the thin prosciutto slices, a salty & nutty profile from the parmesan cheese and much needed texture from the chopped pistachio nuts.

I don’t even bother with a vinaigrette. Instead, I opt for a bit of freshly squeezed lemon juice for acidity and a drizzle of EVOO for that needed richness.

Divine.

So Autumn, please push the snooze button a few more times to allow my Summer to stay a bit longer.

xoxo.

______________________________________

Stone Fruit & Prosciutto Salad
Serves 1

Ingredients:

2 cups mixed greens (arugula, romaine, baby spinach, etc)
¼ cup sliced peaches
¼ cup sliced nectarines
¼ cup sliced plums or pluots
2 thin slices prosciutto, torn into pieces
1 tablespoon roughly chopped pistachio nuts
1 ounces parmesan cheese shavings
juice of 1 lemon wedge
1 tablespoon quality extra virgin olive oil
2 pinches kosher salt
2 pinches coarse black pepper

Plate the first seven items on a serving dish. Squeeze the lemon juice over the plate, followed by the drizzling of olive oil. Season with the kosher salt and black pepper. Enjoy!

Appetizers/Small Plates · Condiments/Sauces · Side Dish · Vegetables/Vegetarian

Oven Baked Portabello Fries with Sriracha Mayo

Oven Baked Portabello Fries with Sriracha Mayo

I am a French Fry Monster.

Those crispy, delectable, fried potato-goodness are my vice. But oh–what a glorious vice it is!

Oven Baked Portabello Fries with Sriracha Mayo

But seeing how it’s probably not the best idea for me to inhale my weight in fries (though I may or may not have tried before), I’ve got to find alternatives to get my crunchy fix in.

And these Oven Baked Portabello Fries fulfill that craving quite well.

Oven Baked Portabello Fries with Sriracha Mayo

Thick portabello mushroom strips are rolled into an egg white mixture and then coated with toasted panko breadcrumbs. After a short tanning in the oven, they come out wonderfully crunchy and not the least bit mushy on the inside. And let me tell ya, these beauties are totally crisp. By toasting the panko and then baking the fries on a rather high heat, they’re able to get that wonderful crunch I love when I go to town on traditional potato fries.

Did I mention that they get dunked into a Sriracha Mayo?

You’re welcome.

ps. They’d also be fantastic wrapped up in tortillas with some Avocado-Cabbage Slaw to make some killer veggies tacos.
_____________________________________________

Oven Baked Portabello Fries with Sriracha Mayo
Serves 2

Ingredients:

Sriracha Mayo
½ cup mayonnaise
1 tablespoon Sriracha
½ teaspoon garlic salt
½ teaspoon onion powder
¼ teaspoon cayenne powder
½ teaspoon fresh lemon juice
1 teaspoon minced parsley
kosher salt
black pepper

Fries
1½ cups panko breadcrumbs
1 tablespoon vegetable oil
2 egg whites
1 tablespoon water
½ teaspoon chopped thyme leaves
1 teaspoon garlic powder
1 teaspoon onion powder
¼ teaspoon cayenne powder
2-3 dashes hot sauce
¼ teaspoon black pepper
kosher salt
cooking spray
1 large portabello mushroom cap or 2 medium sized portabellos
½ teaspoon minced parsley

Whisk the first seven ingredients for the Sriracha Mayo in a bowl. Season with kosher salt and black pepper as needed. Cover and set aside in the refrigerator.

Preheat the oven to 475˚ F.

In a large skillet, toss the panko with the oil. Toast over medium heat, stirring, until golden brown. Set the toasted panko into a dish.

In another bowl or shallow dish, whisk together the egg whites, water, thyme, garlic powder, onion powder, cayenne powder, hot sauce, black pepper and ¼ teaspoon kosher salt.

Take a wire rack and place it over a baking sheet. Lightly coat the rack with cooking spray.

Slice the mushrooms into long strips approximately 1/3 – ½ inch in width. One slice at a time, dip the mushroom into the egg white mixture and then into the breadcrumbs. Use your fingers to gently press the breadcrumbs into the mushroom slice to coat well. Lay the coated mushroom slice on the wire rack. Continue with the remaining ingredients.

Spray the tops of the mushrooms with cooking spray and bake for 20-25 minutes. Flip the mushroom fries halfway through the baking process and spray the tops with cooking spray before returning them back into the oven. The fries are done when they are golden brown. Remove them from the oven and sprinkle them with additional kosher salt and parsley. Serve hot with the Sriracha Mayo.

Side Dish · Vegetables/Vegetarian

Roasted Garlic Mashed Cauliflower

Roasted Garlic Mashed Cauliflower

It’s June in San Diego and I’m about 3 months late on starting my beach-bod workout regiment.

What can I say? Siri forgot to add it to my calendar.

So I’ve been doing what I can, a little bit at a time to make up for it. Cutting out caffeine (which explains my Dr. Jekyll/Mr.Hyde personality in the AM), taking the stairs instead of the elevator, cutting back on starches & sweets, doing quick jogs instead of trying to motivate for several mile-runs, and supplementing my produce intake with daily juicing or fresh green smoothies.

Roasted Garlic Mashed Cauliflower

But you know what my achilles is?

Bread and potatoes.

I could inhale bread and potatoes 24/7. Fine if I was some hardcore athlete but the last time I checked, Instagramming hadn’t been deemed a sport yet.

It’s particularly tough when I’m grilling up some goodness and all that’s missing is a huge pile of mashed potatoes.

Drools…..

Roasted Garlic Mashed Cauliflower

In an attempt to fool my mind while trying to create something lighter that still tastes yummy, I started roasting cauliflower and mashing it up with roasted garlic. Cauliflower is considered a “non-starchy” vegetable but when cooked and mashed (or pureed) it can take on a lot of similar textures as my beloved spud.

Roasted Garlic Mashed Cauliflower

And you know what?

It’s delicious-really! The cauliflower starts to caramelize when you roast it and when you add the rich and almost sweet flavor from the roasted garlic—you’re in for it!

This hearty Roasted Garlic Mashed Cauliflower will never fully replace my taters, but it’s a darn good stand in until I go P90X on y’all.

_____________________________________________

Roasted Garlic Mashed Cauliflower
Serves 4

Ingredients:

1 large cauliflower head, cut into florets
12-15 garlic cloves, peeled
olive oil
kosher salt
1/2 teaspoon garlic powder
1/4 teaspoon black pepper
1 teaspoon chopped chives

Preheat oven to 400 degrees F.

On a baking sheet, toss the cauliflower and garlic cloves with 2-3 tablespoons of olive oil. Season with kosher salt and roast for 20-25 minutes until tender and golden brown. Stir and turn every 5-10 minutes.

Transfer the roasted cauliflower and garlic to a large bowl. Add an additional 1 tablespoon olive oil (or 1 tablespoon butter, if you prefer) and garlic powder. Using a potato masher or ricer, mash the cauliflower until it reaches an even consistency.

Season with additional salt and pepper as needed. Stir in chives (0ptional). Serve warm.

*If you’re looking for a gluten free method, be sure to use gluten free marked garlic powder and butter.