Pork · Seafood · Sunday Family Dinner

The “Not-Really-Fam-Din” Dinner

August 2020

I know, I know…it’s been REALLY quiet around here this past year.

The truth is, even before the world had turned upside down, I was considering what to do with this site. I started TCC in 2008 as a way to share recipes between the Fam since we all lived so far apart. And at the time, “food blogging” had only been around for a few years so I had no idea what I was doing.

As time went on, I cooked TONS more, photographed more, wrote more, and surprisingly had a lot of opportunities arise from what I considered a hobby. It was awesome! But the food landscape has evolved so much. The “food blog” game changed. Sites became highly editorialized with their photos and storylines. All WAY above my skillset. Not only was I out of my league, I was beginning to lose inspiration.

And then in early 2012 we started having our monthly Family Dinners. What was born out of a means to ensure that our family stay connected became these delicious, and yes elaborate, themed meals. TCC moved from recipes being posted 2 or 3 times a week, to Fam Din recaps so that we could document some family history. The blog kind of had a new raison d’etre and readers seemed to really enjoy following our Fam Din shenanigans—to see the dishes (the successes and FLOPS!) and to find out what the fam was up to that month.

But even with the new push, I had been behind with the Fam Din recaps at the end of last year (I blame it on being a Taurus) and as I began writing again to catch up, COVID hit……and the world stopped. Sure, quarantine and working from home gave me extra time to write but it all seemed….well, less important.

The other underlying factor was that our monthly Family Dinners stopped…. we had to. Sheltering in place was in order and non-essential gatherings were all on halt—not just for us, but the world. An 8 year tradition that we never broke had stopped. It was really tough. To try and stay connected, we’ve had weekly Family Zooms every Sunday and our seestrahs in OC make regular grocery and supply drop-offs for our Dad.

August 2020

By early August, it had been nearly 5 months since California had been impacted…..and I hadn’t seen my family, who live only 90ish miles away, in-person since February. Knowing that a “second wave” and stricter mandates may be necessary this Fall, I decided to finally make a trip to see the Fam as it would have been 6 months since our last visit. I got COVID tested (which was negative) and packed up the car. And let me tell you, that 1.5 hour drive seemed like FOREVER! But once I got there—it was fantastic!

We planned to have a casual dinner together. No theme, low maintenance….hence the “Not-Really-Fam-Din” dinner situation. Plus I somehow chose to come up during a heatwave with high humidity so the least amount of cooking was paramount.

That day while we were out getting groceries, we stopped by a few places to pick up essentials— caffeine and hand soaps. We only ordered three drinks — yet somehow ended up with six…….but we did intentionally end up with that many bottles of foaming hand soap. 40 to be exact. Hey! There was a sale!

August 2020

While I was up there, I was happy to see that Lucas had not lost his touch with being a puppy-whisperer. And for those of you that have been paying attention– yes, my fur-niece Lucy, who is a goldendoodle, when from a dark brown to white. Still as adorable and puppy-hyper as ever.

August 2020

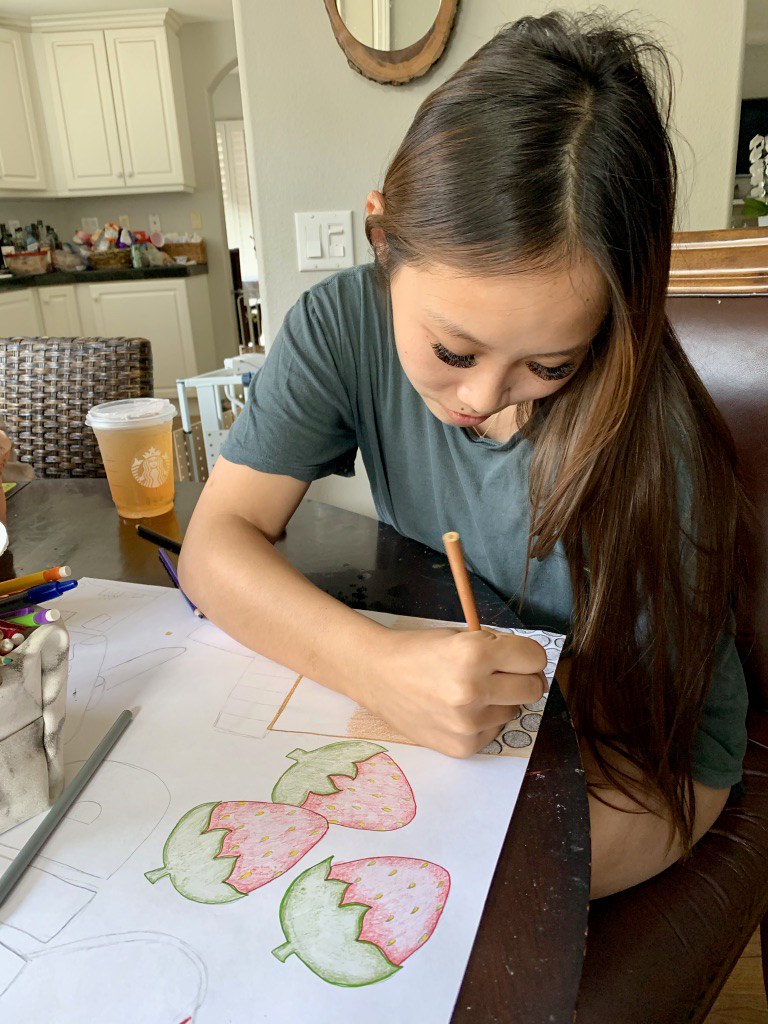
And although it wasn’t a “Family Dinner” some things remain the same….like the kiddos catching up on homework.

Maya is working two computers and her phone at the same time. Those techie Gen Z kiddos…..

August 2020

She even managed to get her big cousie, Nina, to help her on a poster for a presentation she was going to do later that week.

(Confession: I also joined in on the coloring…because I do love to color!)

August 2020

And of course, there were a few adult beverages consumed.

Since it was 105984266978 degrees out, I wanted to have something like and refreshing. Aperol Spritzes it is! Plus it helped me pretend that we were summering somewhere in Italy while drinking these spritzes on a balcony in Venice.

August 2020

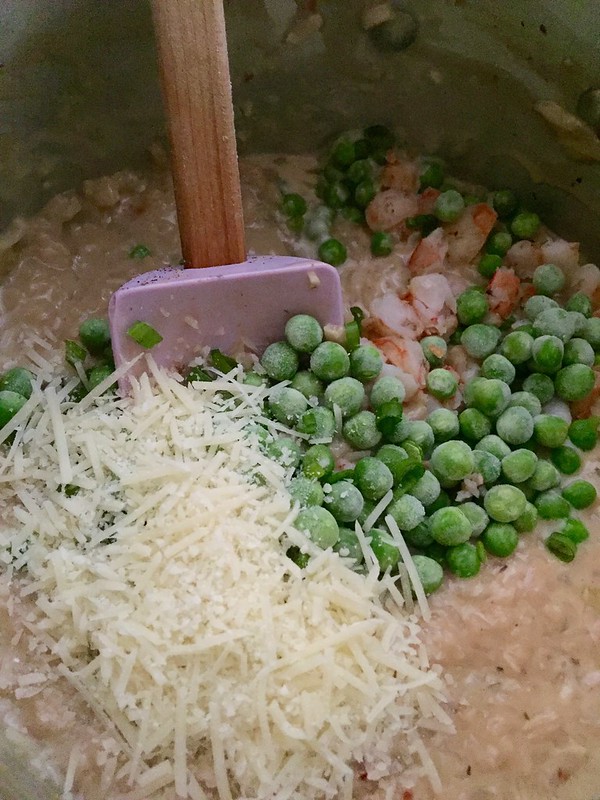
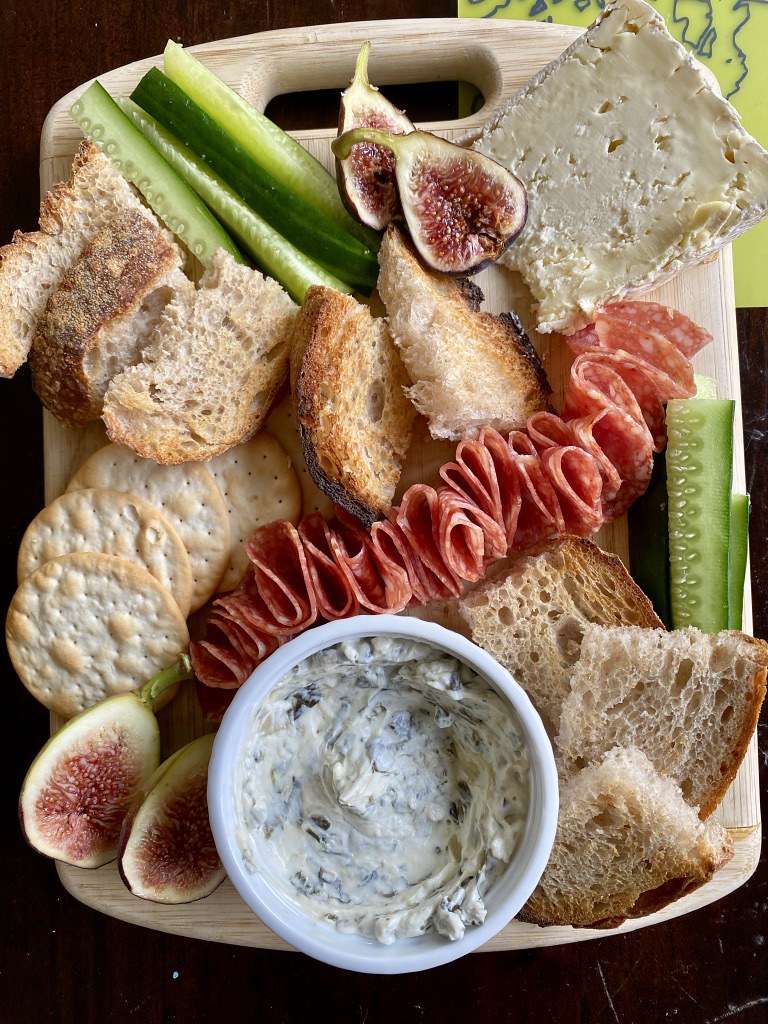
And because I know my family, I picked up some goodies for a simple Cheese and Charcuterie Board for them to nosh on. Although this was not what I had planned for appetizers, Seester N and her fam always arrive R-A-V-E-N-O-U-S …. even though they know dinner won’t be ready for hours!

To avoid a hangry backlash, I grabbed some spicy calabrese and a wedge of Saint André Triple Brie Cheese while we were at Trader Joe’s. We also found some spinach artichoke dip in the fridge and toasted up the sourdough bread that I had baked earlier….along with some fresh figs from T’s tree in the backyard.

August 2020
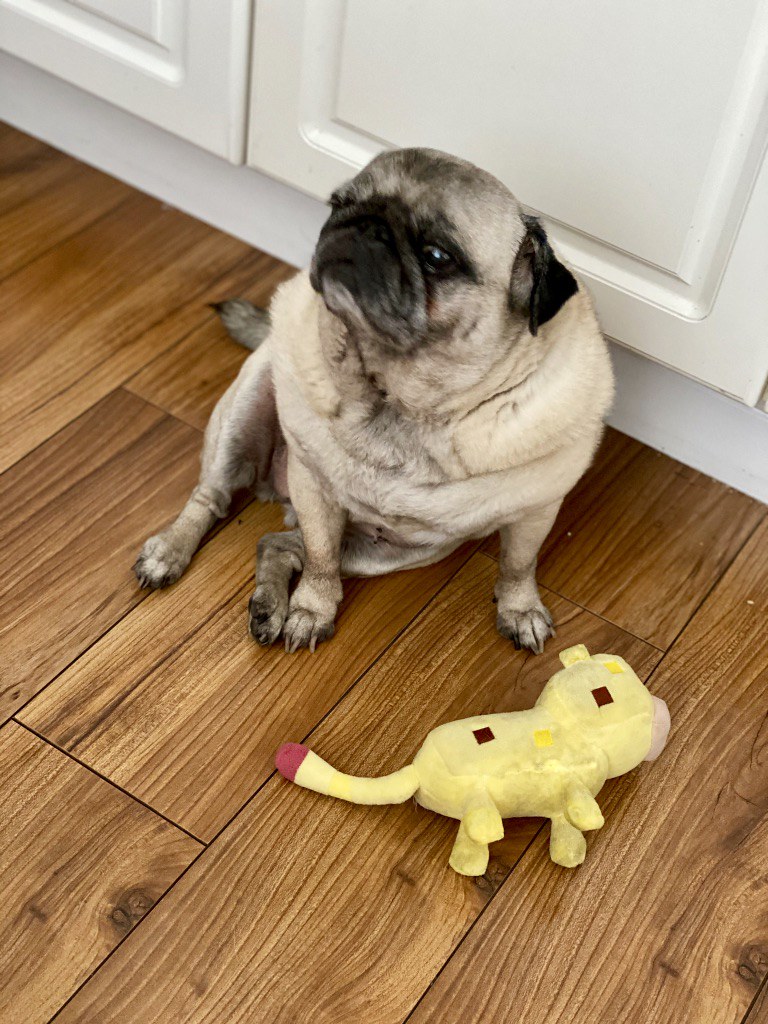
I can’t tell you how much I’ve missed this grumpy face.

August 2020

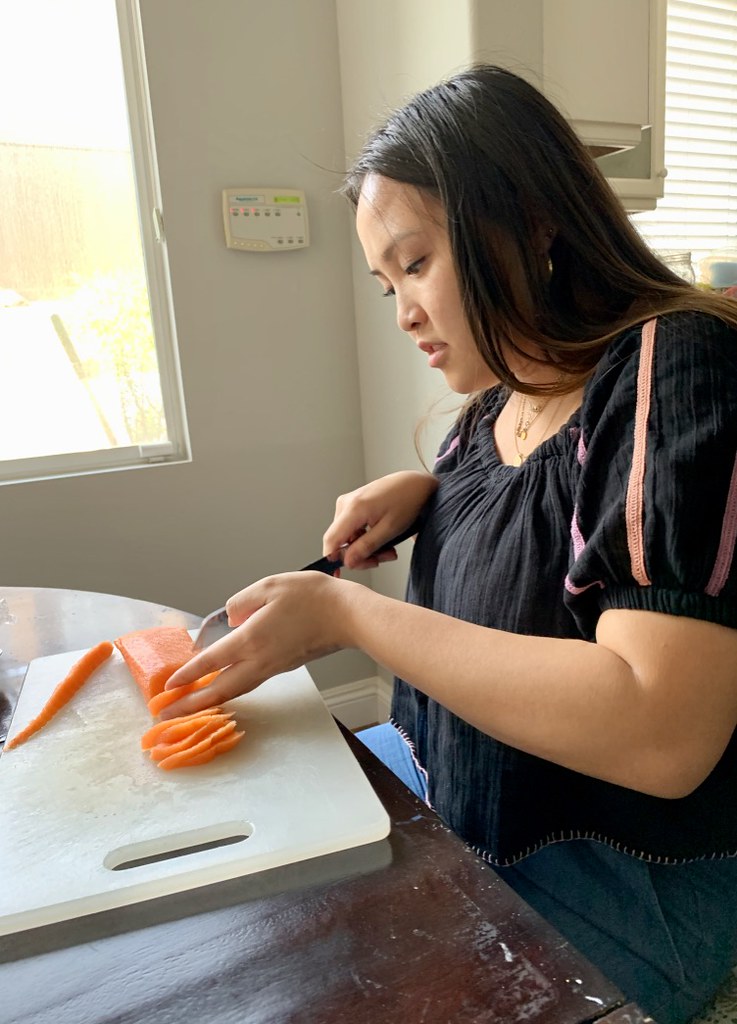
Since it was soooo hot out, I wanted an easy appetizer that was light and required little-to-no cooking. It really is a no brainer what this family likes—sashimi and sushi! So we swung by Tokyo Central to see what they had fresh that day – and they had A LOT. I grabbed several packages of fresh fishes, nori, picked ginger, yuzu kosho …. and a few other snackies to enjoy another day.

After making the rice, I immediately handed the reigns to our resident sushi chef, Nini. She seriously has skills… not just knife skills but she also makes this crack sauce that should be bottled. That afternoon she got some back up from her big seestrah, Nina, on forming the nigiri rice.

August 2020

And this is what they came up with……

August 2020

Sashimi plate of fresh salmon, akami, chūtoro and wakame.

August 2020

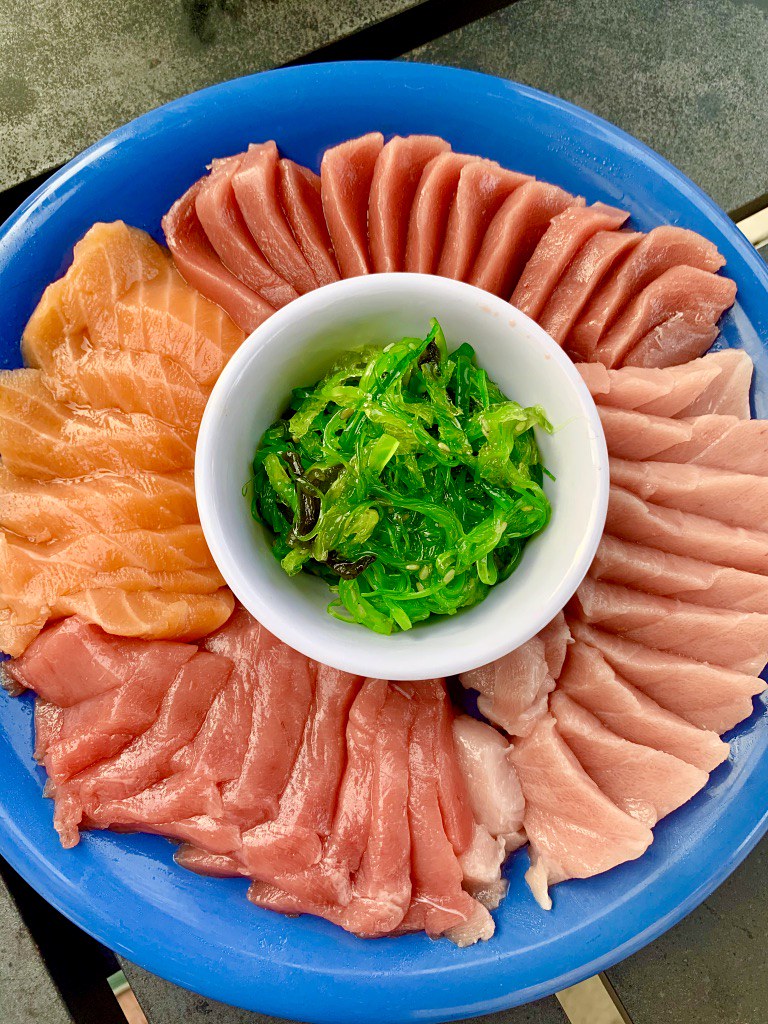
A sushi plate of salmon nigiri, akami nigiri, masago gunkan and spicy salmon & avocado rolls.

August 2020

Amazing right?

And how adorable is she?

Yes, Nini is starting her 3rd year in college but she’s been in charge of our sushi/sashimi for years now. Just goes to show what can happen with a munchin with a good palate and has been exposed to the kitchen at a young age.

August 2020

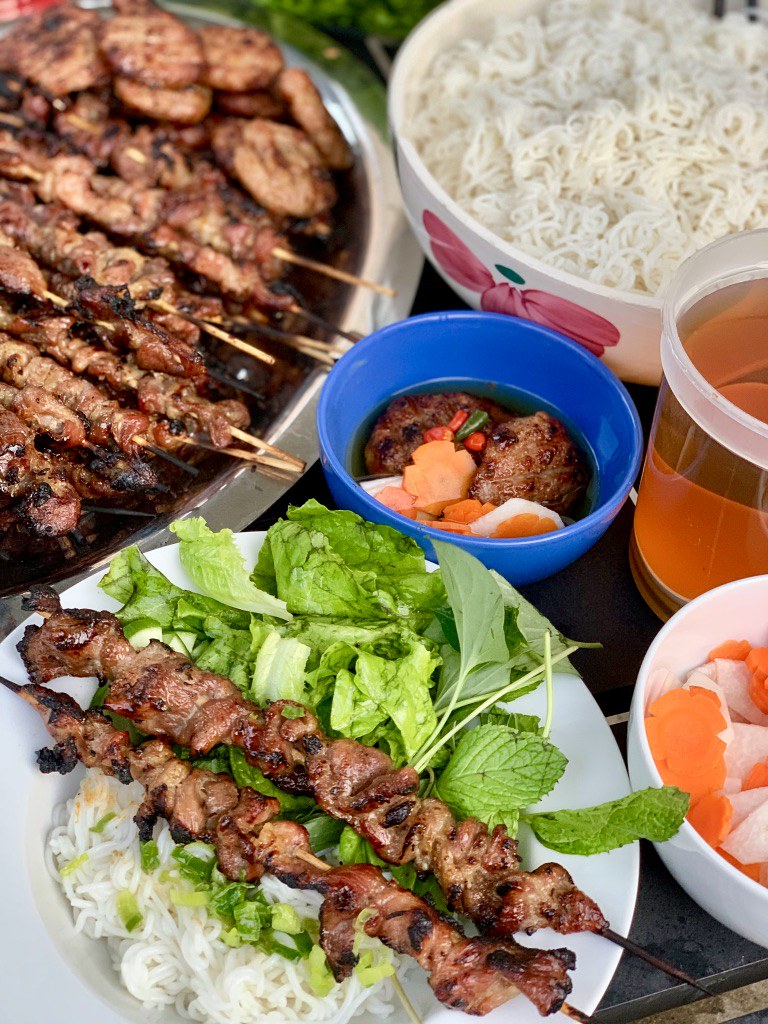
Then, there was the main course. When Seestrah N texted that she would make us Bún Chả Hànội, I squealed with glee…..ask Bella. She can confirm.

Bún Chả Hànội is a Northern Vietnamese dish that consists of grilled pork skewers and pork patties with vermicelli noodles and fresh herbs/veggies. The flavors are both extremely savory and slightly sweet with pungent (in a VERY good way) notes from the nước chấm (dipping sauce) and bright herbaceousness from the herbs, greens and pickled veggies.

It’s so damn good.

Bún Chả Hànội was thrust into the mainstream foodie spotlight when Anthony Bourdain (may he rest in paradise) brought President Obama (may he long live) to enjoy the wonderful dish on his Parts Unknown show.

August 2020

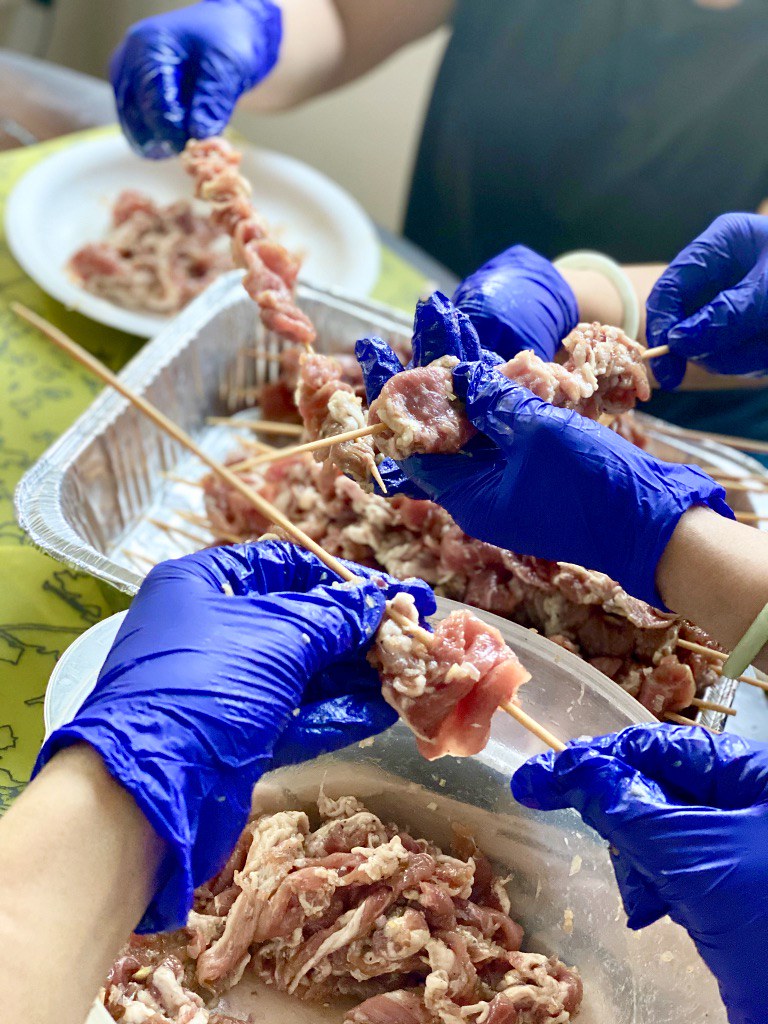
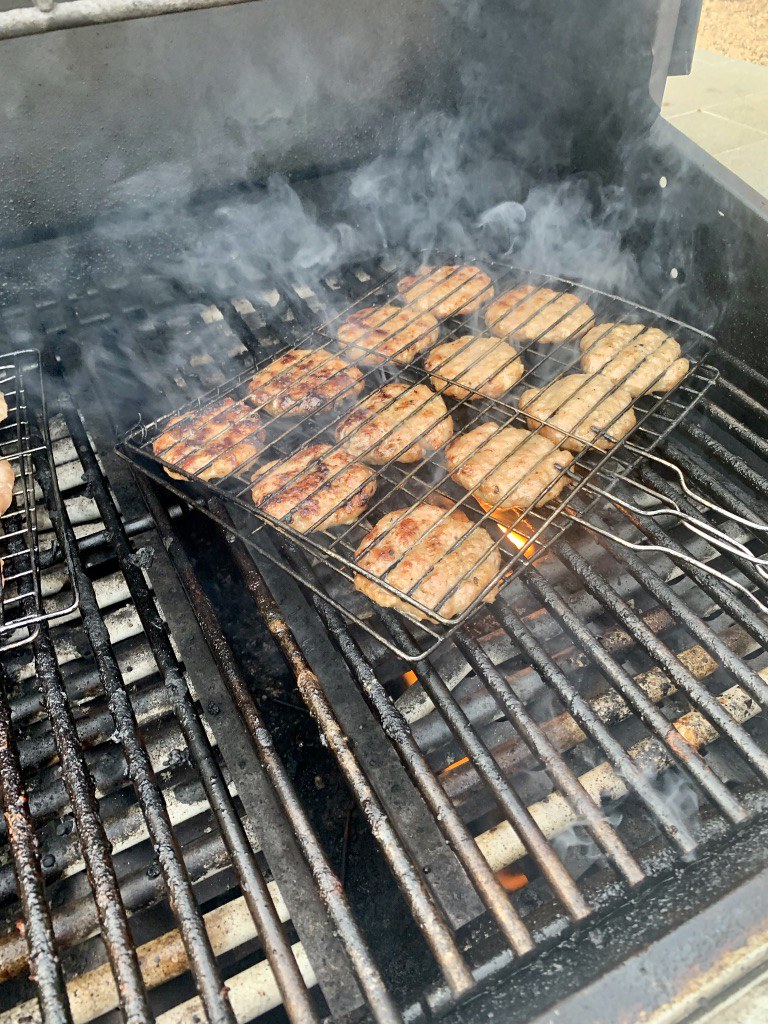
Seester N had marinated the pork overnight with ingredients like fish sauce, sugar, pepper, oyster sauce, garlic and shallots. For the thinly sliced pork, we skewered them on bamboo sticks that she had soaked overnight in water. For the ground pork (with the same marinade), we formed them into little patties. And for the record, she sure did scold us when she thought we didn’t make them the correct size or shape!

Once done, we handed it over to my BIL to grill. Also, can we give a big C-O-N-G-R-A-T-S to C for being newly retired! I’m incredibly envious! (We all are!)

August 2020

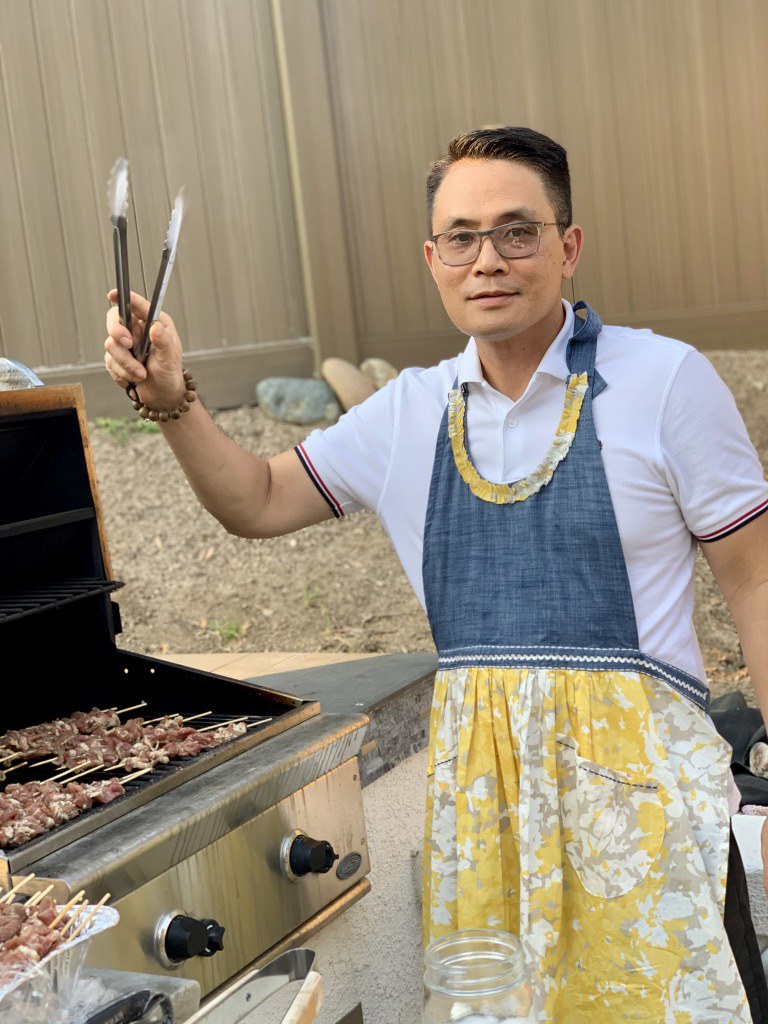
You may think the pork looks a bit fatty but OH MAN. When it chars up—it’s SOOO good.

August 2020

I’ve got to assume the neighbors were very jealous smelling all the deliciousness that was being grilled.

August 2020

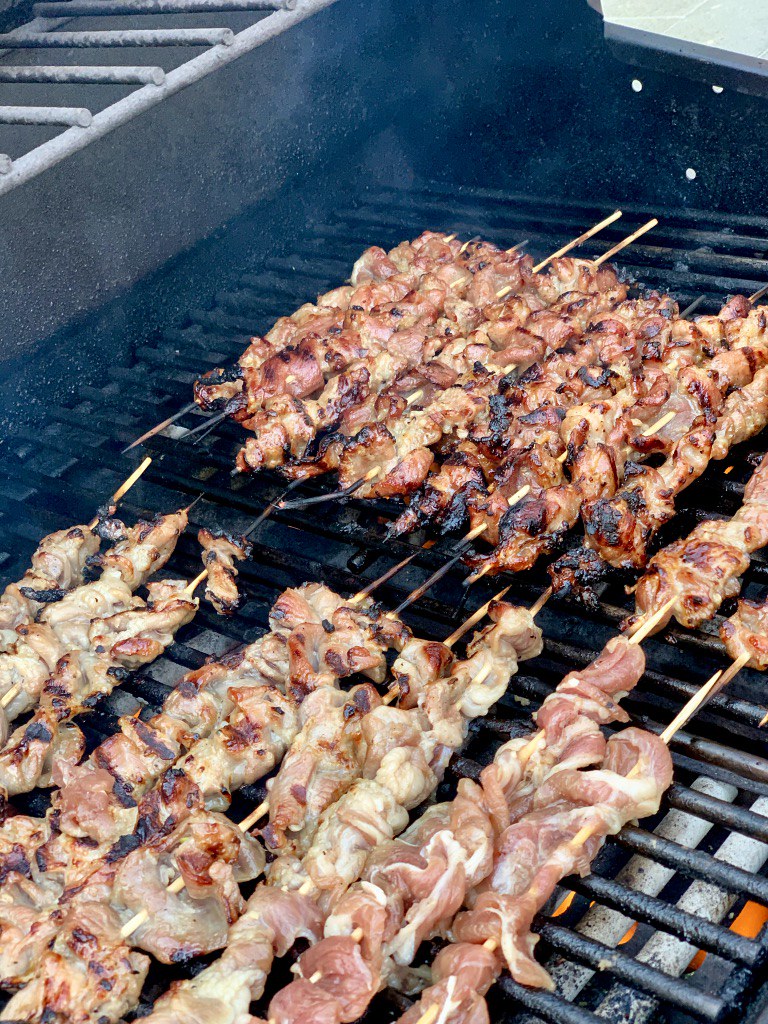
This grill basket is a must so that the patties don’t fall through the grates. You can pick them up for a few bucks at your local Asian grocery store.

August 2020

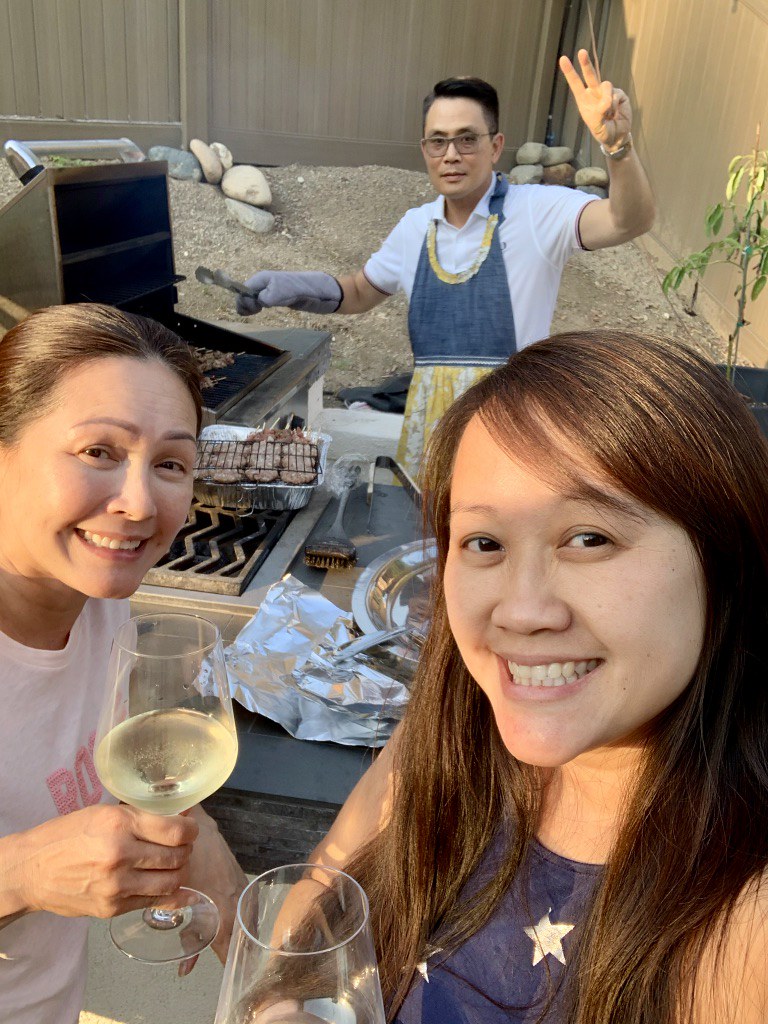
Yeah…we moved onto some Pine Ridge wine by then. And then some Rosé… and then some Decoy Cabernet Sauvignon.

HELLO!?!?!?! It’s been SIX MONTHS since we had seen each other!

August 2020

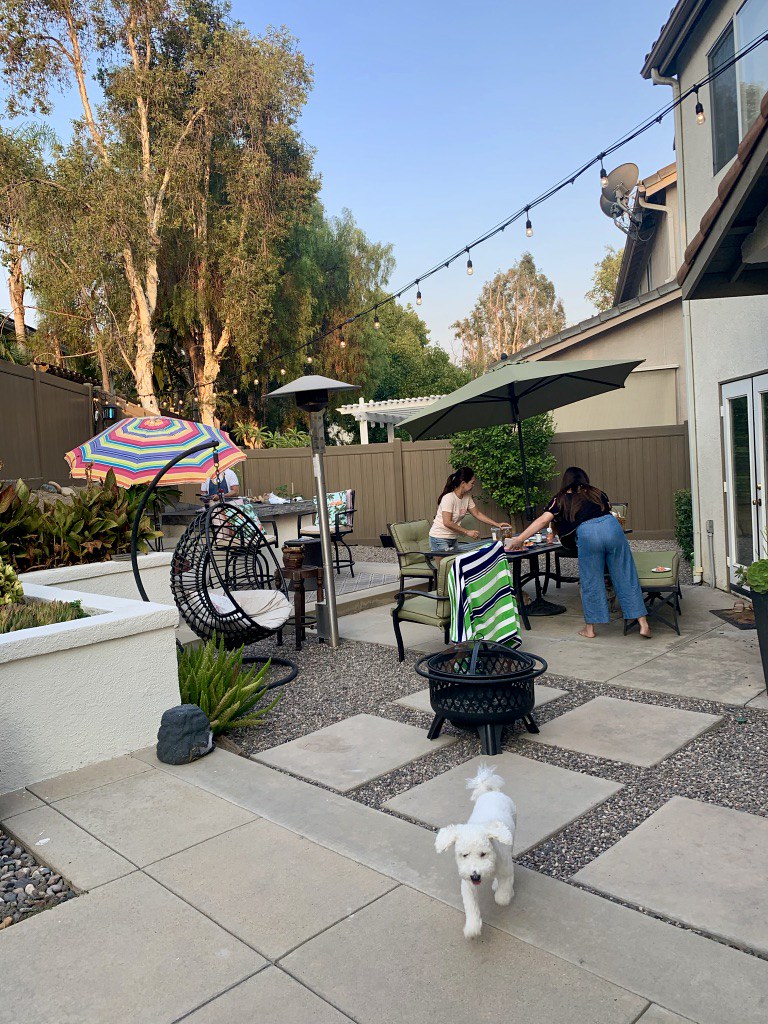
It had finally cooled down a bit so we braved dining al fresco. 

August 2020

Take a gander of this beautiful spread of Bún Chả Hànội!

August 2020

Bún Chả Hànội does looks similar to Bún Thịt Nướng. I would say that some of the differences is that traditionally the nước chấm is much lighter and less pungent in the former dish. It’s a bit watered down so that when served, the pork patties and grilled pork are swimming in a bowl of it. You also dunk the vermicelli noodles into the nước chấm versus having everything already assembled in the bowl like with Bún Thịt Nướng.

Think of it kind of like Tsukemen ramen where the noodles are served separately and you dunk it in the sauce/broth.

August 2020

It may appear to be heavy with all of the pork but the dish is surprisingly light and is the perfect meal for a hot day. All of the fresh herbs and greens definitely contribute to that.

It’s really one of my favorites.

August 2020

Although our time was short, it was so good to spend some QT with the family and see the munchkins together again (both furry and furless!).

August 2020

Some things never change—they’re still hams.

August 2020

p.s. Nini did make us a delicious dessert — a Mango Royale. But we somehow managed to forget to take a picture of it! DOH! PRIME example of how this was NOT your standard family dinner.

p.s.s. I will be posting the recaps of the other Fam Dins to catch up in the next couple of weeks. Pinky swear!

p.s.s.s. Pops is 79 and is definitely in the high-risk group–so he stayed home that night. Rest assured, we visited him (masked and safe) the next day to bring him leftovers.

p.s.s.s.s. This is him realizing that we also brought him lunch from the Cheesecake Factory.

Him: “Is that Cheesecake Factory??? MY FAVORITE!”

ALL the delicious things we cook and bake for him and the Cheesecake Factory is still his favorite.

This guy….

LOL.

And that’s it. Until next time Friends, stay safe— and please WEAR A MASK!

August 2020_________________________________________________________

“Not-Really-Fam-Din” Dinner Menu

Cocktails: Aperol Spritz, Various Wines
Appetizers: Cheese and Charcuterie Board, Sashimi, Sushi
Entree: Bún Chả Hànội {Northern Vietnamese Grilled Pork and Pork Patties with Vermicelli Noodles}
Dessert: Mango Royale


Appetizers/Small Plates · Seafood

Shrimp and Tofu Dumplings

May 2019 Fam Din
Dumplings.

Potstickers.

Wontons.

Gyozas.

Mandu.

I love them all. And the Fam sure does too.

Shrimp and Tofu Dumplings
Dumplings have made their appearance at a few of our Family Dinners before and I happily oblige to make them since it gives me an excuse to make lots of extra to stash away in my freezer.

You know, for those dumpling emergencies.

We all have them….right?

Shrimp and Tofu Dumplings
I had been scrolling through Instagram a few weeks before my birthmonth’s Fam Din when I saw a pic of the cutest little dumplings that had shrimp tails sticking straight out of them. ADORABLE! I had never seen anything like them before and knew right then….. I HAD TO MAKE THEM!

Shrimp and Tofu Dumplings
One of my favorite Korean food blogs is Maangchi. She’s hilarious and her recipes are delish. In fact, the Korea Seafood Soft Tofu Stew we make is a slight variation of hers.

I recalled that she had a recipe for Shrimp and Asian Chive Dumplings (or mandu) where she added crumbled tofu and thought I would do the same for my dumplings.

May 2019 Fam Din
Now if you’re someone who says “EEEEWWWW….TOFU!”, let me say two things:

  1. Fresh tofu really has the mildest of flavor—if any! And in fact, they usually just take up the flavor profile of whichever sauce or seasonings it’s served with. As for these dumplings, it’s added solely to provide extra juiciness to the filling.
  2. Don’t Yuck My Yum.

That is all.

May 2019 Fam Din
As for the rest, I kept the filling pretty simple since the majority of the dumpling “pouch” would be filled up by a whole shrimp. So in addition to the crumbled tofu, I just added just some more chopped shrimp, fish sauce and a few aromatics. Easy peasy.

The end results were shimmy-shimmy good! There’s really something so satisfying about biting into a whole shrimp and having the rest of the filling be just so darn juicy.

I was also told that it was some of my family member’s favorite dumplings to date. And they can be a tough crowd!

May 2019 Fam Din
And as for the shrimp tail that proudly sticks out?

It’s not just for decor….

They became rather a handy mechanism to hold on to when picking up the dumpling to dunk into the sauce.

Functional and deliciously cute. Now that’s a killer combo.

__________________________________________________________

Shrimp and Tofu Dumplings
Makes approximately 40 dumplings

Ingredients:

Dumplings:
8 ounce block of firm tofu
40 butterflied whole shrimp, with tails intact
½ pound of shrimp, peeled and deveined
½ cup chopped scallions
½ tablespoon finely minced garlic
1 tablespoon Shaoxing wine
2 teaspoons toasted sesame oil
2 tablespoons cornstarch
1 tablespoons fish sauce sauce (more, if needed)
½ teaspoon black pepper
1 package dumpling wrappers (approximately 50 skins)

Dipping Sauce:
4 tablespoons soy sauce
3 tablespoons Chinkiang Black Vinegar
1 tablespoon sesame oil
½ tablespoon sugar
1 tablespoons homemade Sichuan Chili Oil (both the oil and flakes)

Press and drain your tofu by wrapping the block in a few sheets of paper towels and then place it on a large plate. Place another large plate on top of the tofu block and place a heavy object on top to weigh it down (e.g. a large can of veggies, a book, etc.). Allow the tofu to drain for about 15-20 minutes

Place the ½ pound of peeled and deveined shrimp in a food process. Pulse several times until the shrimp is well chopped up but has not yet become a paste. You can also hand chop the shrimp on a large cutting board. Once done, place into a bowl.

Crumble the drained tofu into the bowl of chopped shrimp. Add in the scallions, garlic, Shaoxing wine, sesame oil, cornstarch, fish sauce and black pepper. Mix well to combine. Test the filling for seasoning by taking a small spoonful of the mixture and pan fry in a nonstick skillet for 1-2 minutes on each side. Taste and adjust the uncooked filling as needed.

Begin assembly of the dumplings. Lay one dumpling skin on a flat surface. Dip your finger in water and moisten the edge of the wrapper. Place one of the butterflied shrimp in the center of the wrapper, cut side down so that the tail lifts up. Spoon about 1 teaspoon of the filling over the shrimp. Pick up the dumpling and fold the skin over the shrimp/filling. Begin pleating and pressing the edges together to seal around the tail. Place the filled dumpling on a baking sheet and continue until all the filling/skins have been used.

To steam: Arrange the dumplings in a steamer (lined with cabbage leaves or parchment paper) and steam for 8-10 minutes. The shrimp tails will become pink and opaque while the dumpling skins will become rather transparent. You can lightly squeeze the dumpling and feel that filling has become rather firm.

To pan-fry: Heat a large skillet to medium-high heat with 2 tablespoons of oil. Place a single layer of the dumplings in the pan. Fry the dumplings for 1-2 minutes until the bottoms are golden. Carefully pour in about 1/3 cup of water and immediately place a tight fitting lid over the skillet. Lower the heat to medium-low and allow the dumplings to steam for 4-5 minutes. Remove the lid and cook until all the water has evaporated. If you need to fry the dumplings in batches, use a paper towel to wipe the frying pan clean before repeating the above process.

While the dumplings steam/pan-fry, whisk all of the ingredients together for the dipping sauce and set aside.

Once the dumplings are steamed, transfer to a platter and serve immediately with sauce. ENJOY!

*If you would like to freeze the uncooked dumplings, place the baking sheet directly into freezer for 2-3 hours after you have assembled them. Be sure that the dumplings are in a single layer and are not touching each other. Once the dumplings are frozen, you may transfer them to a sealed container. They can be kept in the freezer for a few months and should be cooked frozen. Add 1-2 additional minutes to the cooking time when steaming.


Pastas/Noodles · Seafood

Linguine alle Vongole {Linguine with Clams}

Linguine alle Vongole {Linguine with Clams}
Pasta is my kryptonite.

Linguine alle Vongole {Linguine with Clams}
It’s not just devouring it — I also love cooking pasta dishes, too!

My vice is way too accessible.

Linguine alle Vongole {Linguine with Clams}
So you can see the predicament I am constantly in.

Linguine alle Vongole {Linguine with Clams}
But not all pastas need to be heavy or sauce laden.

Linguine alle Vongole {Linguine with Clams}
In fact, one of my favorites is Linguine alle Vongole – long strands of pasta with clams in a white wine sauce.

YES PLEASE!

Linguine alle Vongole {Linguine with Clams}
It’s really quite simple with just a handful of ingredients that are probably (besides the clams) are already hanging out in your pantry.

Linguine alle Vongole {Linguine with Clams}
As for those clams:

  • Triple check with your fish dude/dudette that they are fresh.
  • Take the time to ensure that you soak and clean them. Biting into sandy clams is NO BUENO!
  • Toss away any clams that do not open after you’ve cooked them because that means they’re D-E-D!  (Nope, not a typo. “DED” is “DEAD”…but wayyyyyy more.)

Linguine alle Vongole {Linguine with Clams}
After you’ve done that, just infuse some olive oil with lots of garlic and red pepper flakes…..

throw in some white wine and your cleaned clams….

pop a lid on and wait until those molluscs open up!

Linguine alle Vongole {Linguine with Clams}
Then it’s just a matter of tossing in the cooked linguine, butter (for a bit of added lusciousness), lemon and parsley.

Linguine alle Vongole {Linguine with Clams}
And then get ready to do a Happy Dance in your kitchen because your tummy will be so appreciative of you!

Buon Appetito!

________________________________________________
Linguine alle Vongole {Linguine with Clams}
Serves 2

Ingredients:

3 tablespoons extra virgin olive oil
3 large garlic cloves, thinly sliced
½ teaspoon red pepper flakes
1 pound clams (Manila clams, cockles, littlenecks), scrubbed and cleaned*
1/3 cup white wine
kosher salt
5 ounces dried linguine, or other long strand pasta
1 tablespoon butter
1 tablespoon fresh lemon juice
1 teaspoon fresh lemon zest
½ cup chopped parsley

Heat the olive oil over low heat in a large skillet. Add the garlic and cook for 5-6 minutes to infuse the oil. Swirl the skillet often to ensure that the garlic does not burn. Add the red pepper flakes and infuse for another minute.

Raise the heat to medium and allow the garlic and pepper flakes to cook for an additional 15-20 seconds. Add the clams to the skillet and pour in the wine. Once the liquids begin to bubble, place a cover over the skillet and allow the clams to steam open – approximately 5-8 minutes depending on their size.

While the clams cook, add salt to a pot of boiling water. Add the dried linguine and cook to just shy of al dente. (Note: If your pasta is not done by the time your clams have cooked through, turn off the heat on the skillet and keep it covered until the pasta is ready. Turn the heat back up to medium once you add the pasta.)

When your pasta is done check your clams and discard any that have not opened yet. Add the pasta directly into the skillet with the clams, tossing to coat. Add the butter and continue stirring/tossing until it has fully incorporated. If the pasta appears slightly dry, add ½ – 1 ladle of the pasta cooking water, continuously stirring to emulsify the sauce. Toss in the lemon juice, zest and chopped parsley. Plate the pasta and serve immediately.

*Rinse and scrub the clam shells with a small brush. Place the scrubbed clams in a dish and submerge with cool water. Place the dish in the refrigerator for 20 minutes. Rinse the clams and change out the cool water every 20 minutes for an hour. If you still see sand/grit at the bottom of the dish at the end of an hour, repeat the soaking process for another 20-40 minutes.


Appetizers/Small Plates · Seafood

Steamed Crab Dumplings – Happy Lunar New Year!

Steamed Crab Dumplings
Hello Peeps!

I’m taking a quick break from the Fam Din recaps (told ya’ I would be making up for lost time!) to say Chúc Mừng Năm Mới!!

Steamed Crab Dumplings
Yes, it’s that time again…. Tết – the Vietnamese Lunar New Year!

Steamed Crab Dumplings
All of the my Tết prep has been dutifully followed.

The house is sparkly clean, the altar is up and I popped into the bank to get “new money” to fill the red lì xì envelopes for the munchkins.

Steamed Crab Dumplings
And OF COURSE, there has to be lots of “lucky” food!

There will be tons of noodles (longevity), fruit (auspicious) and Bánh Tét – steamed rice cakes (prosperity).

Steamed Crab Dumplings

And it wouldn’t be the new year if I wasn’t making lots and lots of dumplings that symbolize wealth. I’m fairly certain that I’ve made a couple hundred dumplings this month alone!

Steamed Crab Dumplings
Since the Year of the Pig rings in tomorrow, I thought I would take a moment to share with you these scrumptiously decadent dumplings I made for family dinner the other week.

Steamed Crab Dumplings
Seester T had requested some type of crab dumplings for her Fam Din menu (more on that soon) so I got to work creating a filling that was truly indulgent and delish.

Steamed Crab Dumplings
Since I wanted the crab to shine, I kept the filling quite simple and only supplemented the shellfish with beech mushrooms and cabbage. I did toy around with the idea of adding water chestnuts because I thought the added texture would be nice. But a quick convo with seestrah N had me doubting it.

Good thing too because I did a quick straw poll at dinner where I found out that most of my fam do not like water chestnuts. Who knew?

Steamed Crab Dumplings
I will also say that this is definitely one of the times that I skipped the dirty work and bought pre-shelled lump crab meat. Who the heck wants to be picking through shells to get a pound of pure, luscious crab meat?!?

I definitely didn’t!

Steamed Crab Dumplings

But it you’re up for it, more power to ya!

ps. I got mine at Costco. The quality is reliable and the price is reasonable.

Steamed Crab Dumplings
Once the filling was made, it was time to assemble. I did a little different fold on these dumplings that made them look like cute little pouches.

Steamed Crab Dumplings
I started off with my tried and true pleated method but then coiled the edges around to seal them up.

I was quite happy with how they looked after they steamed up. ❤

Steamed Crab Dumplings
I suggest serving them with a generous drizzle of my homemade Sichuan oil but even a quick dunk in my soy-black vinegar sauce was delish too!

Steamed Crab Dumplings
I got some solid feedback from the Fam on these so they’ll definitely be making appearances in the future. Added bonus – since the filling is so simple, they were actually quite easy and quick to make.

Though, I’ve got to give Costco some credit there for knocking out a few hours of manual labor. Thanks Costco!

Steamed Crab Dumplings
So with that, dear Friends– Here’s to a wonderful New Year! May yours be filled with health, prosperity, joy and endless Foodventures!

_________________________________________________

Steamed Crab Dumplings
Makes approximately 45-50 dumplings

Ingredients:

2 cups finely chopped Napa cabbage
kosher salt
16 ounces cooked lump crab meat
4 ounces white beech mushrooms, chopped
½ tablespoon finely minced garlic
½ tablespoon finely minced ginger
1 tablespoon Shaoxing wine
2 teaspoons toasted sesame oil
1 tablespoons fish sauce sauce (more, if needed)
½ teaspoon black pepper
50 thin dumpling wrappers
serve with: chopped scallions, sesame seeds, Sichuan oil

Place the cabbage in a colander; sprinkle it with about ½ teaspoon salt and let sit over a bowl for 20 minutes. Wrap the cabbage in a cheesecloth or clean kitchen towel. Squeeze out and discard the excess liquid and place the drained cabbage in a clean bowl.

Add in the crab, mushrooms, garlic, ginger, Shaoxing wine, sesame oil, ½ teaspoon salt, fish sauce and pepper. Taste and add more fish sauce if needed.

Begin assembly of the dumplings. Lay one dumpling wrapper on a flat surface. Dip your finger in water and moisten the edge of the wrapper. Place about 1 tablespoon of the filling in the center of the dumpling skin. Pick up the dumpling, fold it in half and pinch the center together. Starting from the center, make about 4-5 pleats on the right side of the dumpling. Repeat with the left side of the dumpling so that all the pleats point towards the center. Wet one corner of the dumpling and wrap/coil the other end together. Pinch and seal so that it creates an enclosed pouch. Place the dumpling on a baking sheet and continue until all the filling/wrappers have been used.*

To cook, arrange the dumplings in a steamer (lined with cabbage leaves or parchment paper) and steam for 7-8 minutes. Transfer the dumplings to a platter and sprinkle the tops with scallions and toasted sesame seeds. Serve immediately with Sichuan oil or your choice of sauce.

*If you would like to freeze the uncooked dumplings, place the baking sheet directly into freezer for 2-3 hours after you have assembled them. Be sure that the dumplings are in a single layer and are not touching each other. Once the dumplings are frozen, you may transfer them to a sealed container. They can be kept in the freezer for a few months and should be cooked frozen. Add 1-2 additional minutes to the cooking time when steaming.


Appetizers/Small Plates · Seafood

Seafood with Chinese Chive Dumplings

April 2018 Fam Din
Remember these beauties?

They were one of the gajillion dumplings I had made for my Lucasaurus’ bday Fam Din.

It’s only fitting. He’s one of the generals in my Dumpling Army after all.

Seafood & Chinese Chive Dumplings
Since the other dumplings were filled with either pork or chicken, it was a no-brainer that a seafood version had to join the party. I opted for a combo of shrimp and scallops but really, you can use anything you’d like.

And a perfect pairing to seafood are Chinese Chives — also known as Garlic Chives. Chinese Chives have a flavor that is a mix between scallions and onions –and they are HIGHLY aromatic.

Seafood & Chinese Chive Dumplings
I use pre-packaged skins for these Seafood and Chinese Chives Dumplings and prefer the Shanghai style wrappers. I like their thinness and color once cooked.

Pan-Fried Ginger Chicken Dumplings
I usually have a few packages tucked in my freezer for those times when I’m inspired to restock my dumplings stash.

Seafood & Chinese Chive Dumplings

Aren’t they adorable? Like little pouches?

Seafood & Chinese Chive Dumplings
Or like a roly poly?

Delicious — however you see them.

Seafood & Chinese Chive Dumplings
When it’s time to cook them, just line a steamer with either cabbage leaves….

Seafood & Chinese Chive Dumplings
…or sheets of parchment paper with holes cut into them. The holes allow the steam to vent through the levels and cook the dumplings through.

April 2018 Fam Din
After about 8 minutes – voila!

April 2018 Fam Din
Super juicy, plump and perfect when dunked in the soy-vinegar-chili-sesame sauce I’ve included below.

April 2018 Fam Din
Hope you like them! ❤

______________________________________________________________________________
Seafood with Chive Dumplings
Makes approximately 50-75 dumpings

Dumplings:
2 cups Chinese chives, roughly chopped
1 inch piece fresh ginger, peeled and roughly chopped
4 garlic cloves
1 small shallot
1 pound shrimp, peeled and deveined
1 pound scallops
2 tablespoons Shaoxing wine or other preferred rice wine
2 tablespoons soy sauce, more to taste
2 tablespoons fish sauce, more to taste
1 tablespoon sesame oil
½ tablespoon sugar
½ teaspoon ground black pepper
½ teaspoon red pepper flakes (optional)
50-75 Shanghai style dumpling skins
cabbage leaves for steaming (optional)
chopped scallions and toasted sesame seeds for garnish

Dipping Sauce:
4 tablespoons soy sauce
3 tablespoons Chinkiang Black Vinegar
1 tablespoon sesame oil
½ tablespoon sugar
1 tablespoons homemade Sichuan Chili Oil (both the oil and flakes)

Place the chives, ginger, garlic and shallot in a food processor. Pulse several times until all of the ingredients have broken down and become roughly the same minced texture. Add the shrimp and scallops. Pulse until the seafood is chopped but not so much that it turns into a paste – you still want some pieces for texture. Add Shaoxing wine, soy sauce, fish sauce, sesame oil, sugar and peppers. Pulse just until the ingredients have combined. Note: You can also due this all by hand but I love the convenience of using a food processor.

Test the filling for seasoning by taking a small spoonful of the mixture and pan fry in a nonstick skillet for 1-2 minutes on each side. Taste and if needed, add more soy sauce or fish sauce to the uncooked filling.

Begin assembly of the dumplings. Lay one dumpling skin on a flat surface. Dip your finger in water and moisten the edge of the wrapper. Place about 1 heaping teaspoon of the filling in the center of the dumpling skin. Next, choose one of the four following easy methods to seal the dumplings:

  1. Pick up the dumpling, fold it in half into a crescent shape and seal the entire edge by pinching the seam together. These dumplings will lay flat like my Sui Gao. -OR-
  2. Pick up the dumpling, fold it in half into a crescent. Starting from the left side, pleat – fold – and press the edges together, ensuring that you seal the entire dumpling tightly. These dumplings will lay flat but pleated like my Gyoza. -OR-
  3. Pick up the dumpling, fold it in half into a crescent and pinch the center together. Starting from the center, make about 3-4 pleats on the right side of the dumpling. Repeat with the left side of the dumpling so that all the pleats point towards the center. This will create a flat bottom to allow the dumpling to sit upright and form a slight crescent shape like these Pan Fried Dumplings. -OR-
  4. Pick up the dumpling, fold it in half into a crescent shape and seal the entire edge by pinching the seam together. Next, create pleats from the left side all the way to the right side—pinching well to hold. *This is how the dumplings in these photos were folded.

Whichever method you choose, place the filled dumpling on a baking sheet and continue until all the filling/skins have been used. Arrange the dumplings in a steamer (lined with cabbage leaves or parchment paper) and steam for 8-10 minutes.

While the dumplings steam, whisk all of the ingredients together for the dipping sauce and set aside.

Once the dumplings are steamed, transfer to a platter and sprinkle the scallions and sesame seeds on top. Serve immediately with sauce. ENJOY!

*If you would like to freeze the dumplings, place the baking sheet directly into freezer for 4-5 hours after you have assembled them. Be sure that the dumplings are in a single layer and are not touching each other. Once the dumplings have froze, you may transfer them to a sealed container. They can be kept in the freezer for a few months and should be cooked frozen. Add 1-2 additional minutes to the cooking time when steaming the dumplings.*


Seafood

Chawanmushi with Uni and Ikura

March 2018 Fam Din
There are some foods that after one bite, I find myself saying…

“Damn. That’s luxurious.”

And it doesn’t even mean having to use expensive ingredients – though, it definitely doesn’t hurt.

March 2018 Fam Din
A lot of times, that sentiment is evoked for me just based on texture.

Just think about how you feel when you take a bite of crème brûlée. Hopefully, if it is was prepared well, it should be thick and rich with a great mouthfeel. It should make you want to move your mouth around so that the creamy custard hits all of your taste buds and sensors.

March 2018 Fam Din
That’s exactly how I felt the first time I had chawanmushi – a traditional Japanese egg custard. I couldn’t even tell you the name of the restaurant I first had chawanmushi at. All I recall is that it was a tiny little spot we had stumbled into when we were in Osaka years ago. My friends and I didn’t speak a bit of Japanese but had somehow managed to order the most delicious bowls of soba. I guess we amused our host (and the fact that he was incredibly generous) because he brought out several dishes for us to try.

Chawanmushi was one of them.

I recall the bowl was simply adorned with fish cake slices and mushrooms but it was the custard itself that was surprising. It was incredibly light, beautifully silky while having a fresh sea flavor to it.

And that was it.

March 2018 Fam Din
Since then, I’ve enjoyed several variations of it—sometimes with chunks of seafood in the base, sometimes more veggie forward. But always oishi.

At our recent egg themed Fam Din, it was the perfect time make my own chawanmushi. The base of the custard is quite simple to assemble. All we did was combine eggs, seafood stock, dashi and bonito together. And because I’m obsessed with trying to use my sous vide device as much as possible, I put them in little mason jars.

After sealing the jars, I sous vide them at 176 degrees F for an hour. Before serving, we topped each with a sprinkle of Maldon salt flakes, fresh uni, a generous spoonful of ikura and some fresh scallions.

March 2018 Fam Din
Not only did the uni and ikura add to the decadence level and gentle seafood flavor but the little pops from the ikura were a fun little surprise. The Sous Vide Chawanmushi with Uni and Ikura was then served with two different types of Japanese rice crackers (one with wasabi, one without) for some added crunch and texture.

Next time I may add some big chunks of prawns and beech mushrooms to the custard, too. Or maybe even lobster or crab?

Options are endless.

March 2018 Fam Din
Perfect to serve at brunch or as a light appetizer, the beauties are sure to have you and your guests do a little happy food-shimmy.

_______________________________________________________

Chawanmushi with Uni and Ikura
Serves 6

Ingredients:

2 ounces dried bonito shavings
21⁄4 cups seafood stock
2 teaspoons dashi powder
3 large eggs
flaked salt
12 pieces fresh uni (sea urchin)
3-4 ounces fresh ikura (salmon roe)
sliced scallions/chives
serve with senbei (Japanese rice crackers)

In a small pot, combine the bonito shavings and seafood stock. Bring to a simmer and allow the shavings to simmer and steep for 5 minutes. Strain the stock in a bowl and discard the bonito flakes. Stir in the dashi. Allow to slightly cool.

In another bowl, whisk the eggs. You’ll want to ensure the yolks and whites have combined but do so gently as to not create too many bubbles. Pour in about one of cup of the heated broth while gently stirring to combine. Once incorporated and slightly tempered, add the rest of the stock and gently stir.

Divide the custard mixture, pouring through a fine mesh strainer, between six 4-ounce mason jars. Try not to shake or disturb the custard too much as you want to avoid air bubbles. Seal the jars tightly with their respective lids.

Submerge the jars in a secure container of water (pot, food safe bin, etc.)  that has been heated to 176 degrees F. Sous vide the custards at the 176 degrees F temperature for one hour. Once done, carefully remove the jars from the water bath allow to slightly cool. If you prefer not to sous vide, cover each dish/jar and steam for 15-20 minutes.

When it’s time to serve, remove the lids and sprinkle each with a few pinches of salt flakes (we like Maldon for the texture and flavor), 2 pieces of uni, a spoonful of ikura and some scallions/chives. Serve with your choice of senbei on the side.


Adapted from Nomiku blog

Pork · Seafood

Sichuan Wontons in Chili Oil Sauce – Happy Lunar New Year!!!

Sichuan Wontons with Chili Oil Sauce
Friends, today is the beginning of Tết – the Vietnamese Lunar New Year!

As with every new year, I’ve done all the rituals like scrubbed down the house, prepared an altar of traditional Tết goodies and went to the bank to get crisp “new money” to stuff all the bags of lì xì for the munchkins.

Sichuan Wontons with Chili Oil Sauce

Man…I miss the good ol’ days when I was the one collecting stacks of lì xì. Now, Cô Nam just doles out the red envelopes.

Being a grown up is seriously overrated. But at least there’s still all the good food!

Sichuan Wontons with Chili Oil Sauce
Every year I look forward to eating copious amounts of fried Bánh Tét with Dưa Món. Bánh Tét are steamed sticky rice cakes and are cylindrical in shape. Bánh Chưng are essentially the same but are shaped as squares.

The savory ones are filled with pork belly and mung beans. Although they can be eaten just as is, I prefer it fried so the crust is nice and crispy but the interior is still soft. SOOOOO good! And of course, it’s best eaten with a side of Dưa Món – pickled veggies.

Sichuan Wontons with Chili Oil Sauce
Bánh Tét/Bánh Chưng are not something my family make—well, at least not since I’ve been alive!

It’s REALLY a time consuming process and it’s one of those things that if you’re going to go through the efforts to make a few, you might as well make 100. But that would take you foh-evah!

So like most Vietnamese folks nowadays, we buy ours. But we still like to cook other traditional Tết dishes.

Sichuan Wontons with Chili Oil Sauce
But as I’ve gotten older, I’ve started to include some dishes in my yearly rituals that we didn’t grow up eating for Tết. And dumplings definitely top that list!

Sure, our Chinese kin definitely prepare and eat a variety of dumplings as a part of their Lunar New Year traditions. They’re eaten for luck because they symbolize wealth and richness as their shape resembles Chinese gold ingots.

But hey–if it can bring luck and taste delicious, why not adopt the practice, right?

Sichuan Wontons with Chili Oil Sauce
I’ve shared a few of my favorite dumpling versions with you before like:

Sichuan Wontons with Chili Oil Sauce
But for this year’s Tết, I thought I would share with you my Sichuan Wontons with Chili Oil Sauce.

They. Are. So. Dang. Tasty.

But what’s the difference between a dumpling and a wonton?

Honestly I’ve found that the answer changes depending on the person you’ve asked. But generally folks tell me that dumplings are often quite plump and are steamed or pan-fried. Wontons are most often boiled and served in soups or a broth. The wrappers (or skins) are also supposed to be really thin and since they aren’t filled as much as the former, it allows the soup/broth/sauce to stick to the excess dough. That way, you can just slurp them up!

Oh…and some say that wontons only use square wrappers and dumplings use a round shape. But really… you can call them whatever you want —because I’ll take ANY version of them.

Sichuan Wontons with Chili Oil Sauce
These Sichuan Wontons are filled with a 1:1 ratio of pork to shrimp. And unlike my other dumplings, I don’t add much filler other than aromatics. No cabbage, no mushrooms—just protein and few other things.

Why?

Because the co-star of this dish truly is the Chili Oil Sauce that it’s pretty much bathed in. The sauce starts off with my homemade Sichuan Chili Oil. Does it have to be homemade? Well…technically no. But it makes SUCH a difference. And not only is my recipe super easy but it lasts a long time in your fridge!

The chili oil is then combined with soy, Chinese black vinegar (there’s really no substitute for it), sugar and a couple of other items. Simple right? That’s because the homemade oil is so aromatic that it needs very little else!

Sichuan Wontons with Chili Oil Sauce
And if you’re REALLY fiery, after you’ve sauced the wontons, you can add a few extra dollops of the Sichuan Chili Oil everything. You can sure bet that I do—but perhaps dial it down a bit if you’re serving little ones.

There are also several different ways to fold wontons as I’ve shown above but I generally just go for the standard “ingot” fold as I’ve described in the recipe.

Sichuan Wontons with Chili Oil Sauce
And with that dear friends, let Bella and I wish you all Chúc Mừng Năm Mới!!! May the Year of the Dog be filled with happiness, good health, prosperity and endless Foodventures!

ps. Bella believes EVERY year is the Year of the Dog.

________________________________________________

Sichuan Wontons in Chili Oil Sauce
Makes approximately 80 wontons

Ingredients:

For the wontons:
4 scallions
1 inch piece fresh ginger, peeled and roughly chopped
4 garlic cloves
1 small shallot
½ cup fresh cilantro
1 pound shrimp, peeled and roughly chopped
1 pound ground pork
2 tablespoons Shaoxing wine or other preferred rice wine
2 tablespoons soy sauce, more to taste
2 tablespoons fish sauce, more to taste
1 tablespoon sesame oil
½ tablespoon sugar
½ teaspoon ground black pepper
80-100 square wonton wrappers

For the sauce:
4 tablespoons soy sauce
3 tablespoons Chinkiang Black Vinegar
½ tablespoon sugar
4 tablespoons homemade Sichuan Chili Oil (both the oil and flakes)
2 garlic cloves, finely grated
½ teaspoon finely grated fresh ginger
1 tablespoon minced scallions

For garnish:
chopped fresh cilantro
chopped scallions
toasted sesame seeds

Place the scallions, ginger, cloves, shallot and cilantro in a food processor. Pulse several times until all of the ingredients have broken down and become roughly the same minced texture. Add the shrimp and pulse until everything has combined and the shrimp has turned into somewhat of a paste. Add the pork, Shaoxing wine, soy sauce, fish sauce, sesame oil, sugar and pepper. Pulse just until the ingredients have fully combined.

Test the filling for seasoning by taking a small spoonful of the mixture and pan fry in a nonstick skillet for 1-2 minutes on each side. Taste and if needed, add more soy sauce or fish sauce to the uncooked filling.

Begin assembling the wontons. Place one wonton wrapper down on a flat surface so that it points towards you. Dip the tip of your finger into water and moisten the top two edges of the wrapper. Place about 1 heaping teaspoon of the filling in the center of the wonton wrapper. Fold the bottom corner (the one nearest you) over the filling so that it meets the top point and forms a triangle. Press down to seal the edges of the triangle while pressing out any air that may have been trapped inside. Add a dab of water to the two outer corners of the triangle and fold in so that they meet. Press corners together to firmly seal. Place the wonton on a baking sheet and continue until all the filling/wrappers have been used.

Prepare the sauce by whisking all the ingredients together in a bowl until the sugar has dissolved. Set aside.

Bring a large pot of water to a boil. Add the wontons to the pot (no more than a dozen or so at a time) and lower the heat so that it’s at a steady but not rapid boil. Constantly stir so that they do not stick together. Allow the wontons to cook for about 3 minutes or until the wrappers become translucent and the filling has cooked through. Use a large slotted spoon or kitchen spider to remove and drain the wontons. Transfer to a serving dish and spoon the sauce over the wontons. Garnish with scallions, cilantro and sesame seeds. Serve immediately.

Seafood

Tomato-Fennel Mussels

Mussels

Tomato-Fennel Mussels.

Let me tell you, Folks. This is the kind of dish that I want to enjoy a big ol’ bowl of while sitting on my balcony …. watching the ocean waves roll onto the sand with the sun just barely setting. Oh–and of course with a fantastic chilled glass of Sancerre in hand.

Perfection, right?

September 2017 Fam Din

Only problem is–although the beach is just a short bit away, there are a bunch of pesky buildings and homes blocking my view. How inconsiderate of them, right?

Oh….and I also don’t have a balcony.

So instead, I’ll just sit on the living floor while diving into this scrumptious bowl of mussels and watch whichever show I’m binge-watching on Netflix at the moment.

Pretty much the same right? Just splitting hairs, really.

September 2017 Fam Din
I love making mussels. They’re super easy and quick to whip up for guests or if you’re dining solo. And as far as seafood goes, they’re a great bang for your buck!

I usually make Spicy Mussels in White Wine or Belgian Beer Mussels with Frites as they’re both so low maintenance but these Tomato-Fennel Mussels really do bring such a different profile. Just as easy but the addition of the fennel, crushed tomatoes and clam juice create a rich and an intensively flavorful sauce–particularly when the liquor of the mussels join the party. They smell divine while bubbling away and are perfection when you serve it with toasted baguette or ciabatta to soak up all that goodness. In fact, the sauce is thick enough (but not too thick) that it can be served over linguine or other long stranded pasta.

Whatever the setting you end up having these mussels at, you’re going to love them!

ps. And if you’re anything like my Seestrah, add a few threads of saffron when you pour in the tomatoes. She’s fancy like that! ❤

__________________________________________

Tomato-Fennel Mussels
Serves approximately 4-6

Ingredients:

1 small fennel bulb with fronds
2 tablespoons olive oil
2 tablespoons unsalted butter
½ cup diced white onions
1 tablespoon minced garlic
1 teaspoon red pepper flakes
½ cup dry white wine
1 8-ounce bottle clam juice
1 28-ounce can San Marzano tomatoes, crushed
4-5 fresh thyme sprigs
2 dried bay leaves
5 pounds black mussels, scrubbed and debearded
kosher salt
¼ cup chopped fresh parsley

Cut the fennel bulb from the stalk, reserving the fronds. Dice the bulb and roughly chop the fronds. Set aside separately.

Heat a large, heavy bottom pot over medium heat. Add the olive oil, butter and swirl around the pot. Once the oil begins shimmering and the butter has melted, add in the onions and chopped fennel bulb. Stir and cook for 4-5 minutes until softened but not browned. Add the garlic, red pepper flakes and cook for an additional minute until fragrant. Pour in the wine and allow the liquids to come to a boil. Keep stirring until the wine nearly evaporates.

Pour in the clam juice and can of crushed tomatoes with its juices. Stir in the thyme sprigs and bay leaves. Partially cover the pot and allow everything to come to a rolling boil. Reduce the heat to low and simmer the ingredients for 10-15 minutes stirring once or twice during that time.

Uncover the pot and turn up the heat to medium. Once the items starting bubbling, add in the mussels. Stir a few times so that they become coated in the tomato sauce and place the lid back on the pot. Allow the mussels to steam for 5-7 minutes until they have all opened.

Remove the lid, stir the mussels around a few times and taste the sauce. Add additional salt as necessary. Discard of the thyme stems and bay leaves. Fold in the fresh parsley and half of the chopped fennel fronds. Transfer the mussels and the sauce into a large serving dish. Garnish with the remaining fennel fronds and serve with warm bread.

Seafood

Decadently Creamy Risotto with Pan Seared Garlic Shrimp and Peas

Shrimp & Peas Risotto
I know, I know.

I already have a Shrimp Risotto recipe posted on the blog. And it’s wonderful, tried and true.

But y’all…it’s not THIS Shrimp Risotto.

Shrimp & Peas Risotto
Because as much as the other one was delicious, I really kicked it up a few notches with this Creamy Risotto with Pan Seared Garlic Shrimp and Peas.

Shrimp & Peas Risotto

Like most situations, I just can’t leave things be.

I’m constantly tweaking recipes. Sometimes out of necessity because I’m missing an ingredient or two and sometimes because I just want to change things up.

Shrimp & Peas Risotto
So what did I do different?

A few things like use shallots and leeks. But the big game changer was the addition of peas and heavy cream.

Shrimp & Peas Risotto
My usual risottos are rich and creamy just by nature of the slow cooking and constant stirring of the rice to release the starches. But this particular day, I wanted things extra decadent and added a few splashes of heavy cream at the end.

Shrimp & Peas Risotto
How did it turn out?

Freaking brilliantly.

Shrimp & Peas Risotto

Velvety perfection.

And the peas added a nice punch of freshness and texture.

Shrimp & Peas Risotto

It makes me happy just looking at it.

But of course, I’m even happier inhaling it. ❤

___________________________________________________

Creamy Risotto with Pan Seared Garlic Shrimp and Peas
Serves 4

Ingredients:

1 pound large shrimp, peeled and deveined
2 tablespoons minced fresh garlic, divided
1 teaspoon red pepper flakes, divided
2 tablespoons fresh thyme leaves, roughly chopped
sea salt
black pepper
3 tablespoons olive oil, divided
1 tablespoon unsalted butter
½ cup chopped shallots
1 cup chopped leeks, white and light green parts
4-5 cups seafood stock
1 cup Aborio rice
½ cup dry white wine
1 cup frozen peas
½ cup heavy cream
⅓ cup parmesan cheese, grated or shredded
additional fresh thyme to garnish

Combine the shrimp, 1 tablespoon garlic, ½ teaspoon red pepper flakes, and 1 tablespoon thyme leaves. Season with salt, pepper and place in the refrigerator covered for 30 minutes.

Heat 1 tablespoon olive oil in a skillet over medium-high heat. Add the shrimp. Cook for 1-2 minutes on each side until opaque. Remove the shrimp from the skillet. Chop half of the shrimp into large chunks while leaving the other whole. Cover and set aside.

In a heavy bottomed pot, heat remaining olive oil and butter of medium heat. Add the shallots, leeks and cook until tender and translucent.

While the aromatics cook, place the stock in saucepan and bring to a low simmer. Keep the stock simmering on the back of the stove.

Once the shallots and leeks have cooked for 5-6 minutes, add in the remaining garlic, red pepper flakes and thyme. Cook for 1-2 minutes and add the rice and stir until it is well-coated and opaque.  The rice may begin to slightly crackle as it lightly toasts. Pour in the wine and stir until it has nearly evaporated.

Ladle in about 1 cup of the heated stock. Cook and continue stirring the rice until it has nearly absorbed all the liquid. Add the remaining stock, about 1 cup at a time—stirring well in between each addition. Take care to allow the rice to absorb each addition of stock before adding more. You may not need all 5 cups as the risotto should be slightly firm and creamy once done. This process takes approximately 25 minutes.

When the risotto is done, pull it off the heat and stir in the heavy cream, chopped shrimp, peas and Parmesan cheese until fully incorporated. Taste and adjust with additional salt and pepper as needed. Plate each dish with a portion of the risotto topped with the remaining whole shrimp and additional thyme. Serve immediately.

Seafood · Soups/Stews

Our Seafood Cioppino – Happy Birthday Mom!!!

sc043618b9

Today is our Mama’s birthday and although it’s been 10 years since she’s been with us, not a day goes by when we don’t miss or think of her.

sc043f02bf
That fiery spirit that her daughters and granddaughters inherited……

sc0435a1b7
That deep sense of family, love and loyalty……

sc012f9acd01
The affinity to talk to strangers and win them over in minutes….

MomandDad
That strong “will” (yes…I was trying not to say stubborn)…..

New Brighton
And that love to cook and explore new cuisines.

Kids
Of course there are dishes that I cannot help but miss her dearly when I make them. Like Thịt Kho Trứng (Vietnamese Caramelized Pork and Eggs), Thịt Bò Xào (Stir-fried beef), Mì Quảng (Turmeric Noodles) or even Korean Chap Chae —all dishes I used to ask her to make for me.

But then there are dishes like Seafood Cioppino, that although wasn’t her own, has now become a staple among my siblings every time we want to celebrate Mom.

River
At least a dozen years ago when I lived in San Jose, Mom came to visit me and sister P who lived in San Francisco. We spent the time walking around the city, shopping, and eating everything possible. And one night for dinner, P and I decided to make her a decadent, quintessential San Franciscan dish–Seafood Cioppino.

Mom and Nam
Cioppino is a seafood stew that originated in the Italian American communities of SF. It layers tons of aromatics with wine and tomatoes to make a fragrant stock. A variety of seafood is then cooked in the stock –which then deepens in flavor from the juices of the shellfish and seafood.

It’s incredible and we knew Mom would love it.

momanddad

While P and I spent hours in the kitchen that late afternoon charring the peppers, sauteing the veggies, simmering the stock, and cleaning all the seafood we had scored on Clement Street, Mom sat at the table watching us. She kept asking what we were doing—-and then, what we were going to next. Then she would say that we were going to a lot of trouble just for one dish.

But honestly, I think of everything we did during that visit, she loved that day the most. Chatting with her daughters while they cooked and fussed over her.

Of course, she loved the Seafood Cioppino too!

And can we just say how fabulous Mama was sitting in her satin pajamas, wearing her black Tahitian pearls while digging into a big ol’ bowl of Seafood Cioppino??

Fancy.

Shortly after Mom passed, I made a photobook for my family that included old pictures and our favorite recipes from her. And soon after, that one dish P and I made that one SF visit became “Mom’s Cioppino”—something that is lovingly made many times a year since.

Cioppino

I’ve posted tons of pics on Instagram and Facebook of our Seafood Cioppino and often get requests for the recipe. Whether it was too personal or maybe it was still too “soon”–I just wasn’t willing to share it yet.

Cioppino
After all of the years, it doesn’t get “easier” and I still miss her so much. But these days, I am able to share more things about her and now it’s rather perfect to share with you all this dish on her birthday.

Yes, there are many steps with the Cioppino and it does take some time —but the good news is, nothing is really difficult. And it’s the perfect dish to share with your loved ones when you can spend the day together in the kitchen making memories.

I hope you love it as much as we do.

Cioppino
We love you Mama and Happy, Happy Birthday!

______________________
Seafood Cioppino

Serves 8

Ingredients:
Stock
2 red bell peppers
½ red jalapeno pepper
5 Roma tomatoes, halved
olive oil
1 medium sized white onion, diced
2 celery ribs, diced
1 fennel bulb, diced
2 large garlic cloves, smashed
¼ teaspoon red pepper flakes
1 750mL bottle white wine, such as a Sauvignon Blanc or mild White Blend
5 standard tomatoes (Mexican or Florida tomato), coarsely chopped
1 8oz bottle clam juice
½ cup tomato juice
1 bay leaf
1 teaspoon whole black peppercorns
sea salt
20 sprigs fresh thyme
6 springs fresh parsley
8 sprigs fresh tarragon
½ teaspoon saffron threads

Seafood (or a medley of your favorites)
2 dungeness crabs, washed and quartered
2 lobster tails, quartered
2 pounds mussels, debeared and scrubbed
2 pounds manila clams, scrubbed
1 pound firm white fish, such as halibut or mahi, cut into 1½ inch cubes
1 pound shrimp, deveined and shell intact
1 pound sea scallops, if they are large—cut them in half
½ pound calamari, cut into 1-inch rings

Garnish
chopped fennel fronds and parsley

Turn your oven broiler on. Place bell peppers, jalapenos and Roma tomatoes on a rimmed baking sheet and coat with olive oil. Broil the vegetables for 5-7 minutes, using tongs to rotate frequently until the peppers have charred and the skin has bubbled. Transfer the vegetables to a large bowl and cover securely with plastic wrap. Set aside for 20 minutes to allow the vegetables to steam.

Peel the skins off the peppers and discard along with the stems and seeds. Next, peel and discard the skins of the Roma tomatoes.

Place a large stock pot or dutch oven over medium heat on the stove. Add 2 tablespoons olive oil and allow the oil to begin to slightly shimmer. Add the onions, celery and fennel inside the pot and cook until they have softened and become translucent—you do not want them to brown. Add the garlic, red pepper flakes and cook for an additional minute until fragrant. Pour in the wine and allow the liquids to come to a boil. Add the roasted peppers, Roma tomatoes, chopped fresh tomatoes, clam juice and tomato juice. Add the thyme, parley, tarragon, bay leaf, ½ tablespoon sea salt and peppercorns. Allow the liquids to come a rolling boil, lower heat and simmer, partially covered for 1½-2 hours. The liquids will nearly have reduced by half.

Pass the stock to a fine strainer and discard the vegetables and aromatics. Pour the stock into a large clean pot, add the saffron threads and lower the heat to a simmer for several minutes to allow the saffron to bloom and flavor the stock. Taste the broth and add additional sea salt as needed. Bring the stock back to a boil and add in the crab and lobster—cover and cook until the shells have become pink and the flesh becomes almost fully opaque. Stir in the clams, mussels and cover the pot. Allow them to cook for about 2 minutes until they just begin to open. Gently stir in the shrimp, fish, calamari and allow them to cook over a simmering heat—avoid cooking the fish in a rapid boil as they will get tough. Once the last seafood items turn opaque, taste the broth again and adjust with additional sea salt and pepper as needed.

Ladle the seafood into a bowl and pour the hot broth over it. Sprinkle with chopped fennel fronds, chopped parsley and serve immediately with warm bread.

Enjoy!

Note: This stock can definitely be made ahead of time so double or triple the batch and keep some in your freezer for a chilly night!