Poultry

Our Adventures with Howard the Smoked Peking Duck

Smoked Peking Duck
Before I get started, let me caution those that get wary about seeing protein in its “whole” state because this recap will show the entire duck (sans feathers) during the cooking process. If that freaks you out, maybe skip this one and just wait until my next post.

We good?

Cool.

Smoked Peking Duck
One of my favorite things about spending a big chunk of time with the family over the holidays is that we notoriously tackle the more challenging Foodventures that we’ve previously deemed extremely laborious or too daunting to try. I’m talking about things like start-to-finish-Tamales, Xiao Long Bao and the time V created an homage to one of their favorite dishes from Flushings ChinatownSteamed Glutinous Rice with Crab in Lotus Leaves.

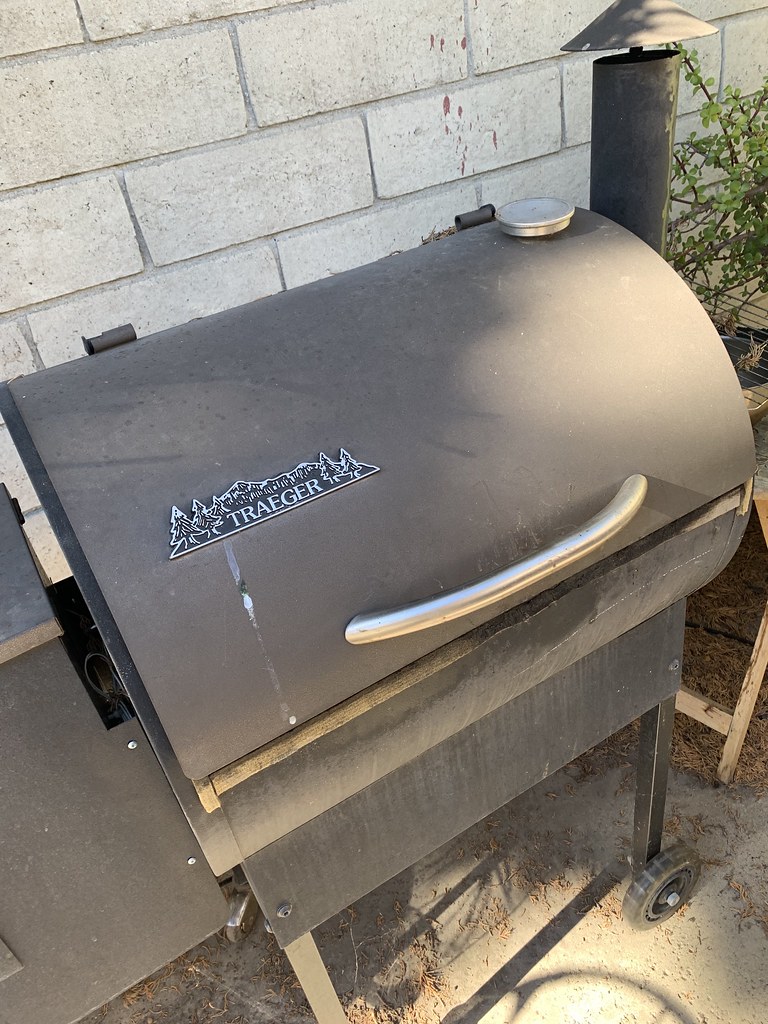
This past holiday break was no exception as Brother and I took a spin at making Peking Duck for the first time using his Traegar smoker. Yes, the decision was made after consuming a few bottles of wine….but aren’t those the best times to make choices?

No? Just us?

Smoked Peking Duck
Luckily, V & L had discovered a FANTASTIC tutorial by BBQ Champion, Harry Soo, on YouTube that we followed to the “t”.

Fun fact: Harry, who is behind Slap Yo Daddy BBQ, lives in Diamond Bar where 4 out of 5 of us sibbies graduated high school – Go Brahmas!

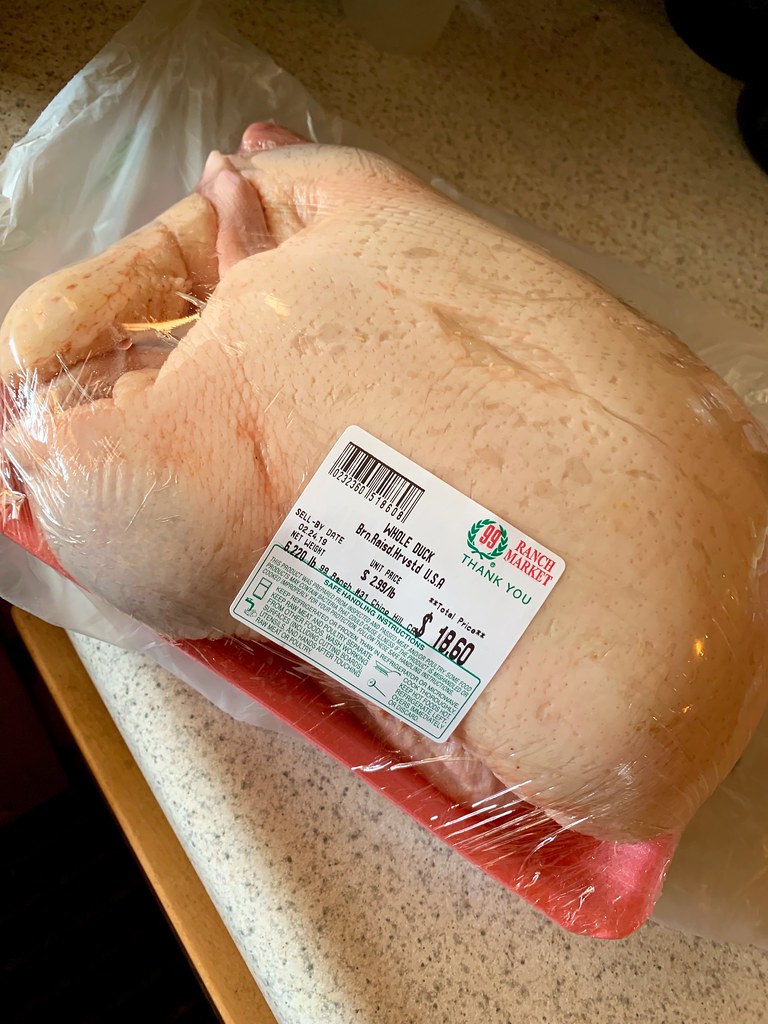
The day of our Peking Duck undertaking, we popped into 99 Ranch Market to pick up some of the essentials that started with a 6 pound whole duck. I removed its wing tips and feet with a large cleaver and then slowly used my fingers to lift and separate the skin from the meat.

Smoked Peking Duck
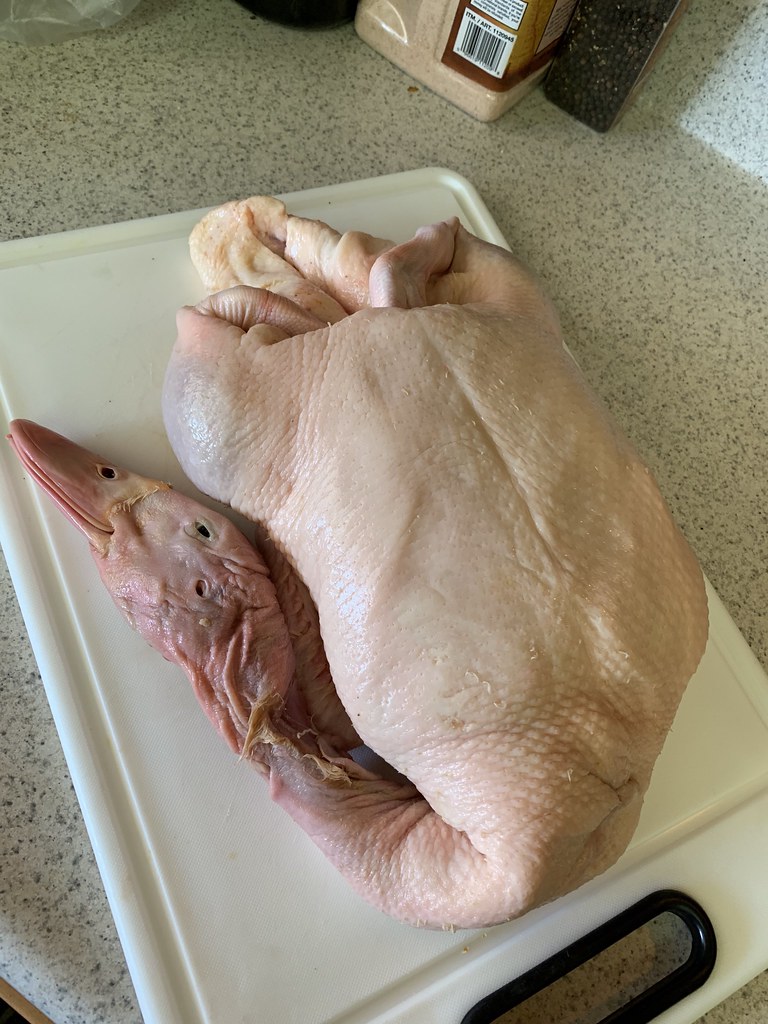
With Peking Duck, it’s all about spending LOTS of TLC on the skin to create a crisp and glossy finish. Even after using your fingers to loosen the skin, the pros will then use an air compressor to detach the skin so that when the duck cooks, the fat will slowly melt away.

And if the pros tell us to do so, we’re gonna try it! Particularly since V happens to have an air compressor! So he switched out the tubing and rigged a straw to be used as the nozzle — and we were then off to the races!

Easily the CRAZIEST thing I’ve ever done in the “kitchen”.  Brother and I were cracking up the entire time but it totally worked!

It’s how we bond.

Smoked Peking Duck
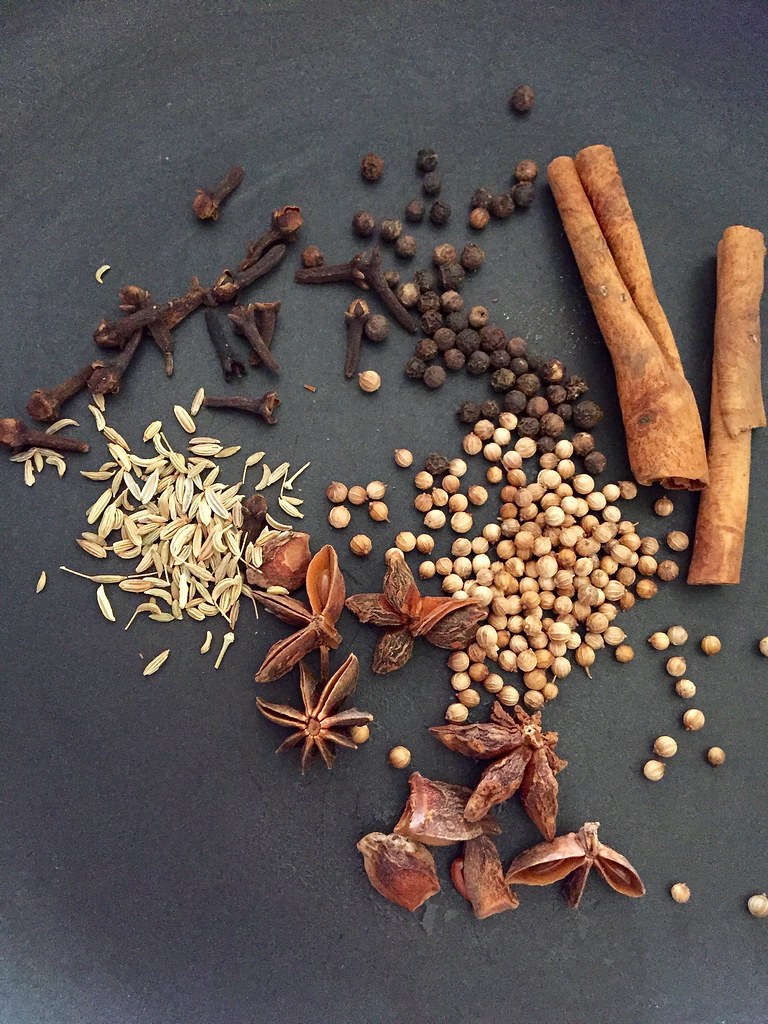
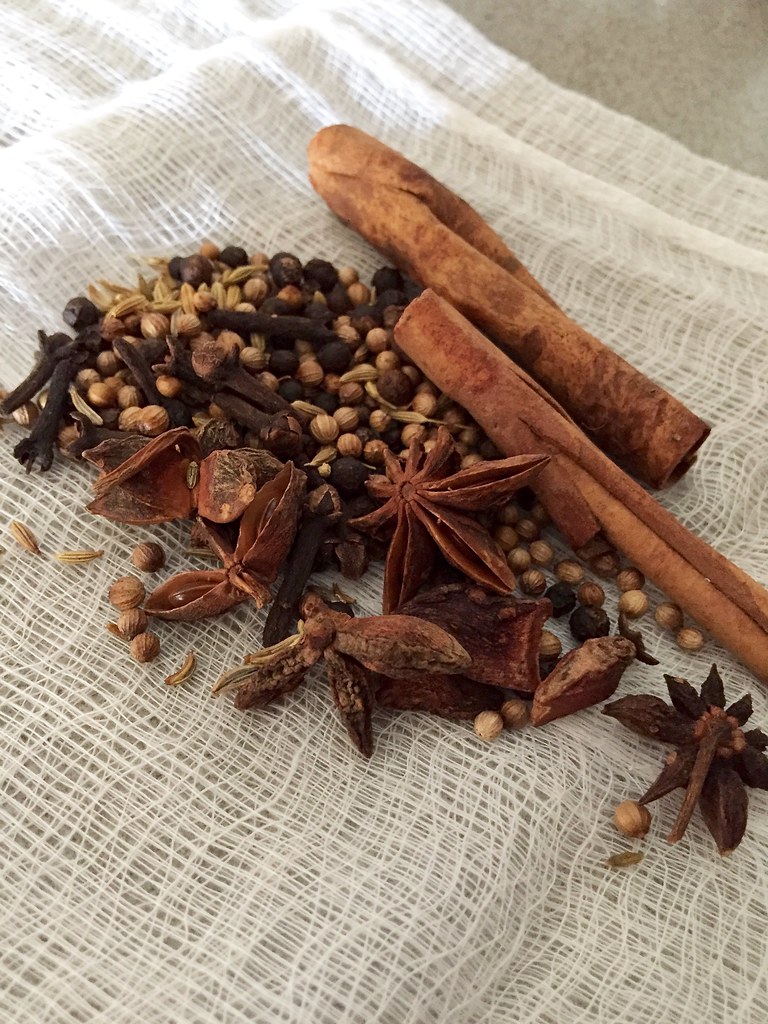
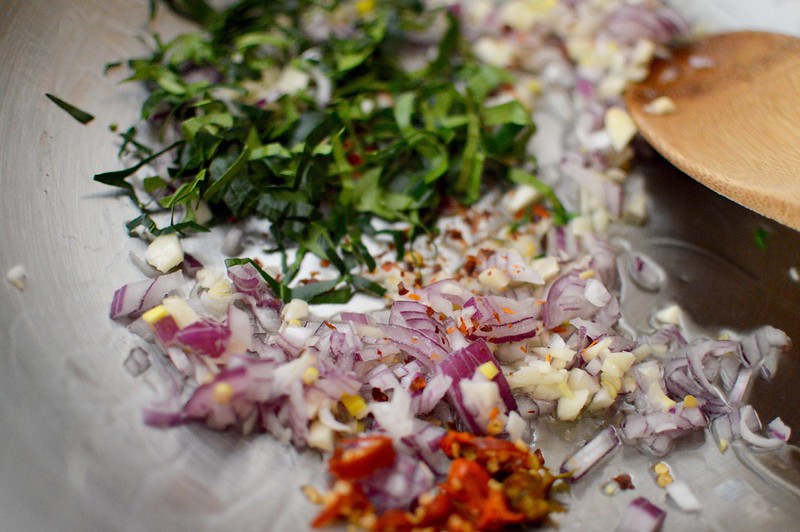
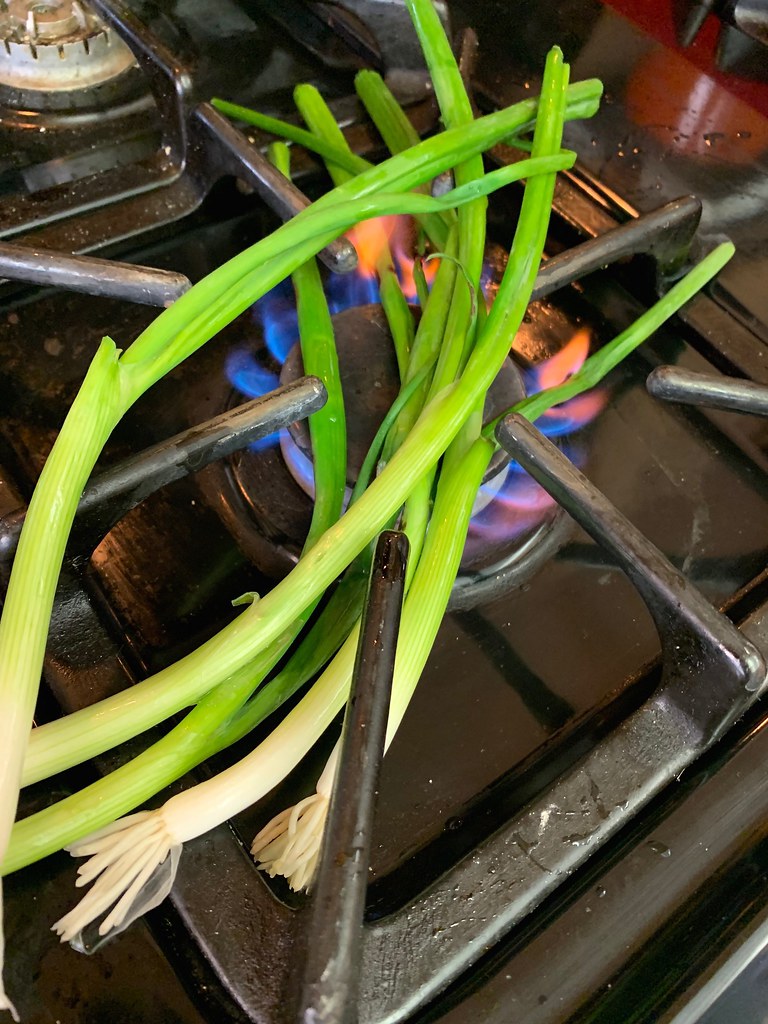
While V finished blowing Howard up (yes, I named him — and yes, it’s after the 80s alien duck movie), I charred the scallions and ginger as well as toasted whole star anise and coriander.

Smoked Peking Duck
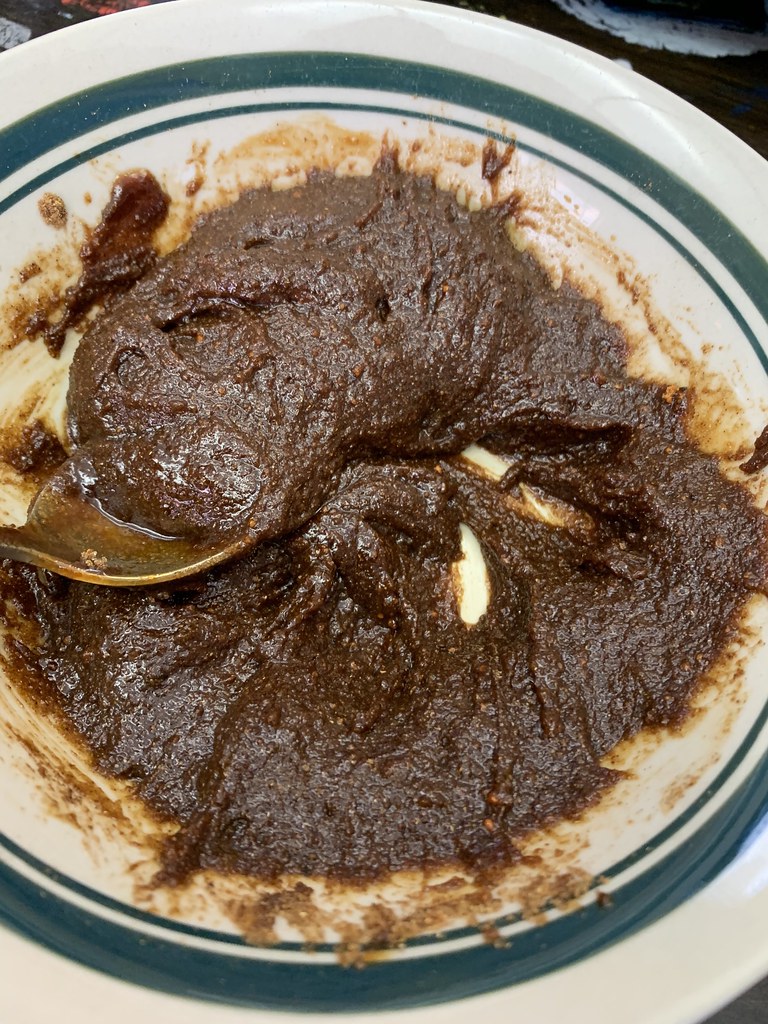
I also mixed up the marinade for the cavity which included five spice powder, brown sugar, hoisin and a grilling spice mix.

Smoked Peking Duck
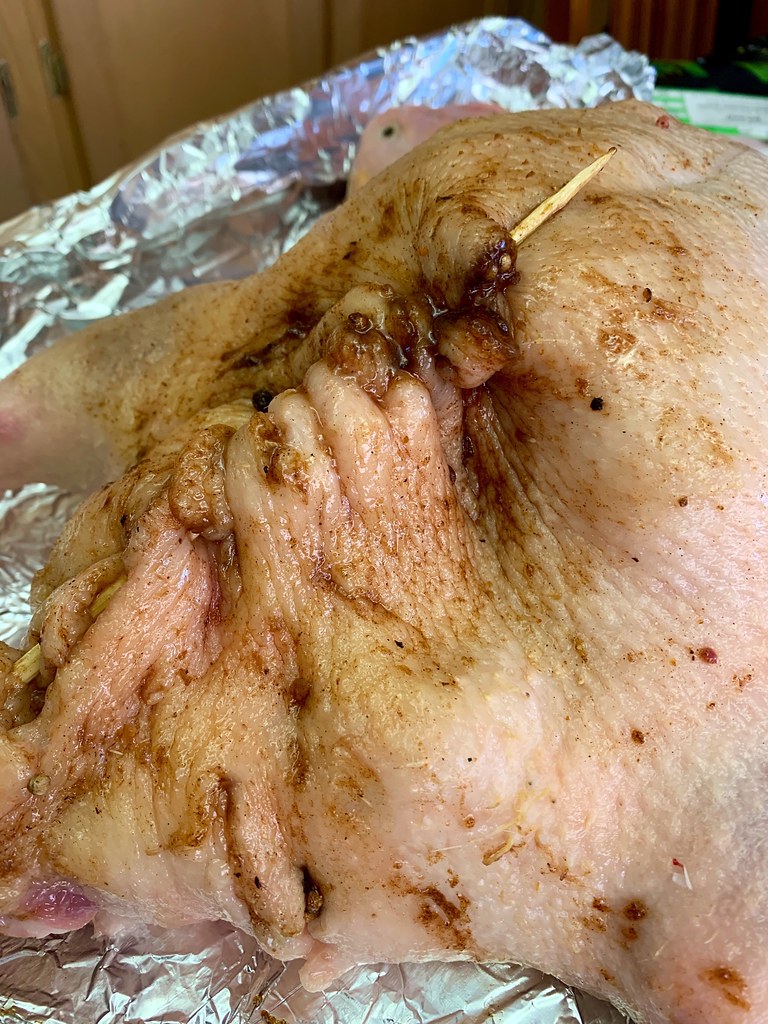
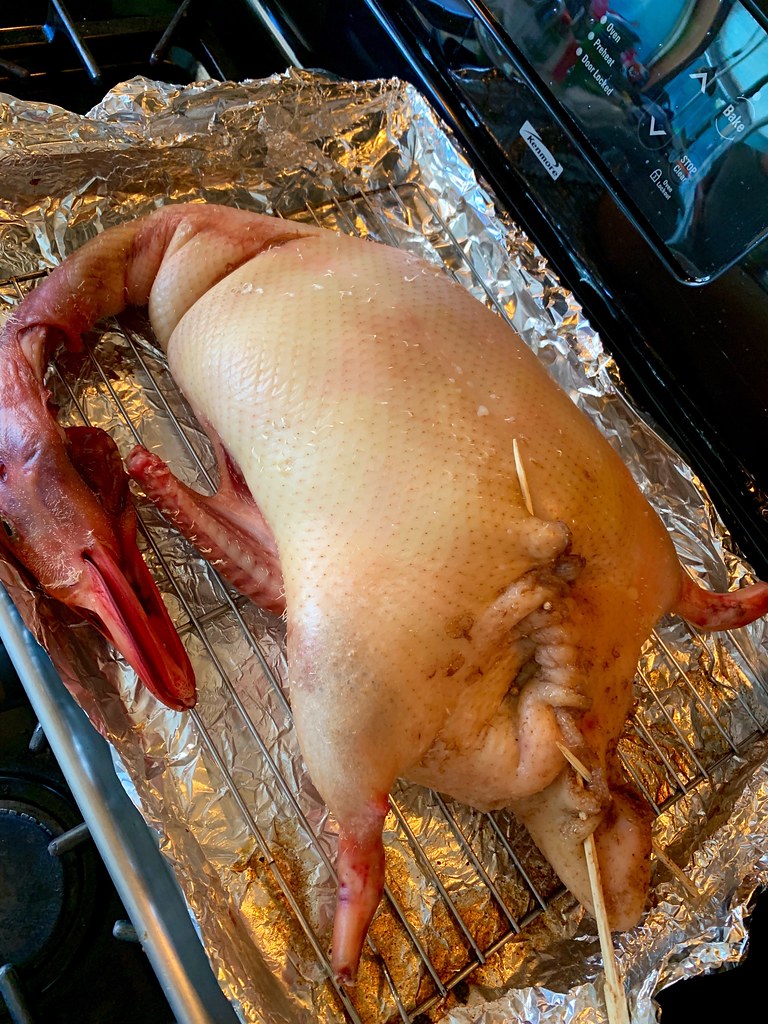
After we stuffed Howard with everything listed above, V stitched him up.

Smoked Peking Duck
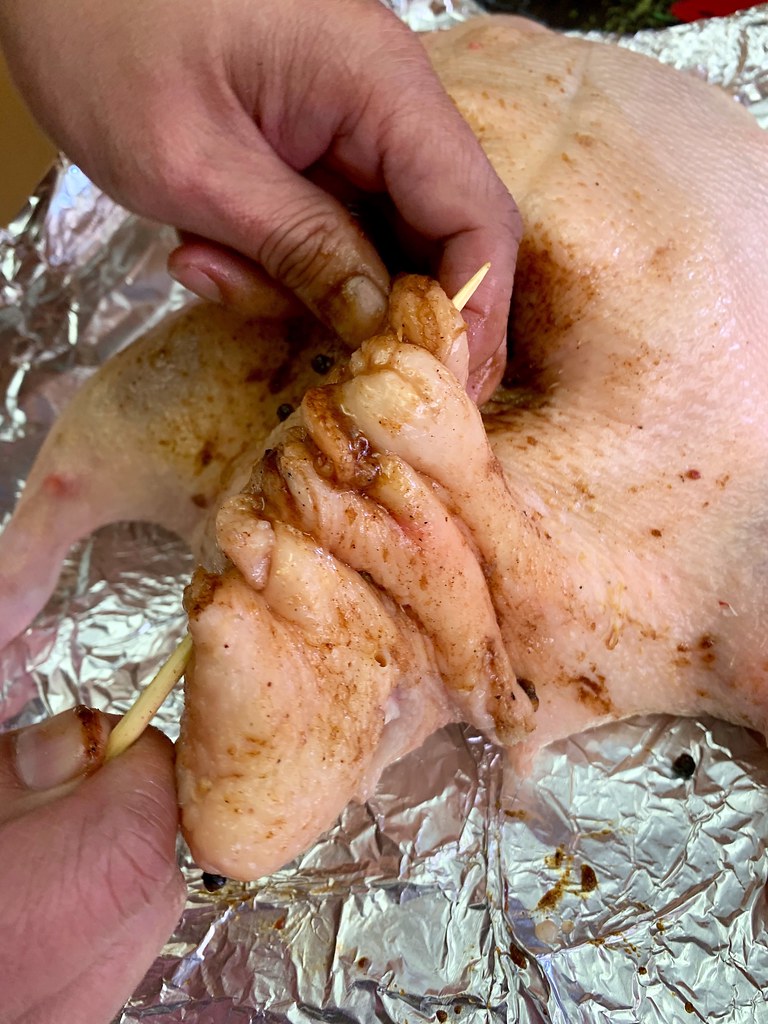
Harry Soo calls this a “spiral stich”.

V couldn’t find a wooden skewer to use, so he whittled a wooden chopstick down. Quite industrious I thought and it definitely did the job!

Smoked Peking Duck
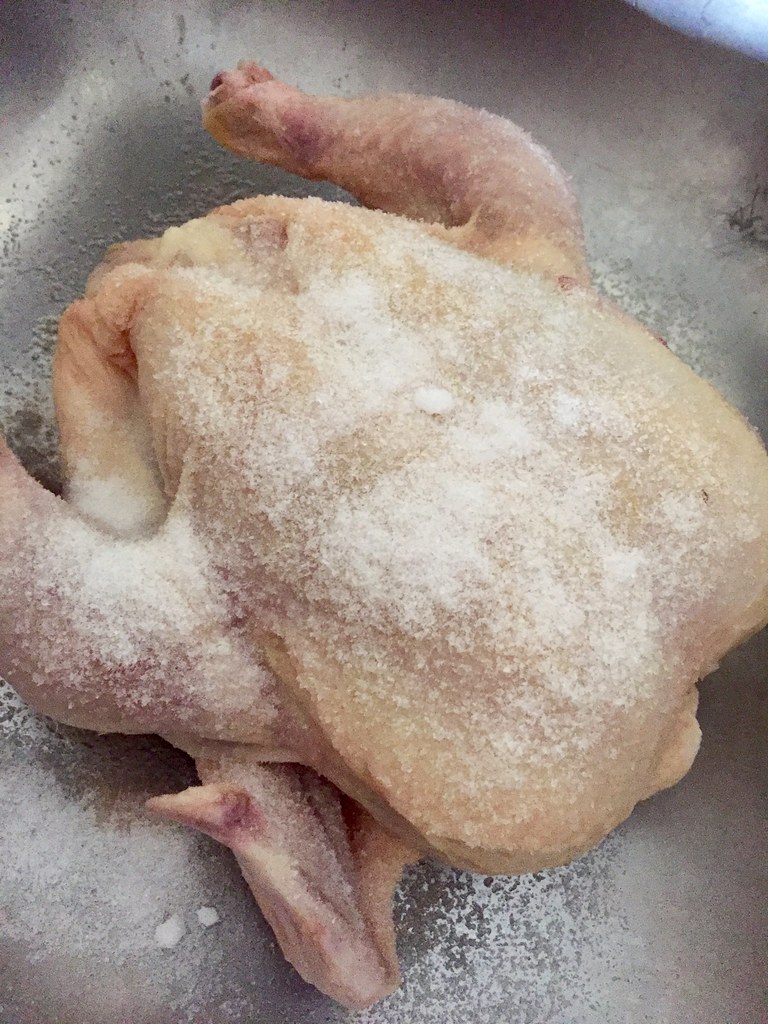
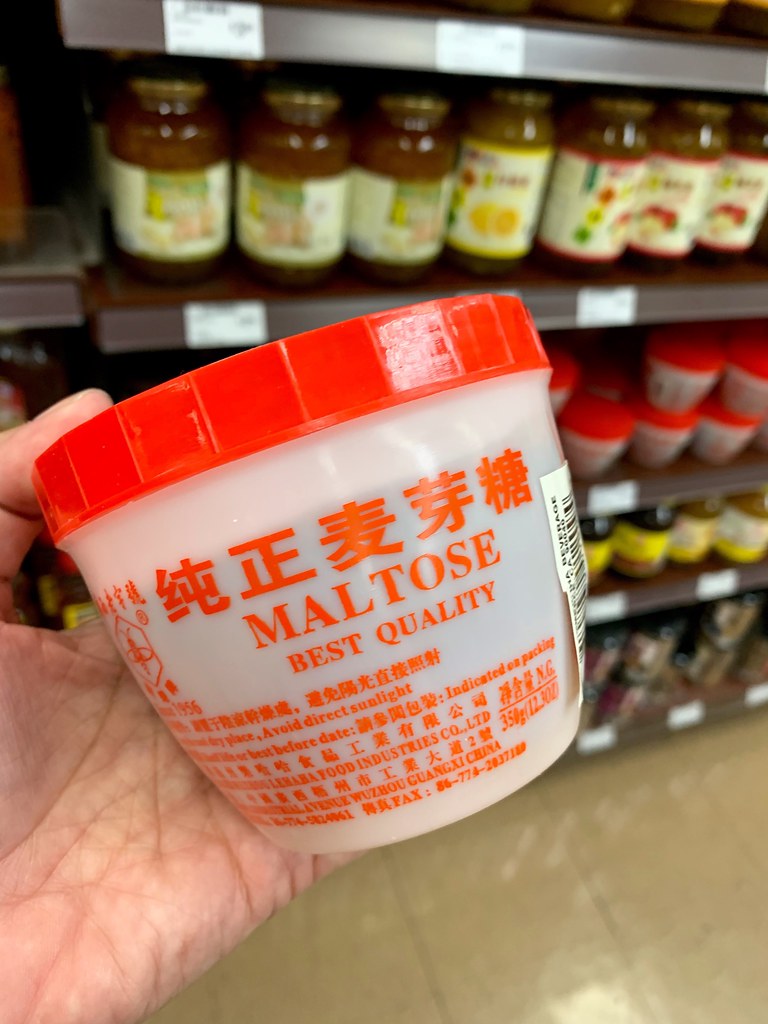
While Brother stitched up Howard, I brought a big pot of water to a boil that included honey, apple cider vinegar and maltose. Maltose is malt sugar and can be found in tubs as shown below at most Chinese/Asian grocery stores. Check the aisles with the honey and jams.

The maltose helps give the duck a nice sheen and color.

Smoked Peking Duck
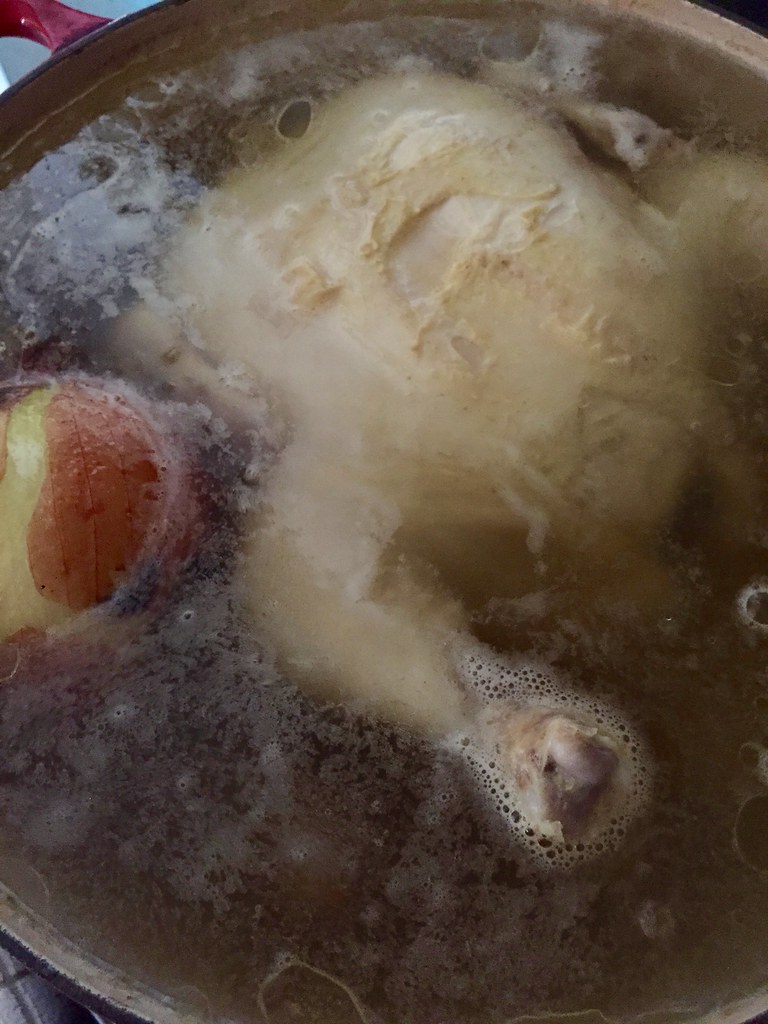
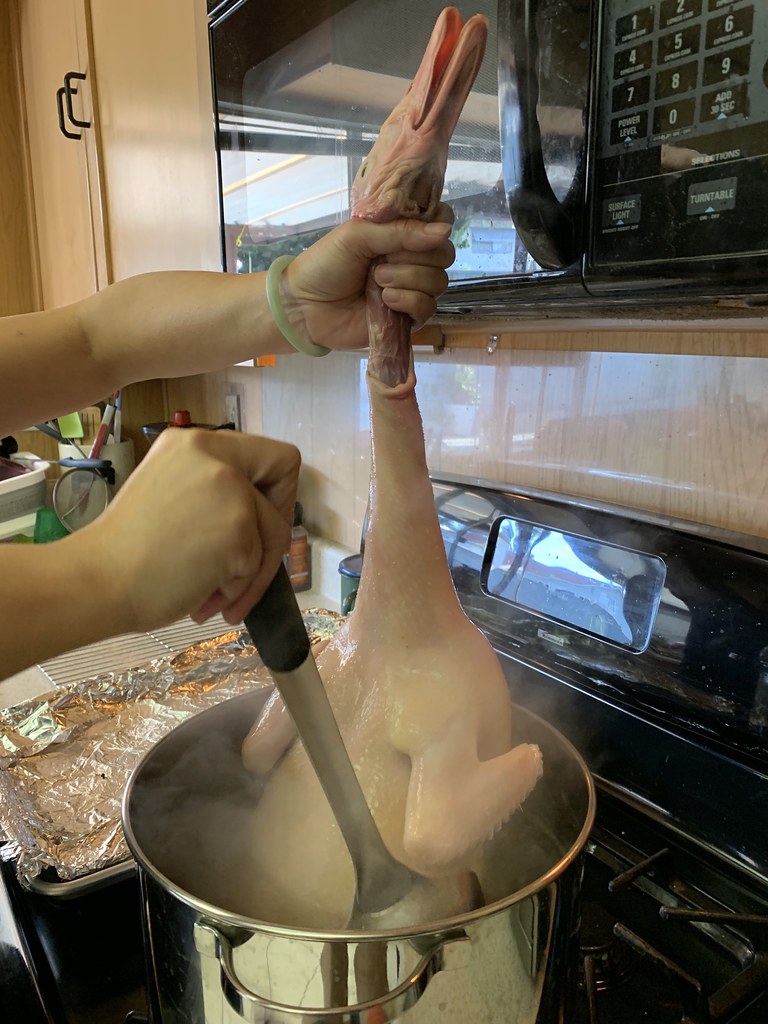
Then it was time for Howard to take a little dip in the jacuzzi.

Okay….I admit, it looks a bit savage but just trust the process.

(ps. I did thank Howard for his sacrifice before we started everything….seemed like the right thing to do at the time.)

Smoked Peking Duck
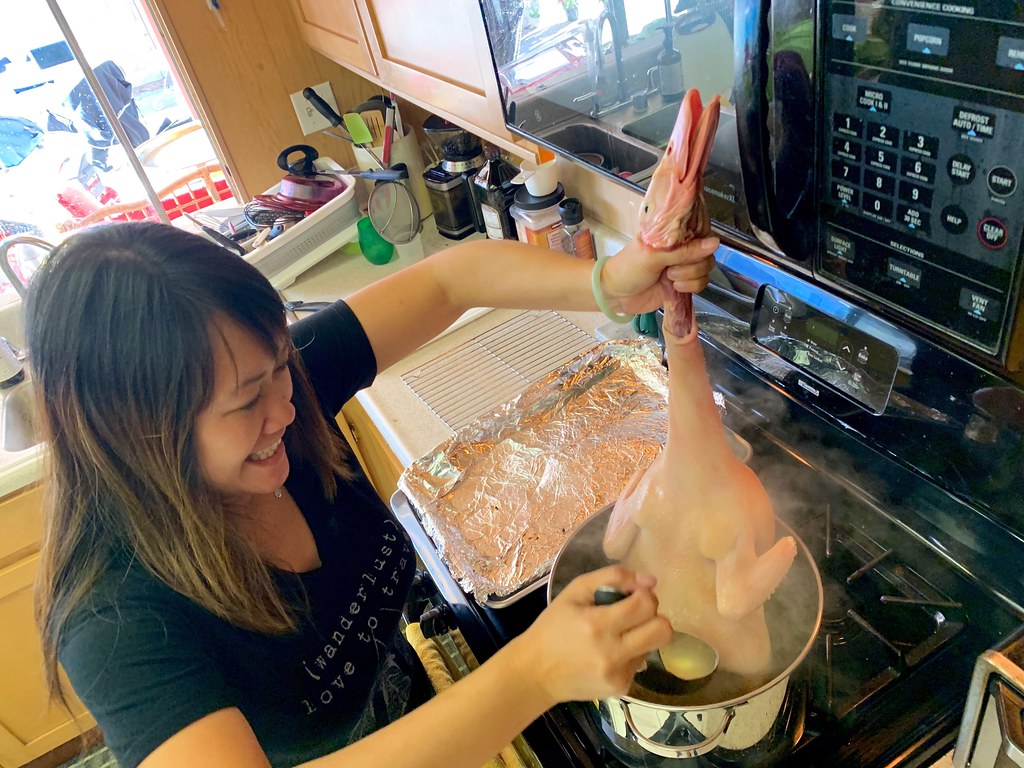
I ladled the boiling liquid over the skin for a few minutes until it tightened and firmed up.

You don’t want to cook the duck but you want to make sure that it’s evenly coated. Again, this dish is all about LOTS of TLC for the skin.

Smoked Peking Duck
Once the duck was sufficiently scalded, it was placed on a rack over a sheet pan and went directly into the fridge (uncovered) for 3 days for the skin to dry out.

Smoked Peking Duck
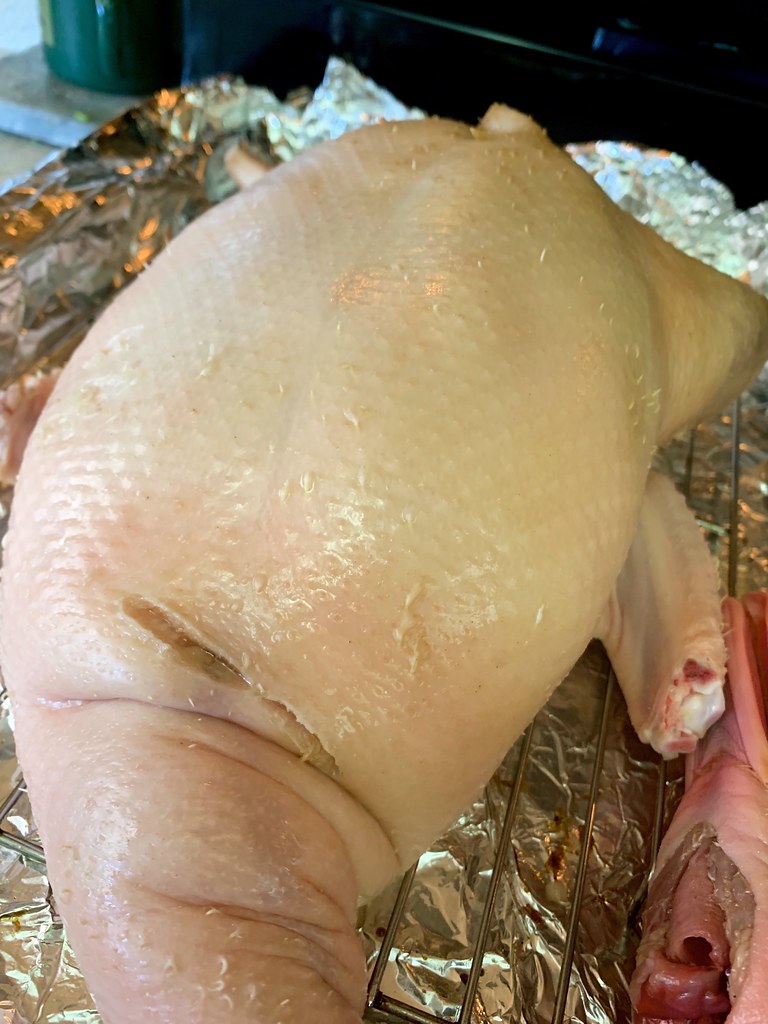
Three days later (Hey–I never said this was quick), we were left with this. The skin was definitely dried and darkened in color – just what we wanted.

Smoked Peking Duck
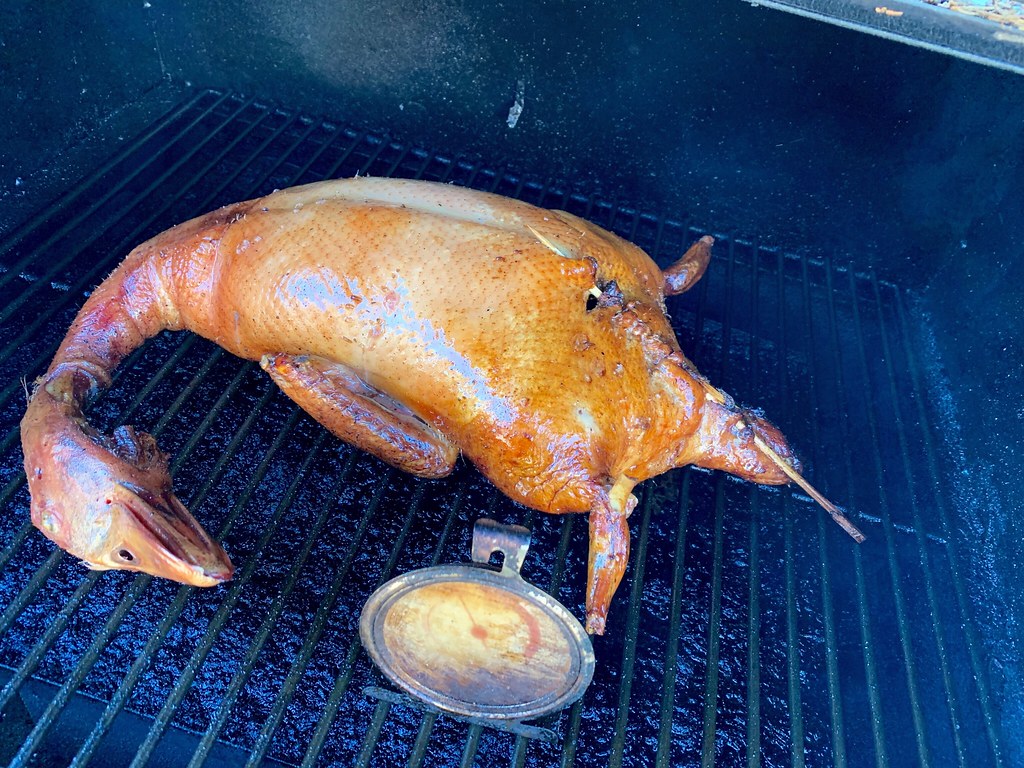
V then fired up his smoker to 350 F degrees with soaked apple and hickory wood.

Smoked Peking Duck
He then proceeded to smoke the duck for about 70ish minutes.

Smoked Peking Duck
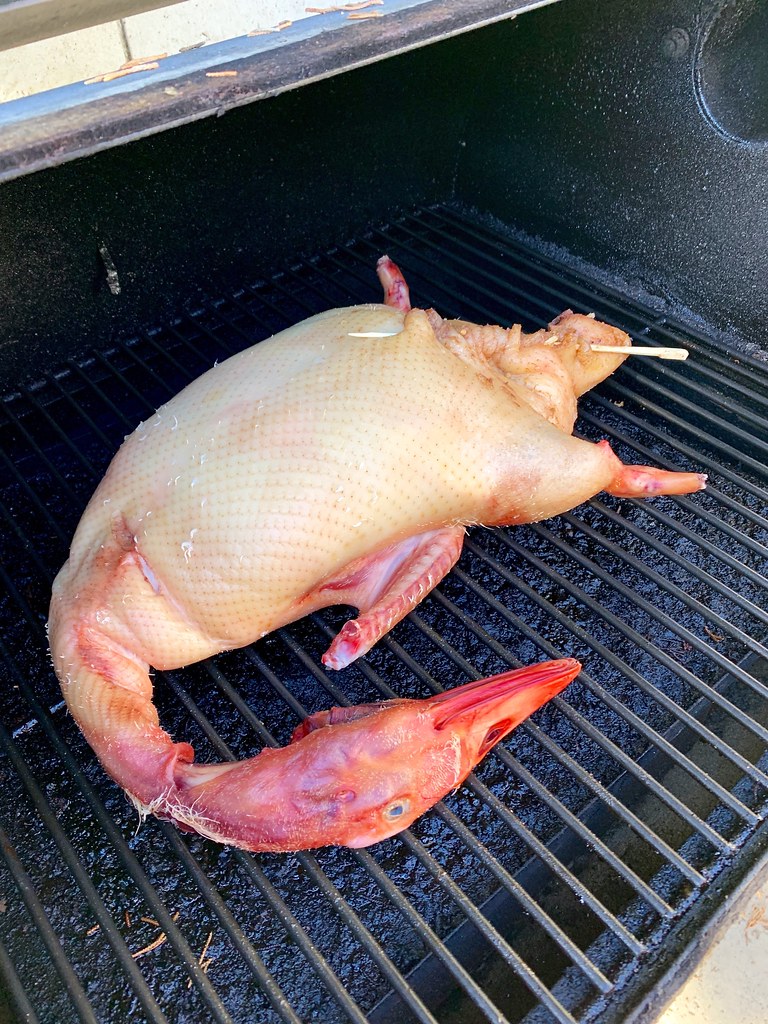
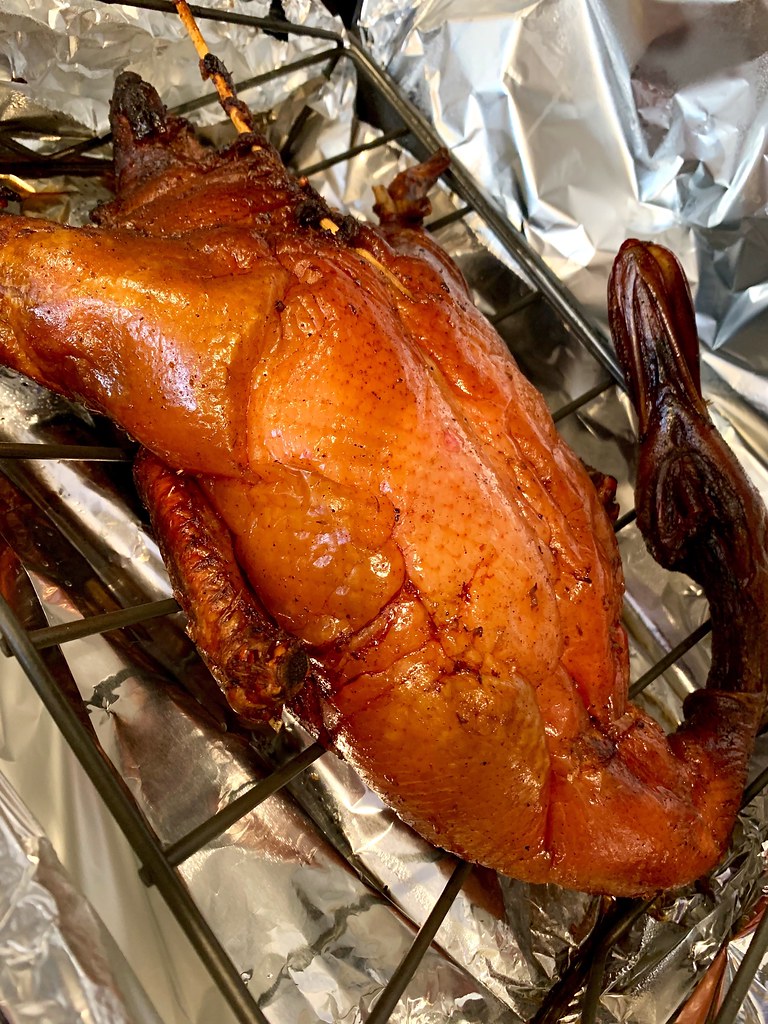
We were a bit concerned because it was much lighter towards the center breast portion. But miraculously in the last ten minutes or so, V said it caught up and became a beautiful dark golden hue all over.

Smoked Peking Duck
Isn’t he lovely???

Smoked Peking Duck
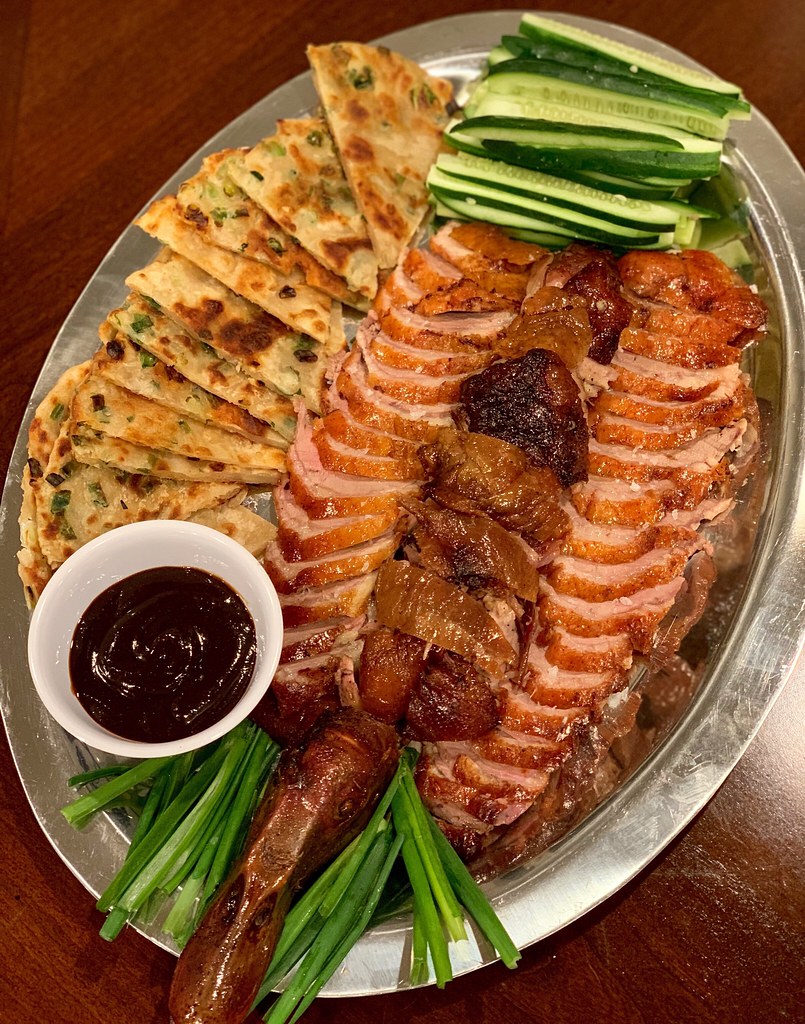
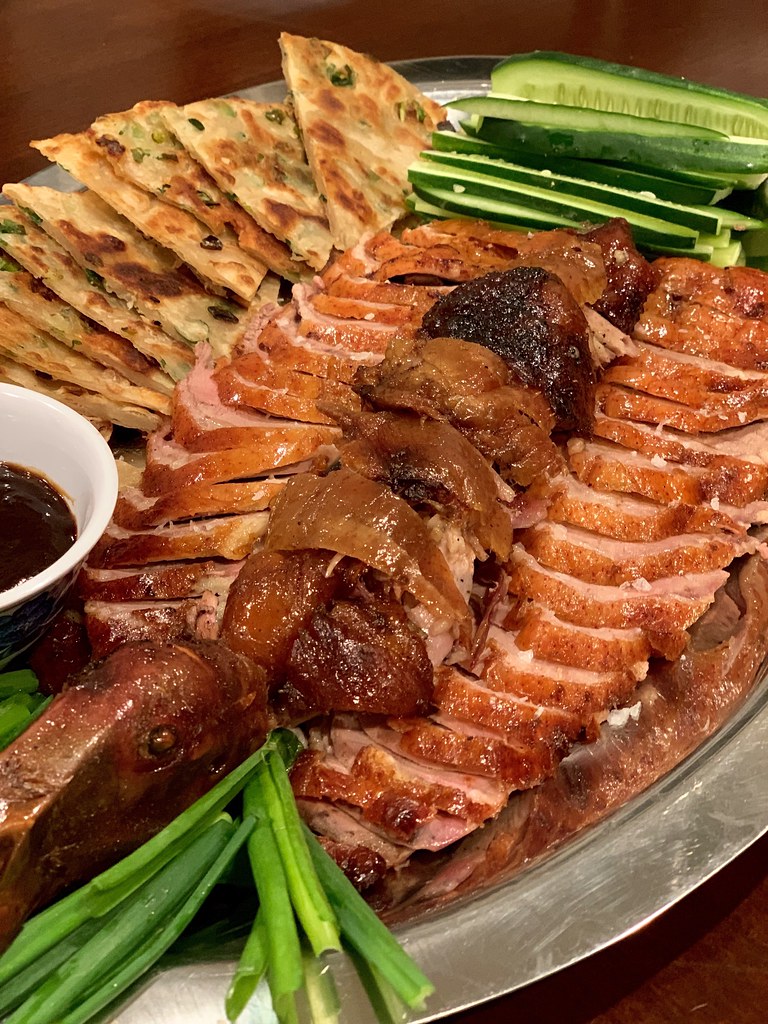
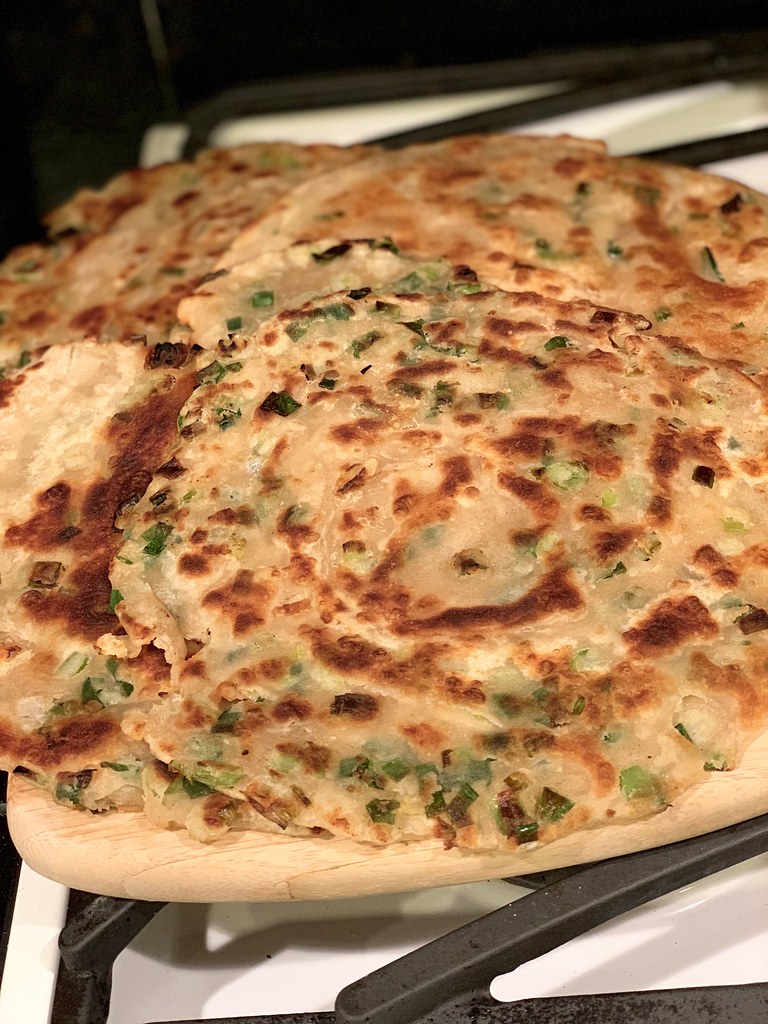
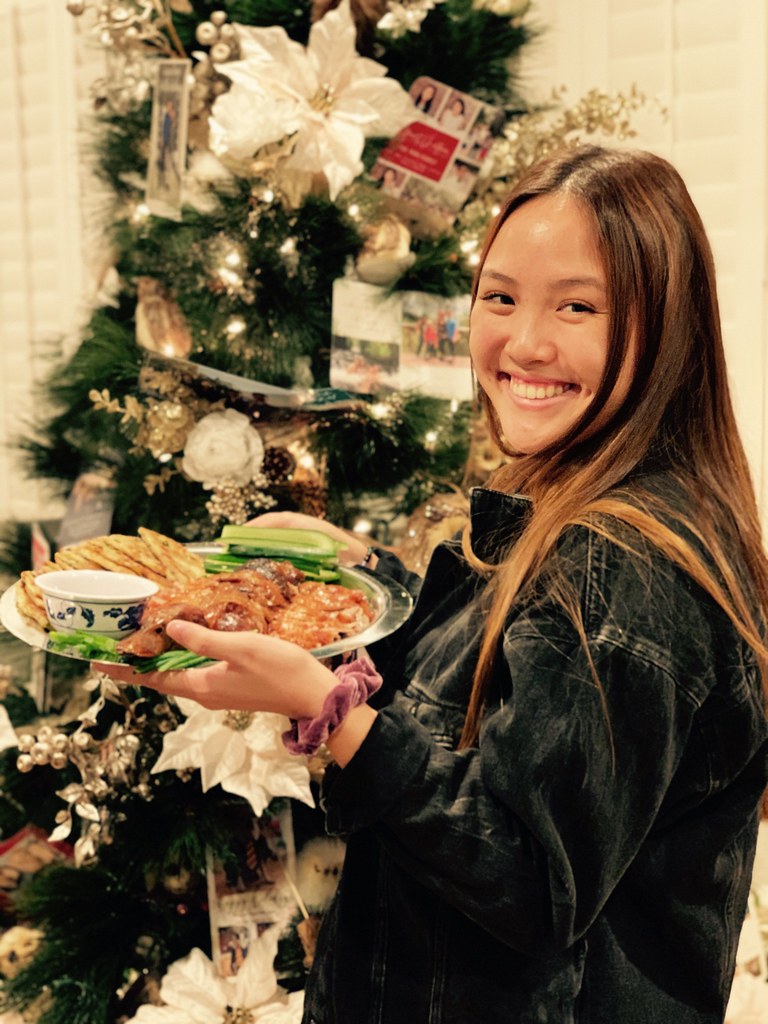
While Howard rested, I made up a batch of flaky scallion pancakes – the perfect accompaniment!

Smoked Peking Duck
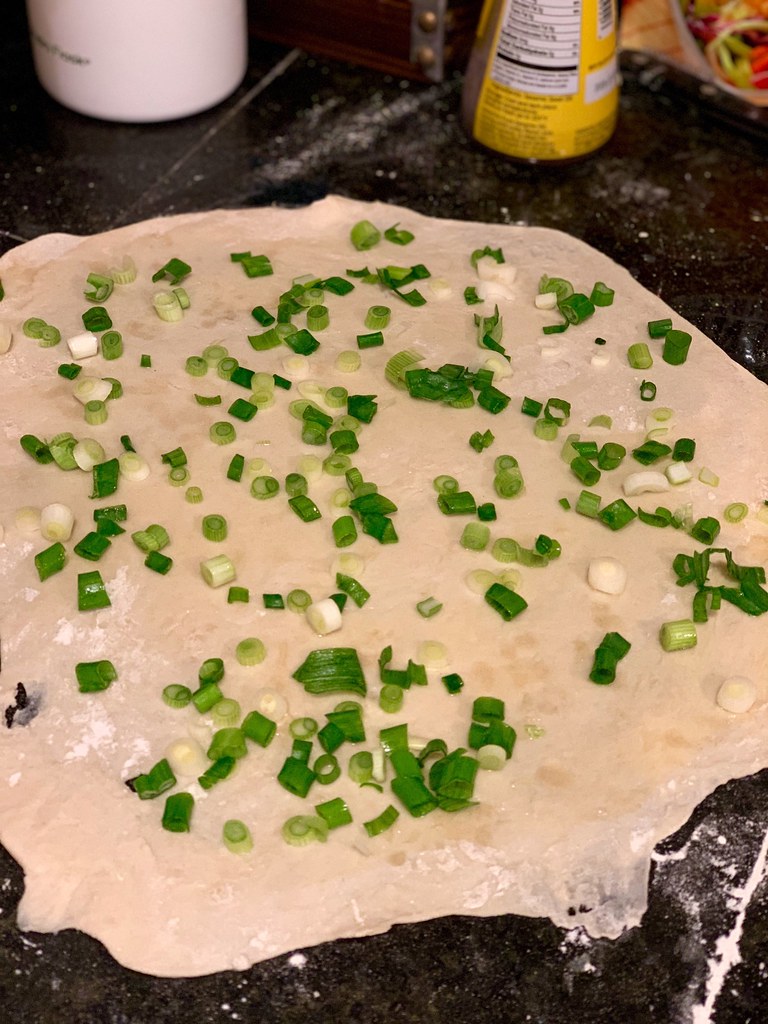
They’re really easy to make and I can post a future recipe if y’all are interested.

I also sliced up some thin cucumbers and more scallions to go with the duck and put out some hoisin sauce.

Smoked Peking Duck
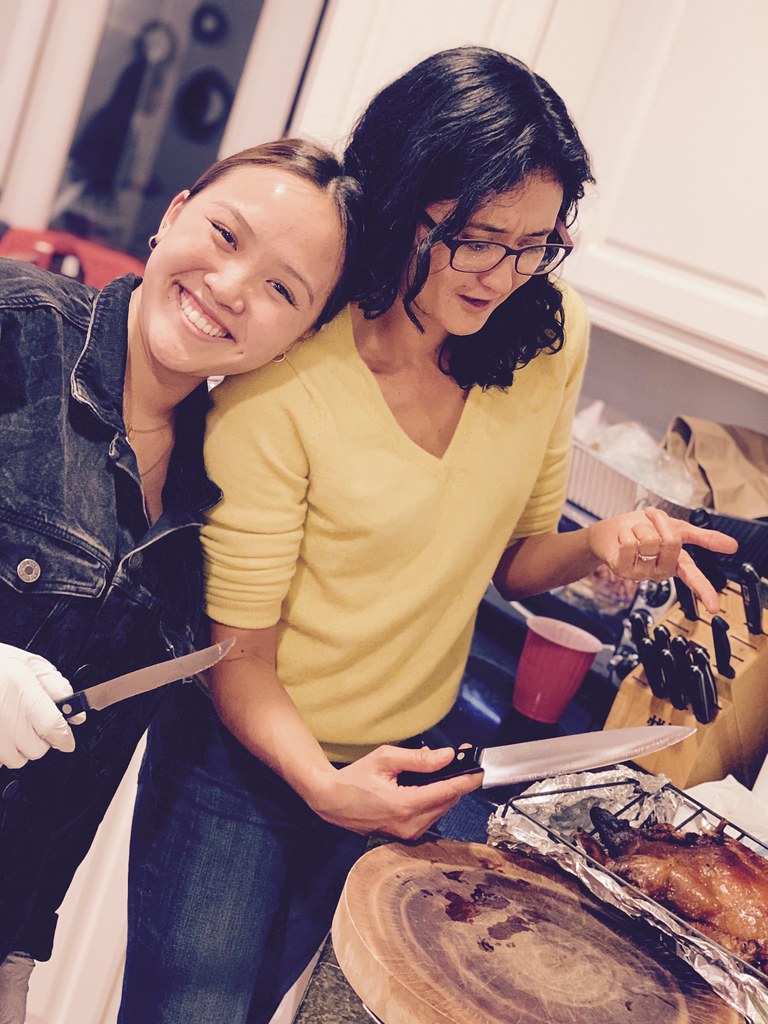
Then we called in Nini and L to do the honors of slicing up the duck. It’s a family affair after all!

Smoked Peking Duck
They say traditional Peking Duck should be sliced into over 100 pieces.

But no one’s got time for that!

Smoked Peking Duck

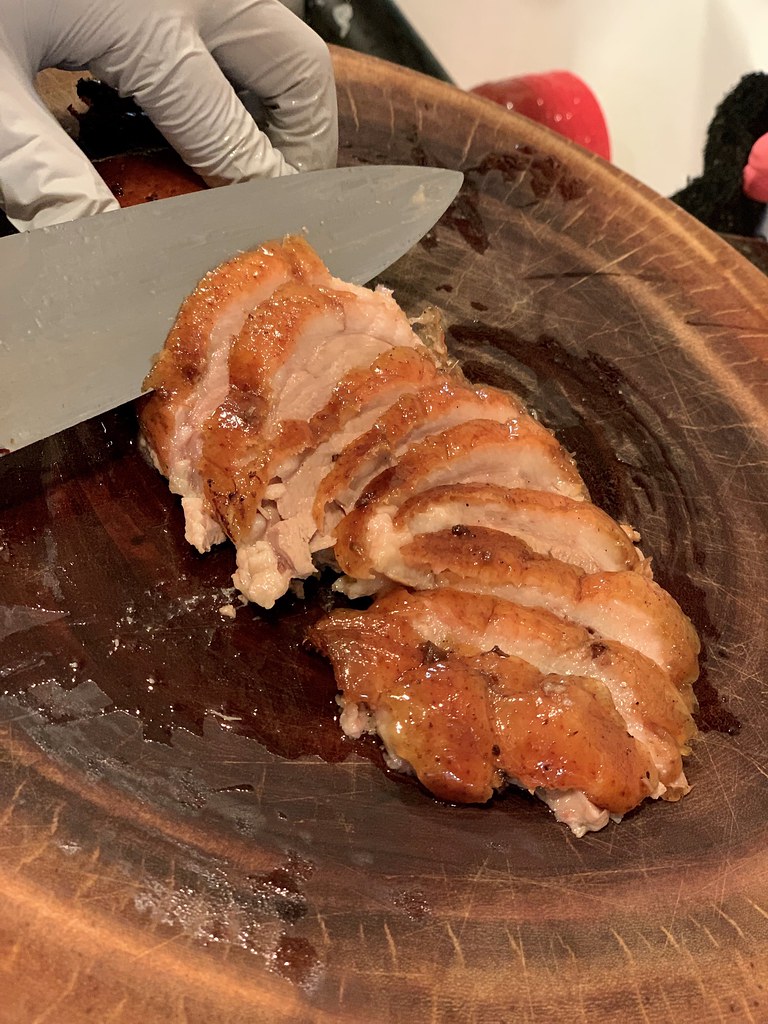
Anyway, I think Nini’s knife-work is just lovely. How many teenagers do you know have such master skills???

Smoked Peking Duck
And voila! Howard in all his glory (THANK YOU HOWARD!)…

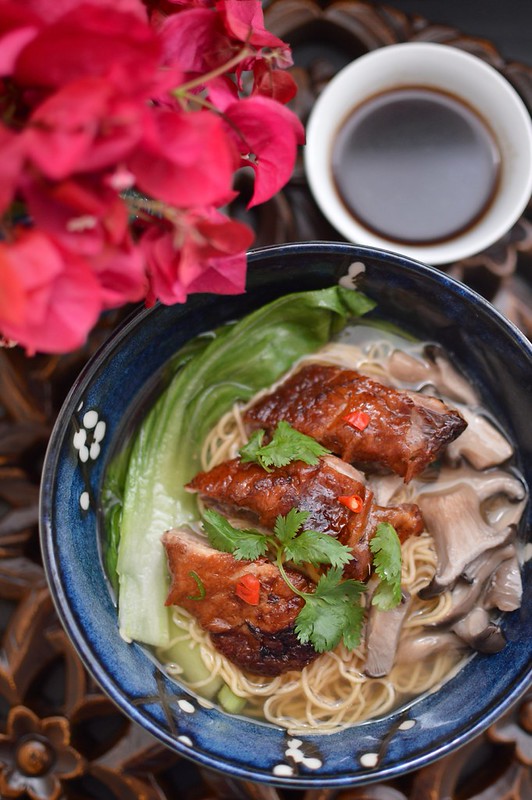
The duck was really delicious….the meat was moist and the skin was lovely. And when eaten with the scallion pancakes, cukes and hoisin–totally legit!

Smoked Peking Duck
Check out this quick little recap video I put together—particularly so you can see the whole crazy air compressor situation! You can also see some snippets in my IG Stories Highlights.

All in all, I think we were pretty successful and I wouldn’t shy away from doing this again! Love our crazy Family Foodventures!

❤ BIG THANKS to Harry Soo for the recipe and tutorial. If you’re into BBQ’ing, definitely check out his YouTube channel.

Pastas/Noodles · Poultry · Vietnamese

Phở Gà – Vietnamese Chicken Noodle Soup for My Soul

Phở Gà

Today is Mom’s Birthday.

And like every year on her birthday, I’ll fix up a big ol’ steak dinner in her honor. Our tiny giant was quite the carnivore after all. A trait that was definitely passed on to my sister and many of our munchkins.

In years past, I’d post some variation of a steak recipe for her birthday, but this year I thought I would share something comforting – Phở Gà. Because what’s more comforting than chicken noodle soup?

Phở Gà

When I was digging through old photos last night, I came upon the one below that I just love. Mom (second from the right) was barely in her mid-teens here and our Ông Ngoại, our maternal grandpa, was in the suit in the back row. There aren’t too many pictures of him so it always makes me smile when we do find one.

And what about our grand uncle seated in the middle? He’s definitely putting out some Vietnamese Colonel Sanders vibes, right?

I’m 100% for it.

sc01309251

I’m also rather obsessed with Mom’s look here. That hair…. those shades!

Very beach chic!

sc0130e32a
As time has passed, I often wonder what is it that I miss most of her.

Her eyes that somewhat twinkled when she smiled? Maya inherited those….

Her sharp-witted comments? She was not to be messed with.

Her constant rearranging of her plants and furniture? She used to love changing things up.

Phở Gà

Then a few months ago, I read an article from a woman who wrote:

“When I lost my mom, I also lost her food”.

And that hit me hard.

It’s exactly how my siblings and I feel.

Phở Gà
Of course it’s so much more than just her cooking—which until the day I leave this existence, I will tout that she was THE best.

Cooking was Mom’s way to show her love.

Phở Gà
Whether it be the time and painstaking details she would put into elaborate meals or even the quick cooking tips she would give us to prepare our own food. It was her medium of communication.

Phở Gà
Which, if you have been with me for the past few years, was the genesis of our monthly family dinners. At the root, we sibbies get together and cook a meal together. Sometimes it’s elaborate and I think that I would NEVER put so much effort into an appetizer or other dish if it wasn’t for my family. And sometimes it’s just comfort food that makes us want to do a little food-shimmy. But there’s never a month that occurs where I don’t think Mom would have loved it that we’ve created this tradition.

And of course, I always talk to her while I cook since I have her photo perched in my kitchen. Very fitting.

Phở Gà
One of the reasons why I wanted to share Phở Gà today was because I think this Vietnamese staple really does epitomize some of the cooking lessons Mom shared with us. Although fairly simple, every step and every ingredient counts.

You always have to scrub the chicken with salt and then parboil for a clean broth.

The onion and ginger must be charred for added depth of flavor.

Spices must be toasted — but she also wasn’t opposed to using pre-packaged spice packets.

Phở Gà

And of course, the whole thing must be simmered, low and slow. It takes time but every step has its purpose.

Love in bowl form.

Phở Gà

Happy, Happy Birthday Mom.

I know we’re keeping you amused with all of our cooking shenanigans.

We love and miss you, always. ❤

ps. How did you keep your waistline the same tiny diameter as that palm tree?!?

sc04365d26

__________________________________________
Phở Gà (Vietnamese Chicken Noodle Soup)
Makes approximately 6 bowls

Ingredients:

1 4-5 lb. whole chicken
coarse salt
1 whole yellow onion
1 4-5 inch piece of fresh ginger
2 small cinnamon sticks
5 whole star anise pods
12 whole cloves
1 teaspoon whole coriander seeds
1 teaspoon whole black peppercorns
½ teaspoon fennel seeds
nước mắm – fish sauce
1 package bánh phở – rice noodles
cilantro and other fresh herbs of your choice
scallions, chopped and sliced into 1-inch pieces
bean sprouts
lime wedges
jalapeno slices
nước mắm gừng – ginger dipping sauce

Place the chicken in the sink and liberally sprinkle salt over it. Using the salt as an exfoliate, scrub the chicken well and rinse with cool water. Place the chicken in a large pot and cover with cold water. Set the heat to high and boil for about 10 minutes. At this point, a lot of the impurities and “scum” will have boiled out. Carefully dump out the water and rinse the chicken thoroughly to remove all the impurities. If you intend on using the same pot for the phở , wash it well before adding the chicken back in.

Pour in about 6-7 quarts of water over the cleaned chicken and bring it to a boil. Once the water has come a boil, lower the heat to a gentle simmer.

While this happens, char your onion and ginger. If you have a gas burner, place the flame on medium heat. Hold the onion and garlic with metal tongs directly over the flame and rotate until they have charred all over. Alternately you can place them on a sheet a few inches under your oven broiler and broil for several minutes—flipping every so often. Once the yellow onion and ginger have been charred, place them into the pot with the chicken. Allow the contents to simmer, partially covered, for about 45 minutes or until the chicken has cooked through.

Carefully remove the whole chicken from the pot and place it on a shallow dish. Allow the contents of the pot to continue simmering. After the chicken has rested for about 10 minutes, carefully (it’ll be quite hot!) carve the chicken into slices and bite-sized pieces. Cover the chicken with plastic wrap and set aside. Place the leftover chicken bones (I throw the wings in too) back into the pot. Allow the contents to simmer, partially covered for about 1.5 hours. During that time, periodically skim and discard any impurities that may have formed on top of the broth. You’ll want a semi-dark but very clear broth like a consommé.

Meanwhile, take the dried spices and place them in a small skillet. Over low heat, toast the spices for a few minutes until they darken slightly and become fragrant. Remove them from the heat and place them in a sheet of cheesecloth. Tie the cloth up and place it into the pot with a 2 tablespoons of nước mắm. Simmer for another 45 minutes.

While the broth simmers, prepare the noodles according to the directions on the package. Usually if using fresh noodles, you’ll want to boil for a few seconds before draining well. If using dried, you’ll want to soak them before a quick boil.

After the broth has finished simmering, taste and add additional nước mắm if needed.

Assemble the phở gà by dividing the cooked noodles between the bowls. Top each bowl with chicken slices, scallions and cilantro. Pour the boiling broth over the noodles and serve with bean sprouts, jalapeno slices, lime and nước mắm gừng on the side.

Ăn ngon!


Poultry

Grilled Honey-Sesame Chicken Skewers

Honey Sesame Chicken Skewers

Easy, Delish and Versatile.

Now that’s the name of a cookbook I’d totally buy as I’d hope it would have satisfyingly scrumptious goodies like these Grilled Honey-Sesame Chicken Skewers.

Honey Sesame Chicken Skewers

These chicken skewers are super quick to prep, takes only a few minutes to cook and I like to serve them in anything from noodle bowls (bún), Vietnamese sandwiches (bánh mì), with rice or even as appetizers.

Oh the possibilities!!

Honey Sesame Chicken Skewers
And if you’re feeling a bit lazy to heat up the grill, you can even throw them in the oven. Just place the skewers on a tray and bake at 425 degrees for about 20 minutes.

Easy peasy.

Note: I prefer the flavor of chicken thighs and find that it tends to dry out less than breast meat. However, feel free to swap out whichever cut is your preference.

___________________________________
Grilled Honey-Sesame Chicken Skewers
Makes 10-12 skewers

Ingredients:

2 tablespoons oyster sauce
1 tablespoon low sodium soy sauce
1 tablespoon honey
1 tablespoon sesame oil
1 tablespoon rice wine vinegar
1 tablespoon mirin
1 tablespoon sambal chili paste
1 tablespoon Sriracha sauce
1 tablespoon fresh lime juice
zest of 1 lime
1 tablespoon minced garlic
1 tablespoon minced ginger
¼ teaspoon black pepper
2 pounds boneless, skinless chicken thighs – cut into 1½ inch pieces
10-12 bamboo skewers soaked in water for 30 minutes
vegetable oil
¼ cup chopped scallions
2 tablespoons chopped fresh cilantro
½ teaspoon toasted sesame seeds

In a large bowl, whisk together the first 13 ingredients. Add the chicken, mix to coat well. Cover the bowl and refrigerate for 30 minutes.

Heat the grill (gas or charcoal) to medium-high heat. Brush the grates of the grill with the vegetable oil. While the grill heats, thread the chicken pieces through the soaked skewers.

Grill the chicken skewers, turning every few minutes, for 6-8 minutes until the chicken has cooked through. Remove the skewers to plate and sprinkle with scallions, cilantro and sesame seeds.

Appetizers/Small Plates · Poultry

Game Day Garlicky-Parmesan Chicken Wings

IMG_7316.JPG
There’s no hiding it, I’ve been seriously MIA. With the holidays and the craziness of the Death Eaters overtaking the Ministry, I desperately needed a break to recharge. Trust me, there’s been a TON of cooking with the winter holidays, family dinners, both Western & Lunar New Year, and endless sporting events—-all of which I plan to share with you all soon.

But I needed something to kick start me back into the writing game….and that, my friends, is Football.

IMG_7309.JPG
Truthfully I don’t have a pony in tomorrow’s Super Bowl Game.

Falcons? BLEH!

Patriots? Patooey!

But football, oh–for the love of FOOTBALL! Nothing can beat the frenetic craziness when it’s a good game.

And although I don’t have much stake in the game tomorrow, let me tell you of a game where my whole being was on the line….the 2017 Rose Bowl Game!!!

Did you smell those Roses?!?!

IMG_7307.JPG
Yes Friends…it was the GAME of GAMES where my USC Trojans battled Penn State. Both teams had undergone years of drama, leadership changes, team changes, injuries. But both fought and somehow they found themselves battling it off at one of the most iconic collegiate bowl games–the Rose Bowl.

Despite weeks of endless indulgence, we convened at big seestrah’s house to watch the game. And when it’s game day, there MUST be game day eats!!!

Seester T made a huge pot of rich and comforting Beef and Beans Chili. Her chili is way better than mine which is somewhat unnerving because she just throws things into the pot and poof–amazing chili.

Brother and Seester N tag teamed to get the components together for Loaded Beef Nachos using tortilla chips that I freshly fried. I know it sounds laborious but fresh fried chips make a huge difference!

IMG_7314.JPG

As for me, I was in charge of the Chicken Wings because hot damn–we love us some wangzzzz’!  When in doubt–wing it out!!

I ended up brining the wings overnight in a solution of water, salt, sugar, hot sauce and some other aromatics. I don’t always have the time to do this, so if you don’t–skip it. But I do think it’s worth this extra step as it infuses in an oompf of flavor. Obvi.

I also despise rubbery chicken wings. You know what I’m talking about– wings that haven’t been crisped enough or opt not to use a flour coating. Don’t get me wrong, other than K.F.C. (and I mean Korean Fried Chicken), I generally don’t like a thick breading on my wings–the meat to coating ratio just doesn’t work out well.  But I do like how a light toss in a mixture of AP flour and rice flour (or cornstarch) helps with the crispiness factor.

I ended making two types that day – my standard Buffalo Wings and per my niece Nina’s request, these Garlicky-Parmesan Chicken Wings. Super garlicky, super cheesy, super crispy….definitely not diet food.

FullSizeRender.jpg

As for the game….I WAS STRESSED!!!

I won’t lie, I was the hottest mess in all the land.

There was some ridiculously high moments and some terribly low ones when the fam was terrified of what my wrath would be if it didn’t end well for the Trojans. But in the last second, my boys pulled the big W and we (more like I) LOST OUR MINDS!! The joy–OH THE JOY!

So although I don’t have much at stake in the game tomorrow….I can 100% empathize with those who do.

For the love of football, make it a great game tomorrow Pats’ and Falcons……..and as for y’all—please make my Garlicky-Parmesan Chicken Wings ❤

__________________________________________
Garlicky-Parmesan Chicken Wings
Serves approximately 4

Ingredients:

8 cups warm water
1/3 cup kosher salt
1/3 cup sugar
1/3 cup hot sauce, I like Frank’s
8-10 sprigs fresh thyme
8-10 sprigs fresh parsley
1 head of garlic, cut in half
1 lemon, cut in half
1 tablespoon black peppercorns
2 bay leaves
2 pounds chicken wings, separate wings at the joint with tips removed
vegetable oil
2 cups all purpose flour
½ cup rice flour or cornstarch
1 tablespoon onion power
2 tablespoons garlic powder, divided
1 teaspoon cayenne power
1 cup unsalted butter
½ cup olive oil
2 tablespoons finely minced garlic
¼ teaspoon red pepper flakes
1 cup finely grated Parmesan cheese
1/3 cup shredded Parmesan cheese*
½ cup chopped fresh parsley

In a large container, whisk the warm water with salt, sugar, and hot sauce until everything has dissolved. Add the thyme, parsley sprigs, garlic, lemon, peppercorns and bay leaves. Add the chicken wings and push down to ensure that all pieces are submerged. Cover the container and refrigerate overnight or about 8 hours.

Drain the chicken and pat dry with paper towels.

In a large, heavy bottom pot, fill 2-3 inches of oil. Heat until temperature reaches 350 degrees F.

While the oil heats, combine the flour, cornstarch, onion powder, 1 tablespoon garlic power, and cayenne power in a large resealable bag. Close the bag and gently toss until the ingredients have combined. In batches, toss the chicken wings in the dried mixture until well coated and shake off any excess. Place the coated wings on a rack fitted over a baking sheet. This will help set the crust.

Begin making the garlic butter sauce by adding the butter, olive oil, remaining garlic powder, minced garlic and pepper flakes in a small saucepan. Over low heat, cook for 10-15 minutes–be careful not to burn the garlic.

Once the frying oil reaches 350 degrees F, begin frying the wings in batches, turning occasionally. Fry the wings for about 10 minutes each batch until they have turned golden brown. Transfer the fried wings to a clean rack fitted over a baking sheet and keep warm in a low temperature oven. Repeat until all the wings have been fried.

Place all the wings in a large bowl. Add several spoonfuls of garlic butter sauce and grated Parmesan cheese. Toss well until all the wings have been coated—adding more garlic butter sauce as needed. Plate the wings and sprinkle the tops with the shredded Parmesan cheese and parsley. Serve immediately with blue cheese dressing, ranch dressing, carrots and celery sticks.

*I like the different textures that come from using both grated and shredded Parmesan. But if you want to use one over the other–knock yourself out!

Poultry · Soups/Stews

Turkey and Bean Chili

Turkey and Bean Chili
This time of the year, Sundays are filled with weekday meal prep and football. It’s only sensible, of course.

And while I was in the middle of prepping a double batch of my Turkey and Bean Chili for tomorrow’s Halloween Potluck, I realized I’ve never posted the full recipe here.

That changes now!!

Turkey and Bean Chili

It’s tried and true and is easily doubled or tripled to feed crowds. AND it freezes beautifully!!

Serve as a main with cornbread or crackers…….or on top of baked potatoes or chips……whatever way, this chili is a beaut! ❤

____________________________________________

Turkey and Bean Chili
Serves 8

Ingredients:

2 tablespoons olive oil
1½ cups white onion, diced
1 red bell pepper, diced
1 heaping tablespoon minced garlic
1 serrano chili pepper, minced
1 jalapeno pepper, minced
1 pound ground turkey meat
2 tablespoons chili powder
1 teaspoon cumin powder
1 teaspoon garlic powder
1 teaspoon onion powder
1/8 teaspoon cayenne pepper (more to taste)
2 tablespoons tomato paste
3 ounces chipotle peppers in adobo sauce (optional)
1 28-ounce can diced tomatoes
1 cup lager beer of your choice
1 15-ounce can kidney beans, rinsed
1 15-ounce can black beans, rinsed
1 teaspoon kosher salt, more to taste
black pepper


Heat the oil in a large dutch oven or heavy bottom pot. Cook the onions and bell peppers until softened—about 5-6 minutes. Add garlic, serrano pepper, jalapeno pepper and cook for an additional 2-3 minutes. Add the turkey and cook while using a wooden spoon to break up the meat. Continue cooking until the meat is no longer pink—about another 5 minutes.

Add the chili powder, cumin, garlic powder, onion powder, and cayenne—stir and cook for an additional minute. Stir in the tomato paste and chipotle peppers (if using) and then add in the diced tomatoes with its juices. Gently stir in the beer, beans, 1 teaspoon salt and bring the mixture up to a slow boil.

Once it reaches a boil, lower the heat to a simmer. Simmer the chili partially covered, for about 45 minutes. Stir the chili every 10 minutes or so as it slowly thickens. Once it reaches your desired consistency, taste and adjust seasonings with salt and pepper as needed.

Serve the chili with additional cheddar cheese, chopped scallions, and sour cream.

Poultry · Seafood

Thai Inspired Shrimp & Chicken Larb Gai

Shrimp & Chicken Larb Gai
I must admit that I’ve been incredibly lazy in the kitchen these past few weeks. It’s been really warm and humid (for San Diego standards, that is) and the last thing I want to do is hang out over the hot stove for long periods of time.

And don’t even get me started about my utter disdain for dishes!

Shrimp & Chicken Larb Gai
So my “cooking” of late has really consisted of compiling ingredients (salads or sandwiches), charcuterie boards (AMEN!), or quick prep dishes such as stir-frys.

Because…you know…. EVERYTHING STIR-FRY and all.

Total shameless plug.

Shrimp & Chicken Larb Gai
But all self-promotion aside, stir-fry dishes are a total legit way to get something scrumptious in your belly with minimal cooking time. The majority of your efforts primarily go towards chopping the ingredients— easy peasy!

Shrimp & Chicken Larb Gai
This Shrimp & Chicken Larb Gai is a slight variation of my Pork Larb Gai which is a Thai minced pork salad. For the protein I went with a surf and turf approach as I love the flavor combo. For the ground chicken, you can go with breast meat but I prefer the flavor of dark meat. And if you want a really light approach, sub the chicken with ground turkey breast.

Shrimp & Chicken Larb Gai

Whichever protein you select, you’ll really love Larb Gai –-especially during the summer months. The dish is light yet fulfilling and is punched up with TONS of flavor from the fresh lime juice, bright herbs and savory sauce. I often have it over steamed rice but when I’m feeling extra lazy or when it’s warm out, I use it as filling for lettuce wraps. Either way, you’ll love it.

Enjoy!

________________________________________

Thai Inspired Shrimp & Chicken Larb Gai
Serves 4-6

Ingredients:

1 tablespoon granulated sugar
1 tablespoon warm water
4 tablespoons fresh lime juice, divided
3 tablespoons fish sauce, divided
1 teaspoon minced Thai chiles, divided
3 tablespoon vegetable oil
1/4 cup minced red onions or shallots
4-5 kaffir lime leaves, sliced into thin strips
1 tablespoon minced garlic
1/2 teaspoon red chili flakes
1 pound ground chicken
½ pound peeled shrimp, cleaned and deveined
2 scallions, chopped
1 heaping tablespoon ground toasted rice powder*
1 cup thinly sliced red onion
1 cup fresh mint leaves, roughly torn
1 cup fresh cilantro leaves, roughly torn
1 cup fresh Thai basil leaves, roughly torn

In a small bowl, create the sauce by whisking together the sugar and warm water until dissolved. Add in 2 tablespoons lime juice, 2 tablespoons fish sauce and ½ teaspoon minced chiles (more to taste). Set the sauce aside.

Heat the vegetable oil in a wok or large skillet over medium-low heat. Add the minced onions, kaffir lime leaves, garlic and cook for 1 minute. Add ½ teaspoon minced chiles (more to taste), red chili flakes and cook for an additional 30 seconds. Increase the heat to medium-high and add in the ground chicken.

Using a wooden spoon, stir the chicken around the wok/skillet while breaking it apart to a crumbled consistency. Cook the chicken for 3-4 minutes and then add the shrimp Stir-fry for an additional 2 minutes until the shrimp becomes pink and opaque. Stir in the remaining fish sauce and scallions.

Remove the wok/skillet from the heat. Toss in the rice powder, remaining lime juice, sliced red onions, mint leaves, cilantro leaves, and Thai basil. Stir in a few spoonfuls of the sauce to taste. Plate the larb with extra fresh herbs, whole chiles, lime wedges, sliced cucumbers, and lettuce. Serve immediately with either steamed rice or whole lettuce leaves for wraps. The remaining sauce can be served alongside as a dipping sauce.

*If you cannot find pre-ground toasted rice powder, you can easily make your own. Toast uncooked jasmine rice in a skillet over low heat until golden brown. Once cooled, transfer the toasted rice into a spice grinder and grind until you get a fine powder.

Poultry · Sponsored

Basil Chicken and Egg Lettuce Wraps

Lettuce Wraps2

I’m all about easy to make meals these days…..

Ok, let’s be honest. I’ve always been enamored with low fuss meals–particularly during the weekdays when I’m always short on time. And when those dishes are savory, fulfilling AND on the health conscious then it’s a NGUYEN-WIN!!!

I’ll tell ya, these Basil Chicken and Egg Lettuce Wraps fit that bill perfectly!

And guess what?

It’s PALEO!!! Yup, you read correctly!

Lettuce Wraps3

Partnering again with our friends at Safest Choice® Eggs, I took quality ground chicken and stir fried it with classic South East Asian aromatics.  After a few splashes of fish sauce (there are tons of fantastic paleo fish sauces out there), I topped the chicken with ribbons of Safe Eggs. Tons of lean protein, packed with flavor and yet still light on the tummy.

Click here to read my post on Paleo Basil Chicken and Egg Lettuce Wraps and here for the recipe.

Have a fantastic week!

Davidsons-Dozen-Blogger-Badge

Poultry · Vietnamese

Short-Cut Roast Duck Noodle Soup

Roast Duck Noodle Soup

It’s that time again….

Chúc Mừng Năm Mới!!

Tết – the Lunar New Year! And this year marks the Year of the Monkey….the Fire Monkey. Which means if you were born the years of the Dragon, Snake or Ox — good things should be coming your way. As for me, I’m of the Horse and as long as nothing “ominous” is slated, I’m totally good with that.

Roast Duck Noodle Soup
In honor of Tết, I decided to share with you a “short-cut” version of Roast Duck Noodle Soup. What’s the short-cut? I run out to Sam Woo BBQ to pick up one of their roast ducks! And I’ll be honest with you, there’s not one part of me that feels bad doing it either.

Their Cantonese style ducks are stuffed with bean paste, scallions and MAGIC….before getting a shellac of a honey mixture to get the skin crispy and brown. The duck is then chopped up and served with either a plum sauce or a dark dipping sauce that at first glance looks like an oily soy sauce. But it’s more of a rich, umami filled broth. DEFINITELY ask for extra because that’s what I add to the soup to give it some extra OOMPF!

No Sam Woo BBQ in your area? BUMMER! But any local Chinese BBQ spot – or even restaurant, will do the trick. Just be sure to ask for the broth-like dipping sauce.

Roast Duck Noodle Soup

In addition to the dipping sauce, the soup consists of stock (duck -if you have it, otherwise chicken is fine), toasted spices and aromatics, as well as a few pieces of the roast duck. I usually just throw in the wings and duck head since I’m not one to gnaw on either of those parts.

Roast Duck Noodle Soup
After the soup simmers for some time, it’s ladled over some egg noodles, bok choy and served with pieces of the roast duck. Easy Peasy!

The dish is my quick nod to Mì Vịt Tiềm – which is Vietnamese Roast Duck Noodle Soup. However, since the duck isn’t marinated in Five Spice, the soup and duck itself isn’t as dark as traditional Mì Vịt Tiềm. It’s also doesn’t have the deep flavor that Five Spice imparts which is why I like to make a spice sachet of toasted anise, coriander, black pepper and cinnamon to mimic it.

Roast Duck Noodle Soup
Once again Friends, let me say Chúc Mừng Năm Mới!! 

May this Year of the Monkey bring you and your loved ones Health, Luck, Laughter and endless Adventures……

_____________________________________

Short-Cut Roast Duck Noodle Soup
Serves 6

Ingredients:

2 star anise
6 cloves
½ cinnamon stick
1 teaspoon coriander
1 teaspoon black peppercorns
2 dried bay leaves
1 small white onion
3 inch piece of fresh ginger
4 garlic cloves, slightly smashed
4 quarts low sodium duck stock or chicken stock
1 quart water
1 store-bought chopped Peking/Cantonese style roast duck with dipping broth/sauce
kosher salt
fish sauce
Maggi seasoning (or low-sodium soy sauce)
2 cups sliced shiitake or oyster mushrooms
2 scallions, diced
12 ounces fresh Chinese egg noodles
1 small bunch bok chok, trimmed and washed
½ cup cilantro leaves
Thai chilies, minced


Place the star anise, cloves, cinnamon, coriander and peppercorns in a small skillet. Over low heat, toast the spices for 2-3 minutes; frequently shake the skillet to toss the spices. You’ll want to toast them until they’ve browned but not burned. Transfer the spices to a small plate to cool completely. Once they’ve cooled, place them with the bay leaves in the center of a square piece of cheesecloth. Gather up the edges of the cloth and tie it into a bundle with kitchen twine. Set aside.


Using tongs to hold the onion, carefully char the exterior over an open flame of your stove burner—rotating the onion to char evenly. Set aside and repeat with the ginger. This can be done under the broiler of your oven as well.


Pour the duck stock, water, about a cup of the duck dipping broth/sauce and sachet of spices into a large pot. Add the duck wings, duck head (if included), charred onion, charred ginger and garlic into the pot and bring the liquids to a boil. Lower the heat and simmer for 30-45 minutes, periodically skim off and discard any impurities that may have formed. Stir in 1-teaspoon salt, 1-tablespoon fish sauce, 1-tablespoon Maggi and add the scallions and mushrooms. Simmer for another 15-20 minutes.


Bring another large pot of water to a boil. Boil the egg noodles according to the package until al dente. Remove the noodles from the pot (save the boiling water) and drain in a colander. Divide the noodles amongst six bowls. Drop the bok choy into the boiling water and stir around for 30 seconds. Remove the bok choy and divide amongst the bowls.


Taste the broth and add additional fish sauce or Maggi as needed. Bring to a rolling boil and then ladle the broth into each bowl. Top each bowl with mushrooms and a few pieces of roast duck. Garnish with cilantro and chilies. Serve immediately with a dish of the remaining dipping broth/sauce.

Poultry

20-ish Minute Chicken Parmigiana

Chicken Parmigiana

A couple of days ago I was playing around with a variation of my tried and true marinara recipe. I didn’t really have any particular purpose for the marinara but just felt a tugging compulsion to make some.

So what does one do when one finds themselves with a pot full of wonderful sauce?

Make some Chicken Parmigiana, of course!

It also may have helped that I was scrolling through IG while the sauce was simmering and saw a rich plate of Chicken Parmigiana that someone had posted. And since I hadn’t made some in a very long time, I decided to put my newly made marinara sauce to some delicious use.

Chicken Parmigiana
Chicken Parmigiana
is typically breaded and pan fried. And although it’s delicious, that step does take some extra time and if you don’t serve it soon after it’s made, the crust can get soggy. Let’s face it–what’s the point of taking the extra effort to have a crispy crust/breading only to have it get all soggy?

So I usually just skip it!

I like to make a very simple and quick version of this Italian-American dish which makes it a perfect weeknight meal. After a quick browning in the skillet (since I nix the breading/frying), I smother the chicken in marinara (homemade or store bought) and cheese before it bakes for several minutes.

Chicken Parmigiana
Super easy, super quick!

The sauce seeps into the chicken while it finishes cooking in the oven so it’s wonderfully juicy and flavorful. Serve it alongside some pasta, potatoes, veggies or even in a sandwich and you’ll be all set!

You can also make a very large dish/tray of it to serve during the holidays. Since there’s no crust, you won’t need to worry about it getting soggy.

That’s totally NGUYEN-ing!

__________________________________

20-ish Minute Chicken Parmigiana
Serves 4

Ingredients:

4 skinless boneless chicken breast
1 teaspoon dried onion powder
½ teaspoon dried basil
½ teaspoon dried fennel seeds, crushed
½ teaspoon red pepper flakes
¼ teaspoon paprika
2 garlic cloves, minced
2 tablespoon lemon juice
zest of 1 lemon
kosher salt
black pepper
olive oil
2 cups marinara sauce (homemade or store-bought)
8 ounces fresh mozzarella, thinly sliced
¼ grated Parmesan
2 tablespoons chopped parsley


Preheat oven to 400 degrees F.

Using a kitchen mallet or bottom of a heavy pan, pound each of the chicken breasts to an even thickness. Place the chicken in a dish and add the onion powder, basil, fennel seeds, red pepper flakes, paprika, garlic, lemon juice and zest, ½ teaspoon kosher salt, ¼ teaspoon black pepper and 3 tablespoons olive oil. Flip the chicken around a few times to coat evenly.

Heat a large heavy bottom skillet with 2 tablespoons olive oil. Cook the chicken breasts over medium-high heat until golden—about 2 minutes each side.

Spread ½ cup marinara sauce on the bottom of a baking dish. Place the browned chicken breasts in the dish and top each breast with the remaining marinara sauce. Top each breast with sliced mozzarella and parmesan. Bake for 7-8 minutes until the chicken has cooked through and the cheeses have melted and browned. If needed, turn on the broiler briefly to brown the cheese.

Remove the dish from the oven and sprinkle the tops with chopped parsley. Serve warm.

Pizzas · Poultry

Game Day BBQ Chicken Pizza — Fight On!

BBQ Chicken Pizza

Alright y’all….this is a last minute post so please excuse the quality of the photos and any typos.

But it’s the SEASON OPENER today for my boys and kick-off is in less than 5 hours–a GOOD LUCK post was a must!

GO USC TROJANS!!!!!!!

BBQ Chicken Pizza

Growing up, football always had a “shadow” presence in my childhood. We lived in Minnesota–land of the mighty Minnesota Vikings. So when football season came along in the fall, Sundays and Monday-nights were off limits for the TV.

Dad held permanent residence in front of the sole family tube during the season.

And as funny as it is now for me to think it, I didn’t really enjoy the game at that time. All I knew was that I had an unquestionable loyalty to the Vikes.

BBQ Chicken Pizza

Then I found myself as a cheerleader all throughout high school (2-year varsity cheer captain–thank you very much! Go BRAHMAS!!) and spent every Friday night cheering for a CIA Champ Football Team. By then, my own appreciation and understanding for the sport had taken shape which only catapulted and grew a MILLION times when I went to school at the University of Southern California during the Coach Pete Carroll/Carson Palmer years.

It was extraordinary…

It’s been over a decade since I’ve been at USC but my loyalties have never waned. In fact, it’s such a serious thing for me during the season that I will rarely watch a game in public at a sports bar (unless I’m at the game) because this 5’2″ gal gets so heated, I become a sailor!

Well, my potty mouth becomes a sailor.

BBQ Chicken Pizza

To cheer on my boys as they face Arkansas State tonight, I made a quick pizza using ingredients that take on the spirit of College Football tailgating– BBQ Chicken Pizza!!

I know, BBQ Chicken Pizza is so “1990’s”–but after all this time, it’s still dang good!

And with that, I’ve got to get back to my usual game day rituals.

Here’s to an incredible College Football season– GO TROJANS!!!!!!

_______________________________________
Game Day BBQ Chicken Pizza
Serves 2

Ingredients:

6 ounces fresh pizza dough, rested and at room temperature
all purpose flour
¾ cup barbeque sauce, divided
1 tablespoon minced garlic
½ teaspoon red chili pepper flakes, divided
1 cup sliced red onions
1/3 pound thinly sliced fresh mozzarella cheese
¼ cup diced scallions, divided
1 cup diced cooked chicken
1 cup grape tomatoes, halved
½ tablespoon corn meal
¼ cup chopped cilantro leaves

Preheat oven to 500 degrees F.

Take the pizza dough and flatten it with your hands on a floured surface. Use a floured rolling pin to gently roll the crust to about ¼ of an inch thickness. Transfer the rolled out dough to a pizza paddle or lightly floured cutting board.

Spread ½ cup of the barbeque sauce over the dough. Next, top the sauce with the minced garlic and ¼ teaspoon red chili pepper flakes. Cover the pizza with the red onions, mozzarella cheese, 2/3 of the scallions, chicken, and tomatoes. Drizzle the remaining barbeque sauce over the top of the pizza.

Sprinkle the corn meal over a baking sheet. Carefully slide the pizza onto the baking sheet and transfer to the oven. Bake the pizza for 15-20 minutes until the crust becomes golden brown and the cheese is bubbly.

Remove the pizza from the oven. Sprinkle the remaining red chili pepper flakes, scallions and cilantro over the top. Slice the pizza and serve warm.