Beef · Soups/Stews

Ground Beef Chili {aka “Tailgate Chili”}

Ground Beef Chili
I realize that crying about 50 degree weather in March could be categorized as some major first world problems….

BUT I’M IN SOUTHERN CALIFORNIA PEOPLE! THIS JUST ISN’T RIGHT!

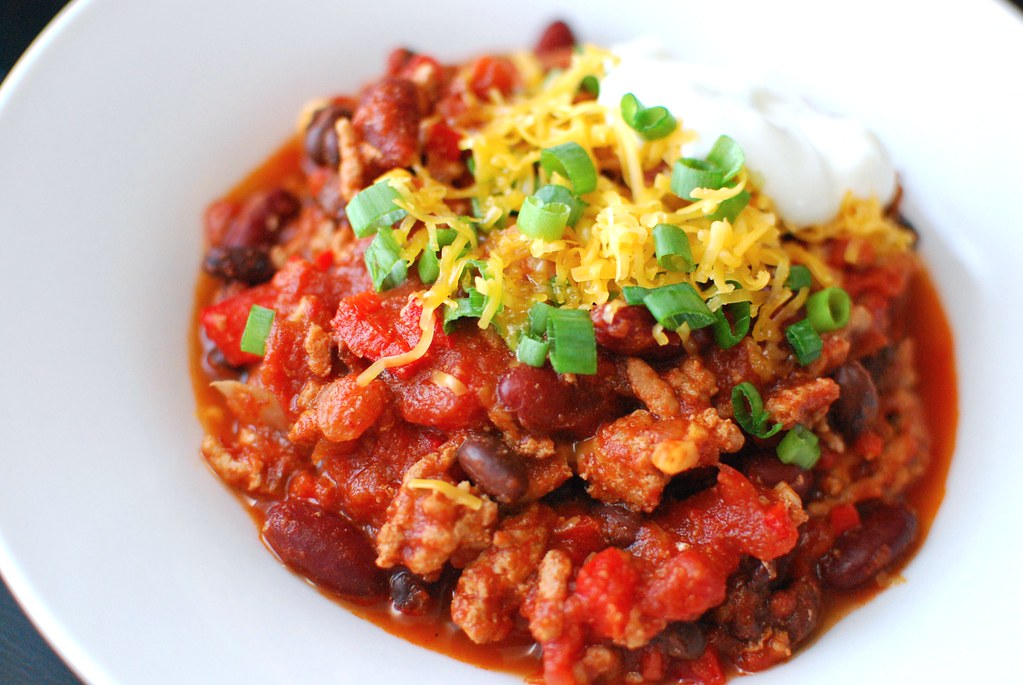
Ok. Now that I got that out of my system, should we chat a bit about this Ground Beef Chili?

Sure, I love my tried and true Turkey and Bean Chili. It’s hearty, savory and just darn tasty.

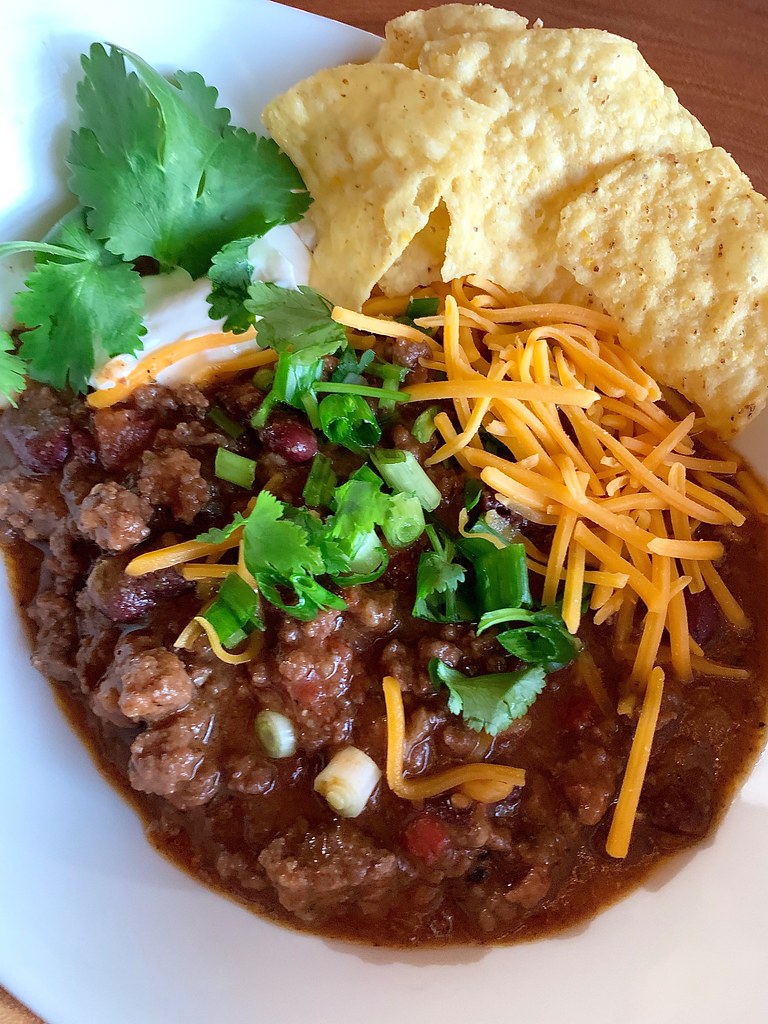
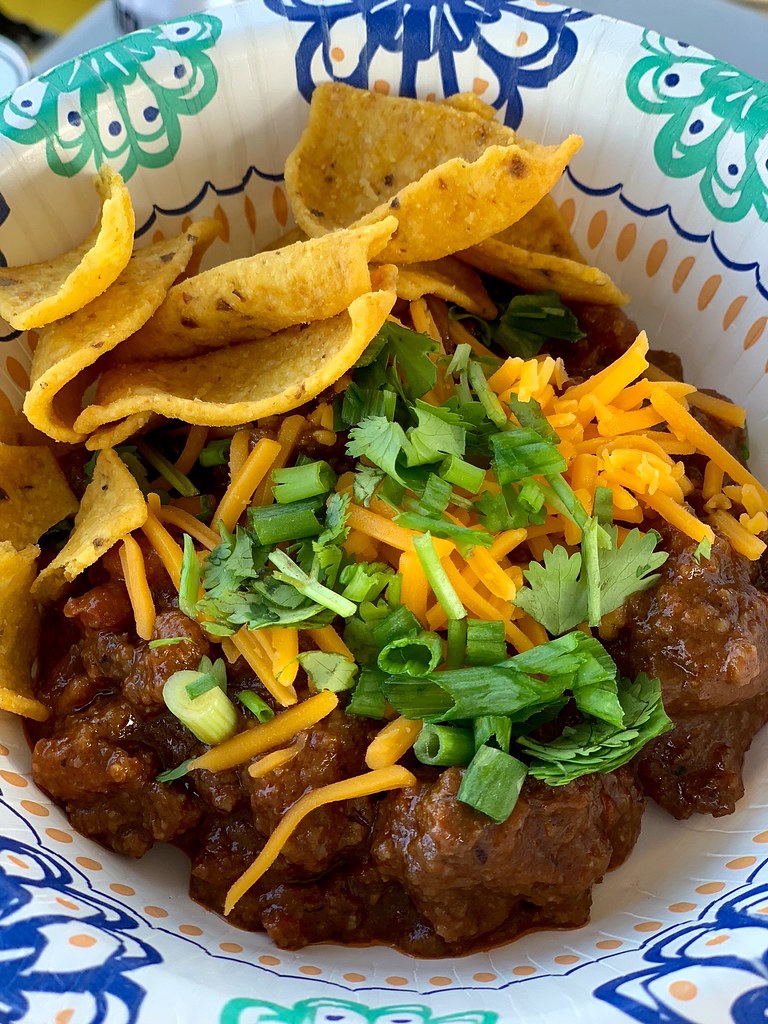
However this beef chili is just….”beefy”. It’s delicious on its own topped with a few onions, a bit of cheese and a dollup of sour cream. But it’s freaking awesome on top of burgers, hot dogs, fries, nachos—which is why I also call it my “Tailgate Chili” where anything goes!

Ground Beef ChiliA few things to mention about this recipe.

First is the addition of baking soda and a bit of water to the ground beef. Sounds strange right? But I picked it up from a Cooks Illustrated recipe and the added step helps keep the beef moist and tender.

Second is the ground tortilla chips. PLEASE don’t skip this! You will be so pleasantly surprised by the deep corn flavor it imparts on the chili and compliments it beautifully.

Last are the beans. I prefer pinto or red kidney beans but really, it’s totally up to you. Black beans, garbanzo beans, butter beans, cannellini beans, navy beans…. Do you, Boo!

Ground Beef Chili
And if you’re going to make a batch of this, why not double it? I have a few quarts of this deliciousness tucked away in my freezer and I will tell you, I never regret that decision when I can have a scrumptious bowl of chili within a few minutes.

Stay warm my fellow So Cal Peeps! ❤

_______________________________________________________
Ground Beef Chili
Serves 8-9

Ingredients:

2 pounds ground beef
¼ cup water
1 teaspoon baking soda
kosher salt
3 tablespoons vegetable oil
1 large yellow onion, diced
1 jalapeno pepper, seeded and minced
1 tablespoon minced garlic
2 tablespoons tomato paste
1 tablespoon dried oregano
1 teaspoon dried thyme
1 tablespoon ground coriander
1 tablespoon garlic powder
1 tablespoon onion powder
2 tablespoons ground cumin
2 tablespoons chili powder
½ teaspoon cayenne power
1 tablespoon paprika
2 teaspoons ground black pepper
1 teaspoon sugar
½ cup ground tortilla chips
2 cups beef stock
1 can (15-ounce) kidney or pinto beans, rinsed
15 ounces pureed tomatoes
1-2 tablespoons apple cider vinegar

In a large bowl, mix the ground beef with the water, baking soda and 2 teaspoons salt. Allow to sit at room temperature for 20 minutes.

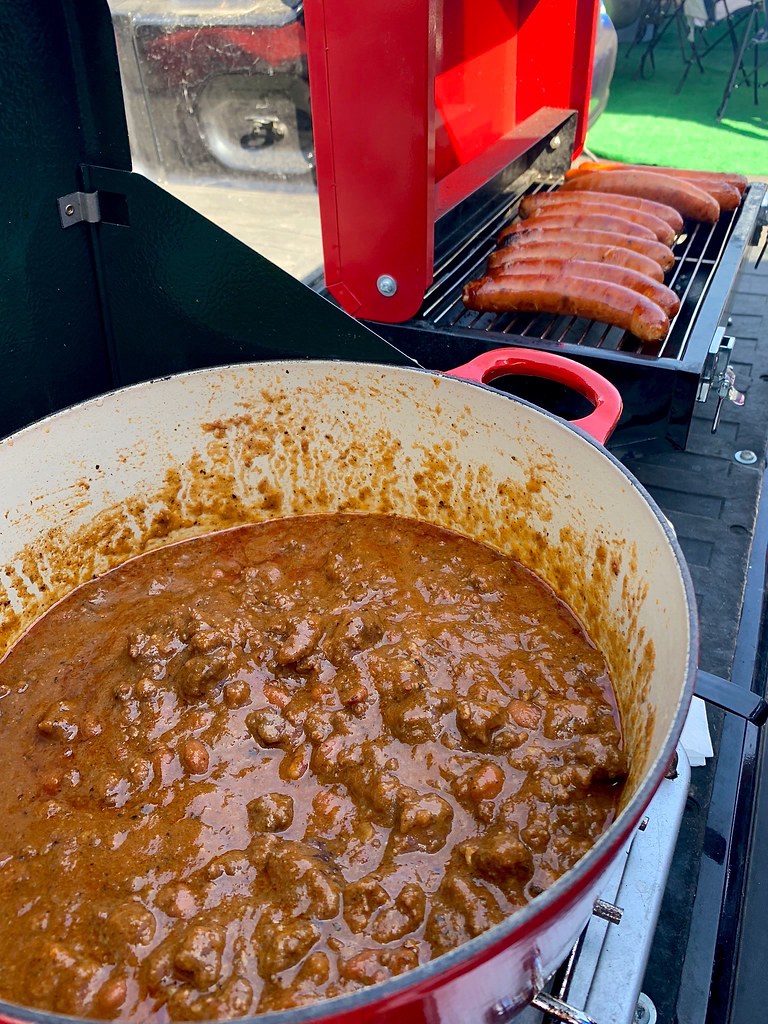
Heat the oil in a large Dutch oven or heavy bottom pot over medium heat. Cook the onions and jalapenos until softened—about 5-6 minutes, stirring frequently. Add the garlic and cook for an additional 1-2 minutes. Add beef and cook, stirring with wooden spoon to break meat up into ¼ inch pieces, until the beef is browned – about 12 to 14 minutes. Add the tomato paste and cook for one minute. Stir in all of the dried spices including the ground tortilla chips. Cook and stir for 2 minutes.

Pour in the beef stock, beans and pureed tomatoes. Bring to boil, scraping bottom of pot to loosen any browned bits. Once it reaches a boil, lower the heat to a low simmer. Simmer the chili partially covered, for 1½ hours. Stir the chili every 15 minutes or so as it slowly thickens.

Remove the pot from the stove and allow to rest, covered, for 15 minutes. Stir in the apple cider vinegar and add additional salt if needed. Serve with your choice of diced red onion, shredded cheddar cheese, diced avocado, chopped scallions, fresh cilantro, sour cream, lime wedges and tortilla chips


Seafood · Soups/Stews

Our Seafood Cioppino – Happy Birthday Mom!!!

sc043618b9

Today is our Mama’s birthday and although it’s been 10 years since she’s been with us, not a day goes by when we don’t miss or think of her.

sc043f02bf
That fiery spirit that her daughters and granddaughters inherited……

sc0435a1b7
That deep sense of family, love and loyalty……

sc012f9acd01
The affinity to talk to strangers and win them over in minutes….

MomandDad
That strong “will” (yes…I was trying not to say stubborn)…..

New Brighton
And that love to cook and explore new cuisines.

Kids
Of course there are dishes that I cannot help but miss her dearly when I make them. Like Thịt Kho Trứng (Vietnamese Caramelized Pork and Eggs), Thịt Bò Xào (Stir-fried beef), Mì Quảng (Turmeric Noodles) or even Korean Chap Chae —all dishes I used to ask her to make for me.

But then there are dishes like Seafood Cioppino, that although wasn’t her own, has now become a staple among my siblings every time we want to celebrate Mom.

River
At least a dozen years ago when I lived in San Jose, Mom came to visit me and sister P who lived in San Francisco. We spent the time walking around the city, shopping, and eating everything possible. And one night for dinner, P and I decided to make her a decadent, quintessential San Franciscan dish–Seafood Cioppino.

Mom and Nam
Cioppino is a seafood stew that originated in the Italian American communities of SF. It layers tons of aromatics with wine and tomatoes to make a fragrant stock. A variety of seafood is then cooked in the stock –which then deepens in flavor from the juices of the shellfish and seafood.

It’s incredible and we knew Mom would love it.

momanddad

While P and I spent hours in the kitchen that late afternoon charring the peppers, sauteing the veggies, simmering the stock, and cleaning all the seafood we had scored on Clement Street, Mom sat at the table watching us. She kept asking what we were doing—-and then, what we were going to next. Then she would say that we were going to a lot of trouble just for one dish.

But honestly, I think of everything we did during that visit, she loved that day the most. Chatting with her daughters while they cooked and fussed over her.

Of course, she loved the Seafood Cioppino too!

And can we just say how fabulous Mama was sitting in her satin pajamas, wearing her black Tahitian pearls while digging into a big ol’ bowl of Seafood Cioppino??

Fancy.

Shortly after Mom passed, I made a photobook for my family that included old pictures and our favorite recipes from her. And soon after, that one dish P and I made that one SF visit became “Mom’s Cioppino”—something that is lovingly made many times a year since.

Cioppino

I’ve posted tons of pics on Instagram and Facebook of our Seafood Cioppino and often get requests for the recipe. Whether it was too personal or maybe it was still too “soon”–I just wasn’t willing to share it yet.

Cioppino
After all of the years, it doesn’t get “easier” and I still miss her so much. But these days, I am able to share more things about her and now it’s rather perfect to share with you all this dish on her birthday.

Yes, there are many steps with the Cioppino and it does take some time —but the good news is, nothing is really difficult. And it’s the perfect dish to share with your loved ones when you can spend the day together in the kitchen making memories.

I hope you love it as much as we do.

Cioppino
We love you Mama and Happy, Happy Birthday!

______________________
Seafood Cioppino

Serves 8

Ingredients:
Stock
2 red bell peppers
½ red jalapeno pepper
5 Roma tomatoes, halved
olive oil
1 medium sized white onion, diced
2 celery ribs, diced
1 fennel bulb, diced
2 large garlic cloves, smashed
¼ teaspoon red pepper flakes
1 750mL bottle white wine, such as a Sauvignon Blanc or mild White Blend
5 standard tomatoes (Mexican or Florida tomato), coarsely chopped
1 8oz bottle clam juice
½ cup tomato juice
1 bay leaf
1 teaspoon whole black peppercorns
sea salt
20 sprigs fresh thyme
6 springs fresh parsley
8 sprigs fresh tarragon
½ teaspoon saffron threads

Seafood (or a medley of your favorites)
2 dungeness crabs, washed and quartered
2 lobster tails, quartered
2 pounds mussels, debeared and scrubbed
2 pounds manila clams, scrubbed
1 pound firm white fish, such as halibut or mahi, cut into 1½ inch cubes
1 pound shrimp, deveined and shell intact
1 pound sea scallops, if they are large—cut them in half
½ pound calamari, cut into 1-inch rings

Garnish
chopped fennel fronds and parsley

Turn your oven broiler on. Place bell peppers, jalapenos and Roma tomatoes on a rimmed baking sheet and coat with olive oil. Broil the vegetables for 5-7 minutes, using tongs to rotate frequently until the peppers have charred and the skin has bubbled. Transfer the vegetables to a large bowl and cover securely with plastic wrap. Set aside for 20 minutes to allow the vegetables to steam.

Peel the skins off the peppers and discard along with the stems and seeds. Next, peel and discard the skins of the Roma tomatoes.

Place a large stock pot or dutch oven over medium heat on the stove. Add 2 tablespoons olive oil and allow the oil to begin to slightly shimmer. Add the onions, celery and fennel inside the pot and cook until they have softened and become translucent—you do not want them to brown. Add the garlic, red pepper flakes and cook for an additional minute until fragrant. Pour in the wine and allow the liquids to come to a boil. Add the roasted peppers, Roma tomatoes, chopped fresh tomatoes, clam juice and tomato juice. Add the thyme, parley, tarragon, bay leaf, ½ tablespoon sea salt and peppercorns. Allow the liquids to come a rolling boil, lower heat and simmer, partially covered for 1½-2 hours. The liquids will nearly have reduced by half.

Pass the stock to a fine strainer and discard the vegetables and aromatics. Pour the stock into a large clean pot, add the saffron threads and lower the heat to a simmer for several minutes to allow the saffron to bloom and flavor the stock. Taste the broth and add additional sea salt as needed. Bring the stock back to a boil and add in the crab and lobster—cover and cook until the shells have become pink and the flesh becomes almost fully opaque. Stir in the clams, mussels and cover the pot. Allow them to cook for about 2 minutes until they just begin to open. Gently stir in the shrimp, fish, calamari and allow them to cook over a simmering heat—avoid cooking the fish in a rapid boil as they will get tough. Once the last seafood items turn opaque, taste the broth again and adjust with additional sea salt and pepper as needed.

Ladle the seafood into a bowl and pour the hot broth over it. Sprinkle with chopped fennel fronds, chopped parsley and serve immediately with warm bread.

Enjoy!

Note: This stock can definitely be made ahead of time so double or triple the batch and keep some in your freezer for a chilly night!

Poultry · Soups/Stews

Turkey and Bean Chili

Turkey and Bean Chili
This time of the year, Sundays are filled with weekday meal prep and football. It’s only sensible, of course.

And while I was in the middle of prepping a double batch of my Turkey and Bean Chili for tomorrow’s Halloween Potluck, I realized I’ve never posted the full recipe here.

That changes now!!

Turkey and Bean Chili

It’s tried and true and is easily doubled or tripled to feed crowds. AND it freezes beautifully!!

Serve as a main with cornbread or crackers…….or on top of baked potatoes or chips……whatever way, this chili is a beaut! ❤

____________________________________________

Turkey and Bean Chili
Serves 8

Ingredients:

2 tablespoons olive oil
1½ cups white onion, diced
1 red bell pepper, diced
1 heaping tablespoon minced garlic
1 serrano chili pepper, minced
1 jalapeno pepper, minced
1 pound ground turkey meat
2 tablespoons chili powder
1 teaspoon cumin powder
1 teaspoon garlic powder
1 teaspoon onion powder
1/8 teaspoon cayenne pepper (more to taste)
2 tablespoons tomato paste
3 ounces chipotle peppers in adobo sauce (optional)
1 28-ounce can diced tomatoes
1 cup lager beer of your choice
1 15-ounce can kidney beans, rinsed
1 15-ounce can black beans, rinsed
1 teaspoon kosher salt, more to taste
black pepper


Heat the oil in a large dutch oven or heavy bottom pot. Cook the onions and bell peppers until softened—about 5-6 minutes. Add garlic, serrano pepper, jalapeno pepper and cook for an additional 2-3 minutes. Add the turkey and cook while using a wooden spoon to break up the meat. Continue cooking until the meat is no longer pink—about another 5 minutes.

Add the chili powder, cumin, garlic powder, onion powder, and cayenne—stir and cook for an additional minute. Stir in the tomato paste and chipotle peppers (if using) and then add in the diced tomatoes with its juices. Gently stir in the beer, beans, 1 teaspoon salt and bring the mixture up to a slow boil.

Once it reaches a boil, lower the heat to a simmer. Simmer the chili partially covered, for about 45 minutes. Stir the chili every 10 minutes or so as it slowly thickens. Once it reaches your desired consistency, taste and adjust seasonings with salt and pepper as needed.

Serve the chili with additional cheddar cheese, chopped scallions, and sour cream.

Poultry · Soups/Stews · Vietnamese

Cà Ri Gà (Vietnamese Chicken Curry)

Cà Ri Gà

Vietnamese is easily one of the top requested foods people ask me to post recipes for. Of course it’s one of my favorite cuisines but to actually quantify measurements in Vietnamese dishes is really tricky. Like Mom and our aunties, I kind of throw a bit of this and a couple of more dashes of that until I like the flavor results.

So please bear with me as I try to share more delish Vietnamese dishes this year and know that you can always adjust amounts (more heat, less nước mắm…) to your hearts content.

Cà Ri Gà

Cà Ri Gà is the Vietnamese version of a chicken curry stew and I LOVE IT. It’s hearty, incredibly aromatic and the flavors get better over time. The rich Cà Ri Gà can be served with jasmine rice or over rice noodles. However my preferred carb accompaniment is with crusty, toasted baguette so that you can dunk pieces in the sauce and gobble it on up.

Cà Ri Gà

I kind of think of Cà Ri Gà as the Vietnamese approach to fusion as a lot of components pull from various cultures. The curry spices itself are from South India – the Vietnamese call it “Cà Ri Ấn Độ“. I like to use a Madras curry blend–a paste in fact but Madras curry powder will also do the trick. As for the coconut milk and kaffir limes – I think of those as classic Thai flavors. And of course the baguette comes from the very heavy French influence in Việt Nam.

Cà Ri Gà

Cà Ri Gà is not difficult to make but like so many other memorable dishes, it does take some time to layer flavors. And trust me, it’s completely worth the few extra steps.

Start off by taking a chicken (it is chicken curry after all) and break it down into 8 pieces. Of course you can use whatever cuts you prefer but I would suggest leaving the skin on and bone-in for more flavor. Mo’ flavor, mo’ better!

Slather the chicken in some of the curry paste and other aromatics –then allow it marinate for several hours.

Cà Ri Gà

After the chicken has had ample time to steep in all the delicious aromatics, lightly brown the meat on both sides.

Browned goodness = Awesome flavor

Tip: Before browning the chicken, wipe off some of the aromatics as they can burn from the high heat in the pot.

Burned garlic/ginger = No bueno flavor

Cà Ri Gà

Remove the chicken after it has browned and saute some other goodies. I’m telling ya, Cà Ri Gà is an aromatic party!

Cà Ri Gà

Then add in a few dollops of the Madras curry paste and cook it down for a minute or two. The heat will release the natural oils from the spices that will add magic to your sauce.

Flavor Magic.

Cà Ri Gà

At some point you’ll also want to smash up some lemongrass stalks. But do me a favor and be careful while you’re hacking away.

Cà Ri Gà

In goes the coconut milk, chicken stock, beaten up lemongrass, kaffir lime leaves and a few dashes of Vietnamese Liquid Gold (fish sauce)……..

Cà Ri Gà

Then the taters, carrots and chicken…………

Cà Ri Gà

And then about an hour later you’ll be ready to get down on some honest to goodness Cà Ri Gà! The chicken should be fork tender and swathed in the luscious curry sauce that is incredibly fragrant from the lemongrass, ginger and kaffir.

Should you find yourself with leftovers, take a tortilla and spoon some basmati rice in the center. Top the rice with the Cà Ri Gà, a few spoonfuls of the sauce and you’ll have an insane Cà Ri Gà Wrap! It also freezes really well.

Cà Ri Gà

And with that dear Friends – Ăn Ngon!

____________________________________________

Cà Ri Gà (Vietnamese Chicken Curry)
Serves 4-5

Ingredients:

1 whole chicken (4-5lbs), broken down into 8 pieces
4 tablespoons vegetable oil, divided
2 tablespoons minced shallots
2 tablespoons minced garlic, divided
1 tablespoon finely minced lemongrass
1 tablespoon finely minced fresh ginger
1 teaspoon black pepper
1 teaspoon sugar
3 tablespoons fish sauce, divided (*more to taste)
5 tablespoons Madras curry paste, divided
1 cup diced white onions
1 inch fresh garlic, sliced into thin matchsticks
2 whole red Thai chilies, minced (*more to taste)
1 13.5-ounce can unsweetened coconut milk
3 cups chicken stock
2 stalks lemongrass
6-8 fresh kaffir lime leaves (2-3 bay leaves can be substituted if needed)
1 pound peeled potatoes, washed and cut into large pieces
3-4 medium sized peeled carrots, cut into 2-3 inch pieces
1 cup fresh cilantro leaves
toasted baguettes

In a large bowl, add the chicken pieces, 2 tablespoons vegetable oil, shallots, minced garlic, minced lemongrass, minced ginger, black pepper, sugar, 1 tablespoon fish sauce, and 2 tablespoons of curry paste. Thoroughly coat the chicken and cover the bowl with plastic wrap. Place the chicken in the refrigerator and allow to marinate for 6-8 hours.

In a large heavy bottomed pot, heat the remaining oil to medium. Brush off the larger shallots/garlic/ginger pieces from the chicken (to prevent it from burning) and in batches, lightly brown the chicken on both sides—about 5-6 minutes. Place the browned chicken on a large plate.

Once all the chicken has been browned, discard all but 1 tablespoon of the oil/grease from the pot. Throw in the diced onions and cook for 2-3 minutes until softened. Add the garlic, chilies and saute for 1 minute before adding in the remaining curry paste. Cook for an additional 30-40 seconds to allow the aromatics and spices to release their oils and bring out their flavors.

Pour in the coconut milk and chicken stock. Take the back of a knife and smash the lemongrass stalks several times to bruise the stalks and release its oils. Add the bruised lemongrass, kaffir leaves, and remaining fish sauce to the pot. Place the potatoes and carrots in the pot and add the chicken. The items should mostly be submerged in the liquids.

Bring the liquids to a boil and then reduce to a simmer. Cook the curry, partially covered, on a low simmered heat for 50-60 minutes. Once done, the chicken should be very tender and the sauce has reduced by about ½.  Taste and adjust with additional fish sauce and black pepper as needed.

Garnish with fresh cilantro leaves and serve hot with toasted baguettes (or rice, noodles, etc.).

Soups/Stews

Basic Chicken Stock 101

Chicken Stock 101

For the record, let me say that I swear by store-bought stocks. I always try and keep the pantry equipped with cans/boxes of them to add to my dishes for that extra oompf. However, when given the chance, I do prefer to use my homemade stocks. More often than not, the flavor is a bit “cleaner” and I know exactly what’s in it.

Chicken Stock 101

Now generally when I make stocks, it’s because I don’t want to waste any of the leftover bones from a different dish we’ve prepared or when I’ve broken down a whole chicken and there’s an entire carcass (I know, kind of an ick word but I don’t know what else to call it) & other parts remaining.

After placing the bones in a large pot, I throw in any fresh herbs hanging out in the produce drawer of my fridge and cover it all with water. The goodies simmer for a few hours before it’s cooled to room temperature and then refrigerated for several hours. The pot is then strained and Voila– homemade stock that can be used right away or stored in the freezer for whenever you need it.

_________________________________

Basic Chicken Stock
Makes approximately 5 quarts

Ingredients:

1.5-2 pounds chicken parts (I use the leftover carcass, wings, etc.)
1 large white onion, quartered
3 medium sized carrots, halved
4 stalks of celery, halved
1 whole garlic clove, split in half
1/2 bunch fresh parsley
15 sprigs fresh thyme
5-6 sprigs fresh sage
3-4 dried bay leaves
1 tablespoon peppercorns
2 tablespoons kosher salt
6 quarts cold water

Place the chicken parts, onion, carrots, celery, garlic, and fresh herbs into a large stock pot. Add the bay leaves, peppercorns, salt and pour in the cold water.

Bring the pot with its contents to a rolling boil and then lower the heat to simmer, partially covered, for about 3 hours. Allow the pot to cool to room temperature and then refrigerate for several hours or overnight.

Remove and discard the larger pieces from the pot. Strain the remaining contents through a cheesecloth or fine mesh strainer. The stock can be used immediately, stored in the refrigerator for up to 3-4 days or kept frozen in the freezer for about 3 months.

Seafood · Soups/Stews · Sunday Family Dinner

Korean Feast for Sunday Family Dinner + Happy Birthday Nina!

August 2013 Korean Family Dinner

My eldest niece, Nina, turns 15 today *gulp*

Don’t ask me how it happened but within a blink of the eye, our super chubby little baby turned into a beautiful and intelligent young woman. The bday gal requested Korean for last week’s Sunday Family Dinner and we willingly obliged.

We LOVE Korean food! And as I’ve shared before, our mom went through an extensive phase where she cooked all types of Korean dishes to dazzle her guests.

August 2013 Family Dinner

As always, we cooked way too much food. But what can we say, we wanted a “little” bit of everything and leftovers are a good thing in our book. A HUGE thanks to Emily Kim, author and founder of Maanchi, whose recipes were heavily used in our menu that night.

As for the menu…..

What’s a Korean meal without some type of Kimchi? Eldest seester started a week before our dinner and prepared a ridiculous amount of Kimchi—and I mean a TON OF KIMCHI! Though I’m not complaining as we each got to take a jar home.

Kimchi

We had crispy, Grilled Pork Belly served with an acidic, vinegar based dipping sauce…….

Grilled Pork Belly

A huge pot of bubbling Soondubu Jjigae – Soft Tofu Stew with lots of seafood……

Soondubu Jjigae - Soft Tofu Stew

Plates of Haemul Pajeon – Seafood Pancake……….

Haemul Pajeon - Seafood Pancake

You can see that the there’s definitely more “filling” than batter in these pancakes.

Haemul Pajeon - Seafood Pancake

And there was a huge pan of Ddeokbokki – Spicy Rice Cakes which is one of my personal faves. Mimi (my oldest friend/ex-roomie) used to make this all of the time for me in grad school and it’s carboliciously, delicious.

Ddeokbokki - Spicy Rice Cakes

We also had Galbijjim – Braised Beef Short Ribs that just fell off the bone. Slightly sweet and incredibly tender. Man, my mouth is watering just remember this goodness…..

Galbijjim - Braised Beef Short Ribs

And there was some Kimchi Bokkeumbap – Kimchi Fried Rice.

Kimchi Bokkeumbap

And last, for dessert, Patbingsu – shaved ice. We adorned ours with sweet red beans, fresh fruits, mochi, tapioca and a drizzle of condensed milk.

Patbingsu - Shaved Ice

And that’s how we roll–Korean style!

Happy 15th Birthday Nina-love!!!! May this year bring you success in school (and tennis), laughter, happiness and adventures (in moderation, of course 🙂 )

xoxo!

August 2013 Family Dinner

This Month’s Family Dinner Menu

Cocktails: Watermelon Soju-tinis
Appetizers: Haemul Pajeon (Seafood Pancake), Homemade Kimchi, Grilled Pork Belly, Soondubu Jjigae 
Entrees: Ddeokbokki, Galbijjim, Kimchi Bokkeumbap
Dessert: Patbingsu, Red Velvet Cake

Pastas/Noodles · Pork · Soups/Stews

Pasta e Fagioli

Pasta e Fagioli

I’m kind of in love.

With this soup, that is.

It’s warming and fulfilling with tons of veggies, beans, sausage, and pasta. I also threw in some beautiful Swiss Chard at the end for some added texture and flavor— but any type of dark, leafy green could do the trick. Extra veggies never hurt a gal, right?

Depending on how you like the consistency of your soup, you can either add or limit the amount of chicken broth. I personally like mine on the soupier side so I can dunk some crusty bread in.

But one thing is for certain. No matter how you prefer it, this Pasta e Fagioli is the ultimate comfort food.

_____________________________________

Pasta e Fagioli
Serves 6-8

Ingredients:

2 tablespoons olive oil
1 pound spicy Italian sausage, casings removed
1 cup white onion, diced
1 cup celery, diced
1 cup carrots, diced
1 tablespoon fresh garlic, finely minced
1 28-ounce can diced tomatoes
1 15-ounce can cannellini beans, drained and rinsed
6 cups low sodium chicken broth, or more depending on desired consistency
3-4 sprigs fresh thyme
2 dried bay leaves
¾- 1 cup macaroni noodles, or other short pasta
¼ cup Parmesan cheese, grated
3 cups Swiss Chard, cleaned and roughly chopped
kosher salt and black pepper

In a large dutch oven or stock pot, heat olive oil over medium. Add sausage and use a wooden spoon to crumble up the meat. Continue browning until the sausage is barely pink. Add the onions, celery, and carrots to the pot and sauté until the vegetables have softened. Add in the garlic and cook for an additional 2 minutes.

Pour in the tomatoes with its juices and Cannellini beans. Add chicken stock, thyme and bay leaves. Partially cover and bring the pot to a boil. Remove the lid and stir in the pasta. Lower the heat to a simmer and cook until pasta is al dente—about 9-10 minutes. Remove and discard the bay leaves and thyme stems. Stir in the cheese and Swiss Chard. Season with salt and pepper and serve.

Poultry · Soups/Stews

Turkey and Bean Chili for Eat, Live, Run

Turkey and Bean Chili

Hi Friends!

I had the privilege to guest post yesterday for Jenna over at Eat, Live, Run.  If you have never been to her site, you simply MUST go there directly. Her recipes are utterly mouth-watering and her posts are a delight!

I opted to make a Turkey and Bean Chili to share with her readers to ease the fall season in. Yummy, yummy, yummy! Head on over and check it out.

Thanks so much Jenna! xoxo

Pastas/Noodles · Poultry · Soups/Stews · Vietnamese

Miến Gà (Vietnamese Chicken Glass Noodle Soup)

Miến Gà (Vietnamese Chicken Glass Noodle Soup)


Chicken Noodle Soup…..what could be more comforting?

Cultures all around the world have their own spin on this soul warming dish. For the Vietnamese, we have at least two versions— Phở Gà and Miến Gà.

Phở Gà is the lighter alternative to the traditional beef Phở and follows a similar cooking method. Due to the slow simmering process of the broth and spices, it takes me a couple of hours to complete a quality Phở Gà. Miến Gà offers a lighter broth and is served with glass noodles (Miến). White on Rice Couple gives a great overview of Miến.


Miến Gà (Vietnamese Chicken Glass Noodle Soup)


Both soups are delicious–especially on cold days. However, I find myself making Miến Gà more often. My version of Miến Gà can be done in a quick 20 minutes. In addition, you can tailor the ingredient amounts to make anywhere from 1 to 8+ bowls. Whereas with Phở Gà, you need a couple hours (at least) and are committed to a huge pot of it!


Miến Gà (Vietnamese Chicken Glass Noodle Soup)
The key to my Miến Gà is homemade chicken stock—something I almost always have on hand.  That combined with a splash of what I call “Vietnamese Liquid Gold” and you will have a wonderful and clean broth for your Miến Gà.

Wondering what Vietnamese Liquid Gold is? Nước Mắm (fish sauce), OF COURSE! 🙂


Miến Gà (Vietnamese Chicken Glass Noodle Soup)


Serve your Miến Gà with fresh herbs (cilantro, Thai Basil), a few slices of red chilies, and a squeeze of lime. The herbs, spice, and the tiny bit of citrus perfectly rounds out the flavors. This type of balance is the quintessential foundation in Vietnamese cuisine.

Miến Gà— now that is comfort food 🙂

_____________________________________________

Miến Gà (Vietnamese Chicken Glass Noodle Soup)
Serves 2

Ingredients:

1.5 Quarts Homemade Chicken Stock
2 Tablespoons Nước Mắm (fish sauce)
1 Inch Fresh Ginger, peeled
1 Teaspoon Black Peppercorns
1 Boneless Chicken Breast
4 Ounces Dried Miến (glass noodles)
Hot Water
Garnish: Chopped Scallions, Chopped Cilantro, Thai Basil, Slices of Red Chilies, Lime Wedges

Fill a large bowl with hot water and add Miến. Soak Miến for at least 15 minutes until they have softened.

In a medium size pot, add chicken stock, Nước Mắm, peppercorns and ginger. Bring to a simmer and add chicken breast. Continue poaching chicken breast until it is fully cooked, about 8 minutes–depending on size. Remove the chicken breast. Once it’s cooled slightly, slice or shred the meat.

Turning back to the the broth, skim off any impurities that may have formed. Taste and adjust the seasonings—adding more pepper or a dash of Nước Mắm as needed. Keep the broth at a low simmer to ensure it stays hot.

Drain the Miến and add to bowls. Sprinkle with scallions, cilantro, and arrange chicken slices on top. Ladle hot broth over and noodles. Garnish with additional scallions, chilies, basil, and lime.

Note: It’s important that the broth remain piping hot when it’s poured over the noodles. The heat will finish cooking the Miến.


**This is my submission to Delicious Vietnam, a monthly blogging event celebrating Vietnamese cuisine which was started by Anh of A Food Lover’s Journey and Hong & Kim of  Ravenous Couple. To participate,  please send entries to theculinarychronicles@gmail.com by March 13th! For more information, please visit Delicious Vietnam**


Soups/Stews

Corn Chowder and a Photo Quandry

In the age of Digital Cameras, photography novices (and I mean ME!) rely on taking hundreds of shots in hopes of getting 1 or 2 photos we like. It’s so easy to snap a photo, take a quick peak, delete, re-shoot….repeat.

Sure, I play around with aperture settings, ISO, composition, blah-blah-blah. But most of it’s trial and error. This especially occurs when I shoot food photos. I often torture loved ones by making them wait until I’ve snapped the thousandth photo before they can dig into their plates. It’s a sad thing.

So I decided to challenge myself the other day……. take only ONE shot of a dish. One quick click without any do overs.

The subject of the photo—a Corn Chowder to take the chill off the cold days we’ve been having.

Sadly, it definitely wasn’t a great photo.  But alas, I had to stick to my guns—- though I had a quandary on my hands. Even though the photo was BLEH the Corn Chowder turned out so darn tasty and tummy warming. If I scrapped the photo, I would have nothing to show you Friends.

Alas….here it is….


Corn Chowder


Meh……

Not my best work but I’m a work in progress. And although I’m glad to have challenged myself, next time I will continue to click away. Let’s face it….that’s why I bought a digital camera in the first place 🙂

______________________________________

Corn Chowder
Serves 4

Ingredients:

3 Cups Russett Potatoes, diced
1 Cup Corn Kernels
½ Cup Carrots, finely diced
½ Cup Celery, finely diced
½ Cup White Onion, finely diced
2 Whole Garlic Cloves, finely diced
3 Strips Bacon, finely diced
2 Dried Bay Leaves
1 Teaspoon Fresh Thyme Leaves
1 Quart Low Sodium Chicken Broth
3/4 Cup Heavy Cream
Kosher Salt and Black Pepper

In a heavy bottom pot, cook the bacon slowly until crisp and the fat has rendered out—about 8-10 minutes. Using a slotted spoon, transfer the bacon to a plate covered with a paper towel.

In the same pot with the bacon grease, add carrots, celery, and onions and cook until they are translucent. Add the garlic, thyme, potatoes and cook for 2 or 3 minutes. Season with salt and pepper. Add chicken broth and bay leaves. Bring liquid to a boil and then cover and lower heat to a steady simmer.

Continue to simmer until the potatoes become tender—about 15-20 minutes. Once this has been achieved, use a wooden spoon to smash some of the potatoes against the sides of the pot to release some of the starch into the liquid. Stir in the corn and cream and continue to simmer for an additional 10 minutes.

Remove the bay leaves and discard. Season to taste with salt and pepper. Ladle soup into bowls and sprinkle the tops with the crisped bacon.