 Man, oh man!
We’re F-I-V-E today!!! For real, for real— as in, I’ve been rambling about food, family, and absolutely random things for 5 YEARS!
Holy Moly!!!
 These past five years have been filled with quite the Foodventures and every foray into the kitchen still brings surprising successes, utter failures and always new takeaways. It’s never a dull moment!
And I kind of dig how my palette has changed over the years. Dishes I used to despise are now the ones I crave and are obsessed with making. Things I used to think I couldn’t live without are now nowhere to be found in my kitchen.
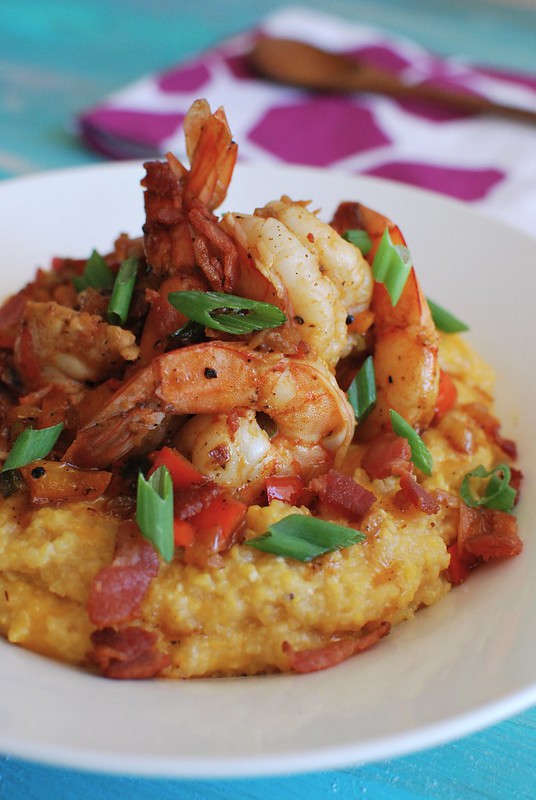
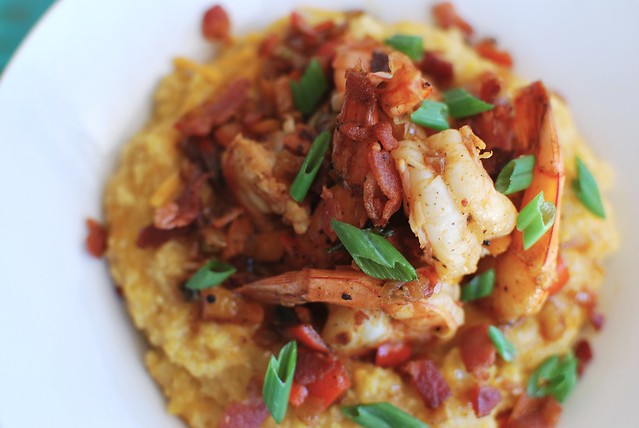
 Which is why for our 5th blogiversary, I opted to make this utterly decadent, stick-to-your-ribs Bacon & Cheesy Grits. Because believe it or not, I used to hate grits. Well…anything of that similar texture. Oatmeal, porridge, cream of wheat— all of it. Bleh!
But then one day, I woke up and the sun was shining, the birds were chirping, the forest animals were frolicking and a bowl of shrimp & grits somehow magically appeared in front of me.
And my life was changed. Luscious, cheesy, goodness. Mind blown.
So I’m pretty certain you’ll love them too. Not to mention it’s super easy to make.
 And because y’all have stuck with me throughout these past few years and have followed my random musings, we’re having a fantabulous (did I just use that word??) $100 American Express® GiftCard GIVEAWAY for one of our lucky readers. I don’t know about you but it may come in handy with the holidays coming up.
Want to know how to win?

There are six (6) different ways for you to enter! Please be sure to leave a separate comment for each indicating which of the below you did: This Giveaway has ended- THANKS!
- Leave a comment sharing what dish do you now love but didn’t like before;
- Subscribe to The Culinary Chronicles & get automatic emails when new posts are published (If you already Subscribe, leave a comment indicating so);
- Like our Facebook Fan Page (If you already “Like” us, leave a comment indicating so); or
- Follow @CulinaryChron on Twitter (If you already Follow us, leave a comment indicating so); or
- Follow our boards on Pinterest (If you already Follow us, leave a comment indicating so); or
- Follow us on Instagram (If you already Follow us, leave a comment indicating so
The deadline to enter is Monday, November 17th at 5pm (PST) and the winner will be notified the next day. This Giveaway has ended- THANKS!
And with that dear friends, thanks again for all of your support and here’s to another five years of delicious and entertaining Foodventures!!!
Alohas ❤
_________________________________________
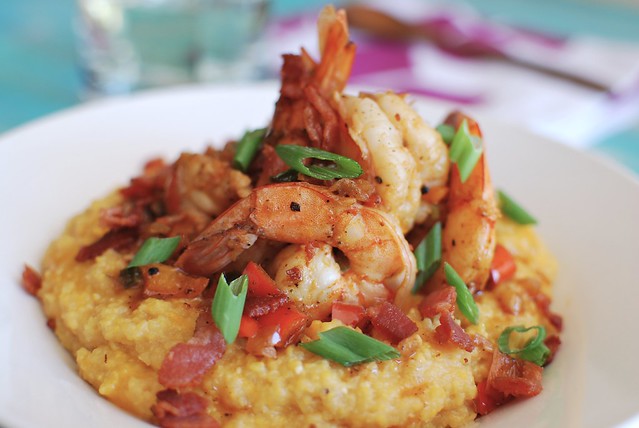
Bacon & Shrimp Cheesy Grits
Serves 4
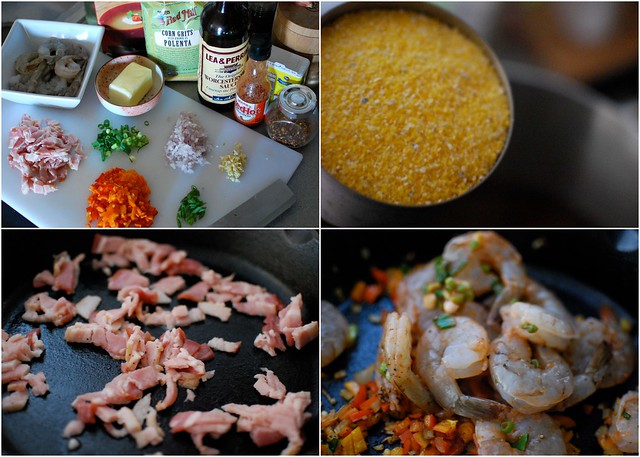
Ingredients:
1 pound shrimp, cleaned and deveined
1 tablespoon hot sauce
½ teaspoon Old Bay Seasoning (or other Cajun spice blend)
¼ teaspoon cayenne pepper
½ teaspoon garlic salt
black pepper
1 tablespoon olive oil
2 scallions, chopped, more to garnish
3¼ cups low sodium chicken stock
kosher salt
1 cup grits
4 tablespoons unsalted butter, divided
½ cup shredded sharp cheddar cheese, more to garnish
3 slices bacon, diced
½ cup minced shallots
1 cup finely diced bell peppers (assorted colors)
1 tablespoon minced garlic
½ cup dry white wine
3-4 dashes Worcestershire sauce
¼ teaspoon red pepper flakes
In a bowl, mix the shrimp with the hot sauce, Old Bay Seasoning, cayenne pepper, garlic salt, ¼ teaspoon black pepper, ¼ teaspoon kosher salt, olive oil and chopped scallions. Set aside.
In a heavy bottom pot, bring the chicken stock to a rolling boil with ¼ teaspoon kosher salt. Slowly whisk in the grits and cook until the grits have thickened and become tender. For quick grits, this will take about 5-7 minutes over medium heat. For regular grits, simmer for about 25 minutes. Once done, stir in 2 tablespoons unsalted butter and cheese. Taste and adjust seasonings as needed. Cover and keep warm.
In a cast iron skillet or other heavy bottom skillet. Slowly sauté the bacon until it becomes crispy and the fat has rendered down—about 5 minutes. Use a slotted spoon and transfer the bacon bits to a plate covered with paper towels. Reserve one tablespoon of bacon drippings in the pan and discard the rest. Sauté shallots in the bacon drippings until translucent. Add the diced bell peppers and cook for an additional two minutes. Add the garlic and shrimp and cook until the shrimp just begins to turn pink—about 2 minutes. Remove the shrimp from the skillet. Turn the heat to medium high and pour in the white wine. Use a wooden spoon and scrape the bottom of the skillet to release all the brown bits. Allow the wine to come to a boil and reduce the liquid for 2-3 minutes. Stir in the remaining butter, Worcestershire sauce, and red chili flakes. Add the shrimp back into the skillet and allow the items to cook for an additional minute. Taste and season as needed.
Divide the cheesy grits amongst four bowls and top each mound with the shrimp mixture. Sprinkle each bowl with the additional cheddar cheese, scallions and crispy bacon. Serve immediately.