Pastas/Noodles · Pork · Soups/Stews

Pasta e Fagioli

Pasta e Fagioli

I’m kind of in love.

With this soup, that is.

It’s warming and fulfilling with tons of veggies, beans, sausage, and pasta. I also threw in some beautiful Swiss Chard at the end for some added texture and flavor— but any type of dark, leafy green could do the trick. Extra veggies never hurt a gal, right?

Depending on how you like the consistency of your soup, you can either add or limit the amount of chicken broth. I personally like mine on the soupier side so I can dunk some crusty bread in.

But one thing is for certain. No matter how you prefer it, this Pasta e Fagioli is the ultimate comfort food.

_____________________________________

Pasta e Fagioli
Serves 6-8

Ingredients:

2 tablespoons olive oil
1 pound spicy Italian sausage, casings removed
1 cup white onion, diced
1 cup celery, diced
1 cup carrots, diced
1 tablespoon fresh garlic, finely minced
1 28-ounce can diced tomatoes
1 15-ounce can cannellini beans, drained and rinsed
6 cups low sodium chicken broth, or more depending on desired consistency
3-4 sprigs fresh thyme
2 dried bay leaves
¾- 1 cup macaroni noodles, or other short pasta
¼ cup Parmesan cheese, grated
3 cups Swiss Chard, cleaned and roughly chopped
kosher salt and black pepper

In a large dutch oven or stock pot, heat olive oil over medium. Add sausage and use a wooden spoon to crumble up the meat. Continue browning until the sausage is barely pink. Add the onions, celery, and carrots to the pot and sauté until the vegetables have softened. Add in the garlic and cook for an additional 2 minutes.

Pour in the tomatoes with its juices and Cannellini beans. Add chicken stock, thyme and bay leaves. Partially cover and bring the pot to a boil. Remove the lid and stir in the pasta. Lower the heat to a simmer and cook until pasta is al dente—about 9-10 minutes. Remove and discard the bay leaves and thyme stems. Stir in the cheese and Swiss Chard. Season with salt and pepper and serve.

Pork · Seafood · Vietnamese

Bánh Xèo (Vietnamese Sizzling Crêpes)

Bánh Xèo (Vietnamese Sizzling Crepe)

Bánh Xèo

Bánh = Cake

Xèo = Sound of the “sizzle” from the skillet

Bánh Xèo (Vietnamese Sizzling Crepe)

Growing up, I always considered Bánh Xèo to be a treat when my mom made them. She insisted that they needed to be eaten immediately from the skillet to maintain its crispy exterior. And unlike when you order them from restaurants, she would fill mine with tons of filling. 🙂

Bánh Xèo gets its yellow hue from the turmeric and is flavored with coconut milk. Traditionally, Bánh Xèo is filled with pork, shrimp, onions, mung beans, and bean sprouts. And just like chả giò (egg rolls), you wrap pieces of the Bánh Xèo with herbs and lettuce leave before dunking it into Nước Chấm–a fish sauce based dipping sauce. The freshness of the veggies is the perfect balance to the slightly fried crêpe.

Enjoy!

________________________________________________

Bánh Xèo (Vietnamese Sizzling Crêpes)

Batter:
1½ Cups Rice Flour
½ Teaspoon Turmeric
¼ Cup Coconut Milk
1 Cup Cold Soda Water, more if needed
½ Cup Scallions, diced
1-2 Dashes Nước Mắm (fish sauce)

Filling:
½ Pound Shrimp, peeled and cleaned
½ Pound Pork Loin, sliced thinly
½ Cup White Onion, thinly sliced
1 Tablespoon Garlic, finely diced
2 Cups Fresh Bean Sprouts
Nước Mắm (fish sauce)
Ground Black Pepper
Vegetable Oil

Nước Chm (Dipping Sauce):
½ Cup Nước Mắm (fish sauce)
½ Cup Sugar
½ Cup Fresh Lime Juice
¼ Cup Warm Water
1-2 Thai Chilies, finely diced

Accouterments:
Lettuce
Thai Basil
Mint
Cilantro
Cucumbers

In a large bowl, whisk together the rice flour and turmeric. Add in coconut milk and mix until well combined. Slowly whisk in the soda water until all the lumps have dissolved. Whisk in Nước Mắm and scallions. Set the batter aside for 30-45 minutes.

Prepare the Nước chm. Combine Fish Sauce, Sugar, Lime Juice, Warm Water and stir until sugar is dissolved. Add in chilies. Cover and set aside.

In another bowl, add in pork and shrimp. Toss with garlic, white onions, a few splashes of Nước Mắm, and pepper. Heat a pan with a few tablespoons of oil to medium-high heat. Add the mixture and cook for a few minutes until the pork and shrimp are almost done. Remove from pan.

In a large nonstick skillet, add 1-2 tablespoons of oil. Stir the batter and carefully spoon a ladleful into the skillet. Tilt and swirl the pan to coat the bottom evenly. After 1-2 minutes, place some of the pork/shrimp mixture on one half of the skillet. Top with the bean sprouts. Cover and cook for 1-2 minutes. Remove lid and drizzle a little bit of oil on the outer edge of the crêpe. Cover the skillet for another 2-3 minutes. Using a spatula, carefully fold the crêpe in half, gently pressing down on top. Transfer to a plate. Serve with lettuce, mint, cilantro, thai basil and nước chm (dipping sauce).


This is my submission to the final Delicious Vietnama monthly blogging event celebrating Vietnamese cuisine started by Anh of A Food Lover’s Journey and Hong & Kim of  Ravenous Couple. Thank You Anh, Kim, and Hong!

Appetizers/Small Plates · Pork · Vietnamese

Bánh Pa Tê Sô (Vietnamese Savory Meat Pies)

Bánh Patê Sô (Vietnamese Savory Meat Pies)


Bánh Pa Tê Sô (also spelled Pâté Chaud) are deliciously flaky pies with a savory filling.

I know what you’re thinking. Puff pastry isn’t exactly among the first things that comes to mind when you think of Vietnamese cuisine. But, like the baguette and coffee, we’ve taken these items initially introduced by the French and have given them a Vietnamese makeover.


Bánh Patê Sô (Vietnamese Savory Meat Pies)

Bánh Pa Tê Sô are usually cut into round shapes but if you want to minimalize the waste of excess pastry dough, you can shape them into squares, rectangles, or triangles. But for the record, when I shape them into rounds, I never throw away the excess dough. Instead, I take the leftover strips, twist them and sprinkle the tops with cinnamon sugar before baking them. That way, I get a little sweet treat, too. Yum.


Bánh Patê Sô (Vietnamese Savory Meat Pies)


The pork filling I use is essentially a riff off of my Chả Giò (eggrolls) filling with the slight adjustments of a few things—such as the addition of peas. I also make a curry-lemongrass pork filling that is really fantastic with the buttery puff pastry, too. But whatever you choose to fill your Bánh Pa Tê Sô with, just be sure to not over stuff them or it will not cook through and may bulge out of the seams.


Bánh Patê Sô (Vietnamese Savory Meat Pies)

You can also freeze the pre-baked Bánh Pa Tê Sô. Just wrap them up individually with plastic wrap and freeze. Before baking, thaw them out to room temperature and bada-bing, bada-boom. Freshly baked Bánh Pa Tê Sô, whenever your heart desires.

Of course if you’ve got some time and ambition on your hands, homemade puff pastry dough would be ideal. I just don’t have that kind of patience and think the store bought pastry dough works just fine for me.

And no, that’s not cheating–despite what my sister, P, would say 🙂

_________________________________________

Bánh Pa Tê Sô (Vietnamese Savory Meat Pies)

Ingredients:

1 Package Puff Pastry Sheets (typically contains two 10×15 inch sheets)
½ Pound Lean Ground Pork
¼ Cup Rehydrated Wood Ear Mushrooms, minced
¼ Cup Rehydrated Bean Thread Noodles, minced
¼ Cup Peas
1 Small Shallot, finely diced
1 Garlic Clove, finely minced
1 Tablespoon Fish Sauce
½ Teaspoon Ground Pepper
1 Egg, beaten

Preheat oven to 375 degrees F.

In a large bowl, mix together pork, mushrooms, noodles, peas, shallots, garlic, fish sauce and pepper until well combined.

Using a 3-inch ring biscuit cutter, cut rounds of puff pastry. Place one tablespoon of the filling in the center of one round and place another piece of puff pastry on top. Using the tines of a fork, crimp the edges of the rounds to seal the pastry. Transfer the Patê Sô to a baking sheet lined with parchment paper. Repeat with the remaining pastry rounds. Brush the tops of each Patê Sô with the beaten egg.

Bake the Patê Sô for about 20-25 minutes until golden brown. Enjoy!


**This is my submission to Delicious Vietnam #18 a monthly blogging event celebrating Vietnamese cuisine which was started by Anh of A Food Lover’s Journey and Hong & Kim of  Ravenous Couple. For more information, please visit Delicious Vietnam Thanks to Bonnibella for hosting this month!**

Pastas/Noodles · Pork · Sponsored

Spinach and Sausage Lasagna Rolls

Spinach and Sausage Lasagna Rolls

“I love Pasta…… I love Pasta…..I love Pasta…….Yea, yea, yea, yea!”

In case you didn’t get that….that was my “pasta song”.  I’m a horrible singer and I really don’t like karaoke.  But I just adore pastas so much that I just have to sing it out sometimes.

Spinach and Sausage Lasagna Rolls

One day I came home from work to find a box sitting at my front door. And in that box, there were PASTAS!!!!!!!

Oh yes—it was a red letter day. 🙂

Spinach and Sausage Lasagna Rolls

Thanks to , I had lasagna sheets and penne rigate at my disposal! They feature pastas that are lower in carbohydrates, high in fiber—and most importantly, delish!

Spinach and Sausage Lasagna Rolls

I took this opportunity to make lasagna rolls filled with spinach and sausage. Rolls are a fun way to change up traditional lasagnas and since the edges are usually my favorite part (due to the extra crispiness) rolls are the perfect way to go.

And on that note…..

“I love Pasta…… I love Pasta…..I love Pasta…….Yea, yea, yea, yea!”

Yeah….I should just stick to cooking.

________________________________________

Spinach and Sausage Lasagna Rolls
Serves 4

Ingredients:

8 lasagna sheets
¼ cup shallots, finely diced
2 garlic cloves, finely minced
½ pound Italian sausage
1 (10-ounce) bag frozen spinach, thawed and excess water squeezed out
1 teaspoon dried thyme
¼ teaspoon dried chili flakes
¼ cup goat cheese
¼ cup cream cheese
3 cups marinara sauce
1½ cups shredded mozzarella cheese
kosher salt
olive oil

Soak the lasagna sheets in hot tap water for 8-10 minutes or boil the pasta sheets for 1/2 the time listed on the box.

In a skillet, heat olive oil and sauté shallots until they are translucent. Add garlic and cook for an additional minute. Add the sausage to the pan. Use a wooden spoon to crumble the meat and break into small pieces.  Once the meat is no longer pink, add the spinach, thyme and chili flakes. Season with kosher salt. Remove pan from the heat and add goat cheese and cream cheese. Stir to combine.

Preheat oven to 375 degrees and drain the lasagna sheets. Spread about one cup of the marinara sauce on the bottom of a baking dish. Set aside.

Spoon/spread about 3-4 tablespoons of the spinach-sausage mixture across each lasagna sheet. Carefully roll up each sheet and place the rolls, seam side down inside the baking dish. Cover the tops of each roll with a few spoonfuls of marinara sauce and mozzarella cheese.  Transfer to the preheated oven and bake for about 20 minutes.

To serve, warm up the remainder of the marinara sauce. Add a few spoonfuls to the bottom of the plate and place rolls on top.

*** I received to sample, however, all views and opinions expressed are my own.***

Pork · Salads · Seafood · Vietnamese

Gỏi Mít Trộn (Vietnamese Young Jackfruit Salad)

Gỏi Mít Trộn (Vietnamese Young Jackfruit Salad)

When our clan gathers, you can be sure that there will be a massive array of delicious food. One can always count on the usual favorites such as Bánh Ít (sticky rice dumplings), Bún Bò Huế (spicy beef noodle soup),and Cua Rang Mui (salt roasted crab). And intermixed with all the Vietnamese goodies would often be a sprinkling of “American” dishes such as mom’s Turkey.

Growing up, each dish became linked to one of the aunties or Mom as they each refined the recipes to make it their own. But as my generation grew older, the proverbial baton was passed and we in turn began to make these iconic family favorites.

And I find comfort in knowing that these dishes that my siblings, cousins, and I create will pass on my family’s traditions through food.  It’s kind of remarkable to think that the Phở Gà I’ll make for my kids will be exactly the same recipe my mom would have made for them.

Incredible, really.

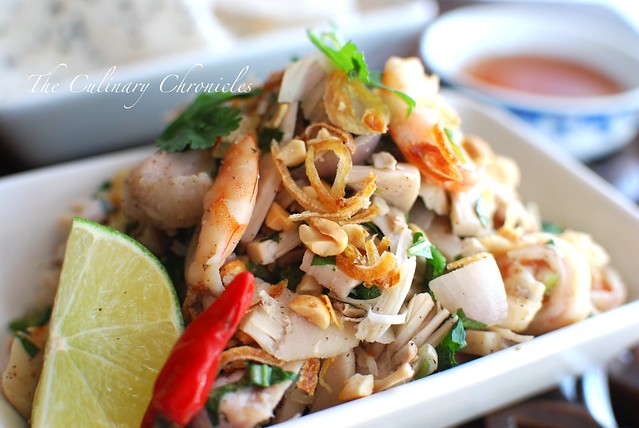
One dish that I hope to continue is Gỏi Mít Trộn. At the heart of the salad is Mít Non—young, unripe jackfruit. The flesh of the young jackfruit is tender and mild in flavor. In the states, Mít Non is sold both canned and frozen. However, if you use the frozen type, you’ll need to boil it for a bit.

Gỏi Mít Trộn (Vietnamese Young Jackfruit Salad)

After being washed and well drained, the Mít is stir fried for a few moments before it’s tossed with shrimp, pork and several herbs like Rau Răm (Vietnamese Cilantro).

Gỏi Mít Trộn (Vietnamese Young Jackfruit Salad)

The Gỏi Mít Trộn is then topped with fried shallots, crushed peanuts and accompanied with nước chm (dipping sauce).

Gỏi Mít Trộn (Vietnamese Young Jackfruit Salad)

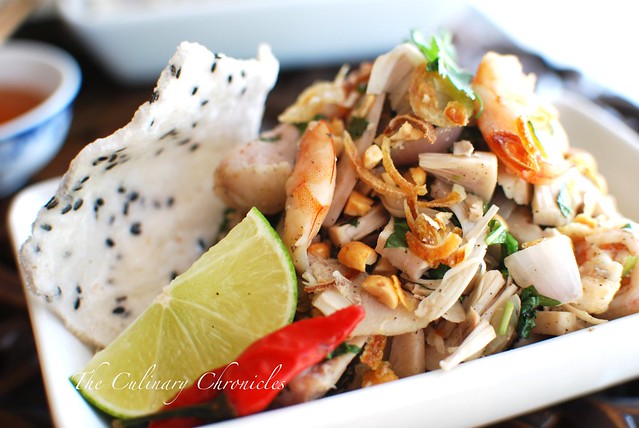
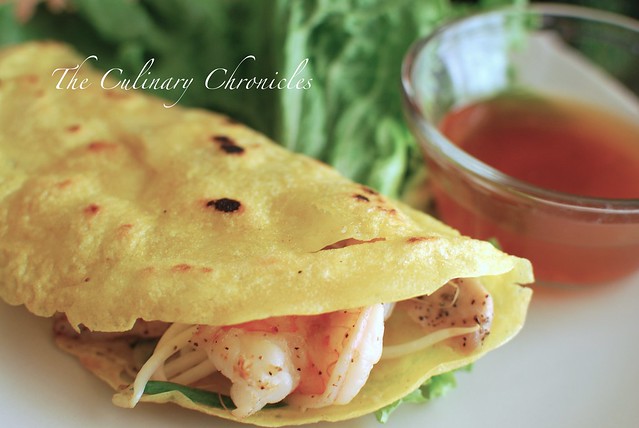
It’s best served with Bánh Đa (also sold as Bánh Tráng Mè) – crispy rice crackers flecked with black sesame seeds. Want to know something funny? When I was little, I used to think that the black sesame seeds in these were ants and stayed clear of these crackers for many years 🙂

 Bánh Đa


I like to eat Gỏi Mít Trộn by drizzling nước chm with lots of chili on top of the salad with a healthy squeeze of fresh lime juice. Then I take a piece of the Bánh Đa and use it to scoop up the goodness. YUM!


Gỏi Mít Trộn (Vietnamese Young Jackfruit Salad)

The layers of flavor and textures in this Gỏi really rock it out. Extremely savory from the proteins and fish sauce with bright herbaceous notes from the Rau Răm, mint, and cilantro. With each bite you get a lovely crunch from the rice crackers and peanuts that balances so well with the tender Mít.

If done correctly, everything is in perfect harmony.

I doubt my Gỏi Mít Trộn will ever be as good as my mom’s or aunties’. But one thing is for certain— in due time, our kids will be trying their hand at it, too 🙂


______________________________________________

Gỏi Mít Trộn (Vietnamese Young Jackfruit Salad)
Serves 8

Ingredients:

3 Cans (20 ounces each) Young Jackfruit
1 Pound Shrimp, shelled and deveined
1 Pound Pork Loin, thinly sliced
2 Tablespoons Shallots, finely diced
1 Tablespoon Fresh Garlic, finely diced
½ Cup Scallions, chopped
1½ Cups Rau Răm Leaves (Vietnamese Cilantro), roughly chopped
¼ Cup Fresh Cilantro, roughly chopped
¼ Cup Fresh Mint, roughly chopped
N
ước Mm (Fish Sauce)
Ground Black Pepper
Vegetable Oil

Accouterments:
Bánh Đa (rice crackers)
N
ước chm (dipping sauce)
Fried Shallots
Crushed Roasted Peanuts
Lime Wedges
Thai Chilies

In a large bowl, combine shrimp, pork, ½ tablespoon garlic, 1 tablespoon shallots, and a few dashes of fish sauce. Mix and season with black pepper. Allow to marinate for 10 minutes.

Drain the cans of jackfruit. Remove any seeds (including the shell layer surrounding the seeds) and cut off and discard any hard sections. With a sharp knife, thinly slice the jackfruit and transfer to a large bowl that has been filled with cold water. Repeat until all the jackfruit has been cut and rinsed. Using clean dishcloths, gently squeeze out the excess liquid. If too much moisture is left, your salad will be really wet and mushy. Set the jackfruit aside.

In a large skillet, heat 2 tablespoons of vegetable oil over a medium flame. Add pork and shrimp and sauté until cooked, about 4-5 minutes. Remove from the pan and set aside.

Using the same skillet, add another 1 tablespoon of oil over a medium flame. Add the remaining shallots, half the scallions and sauté until softened before adding the rest of the garlic. Stir and sauté for 2 minutes. Add the jackfruit and remaining scallions and sauté for an additional 2-3 minutes before seasoning with a few dashes of fish sauce and black pepper. Remove from heat and mix in the shrimp and pork. Toss in the Rau Răm, mint, and cilantro. Taste and adjust accordingly, keeping in mind that additional Nước chm will be used. Plate the contents to a large dish. Sprinkle the tops with fried shallots and crushed peanuts.

Serve the Gỏi Mít Trộn with Bánh Đa, Nước chm, limes, and chilies. Enjoy!


**This is my submission to Delicious Vietnam #15, a monthly blogging event celebrating Vietnamese cuisine which was started by Anh of A Food Lover’s Journey and Hong & Kim of  Ravenous Couple. For more information, please visit Delicious Vietnam Thanks to Angry Asian Creations for hosting this month!**

Breads · Pizzas · Pork

Sausage and Mushroom Pizza

Sausage and Mushroom Pizza

If you were to ask me, “What do you want on your pizza?”———–I will almost always say, Sausage and Mushrooms.

You just can’t go wrong with this delish combo.

I do, however, like to add a few special touches when I make my Sausage and Mushroom Pizzas. And those little extras comes in the form of roasted garlic and grape tomatoes. I try to squeeze in my veggies anyway I can.

Wait a second. Can I really consider garlic a “vegetable”?

Eh…… Sure, why not!? 🙂

Sausage and Mushroom Pizza

For this pizza, I tried out the dough from Cooks Illustrated. I’m happy to report that it came together really easily—especially since I used my KitchenAid Stand Mixer with the dough hook attachment for the kneading. The dough came out beautifully silky before baking and had a wonderful texture when it was done. I definitely recommend it!

Stay tuned for Friday’s post where I take a spin on one of my all time favorite desserts 🙂

______________________________________________

Sausage and Mushroom Pizza

Dough (From Cooks Illustrated):
½ cup warm water (for yeast)
2½ teaspoon instant yeast
1¼ cups water, at room temperature
2 tablespoons extra virgin olive oil
4 cups bread flour, plus more for dusting the work surface and hands
1½ teaspoon salt
olive oil for oiling the bowl
*Makes enough for 4 medium sized crusts

Toppings:
1 cup spicy Italian sausage, browned
1 cup Crimini mushrooms, sliced
1½ cups marinara sauce (more if you like it saucier)
1½ cups shredded mozzarella cheese
½ cup grape tomatoes, diced
¼ roasted garlic
¼ cup fresh Italian parsley, chopped
¼ cup yellow cornmeal
2 tablespoons olive oil

Prepare pizza dough. Measure the warm water into a 2-cup liquid measuring cup. Sprinkle in the yeast and let stand until the yeast dissolves and swells, about 5 minutes. Add room temperature water and oil and stir to combine. Combine the salt and half the flour in a deep bowl. Add the liquid ingredients and use a wooden spoon to combine. Add the remaining flour, stirring until a cohesive mass forms. Turn the dough onto a lightly floured work surface and knead until smooth and elastic, 7 to 8 minutes, using a little dusting flour as possible while kneading. Form the dough into a ball, put it in a deep oiled bowl, cover with plastic wrap and let rise until it doubles in size, about 2 hours.

Place pizza stone or large baking sheet in the middle rack and preheat oven to 400 degrees.

Lightly dust your surface area with flour. Divide the dough into quarters. Take one of the pieces and roll/toss/stretch the dough into your desired shape. Once the oven reaches its temperature, pull the baking stone/baking sheet out of the oven, and sprinkle cornmeal on the surface. Carefully slide the dough on top and bake for 5 to 10 minutes until the dough is lightly golden. Remove the crust from the oven and brush with olive oil over top. Spread the roasted garlic all over the crust. Cover the crust with an even layer of marinara sauce. Sprinkle the shredded mozzarella evenly over the dough, leaving a ½ -inch border around the perimeter. Top with the grape tomatoes, sausage, and mushrooms. Return the pizza back to the oven and bake for an additional 10-15 minutes until all the cheese has melted and pizza is golden brown. Sprinkle the pizza with Italian parsley and serve with additional parmesan cheese and red chili flakes.

Note: If you aren’t planning to use the extra dough right away, there are a few options for you. First, you can shape each piece and parbake them. Wrap them up tightly in plastic wrap and foil—then, throw into the freezer. Another option is to oil the inside of a Ziploc bag with cooking spray. Throw in one ball of dough per oiled bag and remove any excess air before sealing and place it in the freezer. Transfer it to the fridge the night before you want to use it. Then place it on the counter to get it to room temperature for 1-2 hours before you bake it.

Pork

Tonkatsu (Japanese Pork Cutlet)

Tonkatsu

Tonkatsu is such a delicious meal to pull together when I need a quick Japanese fix.

Since the pork used is so thin, it fries up in a flash! Even if you need to make your own sauce, you can have the whole dish done in 20 minutes. Which, let’s be honest, is “Buddha-sent” for weeknight meals.

A lot of Japanese markets carry a perfectly yummy bottled Tonkatsu sauce. But if you don’t have some on hand, it’s just as easy and delish to make. Though, I have been just as happy to dip the crispy cutlets into BBQ sauce.

_____________________________________

Tonkatsu (Japanese Pork Cutlet)
Serves 2

Ingredients:

Tonkatsu:
4 Pieces Pork Loin, ½ inch thin
1 Cup Panko Bread Crumbs
½ Cup Flour
2 Eggs
2 Tablespoons Milk
¼ Cup Vegetable Oil
Salt and Pepper

Tonkatsu Sauce:
2 Tablespoons Barbecue Sauce
2 Tablespoons Ketchup
½ Tablespoon Soy Sauce
1 Teaspoon Worcestershire Sauce
1 Teaspoon Rice Wine Vinegar
½ Tablespoon Sugar
½ Teaspoon Garlic Powder
¼ Teaspoon Black Pepper

Prepare the sauce by mixing whisking all the ingredients together in a bowl. Set aside while preparing the pork.

Place breadcrumbs in a shallow dish and place the flour in another. In a bowl, whisk together the eggs and milk. Season the pork with salt and pepper. Working in batches, dredge a few pieces of the pork in the flour, then the egg mixture, and finally the breadcrumbs to coat, shaking off the excess between each step.  Repeat with the remaining pork.

In a large skillet, heat the oil to medium high heat.  Slide in 2 pieces of pork and fry until golden brown, approximately 2-3 minutes on each side. Remove from pan and drain the cutlets on paper towels. Repeat with remaining pork.

Serve Tonkatsu with rice, sauce, and a squeeze of lemon.

Drinks · Pork · Sponsored

Fat Tire® Braised Carnitas Tacos with Fat Tire® Chavelas

Fat Tire® Braised Carnitas Tacos and Chavelas

I don’t indulge in beers too much these days. Let’s face it—without my college metabolism, it just doesn’t sit that well with me (or my hips!) anymore. But I do make exceptions for an occasional New Castle® or Fat Tire® from time to time.

So you can imagine my delight when, as part of the Foodbuzz Tastemaker Program, I was challenged to create a dish that featured and paired with a New Belgium Brewing Company beer. Which includes Fat Tire®! 🙂

Fat Tire® Braised Carnitas

I immediately knew that I wanted to incorporate the “hoppy” amber ale into a slow braise pork—ultimately to create Carnitas. By adapting David Lebovitz’ recipe, I was able to achieve tender, flavorful pork that was beautifully crispy on the outside. O…M…G.

Wrapped in warm tortillas and topped with a few spoonfuls of pico de gallo, salsa negra and a squeeze of lime—the Carnitas were Delicioso!!!

Fat Tire® Braised Carnitas Tacos

I confess, I turned to the local mercado for the fresh tortillas and salsas. I had every intention of making them myself but when I went to the mercado for some ingredients, I encountered these fabulous women making it all from scratch for a fraction of the cost it would take me to make.

Yep. I opted for the shortcut this time. But for the record……this gal can fix up some yummy salsas. 🙂

To wash it all down, I whipped up an homage to Taqueria Tlaquepaque’s Chavelas. Tlaquepaque was one of my beloved taquerias in San Jose that served up AMAZINGLY fresh and delish food. But the food was only 1/2 of the reason why my dear gal friends and I would congregate there. The other half was for the Chavelas —Mexican beer mixed with fresh lime juice and salt. Very few things in life are more refreshing than a frosty goblet of Chavela. True Story.

Fat Tire® Chavelas

Turns out that Fat Tire® in a Chavela is PDA.  (Translation: Pretty. Darn. Amazing.)

Fat Tire® Braised Carnitas Tacos & Chavelas

Incorporating Fat Tire® in a dish? Not as difficult as one would think  🙂

And as luck would have it—just in time for Cinco de Mayo!!!

___________________________________________________________

Fat Tire® Braised Carnitas
Adapted from David Lebovitz

Ingredients:

5 Pounds Boneless Pork Shoulder, cut into 5-inch chunks, trimmed of excess fat
2-3 Tablespoon Sea Salt
2 Tablespoons Vegetable oil
2 Bottles Fat Tire® Ale (24 ounces)
1 Cup White Onion, diced
1 Tablespoon Fresh Garlic, finely diced
1 Teaspoon Chile Powder
¼ Teaspoon Paprika
¼ Teaspoon Cayenne Powder
¼ Teaspoon Ground Cumin
2 Bay Leaves

Using paper towels, dry off the pork and generously season with salt.

Heat the oil in a large dutch oven over medium-high heat. Cook the pieces of pork in a single layer until very well-browned, turning them as little as possible so they get nice and dark before flipping them around. If your cooking vessel is too small to cook them in a single-layer, cook them in two batches. Be sure to take your time to get a deep brown color as it enhances the flavor. This usually takes me about 30 minutes to properly brown all the meat.

Once all the pork is browned, remove them from the pot and blot away any excess fat with a paper towel. Discard all but one tablespoon of the grease that remains in the pot. Lower the heat to medium. Add the onions to the pot and cook until translucent. Add the garlic and cook for an additional one to two minutes.  Then pour in the beer, scraping the bottom of the pot with a wooden spoon to release all the brown bits.

Heat the oven to 350F degrees.

Add the pork back to the pot and add the remaining of the seasonings and spices. Braise in the oven uncovered for 3-3½ hours, turning the pork a few times during cooking, until much of the liquid is evaporated and the pork is falling apart. Remove the pan from the oven and lift the pork pieces out of the liquid and set them on a platter.

Once the pork pieces are cool enough to handle, shred them into bite-sized pieces discarding any big chunks of fat. Return the pork pieces back to the roasting pan and cook in the oven, turning occasionally, until the liquid has evaporated and the pork is crispy and caramelized.

Serve with corn tortillas and your choice of salsas and toppings.

___________________________________________________________

Fat Tire® Chavelas
Serves One

Ingredients:

1 Bottle Fat Tire® Ale (12 ounces)
2 Tablespoons Fresh Lime Juice
Sea Salt
Lime Wedges

Chill glass in the freezer for 15 minutes. Rim the glass using a lime wedge and dip into sea salt. Pour the lime juice in the bottom of the glass and pour well chilled Fat Tire® Ale  over it. Serve and garnish with lime wedges. Enjoy!

Pastas/Noodles · Pork · Poultry

Penne di Funghi con Pollo e Salsiccia

Penne di Funghi con Pollo e Salsiccia

Okay, I confess. I didn’t really come up with this pasta dish on my own. It’s actually my interpretation of Pasta Pomodoro’s Penne Portobello which I just L-O-V-E.

Italian Sausage, chicken, mushrooms—all in a garlicky cream sauce. How could it not be Delizioso?

Penne di Funghi con Pollo e Salsiccia

In addition to the criminis, I used porcini mushrooms and its liquor for an extra level of earthiness to the dish.  I also threw in fresh arugula leaves at the very end for a bit of freshness and peppery flavor. And although this is technically a cream sauce, you’d be surprised how light it all was.

Bon appetito!

________________________________________________

Penne di Funghi con Pollo e Salsiccia
Serves 4-5

Ingredients:

¾ Pound Penne Pasta
2 Links Spicy Italian Sausage, casings removed
1 Boneless Chicken Breast, sliced
2 Cups Loosely Packed Arugula
2 Cups Crimini Mushrooms, sliced
½ Ounce Dried Porcini Mushrooms
1 Cup Hot Water
1 Cup White Wine
¼ Cup Heavy Cream
3 Tablespoons Shallots, chopped finely
3 Whole Garlic Cloves, diced finely
¼ Teaspoon Dried Chili Flakes
2 Tablespoon Olive Oil
Kosher Salt and Black Pepper

Bring a large pot of water to boil. Add salt and cook the penne pasta just shy of al dente.

Place the dried Porcini in a bowl with the hot water. Allow the mushrooms to reconstitute—about 10 minutes. Squeeze out extra liquid from the Porcinis (saving the liquid) and roughly chop them.

Heat olive oil in a very large heavy pan (or pot) over medium-high heat. Season chicken with salt and pepper. Add Italian sausage to the pot and use a wooden spoon to crumble the meat and break into small pieces. Once the sausage is barely pink, add the chicken. Continue cooking until both are done. Use a slotted spoon and transfer it to a plate covered with paper towels.

Using the same pan, lower the heat to medium and sauté the shallots until translucent. Add garlic, chili flakes, and both mushrooms. Cook until the mushrooms are tender. Stir in wine and liquid that the porcini was reconstituted in–being careful not to add in the mushroom grit/sand. Raise the heat to medium-high and cook the liquids until it is reduced by half. Stir in the cream and cook for an additional 1-2 minutes. Return the sausage and chicken to the pot and add the cooked penne. Stir until all the penne has been coated. Season with salt and pepper to taste. Remove pan from the heat and toss in the arugula leaves. Toss until the leaves are just wilted. Serve and Enjoy!

Pastas/Noodles · Pork

Linguine alla Carbonara

Linguine alla Carbonara

I’d like to think that I was Italian in one of my former lives.

Truly, it would help explain my love and addiction for Italian foods and all pastas.

In fact, most people make sandwiches–or even quick stir frys when they want something fast or need to empty out their fridges. Nope–not me. I make pastas.

Linguine alla Carbonara

And when something is as quick and yummy as this Linguine alla Carbonara, how can you blame me? Rich, simple, delicious—and there’s BACON!

Oh those Italians. Just Brilliant.

_____________________________________

Linguine alla Carbonara
Serves approximately 2

Ingredients:

1/3 Pound Linguine (or other long pasta)
4 Strips Thick Cut Bacon, diced
3 Tablespoons Shallots, chopped finely
2 Garlic Cloves, diced finely
¼ Teaspoon Dried Chili Flakes
2 Fresh Eggs, room temperature
1/3 Cup Parmesan Cheese, finely grated
2 Tablespoons Fresh Italian Parsley, chopped
Kosher Salt and Pepper
Additional Parsley and Parmesan Cheese for Garnish

In a large bowl, whisk together eggs and parmesan cheese. Once combined, mix in parsley. Set bowl aside.

Add bacon to a large pan and turn burner to medium heat. Slowly sauté the bacon until it becomes crispy and the fat has rendered down—about 10 minutes.  While the bacon is browning, begin boiling the linguine in a large pot of salted water. Once bacon is finished, use a slotted spoon and transfer it to a plate covered with paper towels. Reserve one tablespoon of bacon drippings in the pan and discard the rest. Sauté shallots in the bacon drippings until translucent. Add garlic and cook for an additional two minutes. Add chili flakes and cook for an additional minute. Transfer shallots/garlic mixture to a bowl.

Once cooked, drain the hot pasta and quickly toss it in the eggs/cheese mixture until the “sauce” has thickened. Add all but two tablespoons of the crispy bacon and shallots/garlic mixture. Continue to mix until all items have been thoroughly incorporated. Check for seasonings and adjust with salt and pepper accordingly. Plate the pasta and sprinkle with extra cheese, parsley, and remaining bacon.  Serve immediately.

Note: It is important to use the freshest eggs possible when making Carbonara. The heat from the hot pasta will warm the eggs but not thoroughly cook it. If you are wary of eggs that are not fully cooked, then Carbonara may not be the dish for you.