Pizzas · Pork · Seafood

Seester’s Fav–Shrimp and Prosciutto Pizza with Fresh Arugula

Shrimp and Prosciutto Pizza with Fresh Arugula

For well over a decade, my SEESTER, T,  has been obsessed with Berri’s Cafe in LA. As in, SO OBSESSED that she will face driving through LA traffic from Orange County to get her beloved Berri’s. Correction….she will make her husband face the LA traffic so she can get her Berri’s fix.

And guess what? She orders the same thing EVERY TIME–the Berri’s Original Pizza. In the many times I’ve gone there with her (and I mean MANY since I used to live down the street from Berri’s), she’s only let me order the same thing too!

T  has a fixation with their Original Pizza and compares EVERY pizza with it. She even said it’s better than the pizzas she’s had in Italy! Hey….don’t yell at me–she’s the one whose infatuated. In fact, one night when we had gone out, yours truly had a little too much boozy goodness and got sick. Instead of driving her poor little sis straight home so she could properly pray to the porcelain gods, T made a pit stop at Berri’s and had the valet keep an eye on me while she ran in to get the pizza! Good Grief! I don’t know whether to laugh or cry!

Actually…it’s pretty hilarious.

Shrimp and Prosciutto Pizza with Fresh Arugula

This past weekend was my SEESTER’s (yes, purposely spelled that way) birthday. She and her fam headed up to San Francisco for a celebration weekend with our other sis, P. My work schedule wouldn’t allow me to join in on the fun but I was so bummed to be missing out on her bday festivities—not to mention all the yummy food and trip to Napa 😦

So in her honor (and to make her feel a little “jelly”), I decided to take a spin on Berri’s Original-— a thin crust pizza with shrimp, prosciutto and topped with fresh arugula. And you know what? I think I did it justice!

I added fresh Bufala mozzarella which gave a level of creaminess that played off the crunch from the shrimp and saltiness from the prosciutto. The pile of peppery arugula was so bright and fresh that heck—this pizza was almost like a salad!  Ok….maybe that’s a bit of a stretch.

HAPPY BIRTHDAY SEESTER!!!!!

And yes, I’ll make this again for you.

___________________________________________

Shrimp and Prosciutto Pizza with Fresh Arugula

Ingredients:

Pizza Dough:
1.75 Cups Lukewarm Water
½ Tablespoon Granulated Yeast
½ Tablespoon Kosher Salt
3.75 Cups Unbleached All Purpose Flour
*Makes enough for 4 12-inch pizza crusts

Toppings:
2 Ounces Shrimp, peeled and deveined
1 Garlic Clove, finely minced
2 Pinches Red Chili Flakes
¼ Cup Marina Sauce, or your choice of Tomato Sauce
½ Shallot, thinly sliced
2-3 Fresh Basil Leaves, torn in pieces
2 Tablespoons Shredded Mozzarella
2 Ounces Fresh Bufala Mozzarella, sliced and patted dry
1-2 Thin Slices Prosciutto, torn in pieces
1-2 Handfuls Arugula Leaves
Kosher Salt
Premium Extra Virgin Olive Oil

Prepare the dough the night before. Add yeast and salt to the water in a 5-quart bowl. Add in the flour and mix in a heavy stand mixer (with paddle attachment) until everything is uniformly moistened, without dry patches. Cover the bowl with a kitchen towel and allow to rise at room temperature for approximately 2 hours. After rising, cover the container tightly and refrigerate overnight.

One hour before baking, preheat the oven to 500 degrees F with a pizza stone on the lower rack. If baking the pizza on a sheet, preheat 30 minutes before baking.

Remove the dough from the refrigerator. Sprinkle the work surface and top of the pizza dough with flour. Using kitchen shears, pull up and cut a piece of dough about the size of an apple. Hold the piece of dough in your hands and add more flour as needed so it won’t stick to your hands. Gently stretch and fold the dough underneath itself to create a ball. Allow the dough to rest, covered with plastic wrap on the work surface for about 20 minutes.

While dough is resting, mix the shrimp, garlic, chili flakes, pinch of kosher salt, and drizzle of olive oil in a small bowl. Set aside.

When the dough has rested, flatten it with your hands and use a floured rolling pin to make a crust about 1/8 of an inch. Transfer the dough to a pizza peel (if baking directly on stone) or onto a baking sheet. Spread the marina sauce on top of the crust so it creates a thin, even layer. Sprinkle the fresh basil, cheese, shallots, and shrimp all over the pizza.

Lower the oven temperature to 450 degrees F. If using a pizza peel, carefully slide the pizza in the oven on the stone. If using a baking sheet, place pizza in the oven. Bake for 12-15 minutes, rotating the pizza midway for even cooking. In the last 1-2 minutes of baking, add the prosciutto to the pizza and continue baking.

When done, remove the pizza and top with fresh arugula. Drizzle the top of the pizza with olive oil and serve.

Pizza Dough Adapted From: Artisan Pizza and Flatbread in Five Minutes a Day

Pork · Seafood · Vietnamese

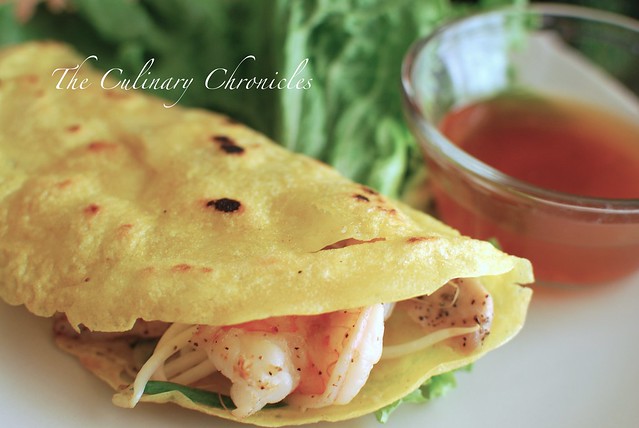
Bánh Xèo (Vietnamese Sizzling Crêpes)

Bánh Xèo (Vietnamese Sizzling Crepe)

Bánh Xèo

Bánh = Cake

Xèo = Sound of the “sizzle” from the skillet

Bánh Xèo (Vietnamese Sizzling Crepe)

Growing up, I always considered Bánh Xèo to be a treat when my mom made them. She insisted that they needed to be eaten immediately from the skillet to maintain its crispy exterior. And unlike when you order them from restaurants, she would fill mine with tons of filling. 🙂

Bánh Xèo gets its yellow hue from the turmeric and is flavored with coconut milk. Traditionally, Bánh Xèo is filled with pork, shrimp, onions, mung beans, and bean sprouts. And just like chả giò (egg rolls), you wrap pieces of the Bánh Xèo with herbs and lettuce leave before dunking it into Nước Chấm–a fish sauce based dipping sauce. The freshness of the veggies is the perfect balance to the slightly fried crêpe.

Enjoy!

________________________________________________

Bánh Xèo (Vietnamese Sizzling Crêpes)

Batter:
1½ Cups Rice Flour
½ Teaspoon Turmeric
¼ Cup Coconut Milk
1 Cup Cold Soda Water, more if needed
½ Cup Scallions, diced
1-2 Dashes Nước Mắm (fish sauce)

Filling:
½ Pound Shrimp, peeled and cleaned
½ Pound Pork Loin, sliced thinly
½ Cup White Onion, thinly sliced
1 Tablespoon Garlic, finely diced
2 Cups Fresh Bean Sprouts
Nước Mắm (fish sauce)
Ground Black Pepper
Vegetable Oil

Nước Chm (Dipping Sauce):
½ Cup Nước Mắm (fish sauce)
½ Cup Sugar
½ Cup Fresh Lime Juice
¼ Cup Warm Water
1-2 Thai Chilies, finely diced

Accouterments:
Lettuce
Thai Basil
Mint
Cilantro
Cucumbers

In a large bowl, whisk together the rice flour and turmeric. Add in coconut milk and mix until well combined. Slowly whisk in the soda water until all the lumps have dissolved. Whisk in Nước Mắm and scallions. Set the batter aside for 30-45 minutes.

Prepare the Nước chm. Combine Fish Sauce, Sugar, Lime Juice, Warm Water and stir until sugar is dissolved. Add in chilies. Cover and set aside.

In another bowl, add in pork and shrimp. Toss with garlic, white onions, a few splashes of Nước Mắm, and pepper. Heat a pan with a few tablespoons of oil to medium-high heat. Add the mixture and cook for a few minutes until the pork and shrimp are almost done. Remove from pan.

In a large nonstick skillet, add 1-2 tablespoons of oil. Stir the batter and carefully spoon a ladleful into the skillet. Tilt and swirl the pan to coat the bottom evenly. After 1-2 minutes, place some of the pork/shrimp mixture on one half of the skillet. Top with the bean sprouts. Cover and cook for 1-2 minutes. Remove lid and drizzle a little bit of oil on the outer edge of the crêpe. Cover the skillet for another 2-3 minutes. Using a spatula, carefully fold the crêpe in half, gently pressing down on top. Transfer to a plate. Serve with lettuce, mint, cilantro, thai basil and nước chm (dipping sauce).


This is my submission to the final Delicious Vietnama monthly blogging event celebrating Vietnamese cuisine started by Anh of A Food Lover’s Journey and Hong & Kim of  Ravenous Couple. Thank You Anh, Kim, and Hong!

Pastas/Noodles · Seafood

Celebrating our Blogoversary with Uni (Sea Urchin) Pasta!

Uni (Sea Urchin) Pasta

I still can hardly believe it…..

Today, is our 2 year Blogoversary! And on 11.11.11 to boot!

Uni (Sea Urchin)

Over the past two years, I have loved this space that has allowed me to share my voice and Foodventures with you. But above all, I am so thankful for the overwhelming encouragement and support I have received from my family, friends, and the fabulous food community. Awww shucks gang….y’all are awesome.

By the way….stay tuned next week for a pretty neato giveaway I’ll be hosting to show my appreciation 🙂

Uni (Sea Urchin) Pasta

In honor of our 2 year Blogoversary, I wanted to indulge and use one my favorite things in a decadent pasta—UNI!  And what better way to celebrate, right?

The super unctuous texture of the uni with its fresh sea flavor is the perfect pairing with linguine. Of course you could use any long strand pasta you choose but I like the slightly thick noodle so that it can hold more of the rich sauce. Sooo good! And you know what’s even better? This delicious pasta can be done in 15 minutes! Perfect if you need to make an impressive dish but not have a lot of time.

But be warned…this pasta is not for the faint of the heart. It’s the real–super rich–super decadent deal!

And with that Dear Friends….here’s to many, MANY more years of Foodventures together!

xoxo….

________________________________________

Uni (Sea Urchin) Pasta
Serves 2

Ingredients:

¼ pound dried linguine, or pasta of your choice
1 tablespoon olive oil
1 tablespoon unsalted butter
1 teaspoon finely minced garlic
¼ teaspoon red chili flakes
¼ cup heavy cream
5 ounces fresh uni (or one tray)
1 tablespoon fresh chives, finely diced
1 teaspoon toasted sesame seeds
seasoned Nori (seaweed), chiffonade
kosher salt and white ppper

Bring a large pot of salted water to boil. Cook the pasta to al dente.

In a large skillet over medium heat, melt the olive oil and butter together. Add garlic and sauté for 1-2 minutes. Add in chili flakes and heavy cream. Bring to a slight slimmer and add all but 4 pieces of the uni.

Remove from heat and whisk items together until the uni has broken down into the sauce. Toss in the cooked pasta until the noodles have been evenly coated. Season with salt and pepper.

Plate the pasta and place the remaining whole uni segments on top.  Sprinkle the tops with chives, sesame seeds, and nori. Serve immediately.

Pastas/Noodles · Seafood · Sponsored

Spicy Prawns with Ginger Peanut Noodles

Spicy Prawns with Ginger Peanut Noodles

I was thrilled at the chance to participate in this month’s 24×24 with Foodbuzz—particularly since the theme was focused on budget friendly meals. And not only did our meal need to be budget conscience but we had to use items already found in our pantries. Sounds like the making of a good cooking show to me.

I began thinking of things that I ALWAYS have on hand either in my cupboards or fridge and came up with the following things:

  1. Dried pastas
  2. Fresh Garlic and Chili (whether chili sauce, paste, or even fresh chili peppers)
  3. Some type of protein in the freezer (usually shrimp or chicken)
  4. Canned vegetables
  5. Condiments (Remember, I’m a condiment monster.)
  6. Booze (Um……self explanatory.)

With that list, it became a no brainer for me………. I was going to make some type of pasta for this challenge.


Nini and Nina_9.24.11

I decided to make Ginger Peanut Noodles for lunch with my nieces and served it with some spicy grilled prawns. Stephanie and Nina are always such willing taste testers for my experiments. And don’t let their age fool you, they’ve got quite the refined palettes. Oh—and in case you missed the photo above, Bella was trying to squeeze in on the taste testing, too.  She heard “peanut butter” and came running.

I’ve made these Ginger Peanut Noodles on several occasions with just items pulled right out of my pantry. The type of noodle can be substituted with whatever you have on hand as I’ve used spaghetti, fettuccine, and even chow mein—anything goes! For this particular preparation we happened to have some red bell pepper which added great texture and freshness. However, thinly sliced cucumber, zucchini or even bean sprouts would be great in it, too.

Bella is still focused on the fact that I just said “peanut butter”.


Bella_9.24.11


As for the protein, I happen to prefer prawns with this but chicken, pork, or even tofu would be just as delicious. Just use the same marinade for whichever you choose.


Spicy Prawns with Ginger Peanut Noodles

This entire meal comes together in about 30 minutes and is perfect for a weeknight dinner or when you’re short on time during the weekends.

Fast? Budget friendly? Yummy?

Now that is a Trifecta of Goodness.

________________________________________________

Spicy Prawns with Ginger Peanut Noodles
Serves approximately 6

Ingredients:

Prawns:
1 Pound Prawns, shelled, deveined with tails on
1 Teaspoon Red Chili Flakes
1 Tablespoon Sriracha Chili Sauce, or chili sauce of your choice
1 Tablespoon Fresh Garlic, finely minced
1 Tablespoon Low Sodium Soy Sauce
1 Tablespoon Sesame Olive Oil
2 Tablespoon Vegetable Oil

Noodles:
¾ Cup Smooth Peanut Butter
1 Tablespoon Honey
1/3 Cup Low Sodium Soy Sauce
¼ Cup Rice Wine Vinegar
1½ Tablespoons Sesame Oil
1½ Tablespoons Sambal Chili Paste
2 Tablespoons Fresh Ginger, finely minced
1 Tablespoon Fresh Garlic, finely minced
1 Teaspoon Lime Zest
½ Tablespoon Fresh Lime Juice
¼ – ½ Cup Hot Starchy Water (from boiling the pasta)
1 Whole Red Bell Pepper, thinly sliced
2 Scallions, cut into 1 inch strips
1 Pound Linguine
*Top with ¼ Cup Toasted Sesame Seeds and ½ Cup of Crushed Roasted Peanuts

Bring a large pot of water to a rolling boil. Cook linguine noodles barely over al dente.

Combine the prawns with all of its marinade ingredients together in a bowl. Cover and refrigerate.

In a blender, combine the first 10 ingredients of the noodles together. Blend until smooth. Add the starchy liquid from the pasta water until you reach the desired consistency—about ¼ – ½ Cup. Set aside.

Bring a grill pan or a large skillet to medium high heat. Lightly cover with cooking spray and cook prawns for 1-2 minutes on each side until they are opaque and golden. Remove to a clean plate and cover.

When then noodles have cooked, drain well and return to the hot pot. Ladle in a few spoonfuls of the peanut sauce at a time until the noodles have been thoroughly coated. Toss in the scallions and bell pepper slices. Plate with a mound of the peanut noodles, prawns, and sprinkle the tops of each plate with sesame seeds and crushed peanuts.

Seafood · Vietnamese

Tôm Rang Muối (Vietnamese Style Crispy Salted Prawns)

Tôm Rang Muối (Vietnamese Style Crispy Salted Prawns)

To me, comfort food consists of simple, everyday dishes my family grew up eating. Uncomplicated Vietnamese dishes really…. but packed with flavor—and memories.

They included braised bamboo shoots, sauteed greens in shrimp paste, beef stir fry with potatoes, and  if we were lucky–fried shrimp.

Tôm Rang Muối (Vietnamese Style Crispy Salted Prawns)

Depending on Mom’s mood—meaning if she was in the mood of peeling the shrimp or not, we would be treated to either Tôm Lăn Bột (batter fried shrimp) or Tôm Rang Muối (salted fried shrimp). Either way–I LOVED both dishes.

Tôm Lăn Bột are peeled headless shrimp, dipped into a batter, and then fried until golden brown. Tôm Rang Muối are head-on shrimp that are tossed into salt and flour (or cornstarch) and quickly fried. Since the shrimp are left with their shells on, they retain a lot of their moisture and add great texture. And the bonus—you get to suck the deliciousness from the heads!

Tôm Rang Muối (Vietnamese Style Crispy Salted Prawns)

Mom and the aunties would often make Tôm Rang Muối at our family parties, too. Since it’s so quick to make, they would whip up several batches to tie us over before we got to eat. Big plates of Tôm Rang Muối would also get sent over to wherever the “menfolk” were sitting to “nhậu“—-which is the Vietnamese word for drinking adult beverages while nibbling on food.

I’m sure my mom would scold me for broadcasting this but THANK BUDDHA that I can nhậu now, too! 🙂

Hope you enjoy!

_________________________________________________

Tôm Rang Muối (Vietnamese Style Crispy Salted Prawns)
Serves 4-6

Ingredients:

1 Pound Prawns, heads-on
1 Cup Rice Flour (or cornstarch, tempura powder, etc.)
1½ Tablespoon Kosher Salt
1 Red Chili Pepper, sliced
¼ Cup Green Scallions, sliced
Vegetable Oil for Frying

Devein the prawns while keeping the shells in tact. This can be done by using a sharp knife to slice the backs of the prawns. Remove and discard the veins. Using kitchen shears, snip off the antennas and legs. Place the prawns in a colander and run cool water over them. Gently shake to drain the water and use paper towels to dry off excess moisture. Sprinkle salt over the prawns, tossing well to cover each prawn. Place the colander with prawns (with a bowl underneath to catch any excess fluid) in the refrigerator for 10 minutes.

In a large pot (or deep fryer), preheat oil to 375 degrees.

Remove prawns from the refrigerator and sprinkle rice flour all over. Toss the prawns to coat and sift to get rid of any extra flour. In batches, carefully add the prawns into the hot oil and cook for about 2-3 minutes or until lightly golden and crispy. Transfer the fried prawns to a paper towel lined plate. When the grease has been drained, gently toss the prawns with scallions and chilies. Serve immediately.

**This is my submission to Delicious Vietnam #17 a monthly blogging event celebrating Vietnamese cuisine which was started by Anh of A Food Lover’s Journey and Hong & Kim of  Ravenous Couple. For more information, please visit Delicious Vietnam Thanks to Phuoc from Phuoc’n’delicious for hosting this month!**

Condiments/Sauces · Seafood

Grilled Shrimp Tacos with Spicy Avocado Crema

Grilled Shrimp Tacos


San Diego is the land of fish and seafood tacos.

And since moving here, I’ve had my fair share of them. Deliciously fresh seafood combined with bright salsas and spice—- all wrapped up in flour or corn tortillas.

Perfection.

So it was high time that I share with you one my favorite (and easy) seafood tacos that I love to make—Grilled Shrimp Tacos.

Grilled Shrimp Tacos

To add even more oompf to these tacos, I made a Spicy Avocado Crema using Mexican Crema. Mexican Crema–or Crema Espesa is similar in flavor and consistency to Crème fraîche. Its natural cooling effect works wonders to balance spicy tones and is even more fantastic with the addition of the creamy avocados, cilantro, and jalapeno.

Fish would be just as fantastic in these tacos using the same marinade and method—however, if you do go this route, be sure to use a firmer fish that would hold up in the taco. I personally like the “bite” of texture that the shrimp give in these tacos but to each their own!

And in case you’re wondering, my suggested cocktail pairing for these killer tacos would be a Cadillac Margarita or an icy cold Mexican Beer with Lime & Salt. 🙂

__________________________________________

Grilled Shrimp Tacos with Spicy Avocado Crema  

Ingredients:

Spicy Avocado Crema:
1½ Cups Ripe Avocado, diced
½ Cup Mexican Crema (or Crème fraîche )
¼ Cup Fresh Cilantro, chopped
1 Teaspoon Jalapeno Pepper, finely diced and seeded
1 Tablespoon Fresh Lime Juice
Kosher Salt and Ground Pepper to taste

Shrimp:
1 Pound Large Shrimp, peeled and deveined
1 Teaspoon Fresh Garlic, finely minced
1 Teaspoon Fresh Lime Zest
¼ Teaspoon Red Chili Flake
2 Pinches Cayenne Pepper
2 Pinches Ground Cumin
2 Tablespoons Vegetable Oil
Kosher Salt

Serve with:
Tortillas
Fresh Corn Pico de Gallo
Fresh Cilantro Leaves
Lime Wedges

Prepare the Spicy Avocado Crema by combining all the ingredients in a food processor. Puree until thoroughly combined. Place in a bowl, cover with plastic wrap and refrigerate for at least 1 hour.

Prepare shrimp by combining all the ingredients in a large bowl and marinate for 10 minutes. If using an outdoor grill, skewer the shrimp on soaked bamboo sticks.  If using an indoor grill pan, heat over a medium-high flame. Grill shrimp for 1-2 minutes on each side until opaque. Remove from grill and place on a large platter.

Warm tortillas in a skillet. Assemble tacos by placing a layer of the Corn Pico de Gallo in a tortilla and top with the grilled shrimp. Drizzle the Spicy Avocado Crema over the top and sprinkle with cilantro. Enjoy!

Seafood · Vegetables/Vegetarian

Muggles’ Fish and Chips

Muggles' Fish and Chips

11+ years…..

11+ years I’ve been engrossed in the world of Patronus charms, invisibility cloaks, house elves, and Quidditch.

11+ years I’ve arrived in costume at stores for their early book release parties, stood in line for midnight movie premiere showings, and took online quizzes to find out which House I would be “sorted” in (Gryffindor, of course).

Muggles' Fish and Chips

So as the final movie installment of the Harry Potter saga comes to a close this Friday in the States, I find myself mixed with feelings of utter glee and sadness. Kind of like at your college graduation…..excited for closure yet somehow saddened to see it end. Bittersweet.

As a tribute (damn, that J.K. Rowlings is brilliant), I wanted to make something “British” to send off some of my favorite characters. And of course, the first thing that came to my mind was Fish and Chips. Cliche? Maybe, but I love Fish and Chips 🙂


Muggles' Fish and Chips


These Fish and Chips from America’s Test Kitchen are easily some of the best I’ve ever had. The cod remained moist and flavorful through the frying process and the batter was utterly crispy—-even after 20+ minutes out of the fryer. I decided to serve this classic with a kicked up version of tartar sauce that was amped up with prepared horseradish. But if you’re not a fan, feel free to omit as you see fit.

And why did I call it “Muggles’ Fish and Chips“? Simple really….because THIS muggle made them!

But trust me on this, these Fish and Chips are so delish that even “He Who Must Not Be Named” would change his ways after taking a bite. Well….at least he would stop and think twice. 🙂

Here’s to an incredible adventure that has inspired millions of children (and adults!) across the world to become excited about reading and believing in MAGIC…..

__________________________________

Muggles’ Fish and Chips
Serves 4

Ingredients:

Fish (From Americas Test Kitchen):
1 1/2 Cups All-Purpose Flour
1/2 Cup Cornstarch
1/2 Teaspoon Cayenne Pepper
1/2 Teaspoon Paprika
1/8 Teaspoon Ground Black Pepper
Table Salt
1 Teaspoon Baking Powder
1 1/2 Pounds 1-inch-thick Cod Fillet or Haddock, cut into eight 3-ounce pieces
1 1/2 Cups Beer (12 ounces), cold

Chips (From Americas Test Kitchen):
3 Pounds Russet Potatoes, peeled, ends and sides squared off, and cut lengthwise into 1/2 inch by 1/2-inch fries
3 Quarts Peanut Oil (or canola oil), plus 1/4 additional cup

Tartar Sauce:
1/2 Cup Mayonnaise
1 Tablespoon White Wine Vinegar
1 Tablespoon Caper Berries, roughly chopped
1/2 Tablespoon Prepared Horseradish
2 Teaspoons Dijon Mustard
Kosher Salt and Pepper to taste

Prepare tartar sauce by whisking all the ingredients in a a bowl until fully incorporated. Cover with plastic wrap and refrigerate for at least 30 minutes.

Place cut fries in large microwaveable bowl, toss with 1/4 cup oil, and cover with plastic wrap. Microwave on high power until potatoes are partially translucent and pliable but still offer some resistance when pierced with tip of paring knife, 6 to 8 minutes, tossing them with rubber spatula halfway through cooking time. Carefully pull back plastic wrap from side farthest from you and drain potatoes into large mesh strainer set over sink. Rinse well under cold running water. Spread potatoes onto kitchen towels and pat dry. Let rest until room temperature, at least 10 minutes and up to 1 hour.

While fries cool, whisk flour, cornstarch, cayenne, paprika, pepper, and 2 teaspoons salt in large mixing bowl; transfer 3/4 cup of
mixture to rimmed baking sheet. Add baking powder to bowl and whisk to combine.

In heavy-bottomed Dutch oven, heat 2 quarts oil over medium heat to 350 degrees. Add fries to hot oil and increase heat to high. Fry, stirring with mesh spider or slotted metal spoon, until potatoes turn light golden and just begin to brown at corners, 6 to 8 minutes. Transfer fries to thick paper bag or paper towels to drain.

Reduce heat to medium-high, add remaining quart of oil, and heat oil to 375 degrees. Meanwhile, thoroughly dry fish with paper towels and dredge each piece in flour mixture on baking sheet; transfer pieces to wire rack, shaking off excess flour. Add 1 1/4 cups beer to flour mixture in mixing bowl and stir until mixture is just combined (batter will be lumpy). Add remaining beer as needed, 1 tablespoon at a time, whisking after each addition, until batter falls from whisk in thin, steady stream and leaves faint trail across surface of batter. Using tongs, dip 1 piece fish in batter and let excess run off, shaking gently. Place battered fish back onto baking sheet with flour mixture and turn to coat both sides. Repeat with remaining fish, keeping pieces in single layer on baking sheet.

When oil reaches 375 degrees, increase heat to high and add battered fish to oil with tongs, gently shaking off excess flour. Fry,
stirring occasionally, until golden brown, 7 to 8 minutes. Transfer fish to thick paper bag or paper towels to drain. Allow oil to return to 375 degrees.

Add all fries back to oil and fry until golden brown and crisp, 3 to 5 minutes. Transfer to fresh paper bag or paper towels to drain.
Season fries with salt to taste and serve immediately with fish, fresh lemon, and tartar sauce.

Pork · Salads · Seafood · Vietnamese

Gỏi Mít Trộn (Vietnamese Young Jackfruit Salad)

Gỏi Mít Trộn (Vietnamese Young Jackfruit Salad)

When our clan gathers, you can be sure that there will be a massive array of delicious food. One can always count on the usual favorites such as Bánh Ít (sticky rice dumplings), Bún Bò Huế (spicy beef noodle soup),and Cua Rang Mui (salt roasted crab). And intermixed with all the Vietnamese goodies would often be a sprinkling of “American” dishes such as mom’s Turkey.

Growing up, each dish became linked to one of the aunties or Mom as they each refined the recipes to make it their own. But as my generation grew older, the proverbial baton was passed and we in turn began to make these iconic family favorites.

And I find comfort in knowing that these dishes that my siblings, cousins, and I create will pass on my family’s traditions through food.  It’s kind of remarkable to think that the Phở Gà I’ll make for my kids will be exactly the same recipe my mom would have made for them.

Incredible, really.

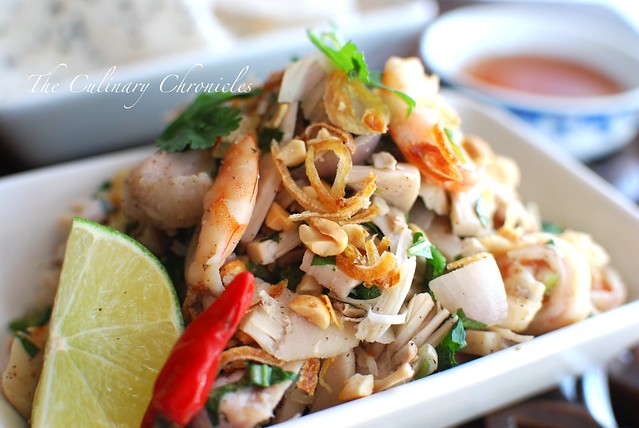
One dish that I hope to continue is Gỏi Mít Trộn. At the heart of the salad is Mít Non—young, unripe jackfruit. The flesh of the young jackfruit is tender and mild in flavor. In the states, Mít Non is sold both canned and frozen. However, if you use the frozen type, you’ll need to boil it for a bit.

Gỏi Mít Trộn (Vietnamese Young Jackfruit Salad)

After being washed and well drained, the Mít is stir fried for a few moments before it’s tossed with shrimp, pork and several herbs like Rau Răm (Vietnamese Cilantro).

Gỏi Mít Trộn (Vietnamese Young Jackfruit Salad)

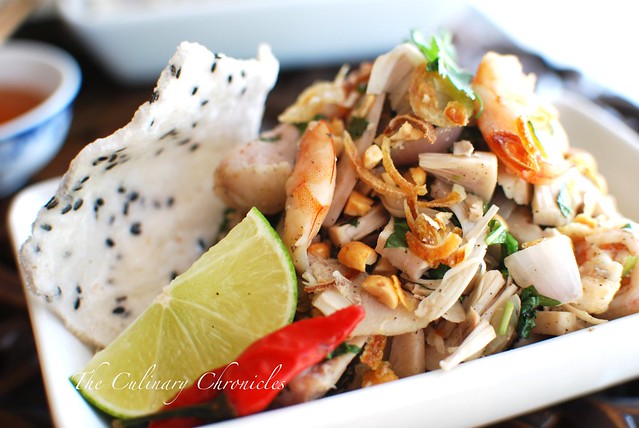
The Gỏi Mít Trộn is then topped with fried shallots, crushed peanuts and accompanied with nước chm (dipping sauce).

Gỏi Mít Trộn (Vietnamese Young Jackfruit Salad)

It’s best served with Bánh Đa (also sold as Bánh Tráng Mè) – crispy rice crackers flecked with black sesame seeds. Want to know something funny? When I was little, I used to think that the black sesame seeds in these were ants and stayed clear of these crackers for many years 🙂

 Bánh Đa


I like to eat Gỏi Mít Trộn by drizzling nước chm with lots of chili on top of the salad with a healthy squeeze of fresh lime juice. Then I take a piece of the Bánh Đa and use it to scoop up the goodness. YUM!


Gỏi Mít Trộn (Vietnamese Young Jackfruit Salad)

The layers of flavor and textures in this Gỏi really rock it out. Extremely savory from the proteins and fish sauce with bright herbaceous notes from the Rau Răm, mint, and cilantro. With each bite you get a lovely crunch from the rice crackers and peanuts that balances so well with the tender Mít.

If done correctly, everything is in perfect harmony.

I doubt my Gỏi Mít Trộn will ever be as good as my mom’s or aunties’. But one thing is for certain— in due time, our kids will be trying their hand at it, too 🙂


______________________________________________

Gỏi Mít Trộn (Vietnamese Young Jackfruit Salad)
Serves 8

Ingredients:

3 Cans (20 ounces each) Young Jackfruit
1 Pound Shrimp, shelled and deveined
1 Pound Pork Loin, thinly sliced
2 Tablespoons Shallots, finely diced
1 Tablespoon Fresh Garlic, finely diced
½ Cup Scallions, chopped
1½ Cups Rau Răm Leaves (Vietnamese Cilantro), roughly chopped
¼ Cup Fresh Cilantro, roughly chopped
¼ Cup Fresh Mint, roughly chopped
N
ước Mm (Fish Sauce)
Ground Black Pepper
Vegetable Oil

Accouterments:
Bánh Đa (rice crackers)
N
ước chm (dipping sauce)
Fried Shallots
Crushed Roasted Peanuts
Lime Wedges
Thai Chilies

In a large bowl, combine shrimp, pork, ½ tablespoon garlic, 1 tablespoon shallots, and a few dashes of fish sauce. Mix and season with black pepper. Allow to marinate for 10 minutes.

Drain the cans of jackfruit. Remove any seeds (including the shell layer surrounding the seeds) and cut off and discard any hard sections. With a sharp knife, thinly slice the jackfruit and transfer to a large bowl that has been filled with cold water. Repeat until all the jackfruit has been cut and rinsed. Using clean dishcloths, gently squeeze out the excess liquid. If too much moisture is left, your salad will be really wet and mushy. Set the jackfruit aside.

In a large skillet, heat 2 tablespoons of vegetable oil over a medium flame. Add pork and shrimp and sauté until cooked, about 4-5 minutes. Remove from the pan and set aside.

Using the same skillet, add another 1 tablespoon of oil over a medium flame. Add the remaining shallots, half the scallions and sauté until softened before adding the rest of the garlic. Stir and sauté for 2 minutes. Add the jackfruit and remaining scallions and sauté for an additional 2-3 minutes before seasoning with a few dashes of fish sauce and black pepper. Remove from heat and mix in the shrimp and pork. Toss in the Rau Răm, mint, and cilantro. Taste and adjust accordingly, keeping in mind that additional Nước chm will be used. Plate the contents to a large dish. Sprinkle the tops with fried shallots and crushed peanuts.

Serve the Gỏi Mít Trộn with Bánh Đa, Nước chm, limes, and chilies. Enjoy!


**This is my submission to Delicious Vietnam #15, a monthly blogging event celebrating Vietnamese cuisine which was started by Anh of A Food Lover’s Journey and Hong & Kim of  Ravenous Couple. For more information, please visit Delicious Vietnam Thanks to Angry Asian Creations for hosting this month!**

Seafood

Grilled Shrimp Risotto

Shrimp Risotto

Summers in San Diego are pretty awesome.

They’re filled with gorgeous sunshine, lazy days lounging at the beach, deliciously fresh produce, and warm afternoons sipping on chilled white wine. Perfection.

To pair with a lovely Chenin Blanc I had chilling in the fridge, I decided to make a tummy satisfying Grilled Shrimp Risotto. The wonderful light “crunch” texture from the shrimp balances so well with the creamy risotto. And although you may think otherwise, it’s surprisingly light making it a perfect summer time dish.

Leave it to me to decide on what dish to make based upon what adult beverage I’m drinking. 🙂

_______________________________________

Grilled Shrimp Risotto
Serves 3-4

Ingredients:
1 pound large shrimp, cleaned and peeled
1 teaspoon fresh lemon zest
¼ teaspoon red chili flake
4 cups shrimp stock*
2 tablespoons olive oil, divided
½ cup white onion, diced
2 tablespoons garlic, finely minced, divided
1 teaspoon fresh thyme leaves
2 tablespoon fresh Italian parsley, chopped
1 cup Arborio rice
½ cup white wine
¼ cup Parmesan cheese, grated
salt and pepper to taste

In a large bowl, mix together 1 tablespoon olive oil, chili flakes, lemon zest, 1 tablespoon garlic, thyme and shrimp. Season with salt and pepper and allow to marinate in the refrigerator for at least 20 minutes. Heat a grill pan to medium high and cover lightly with cooking spray. Grill shrimp until they turn pick about 1-2 minutes on each side. Remove from pan and tent with a piece of foil.

Meanwhile, heat the shrimp stock in a medium saucepan and keep warm over low heat.

Heat the remaining olive oil in a large skillet over medium heat. Add onion and remaining garlic to the skillet. Cook until items are translucent, about 5 minutes. Add the rice and stir quickly until it is well-coated and opaque.  Stir in wine and cook until the liquid is nearly all evaporated.

Ladle in 1 cup of the broth into the rice. Simmer and slowly stir until the rice has absorbed the liquid. Add the remaining broth, 1 cup at a time. Continue to simmer and stir, allowing the rice to absorb each addition of broth before adding more. The risotto should be slightly firm and creamy–approximately 20 minutes in total.

Gently fold the grilled shrimp into the risotto. Stir in Parmesan cheese and cook briefly until the cheese has melted. Check for seasonings and adjust with salt and pepper if needed. Spoon risotto into dishes and top with chopped parsley before serving.

*The Shrimp Stock is a key component in layering the shrimp flavor throughout the entire dish. It can be made by simmering 2½ quarts of water with shrimp shells, 1 onion roughly chopped, 2 carrots roughly chopped, 2 cups celery roughly chopped, 1 teaspoon black peppercorns, 2 bay leaves, and a generous amount of sea salt. Simmer for 30 minutes, strain and use accordingly.

Appetizers/Small Plates · Seafood · Sponsored

Fried “Buffalo” Calamari

Fried "Buffalo" Calamari

The other day I came home to a package that had a big bottle of KC Masterpiece® Buffalo Marinade in it—-courtesy of the Foodbuzz Tastemakers Program.

I immediately thought of whipping up a batch of Buffalo Wings….because who doesn’t love a good Buffalo Wing? But at second thought, I decided to try something different and take a spin off of another great pub food—Fried Calamari!

Fried "Buffalo" Calamari

I attempted to mimic the Buffalo Wing taste by marinating the calamari in buttermilk and KC Masterpiece® Buffalo Marinade. After a quick toss in flour and a few minutes of deep frying, I had a plate full of crispy–yet tender, Fried Calamari.

Fried "Buffalo" Calamari

I’m not sure I fully tasted the flavors of the marinade in the Calamari by itself. But after a little squeeze of lemon and quick dunk into the Buffalo Marinade, the flavors were definitely more prominent.

But let’s be honest, anything fried and then dipped in hot sauce is pretty delicious in my book 🙂

Happy Friday, Friends!

____________________________________________________

Fried “Buffalo” Calamari
Serves 4

Ingredients:

1 Pound Calamari, cleaned and cut into 1 inch rings—tentacles left whole
1 Cup All Purpose Flour
¾ Cup KC Masterpiece® Buffalo Marinade, or other hot sauce marinade
¼ Cup Buttermilk
1 Teaspoon Kosher Salt, plus more to season after the calamari is fried
½ Teaspoon Black Pepper
Vegetable Oil, for deep frying
Serve with Celery and Carrot Sticks, additional KC Masterpiece® Buffalo Marinade, Blue Cheese Dressing, and Lemon Wedges


In a large bowl, mix the marinade and buttermilk together. Add the cleaned calamari—ensuring it’s well covered in the liquid. Cover the bowl with plastic wrap and place in the refrigerator for at least 45 minutes.

Place a large colander in the sink and pour the calamari with buttermilk mixture into it. Gently shake the colander to drain off the marinade. Use paper towels to blot off excess liquids.

In a large pot (or deep fryer), preheat oil to 375 degrees.

In a large zip lock bag, add the flour, salt, and pepper. Add the calamari zip the bag closed. Shake well to evenly coat the calamari. Pour the contents of the bag into a large sifter (or you can do this in batches) and sift the calamari to get rid of any extra flour. In batches, carefully add the calamari into the hot oil and cook for about 3-4 minutes or until lightly golden and crispy.

Transfer the fried calamari to a paper towel lined plate and sprinkle with additional salt. Repeat until all the calamari has been fried.

Serve immediately with celery and carrot sticks, additional KC Masterpiece® Buffalo Marinade, Blue Cheese Dressing, and lemon wedges