Drinks · Sunday Family Dinner

Summer Grilling Family Dinner + Fresh Peach Bellinis

Grilled Lobster with Cilantro Chile Butter

We’ve got a fair amount of July Babies in our family. Though, let’s be honest…with a family as large as ours, there are a lot of babies year round. Big Seester N, Big Seester P, brother-in-law, niece, several cousins, an auntie, an uncle….and that just includes the family in the states!

For July’s Sunday Family Dinner, we celebrated 2 of our July babies—Big Seester N and my brother-in-law R. As for theme? We kept the menu quite straight forward but pretty dang delicious.

Summer Grillin’

And of course, since we were celebrating, there had to be a bit of decadence. In the form of lobsters. Lots of lobsters.

N was totally freaking out Lucasaurus with them.

July 2013 Family Dinner

Seester T staffed the grill for a good portion of our meal which totally amused her hubs, the birthday boy.

July 2013 Family Dinner

Now what’s a Sunday Family Dinner without cocktails? Surely not one of ours!

This month we toasted with Fresh Peach Bellinis. Granted they weren’t grilled but they definitely were a nod to summer using wonderfully sweet, white peaches. After adding a few spoonfuls of fresh white peach puree and a squeeze of lime to champagne flutes, I topped off each glass with bubbly Prosecco.

Simply perfect.

Peach Bellinis

And of course, we had to take our mandatory-monthly Seesters pic while holding our cocktails.

Seesters

Our menu included:

Grilled Rosemary Flatbread.

Grilled Flat Bread

Grilled Pacific Oysters……..

Grilled Oysters

A few Grilled Ginormous Prawns…….

Grilled Prawns

Rosemary Garlic Lamb Rib Chops……….

Grilled Lamb Chops

and Grilled Lobsters with Cilantro-Chile Butter…….

Grilled Lobster with Cilantro Chile Butter

Did I mention that our kiddos have quite the refined palates?

And I think they’re uber adorable.

July 2013 Family Dinner

For dessert? Vanilla Bean Crème Brûlée that my niece, Nina, made. Although technically not made on the grill, she did torch the tops to brûlée it.

Totally counts. 🙂

Creme Brulee

The kiddos also made this adorable sign for the birthday babies—I loved that they used their nicknames!

image_1

Not only was the dinner scrumptious but it was fairly low maintenance with at least 80% of the “cooking” done on the grill. The cherry on top? It made clean up a breeze!

Peach Bellinis

And for those who cannot travel to Venice to try the original Bellini at Harry’s Bar, give my version a spin. My Seester said it’s pretty darn close to the real thing 🙂

CHEERS to another memorable Sunday Family Dinner!

This Month’s Family Dinner Menu

Cocktails: Peach Bellini
Appetizers: Rosemary Grilled Flatbread, Grilled Oysters, Grilled Prawns
Entrees: Rosemary-Garlic Lamb Rib Chops, Grilled Lobsters with Cilantro-Chile Butter
Dessert: Vanilla Bean Creme Brulee

_____________________________________________

Fresh Peach Bellinis
Serves 4

Ingredients:

2 ripe white peaches, pitted and quartered
1/4 cup water
1-2 tablespoons sugar, optional
4 lime wedges
chilled Prosecco or other sparkling wine

Add the peaches and water into a blender. Depending on the sweetness of the peaches, add sugar as needed. Puree until smooth. Optional: Strain the peach puree through a fine-meshed strainer.

Spoon 2-3 tablespoons of the peach puree into each glass. Squeeze the juice of a lime wedge into each glass and slowly top with the chilled Prosecco. Gently stir each glass before serving. Cheers!

Note: The Bellinis shown here are garnished with yellow peaches, however, the cocktails were made with the traditional white peach.

Appetizers/Small Plates · Beef · Sunday Family Dinner

Papas Rellenas – Cuban Potato Balls

Papas Rellenas - Cuban Potato Balls

Not gonna lie….I could really use a Papas Rellena right now.

Or two, or three—okay….probably 4. Well, for now at least.

We made Papas Rellenas {Cuban Potato Balls} for our June Sunday Family Dinner as an homage to Porto’s Bakery. Papas Rellenas are incredibly addictive crispy, mashed potato balls that are stuffed with a savory meat filling. At Porto’s Bakery, they fill their Papas with ground beef, veggies, and spices.

Papas Rellenas - Cuban Potato Balls

I had stumbled upon a wonderful recipe for Papas Rellenas from Jonathan over at The Candid Appetite. If you haven’t seen his site, you must check it out. But be warned, whether you read it on a full stomach or not, his posts will leave you drooling!

As for the Papas, not only was his post incredibly informative but his step by step photos were gorgeous! I was so inspired that I had to try and take pics along the way as well. Clearly mine weren’t nearly as stunning but let’s just go with it.

On to the Papas!

After washing, cubing and boiling a ton of potatoes–smash them up to smithereens! Then, get started on the aromatics.

Papas Rellenas - Cuban Potato Balls

You’ll want the aromatics nice and fine. Throwing them into a food processor will definitely make life easier but if you’re a glutton for punishment, take a chefs knife and go at it!

After you pulse each item, you’ll want to drain it through a very fine sieve to get rid of any excess liquid. Sound crazy? Nope, it’s brilliant.

Papas Rellenas - Cuban Potato Balls

After everything is prepped, begin browning the beef in a large skillet. I drain the liquid from the beef before adding in the chopped onions and garlic. Once the onions become translucent, add the red and green peppers into the party.

Papas Rellenas - Cuban Potato Balls

Once the filling has been seasoned and cooked down, you’re ready to start assembling. Lucky for me, I enlisted the help of my niece, Nini, to join the Papas Rellenas Assembly Line. She also served as the hand model for the next series of photos.

Huh…what if this is the catalyst to her budding Hand Modeling career? Um, don’t tell my sister.

Papas Rellenas - Cuban Potato Balls

Back to the Papas……

To get uniformed potato balls, grab an ice cream scoop. Porto’s Bakery make their Papas Rellenas quite large but I opted for a smaller size for a 1-2 bite. Using the gadget of your choice, scoop out a dome of the cooled mashed potato mixture.

Papas Rellenas - Cuban Potato Balls

Using the palm of your hand, try to flatten it out into an even round—about 1/4 – 1/3 inch thick.

Papas Rellenas - Cuban Potato Balls

Place a heaping spoonful of the cooled filling in the center of the potato.

Now let me warn you, despite what every fiber in your body says–DON’T OVER STUFF them! If you do, they won’t seal properly and things will get down right wonky.

Willy Wonky!

Papas Rellenas - Cuban Potato Balls

Carefully fold the sides over the filling.

This is where you’ll kick yourself if you overfill it.

Papas Rellenas - Cuban Potato Balls

Then gently roll it into an even, smooth ball.

Papas Rellenas - Cuban Potato Balls

Once all the potato balls have been filled, start the 3-step process to bread them.

Flour. Egg Wash. Bread Crumbs.

Papas Rellenas - Cuban Potato Balls

After the Papas have chilled for several hours, it’s time for a 3-5 minute “soak” in an oil jacuzzi that’s been heated to 375 degrees F until they’ve become golden brown.

Bada-Bing! Bada-Boom!

That’s it!

On a random note (as if I wasn’t random enough), my other niece, Nina, took over hand modeling for the “completed” Papas pics. What can I say? I’m prepping the kids for the Hand Modeling Olympics.

Papas Rellenas - Cuban Potato Balls

These Papas Rellenas can be served at room temp with a sprinkle of freshly chopped cilantro & a few lime wedges. You can also serve them with a Mojo dipping sauce or by itself.

And the kicker? They can definitely made in advance and frozen so that you can fry them whenever you get a Cuban Hankering! So double the recipe! You’ll thank me…..or maybe you should thank Jonathan since it’s his recipe 🙂

Want to know how to make these golden delicious Papas Rellenas? Pop on over to here.

HAPPY FRIDAY, FRIENDS!

Appetizers/Small Plates · Pork · Sponsored

Crunchy Jalapeno-Bacon wrapped Avocado Fries

Crunchy Jalapeno-Bacon wrapped Avocado Fries

Remember when I made the Double Jalapeno-Bacon Cheeseburgers using Farmer John Jalapeno Bacon? The burgers were so baconlicious that plain ol’ fries just wouldn’t cut it.

Because once you decide to go big, you’ve got to go all in.

Crunchy Jalapeno-Bacon wrapped Avocado Fries

And in this case, going “all in” comes in the form of crunchy avocado “fries” that are wrapped with bacon. I know it sounds like a food stand at the summer fair but before you totally nix it, you’ve got to give them a try.

It’s the only Bacon thing to do, after all.

Crunchy Jalapeno-Bacon wrapped Avocado Fries

These “fries” have a great play on textures. Super crunchy from the panko breadcrumbs & crispy bacon balanced by the buttery avocado. Dunk them in a Roasted Poblano Aioli or a cool Cilantro Ranch Dressing and you have a perfect appetizer or side.

Have a Baconriffic Day!

__________________________________________

Crunchy Jalapeno-Bacon wrapped Avocado Fries
Serves 2

Ingredients:

1 large avocado
1 large egg
1 tablespoon water
1/2 cup flour
1/4 teaspoon cayenne pepper
kosher salt and pepper
1 cup Panko breadcrumbs
4 slices jalapeno bacon, cut in half
vegetable oil

Slice the avocado into 8 equal wedges. Place on a plate, cover with plastic wrap and freeze for 20 minutes.

In a shallow dish, whisk together the egg and water. Place the Panko breadcrumbs and flour into two separate shallow dishes. Season the flour with cayenne pepper, kosher salt and black pepper.

Once the avocados have chilled, take one wedge and dredge it into the flour. Gently shake off the excess flour before dipping it in the egg wash. Roll the avocado wedge in the Panko and gently shake off the excess. Set aside. Continue dredging the remaining avocados.

Take a 1/2 slice of bacon, wrap around each wedge of avocado using toothpicks to secure them together. Place back into the freezer for another 10 minutes.

Fill a heavy bottom pot with 2 inches of vegetable oil. Heat until the oil reaches 350 degrees F.

Fry the avocado fries for 4-5 minutes, turning them from time to time until they become golden brown. Remove the fries and drain them on a wire rack or plates lined with paper towels. Season with additional kosher salt immediately when they come out of the oil and carefully remove & discard the toothpicks. Serve warm with Roasted Poblano Aioli or condiments of your choice.

 **Disclosure: I did receive products from Farmer John, but as always, my opinions are my own.**

Desserts/Pastries · Ice Cream · Sponsored

Macadamia-Java-Chip Ice Cream for King’s Hawaiian

Macadamia-Java-Chip Ice Cream

I scream, You scream…

We all scream for Ice Cream!

With Summer in full effect, the heat has been blazing here in Southern California. Somewhat uncomfortable at times but it’s the perfect Ice Cream weather!

Channeling the flavors of the islands, I put together this onolicious Macadamia-Java-Chip Ice Cream for the King’s Hawaiian O’hana. The recipe is quite simple to pull together and is packed full of the balanced island flavors of coffee, chocolate, and rich macadamia nuts. Click here to find my post and recipe for the KH O’hana as this is the perfect way to end the week.

Happy Aloha Friday Friends!!!

Breakfast/Brunch · Pork

Easy and Cheesy Breakfast Enchiladas

Breakfast Enchiladas

Y’all may recall how much I sing the praises of breakfast dishes. But when you’re someone who hits the snooze button several times a morning–every morning, spending a lot of time in the kitchen in the AM is the last thing I ever want to do.

So what’s a breakfast lovin’ gal to do?

Easy….

Breakfast Enchiladas

Create recipes that you can make the night before!

Yup. Dishes that can be prepped hours before cooking that are no fuss- no muss but don’t sacrifice on the flavor.

These super easy, super cheesy Breakfast Enchiladas fit the bill. They’re filled with tons of spices, eggs, sausage & cheeses and then rolled up in corn tortillas before being smothered with more enchilada sauce and shredded cheese. At this point, you can either bake the enchiladas or throw them in the fridge overnight.

Breakfast Enchiladas

I often choose the latter option so that when my first alarm goes off in the morning, I can roll out of bed to preheat the oven….and then roll back in until it reaches temp. After a quick snooze, I throw the dish of enchiladas in and bake for about 20 minutes.

Which just so happens to be enough time for another quick snooze session.

Yea–I’ve got issues. But by the time the timer goes off, the enchiladas are ooey-gooey perfect! I dress them with some diced tomatoes, fresh cilantro, avocado, salsa and sour cream–Delicioso!

Now if I could only teach my puggle how to make coffee….
______________________________________

Easy and Cheesy Breakfast Enchiladas
Serves 6- 8

Ingredients:

4 large eggs, beaten
2 tablespoons milk
½ tablespoon taco seasonings
¼ teaspoon red pepper flakes
¼ cup chopped cilantro
1 tablespoons vegetable oil
½ pound breakfast sausage
½ cup diced yellow onion
1 small jalapeno pepper, seeded and minced
2 garlic cloves, minced
kosher salt and pepper
15-ounce can enchilada sauce
12 corn tortillas
2 cups shredded Monterrey Jack or Cheddar cheese
1 scallion, diced
½ cup finely diced tomatoes
½ cup finely diced red bell pepper
1 small avocado, diced or thinly sliced
sour cream and salsa, optional

In a bowl, whisk together the eggs, milk, taco seasonings, red pepper flakes and 2 tablespoons cilantro.

In a skillet, heat the vegetable oil to medium and add the breakfast sausage. Use a wooden spoon to crumble the sausage and break into small pieces. Cook the sausage until browned and transfer to a plate.

Add the onions, jalapeno and garlic to the skillet and cook for 1 minute. Pour in the eggs. Continue cooking, gently stirring the eggs with a rubber spatula until the eggs have almost set. Fold in the cooked sausage and cook for an additional minute. Season with additional salt and pepper and remove the skillet from the stove to allow the mixture to slightly cool.

Preheat oven to 375 degrees F.

Coat the bottom of a 13 x 9-inch casserole dish with a few spoonfuls of the enchilada sauce. Pour the remaining sauce into a shallow dish. Wrap the tortillas in a kitchen towel and microwave for 30 seconds so that they become more pliable. Dip each tortilla into the dish of enchilada sauce to coat both sides. Place a few spoonfuls of the egg/sausage mixture in the center of each tortilla. Top with shredded cheese and roll the tortilla, securing all the fillings inside. Place the filled tortilla, seam side down into the casserole dish. Repeat with the remaining ingredients, placing each enchilada snuggly against each other.

Pour the leftover sauce over the enchiladas and top with the remaining cheese. Bake for 15-20 minutes or until the cheese has fully melted. Remove from the oven and top the enchiladas with scallions, tomatoes, bell pepper, avocado and the remaining cilantro. Serve warm with salsa and sour cream.

Desserts/Pastries · Sunday Family Dinner

Cuban Family Dinner + Mojito Cheesecake

Mojito Cheesecake

We’ve been on a Latin and Spanish kick with our Sunday Family Dinner themes. But since eldest Seester and her fam were soon headed to Miami for an extended vacay, what better menu for June’s Fam-Din than Cubano?

Plantains

As usual, we started off our dinner prep with a few (okay, more than “a few”) bright and refreshing cocktails. Mojitos for the adults and virgin Valencia Orange-Mojitos for the kiddos.

Mojitos

Eldest Seester, N, kicked off dinner with a duo of Empanada appetizers. She made the dough out of flour, salt, baking powder, butter, sugar, eggs, and cream cheese. It was surprising to see how easy the dough came together but it was truly outstanding! The cream cheese made the Empanadas incredibly flaky and rich. A total keeper!

She filled half of the Empanadas with roasted chicken, mushrooms, cumin and other layered aromatics. The other half was stuffed with a savory Ground Beef mixture.

I could nosh on these all day long. You could definitely make a double batch and freeze them to bake off on a rainy day. Perfect little party apps.

Empanadas

Next came my homage to the beloved Porto’s Bakery. If you’re from Southern California, chances are, you are well acquainted with the renown Cuban Bakery and Cafe. Not only do they make delicious Cuban inspired sweets such as Guava & Cheese Pastries, Tres Leche, & Flan but they also are the creators of some of my family members’ favorite cake–the Triple Chocolate Mouse Cake.

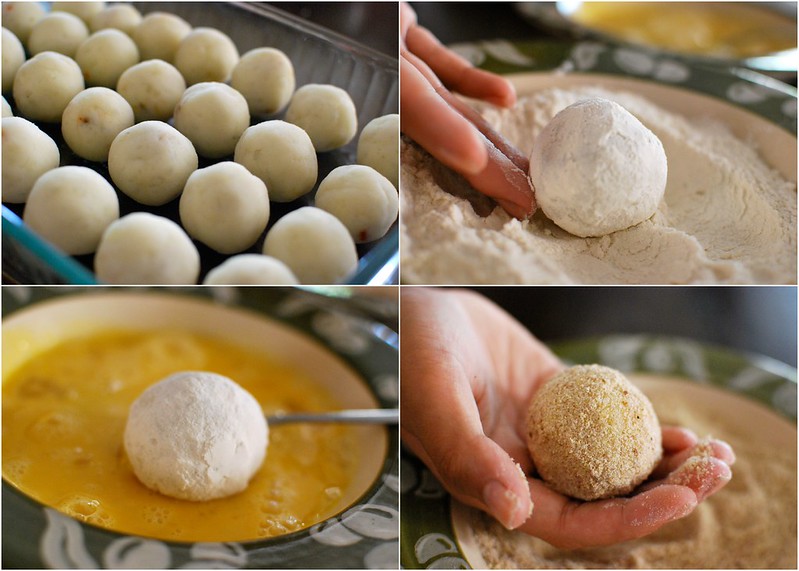
You can also satisfy your savory Cuban cravings at Porto’s by ordering their sandwiches (including a Cubano), soups, or my personal favorite– Papas Rellenas. Essentially, they’re a crispy mashed potato ball filled with a ground beef mixture of onions, peppers, and tons of spices.

We made them a tad smaller than the original version but other than that, I was quite pleased with the copycat recipe and thought it was pretty spot on. I’ll be posting a step by step on it soon but you can find the recipe I used here.

Cuban Potato Balls (Papas Rellenas)

And what’s a traditional Cuban meal without plantains?

My sis and niece made these Tostones by twice-frying plantains. They took slices of plantains that were about 1/2 – 3/4 of an inch thick and fried them until they were golden. Afterwards, they took a cleaver and smashed them to about 1/4 of inch. After being pan fried for the second time, they seasoned them with course sea salt and served them with a peppery garlic dipping sauce.

It’s incredible how starchy plantains are and, in my opinion, are more like potatoes than bananas.

Tostones

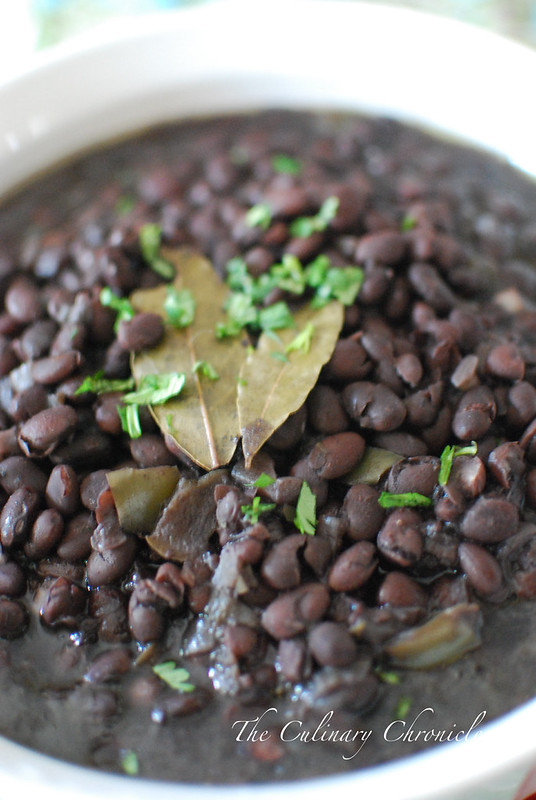
Seester, T, made a huge and I mean HUGE batch of slow cooked Frijoles Negro.

They had a wonderful, rich flavor to them and were thick…almost stew-like. She also made rice but I totally blew it and didn’t take a picture of it.

#fail

Frijoles Negro

And for the main course, Cuban Roast Pork with Mojo Sauce.

HOLY aromatic!

The moment we walked into T’s house, we were engulfed with the delicious scent of the pork roasting in the oven. She ended up doing a mash up of several different recipes she found but at the base of it, the marinade included tons of garlic, fresh orange and lime juices, fresh herbs and some spices. The Mojo was a pureed mixture of garlic, cilantro, serrano peppers, citrus juice, and olive oil.

It was surprising how much sweetness the fresh orange juice added but it was because of it that allowed the roast to become rich and caramelized.

Total winner.

Cuban Roast Pork with Mojo Sauce

And finally, dessert. We had a two types that night (as if we weren’t gluttonous enough already).

The first were Sweet Empanadas using the same pastry dough as the savory version. This time, N took whole Guava and cooked them down with sugar and lime until it broke down into a thick, almost compote texture. She then pressed it through a fine sieve to get a floral Guava paste. Seester and the kids stuffed the Sweet Empanadas with a few spoonfuls of the guava paste and a dollup of cream cheese. YUM!

But again, I blew it and didn’t get any good pictures of them.

#failedagain

DOH!

I promise I’ll be better next time!

Mojito Cheesecake

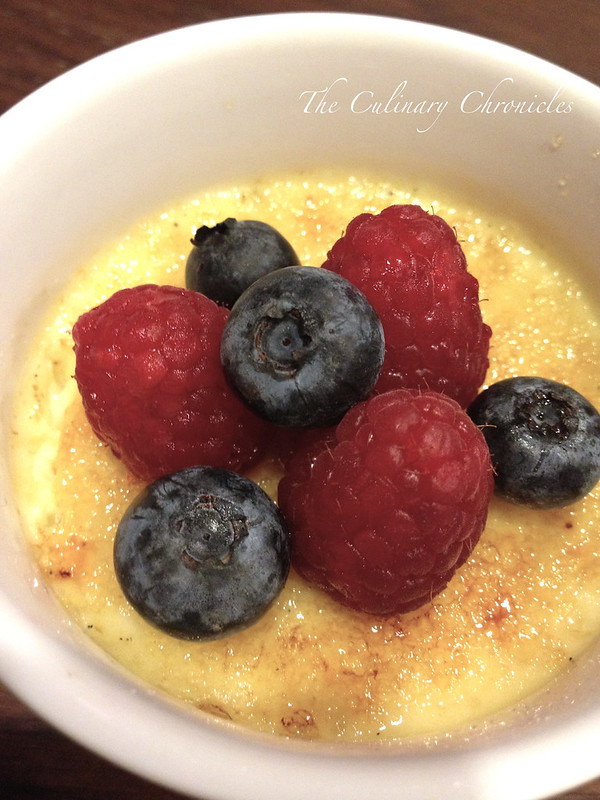
The second dessert of the night was my riff on a Mojito inspired Cheesecake.

What makes this a Mojito Cheesecake?

I started off by making “mint sugar” by pulsing plain ol’ granulated sugar with a few handfuls of fresh mint leaves. The end results in a bright and herbaceous sugar. Perfect for baking like in my Mojito Cookies or in drinks.

Mojito Cheesecake

The filling is flavored with mint sugar, tons of fresh lime juice, lime zest and lime extract. If the kiddos weren’t partaking, I would have also added a few splashes of light rum to the batter as well as the whipped cream. Granted the baking would cook off any alcohol but I didn’t think the munchkins would like flavor.

And since we were already sipping on Mojitos, I thought we could skip on the extra booze. I can practice restraint sometimes. 🙂

Bellies full, to-go bags packed…..I’d say it was another SUCCESSFUL Family Dinner!

This Month’s Family Dinner Menu

Cocktails: Mojito
Appetizers: Chicken Empanada, Beef Empanada, Papas Rellenas
Entrees: Cuban Pork Roast with Mojo, Frijoles Negro, Tostones, Rice
Dessert: Mojito Cheesecake

_____________________________________

Mojito Cheesecake
Serves 8-10

Ingredients:

Mint Sugar:
1½ cups granulated sugar
1 cup loosely packed mint leaves, washed and thoroughly dried
Crust:
2 cups graham cracker crumbs
3 tablespoons mint sugar
6 tablespoons unsalted butter, melted

Filling:
24 ounces cream cheese, at room temperature
¼ cup sour cream, at room temperature
1 cup mint sugar
1/8 teaspoon cornstarch
3 large eggs, at room temperature
3 tablespoons fresh lime juice
2 tablespoons fresh lime zest
1½ teaspoon Key Lime extract
1 ounce light rum, optional

Whipped Cream:
1 cup heavy cream, chilled
2 tablespoons mint sugar
1 tablespoons fresh lime zest
½ ounce light rum, optional

Preheat oven to 325 ˚F.

Prepare the mint sugar. In a food processor, pulse the granulated sugar and mint leaves until the leaves have been ground down and combined with the sugar.

Prepare the crust. Combine the graham cracker crumbs, mint sugar and butter until moistened and resembles the texture of wet sand. Pour into a 9-inch springform pan and press crumbs into the bottom of the pan and about one inch up the sides. Bake for 8-10 minutes until golden and cool to room temperature.

Prepare the filling. Using a standing mixer fitted with the paddle attachment, whip the cream cheese and sour cream until its light and fluffy. Gradually mix in the mint sugar and cornstarch. Mix in the eggs one at a time, beating well after each addition. Add the lime juice, lime extract, zest, and rum (optional) until well combined. Pour the filling over the cooled crust. Place the pan on the middle rack of the oven with a pan half full of boiling water on the bottom rack of the oven. Bake for 50-60 minutes or until the center is set. Turn off the oven and allow the cake to sit in the oven with the door propped open for about 30 minutes. (To prop the oven door, I use a wooden handled spoon to keep it ajar a few inches). Remove from the oven and transfer to a wire rack. Allow the cake to cool for an additional 30 minutes. Wrap well with plastic film and foil. Refrigerate for at least 8 hours. Carefully remove the sides of the pan by running a hot knife around the outside of the cake.

When you are ready to serve, prepare the whipped cream. Using a standing mixer fitted with the whisk attachment, whip the chilled heavy cream on high until it just holds stiff peaks. Slowly sprinkle in the mint sugar until you reach a thick consistency. Add in the zest, rum (optional) and whip until combined.

Pipe the whipped cream on top of the cheesecake and garnish with additional lime slices and mint leaves.

Beef · Condiments/Sauces · Pork · Sponsored

Double Jalapeno-Bacon Cheeseburgers with Roasted Poblano Aioli

Double Jalapeno Bacon Cheeseburgers

Summer has been beating down my door lately with gorgeous sunny days and warm weather. And of course, what’s better to do in the summer than grilling up some delicious eats?

So when this glorious box of Farmer John Jalapeno Bacon showed up at the doorstep, it was a no brainer what had to be done.

Jalapeno Bacon

Burgers.

Ultimate, jalapeno bacon loaded burgers.

With a bit of heat.

Awwww yea….

Double Jalapeno Bacon Cheeseburgers

These decadent burgers are not only topped with a pile of crispy jalapeno bacon but there’s also chopped up bacon INSIDE the patty!!

Yea, I totally went there.

Poblano

And because burgers are the perfect canvas to go BIG, I dressed these bad boys up with spicy pepper cheese, crispy cornmeal onion strings, peppery arugula and a creamy roasted poblano aioli.

Double Jalapeno Bacon Cheeseburgers

These burgers not only have a ton of great textures, a balanced level of heat, but were ultimately bacon-licious! The jalapeno component to the bacon was not at all overpowering but rather mild. Perfect for folks who just want a tad of heat.

And if you think these burgers are bacon-riffic, just wait for my upcoming post on Jalapeño-Bacon wrapped Avocado Fries!

Have a fantastic weekend folks!!
________________________
Double Jalapeño-Bacon Cheeseburgers with Roasted Poblano Aioli
Serves 4

Ingredients:

1 large poblano pepper
½ tablespoon minced garlic
1 cup mayonnaise
½ tablespoon Dijon mustard
½ tablespoon fresh lemon juice
1 tablespoon finely chopped fresh cilantro
kosher salt
black pepper
1 pound ground beef (80/20 blend)
½ tablespoon garlic salt
½ tablespoon garlic powder
½ tablespoon onion powder
¼ teaspoon cayenne powder
1 tablespoon worcestershire sauce
1 pound cooked jalapeno bacon
vegetable oil
1 small yellow onion, thinly sliced into rings
½ cup flour
½ cup yellow corn meal
4 slices pepper jack cheese
1½ cups fresh arugula
4 burger buns, split and toasted

Prepare the aioli. On your stovetop range, char the poblano pepper on all sides. This can also be done under your oven broiler. Once charred, place in a bowl and cover with plastic wrap for 10 minutes. This will help the skin loosen from the pepper. Once cooled, peel the skin from the pepper and discard along with the stem and seeds. Finely chop up the pepper and transfer to a clean bowl. Whisk in the garlic, mayonnaise, mustard, lemon juice and cilantro. Season with kosher salt and pepper. Cover with plastic wrap and refrigerate for at least one hour.

In a large bowl, mix the ground beef, garlic salt, garlic powder, onion powder, cayenne and Worcestershire. Season generously with kosher salt and pepper. Take ½ of the bacon and roughly chop into small pieces. Add the bacon to the beef and mix until just combined. Form the meat into 4 patties and create a small indentation in the center of each patty. This is to help the patties from puffing up. Transfer them to a plate and refrigerate for about 30 minutes.

Prepare the onion strings. Fill a heavy bottomed pot with 2 inches of oil. Heat to 375 degrees F. In a bowl, whisk together the flour, cornmeal, ¼ teaspoon black pepper, and ½ teaspoon kosher salt. In batches, place the onions into the dry ingredients, tossing well to coat. Gently shake out the excess and carefully lower into the oil. Fry the onions for about 5-6 minutes, stirring every so often until golden brown. Drain the onions on a plate lined with paper towels and season immediately with additional salt. Repeat until all the onions have been fried. Transfer the onion strings to a large baking sheet. Keep warm in a 200 degree F oven while you grill the patties.

Remove the patties from the refrigerator and lightly brush them with vegetable oil. Light your grill (or preheat grill pan). Place the patties over medium heat and grill on each side for about 4-5 minutes. About 1-2 minutes before the second side is done, lay one slice of cheese over each patty. Cover the grill and cook until the cheese has melted. Remove the patties and tent with aluminum foil while you’re assembling the burgers.

On a toasted bun, place a small mound of the arugula and then lay a patty on top. Spread a few spoonfuls of the aioli on top of the patty before adding a few strips of the remaining bacon. Next, add a small pile of the crispy onion strings and then top off with the other side of the bun. Serve immediately.

 **Disclosure: I did receive products from Farmer John, but as always, my opinions are my own.**

Giveaways

Pssst….. I wrote a Cookbook + GIVEAWAY!!

EV

Oh wait.

Didn’t I tell y’all?

Jan 21, 2013

Yup. It’s true. Pinky Swear!

Last year, I partnered with the folks at Adams Media to author the 2nd edition of the Everything Stir-Fry Cookbook.

Over several months, I developed and tested scores of recipes for the book and now it’s ready for your hot little hands!

Now before you second guess what encompasses “stir-frying”, know that my approach is less about what you think stir-fry dishes are and is more about about understanding a basic method (high heat with proper mise-en-place).

Adobe Photoshop PDF

Of course you’ll find some favorite stir-fry dishes such as Teriyaki Chicken, Mapo Tofu, Mongolian Beef and Chow Fun. But you’ll also find some unexpected delights such as Chimchurri Skirt Steak, Pork Saltimbocca, Rock Shrimp Tacos, Linguine alla Carbonara, and Cheese Steak Sandwiches. I had to put the Nam twist on the book! 🙂

All and all, I’m quite happy about the final results. I’m pleased with the recipes I’ve put forward and feel pretty great about the dishes I’ve styled and photographed for the book. It’s a great starting point and handbook for folks just starting off in the kitchen.

4 years ago, I would have never imagined that I would have a food blog let alone write a cookbook. But life has its funny ways of working out. And as I stare at this pile of my printed cookbooks– I can hardly believe it! CRAZY! Needless to say, it was definitely a Foodventure!

I owe my family, loved ones, and YOU a big thank you for giving me the oompf to do this. And to show my appreciation, I’m offering a fun combo giveaway of my new cookbook + a nifty The Culinary Chronicles canvas bag.

Tote

Five (5) folks will have the chance to win this combo pack—and there are six (6) different ways for you to enter! Now those are some great odds!  This GIVEAWAY is now closed. Thanks for entering!

Please be sure to leave a separate comment for each indicating which of the below you did:

  1. Leave a comment sharing what your favorite stir-fry dish is;
  2. Subscribe to The Culinary Chronicles & get automatic emails when new posts are published (If you already Subscribe, leave a comment indicating so);
  3. Like our Facebook Fan Page (If you already “Like” us, leave a comment indicating so); or
  4. Follow @CulinaryChron on Twitter (If you already Follow us, leave a comment indicating so); or
  5. Follow our boards on Pinterest (If you already Follow us, leave a comment indicating so); or
  6. Follow us on Instagram (If you already Follow us, leave a comment indicating so

The deadline to enter is Friday, July 5th at 5pm (PST) and the winners will be notified the next day.

And in case you want to give them away as gifts, you can order the book at Amazon here.

HUGE….GINORMOUS THANKS for all of the support! I hope y’all like the book and best of luck with the giveaway!

xoxo and Alohas,

Nam

Desserts/Pastries

Chocolate Sour Cream Cupcakes with Whipped Ganache

Chocolate Sour Cream Cupcakes with Whipped Ganache

Chocolate is a beautiful thing—don’t you think? The Mayans and Aztecs sure thought so.

Rich, deep….just bliss.

Whipped Ganache

So how can you possibly make it even better?

Top chocolate with chocolate.

Now we’re talking!

Chocolate Sour Cream Cupcakes with Whipped Ganache

These cuppies are decadently rich with the deep flavor of cocoa. Due to the tangy sour cream, it’s not only incredibly moist but perfectly balanced. As for the frosting, what better than an uber chocolatey whipped ganache? So simple, so much chocolate.

A chocoholic’s dream.

Swoon……

But be warned—come equipped with a tall glass of milk.

And with that Friends– Happy 1st Day of Summer & National Flip Flop Day!!!

______________________________________________________

Chocolate Sour Cream Cupcakes with Whipped Ganache
Makes approximately 24 cupcakes

Ingredients:
¾ cup unsweetened cocoa powder
2 cups all purpose flour
1 teaspoon baking soda
1 teaspoon baking powder
¼ teaspoon salt
2 large eggs
1½ cups sugar
½ cup vegetable oil
1 cup sour cream
2 tsp vanilla extract
1 cup strongly brewed coffee, room temperature
14 ounces bittersweet chocolate, finely chopped
1 cup heavy cream
1 tablespoon coffee liqueur, optional
sprinkles, optional

Preheat oven to 350 degrees. Place paper liners in cupcake pans.

Sift together cocoa powder, flour, baking soda, baking powder, and salt into a large bowl.

In a mixing stand with the paddle attachment, beat eggs and sugar for 2-3 minutes until they become a pale yellow. Add the oil, sour cream, coffee, and vanilla extract. Mix until combined. Slowly add dry ingredients and mix until just incorporated. Fill each of the cups ¾ the way up.

Bake for 18-20 minutes or until a toothpick inserted in the center comes out clean. Allow cupcakes to cool in the pans for 5 minutes before removing to cooling racks.

While the cupcakes cool, prepare the ganache frosting.

Place the chopped chocolate in a bowl. In a small saucepan, bring the heavy cream just to a boil. Remove and pour the scalded cream through a fine-meshed sieve directly into the bowl of the chopped chocolate. Loosely cover the bowl with plastic wrap and let sit for 4-5 minutes. Gently whisk the mixture until the ganache is smooth and glossy. Whisk in coffee liqueur, optional. Refrigerate for 15-20 minutes until the ganache has slightly chilled.

Transfer the ganache to the bowl of a mixing stand. With the whisk attachment, whisk until the ganache becomes light and fluffy. Fill a piping bag with the frosting and pipe on top of the cooled cupcakes. Garnish with sprinkles.

Side Dish · Vegetables/Vegetarian

Roasted Garlic Mashed Cauliflower

Roasted Garlic Mashed Cauliflower

It’s June in San Diego and I’m about 3 months late on starting my beach-bod workout regiment.

What can I say? Siri forgot to add it to my calendar.

So I’ve been doing what I can, a little bit at a time to make up for it. Cutting out caffeine (which explains my Dr. Jekyll/Mr.Hyde personality in the AM), taking the stairs instead of the elevator, cutting back on starches & sweets, doing quick jogs instead of trying to motivate for several mile-runs, and supplementing my produce intake with daily juicing or fresh green smoothies.

Roasted Garlic Mashed Cauliflower

But you know what my achilles is?

Bread and potatoes.

I could inhale bread and potatoes 24/7. Fine if I was some hardcore athlete but the last time I checked, Instagramming hadn’t been deemed a sport yet.

It’s particularly tough when I’m grilling up some goodness and all that’s missing is a huge pile of mashed potatoes.

Drools…..

Roasted Garlic Mashed Cauliflower

In an attempt to fool my mind while trying to create something lighter that still tastes yummy, I started roasting cauliflower and mashing it up with roasted garlic. Cauliflower is considered a “non-starchy” vegetable but when cooked and mashed (or pureed) it can take on a lot of similar textures as my beloved spud.

Roasted Garlic Mashed Cauliflower

And you know what?

It’s delicious-really! The cauliflower starts to caramelize when you roast it and when you add the rich and almost sweet flavor from the roasted garlic—you’re in for it!

This hearty Roasted Garlic Mashed Cauliflower will never fully replace my taters, but it’s a darn good stand in until I go P90X on y’all.

_____________________________________________

Roasted Garlic Mashed Cauliflower
Serves 4

Ingredients:

1 large cauliflower head, cut into florets
12-15 garlic cloves, peeled
olive oil
kosher salt
1/2 teaspoon garlic powder
1/4 teaspoon black pepper
1 teaspoon chopped chives

Preheat oven to 400 degrees F.

On a baking sheet, toss the cauliflower and garlic cloves with 2-3 tablespoons of olive oil. Season with kosher salt and roast for 20-25 minutes until tender and golden brown. Stir and turn every 5-10 minutes.

Transfer the roasted cauliflower and garlic to a large bowl. Add an additional 1 tablespoon olive oil (or 1 tablespoon butter, if you prefer) and garlic powder. Using a potato masher or ricer, mash the cauliflower until it reaches an even consistency.

Season with additional salt and pepper as needed. Stir in chives (0ptional). Serve warm.

*If you’re looking for a gluten free method, be sure to use gluten free marked garlic powder and butter.