Reviews

Sea Rocket Bistro: Local and Sustainable Dining

Sea Rocket Bistro

My sister P came down for a visit and while I was locked up all day at work, she was enjoying the gorgeous sunny day with Bella at the beach. Yep, I was jealous.

On Friday, we were going to Orange County to hang out with our family for the weekend but decided to grab dinner first to let the traffic die down before heading out. It is Southern California, after all. Our Traffic has a life of it’s own.

I decided dinner in North Park would be fantastic to show my sis around. North Park is an extremely delightful area of San Diego filled with tons of neighborhood restaurants, shops, and all the charm of a great community.

Sea Rocket Bistro was recommended to me by a co-worker as they are known for serving delectable local seafood that has been sustainably caught. Scrumptious food with a conscience? YES, PLEASE!

Sea Rocket Bistro: Sea Urchin Crostini

We started off dinner with a Sea Urchin Crostini. The Sea Urchin was harvested right in Point Loma and was served on grilled bread with lemon and smoked salt. A few bites of lightly dressed greens and onions were served on the side to accompany the unctuous sea urchin. The urchin was wonderful fresh and although I appreciated the texture contrast the smoked salt added, I thought it was not needed. Delish, nonetheless.

Sea Rocket Bistro: Grilled Halibut Street Tacos

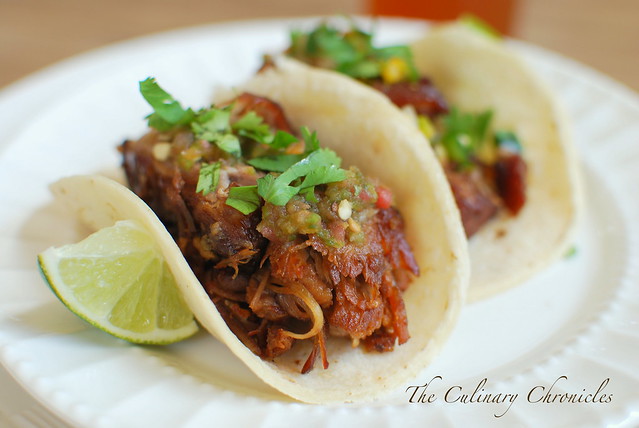
We took advantage of one of their Happy Hour specials by ordering a plate Grilled Halibut Street Tacos. These were a pleasant surprise as the halibut was perfectly grilled—moist and the charred flavor from the grill was awesome. The corn tortillas were tender and light—and for only $3 a pair, these tacos are a must!

Sea Rocket Bistro: House Sangria

And what is a dinner without cocktails?? My choice of the night was their house sangria—colorful with a good amount of fresh fruit and basil. I thought the sangria was refreshing but a tad on the lighter side for my preference.

Sea Rocket Bistro: Mixed Seafood Stew

My sister ordered the Mixed Seafood Stew — a stew with clams, mussels, fish, piperade, leek, and fennel. The stew was served with warm ciabatta—which I was happy to polish off for my sister. I’m a sucker for fresh, warm bread.

Sea Rocket Bistro: Seared Scallops Special

I chose one of the specials for the night for my entree— Seared Scallops served on top of a corn puree with additional corn and English peas. The veggies were wonderfully al dente that featured the sweet flavors of the corn and peas. And as for the scallops—-perfectly seared! They were naturally sweet and were harmonious with the veggies.

The decor of the restaurant was funky yet modernly-minimal. As for the staff, they were quite friendly and helpful.

Sea Rocket Bistro is an establishment that leaves you feeling great after dining there. The seafood is well prepared and with a firm commitment to sustainable practices. And with that, you can be sure that both your tummies and conscience will be well taken care of.

Desserts/Pastries

Strawberry Cupcakes and a Surprise 70th Birthday Party

Strawberry Cupcakes with Strawberry Swiss Meringue Buttercream

The month of May has always been busy for my family — completely filled with TONS of birthdays, weddings, graduations, etc.

This May in particular marked a milestone for our family as our parents turned 70! And although our mom is no longer with us we wanted to be sure to have a big celebration for our dad.

Strawberry Cupcakes with Strawberry Swiss Meringue Buttercream

This past weekend, my siblings and I successfully threw a surprise birthday party for our dad filled with tons of family, delish food, and good times. Needless to say, Dad was pretty darn surprised when he opened the door to what he thought was going to be a small birthday dinner at my sister’s place. It took him a few minutes to realize that the house filled with people were there to celebrate his birthday!

Strawberry Cupcakes with Strawberry Swiss Meringue Buttercream

As one of the desserts for the night, I decided to bake Martha Stewart’s Strawberry Cupcakes. They have been on my “must try” list for a long time and this was the perfect opportunity to give them a roll.

Truth be told, the cupcake itself was just “ok”. But the frosting was TO DIE FOR!!!!!!!! As in OH….MY….GAWD!

It was the first time I had made a true Swiss meringue buttercream and was a bit thrown off at how long it took to make—at least 30 minutes!!! But my patience truly paid off because after one taste, I was in heaven. The texture was so beautifully smooth and silky and it literally tasted like a Strawberry Shake!!! Not the least bit overly sweet and absolutely delicious. All night long I kept on saying, “It tastes like an In-N-Out Strawberry Shake!” Clearly, the cupcake is just a vessel for this amazing buttercream.

If you do decide to give this buttercream a whirl, be sure to take your time with it. Some reviewers say that their buttercream looked curdled or didn’t come together. Luckily I didn’t have this issue but I believe you’ve just got to be patient and definitely use room temperature butter. When all else fails—keep on whipping it!

And on another note, I would be scolded if I didn’t disclose that my sister was the one who added the strawberries on top! šŸ™‚

As for Dad, he thoroughly enjoyed himself. After so many years of taking care of his family, it was nice to have a shindig just for him. In fact, he told everyone he cannot wait to see what we do for his 71st birthday!!!! šŸ™‚

HAPPY BIRTHDAY DAD!!!!


__________________________________________________________

Strawberry Cupcakes with Strawberry Swiss Meringue Buttercream
From Martha Stewart
Makes 34 Cupcakes

Ingredients:

Cupcakes:
2¾ cups all-purpose flour
½ cup cake flour, (not self-rising)
1 tablespoon baking powder
1 teaspoon salt
8 ounces (2 sticks) unsalted butter, softened
2¼ cups sugar
3 large eggs
1 large egg white
1 cup whole milk
1½ teaspoons pure vanilla extract
2 cups finely chopped strawberries, plus small strawberries for garnish

Buttercream:
4 large egg whites, room temperature
1¼  cups sugar
1½ cups unsalted butter, softened, cut into small pieces
1½ cups fresh strawberries, pureed

To make the cupcakes, preheat the oven to 350˚ F.  Line cupcake pans with paper liners.  In a medium bowl, combine the all-purpose flour, cake flour, baking powder and salt; whisk to blend. In the bowl of an electric mixer, combine the butter, sugar and vanilla.  Beat on medium-high speed until light and fluffy, about 3 minutes.  Beat in the eggs and egg white one at a time, mixing well after each addition and scraping down the sides of the bowl as needed.  With the mixer on low speed, add the flour mixture in two additions alternating with the milk, mixing each addition just until incorporated.  Gently fold in the chopped strawberries with a spatula. Divide the batter between the paper liners, filling each about ¾-full.  Bake until light golden and a toothpick inserted in the center comes out clean, about 20 minutes, rotating the pans halfway through baking.  Allow to cool in the pans a few minutes, and then transfer to a wire rack to cool completely.

While cupcakes are cooling, prepare the buttercream. Ā Place whites and sugar in a heatproof mixer bowl set over a pot of simmering water. Whisk until sugar dissolves and mixture registers 160 degrees on a candy thermometer. Remove from heat, and attach bowl to a mixer. Whisk on medium speed for 5 minutes. Increase speed to medium-high, and whisk until stiff, glossy peaks form, about 6 minutes. Reduce speed to medium, and add butter, 1 piece at a time, whisking well after each addition. Switch to a paddle attachment. With mixer on low, add strawberry puree, and beat until smooth, 3 to 5 minutes. Fill a piping bag with a fitted tip. Pipe on the buttercream on top of cooled cupcakes. Garnish with fresh strawberry slices.

Ā Note: For these cuppies, I used an open-star Wilton 4B Tip to pipe the buttercream. I also chose to use a slightly larger than standard cupcake liner for a fuller look. As a result I increased the baking time by 2-3 minutes.

Appetizers/Small Plates · Seafood · Sponsored

Fried ā€œBuffaloā€ Calamari

Fried "Buffalo" Calamari

The other day I came home to a package that had a big bottle of KC MasterpieceĀ® Buffalo Marinade in it—-courtesy of the Foodbuzz Tastemakers Program.

I immediately thought of whipping up a batch of Buffalo Wings….because who doesn’t love a good Buffalo Wing? But at second thought, I decided to try something different and take a spin off of another great pub food—Fried Calamari!

Fried "Buffalo" Calamari

I attempted to mimic the Buffalo Wing taste by marinating the calamari in buttermilk and KC MasterpieceĀ® Buffalo Marinade. After a quick toss in flour and a few minutes of deep frying, I had a plate full of crispy–yet tender, Fried Calamari.

Fried "Buffalo" Calamari

I’m not sure I fully tasted the flavors of the marinade in the Calamari by itself. But after a little squeeze of lemon and quick dunk into the Buffalo Marinade, the flavors were definitely more prominent.

But let’s be honest, anything fried and then dipped in hot sauce is pretty delicious in my book šŸ™‚

Happy Friday, Friends!

____________________________________________________

Fried ā€œBuffaloā€ Calamari
Serves 4

Ingredients:

1 Pound Calamari, cleaned and cut into 1 inch rings—tentacles left whole
1 Cup All Purpose Flour
¾ Cup KC Masterpiece® Buffalo Marinade, or other hot sauce marinade
¼ Cup Buttermilk
1 Teaspoon Kosher Salt, plus more to season after the calamari is fried
½ Teaspoon Black Pepper
Vegetable Oil, for deep frying
Serve with Celery and Carrot Sticks, additional KC MasterpieceĀ® Buffalo Marinade, Blue Cheese Dressing, and Lemon Wedges


In a large bowl, mix the marinade and buttermilk together. Add the cleaned calamari—ensuring it’s well covered in the liquid. Cover the bowl with plastic wrap and place in the refrigerator for at least 45 minutes.

Place a large colander in the sink and pour the calamari with buttermilk mixture into it. Gently shake the colander to drain off the marinade. Use paper towels to blot off excess liquids.

In a large pot (or deep fryer), preheat oil to 375 degrees.

In a large zip lock bag, add the flour, salt, and pepper. Add the calamari zip the bag closed. Shake well to evenly coat the calamari. Pour the contents of the bag into a large sifter (or you can do this in batches) and sift the calamari to get rid of any extra flour. In batches, carefully add the calamari into the hot oil and cook for about 3-4 minutes or until lightly golden and crispy.

Transfer the fried calamari to a paper towel lined plate and sprinkle with additional salt. Repeat until all the calamari has been fried.

Serve immediately with celery and carrot sticks, additional KC MasterpieceĀ® Buffalo Marinade, Blue Cheese Dressing, and lemon wedges

Breads · Breakfast/Brunch

Garlic Bagels

Garlic Bagels

As much as I enjoyed the Homemade Plain Bagels from a few weeks ago, I still felt there was much room for exploration as far as bagels were concerned.

Especially since I was fixated on creating a Garlic Bagel.

Garlic Bagels

When I came across a recipe from Ultimate Bread, I just knew it would be great to adapt into a garlic version. Especially since it didn’t require a sponge. Score!

On half of the bagels, I sprinkled sea salt on the tops and on the other half I brushed on a garlic-olive oil mixture. At the end of the day, the latter won in flavor. Deliciously garlicky with a yummy crunch created by the olive oil. YUM!

Garlic Bagels

The texture of these bagels were perfect—a wonderful balance of soft and chewy. As for the garlic flavor—it was exactly what I was looking for. Almost like a breakfast garlic bread šŸ™‚

_____________________________________

Garlic Bagels
Adapted From Ultimate Bread
Makes 8 Bagels

2 Teaspoon Dry Yeast
1½ Tablespoon Sugar
½ Tablespoon Garlic Powder
1¼ Cups Warm Water
3½ Cups Unbleached flour, plus extra for kneading
1½ Teaspoon Salt
1 Tablespoon Garlic, finely minced
3 Tablespoons Olive Oil
2 Tablespoons Corn Meal
1 Teaspoon Baking Soda
Vegetable Oil

Sprinkle the yeast and sugar into 1/2 cup of the water in a small bowl. Leave for 5 minutes and then stir to dissolve. In a large bowl, mix the flour, garlic powder and salt together. Form a well in the center and pour in the dissolved yeast.

Pour half of the remaining water into the well. Mix in the flour and stir in the reserved water as needed, forming a firm and moist dough. Turn out onto a floured surface and knead until smooth and elastic, about 10 minutes. Gradually work in as much additional flour as possible while comfortably kneading to form a stiff and firm dough.

Put the dough in a lightly oiled bowl, turning the dough to coat it. Cover with a towel and let rise for 1 hour or until doubled in size. Punch down and let the dough rest 10 minutes.

Divide the dough into 8 pieces. Shape each piece into a ball – cup between your hands and press the bottoms together between your palms. Press down to get rid of air bubbles and roll the dough between your palm and the work surface to form a smooth ball. Coat a finger in flour and press it through each ball to form a ring.

Work the rest of your fingers into the hole, stretching the ring and widening the hole to about 1/3 of the bagel’s diameter. Place the bagels on a lightly oiled baking sheet and cover with a damp towel. Let rest for 10 minutes and preheat the oven to 425 degrees F.

In a small bowl, mix olive oil and garlic together. Bring a large pot of water to a boil and then reduce to a simmer. Carefully sprinkle in the baking soda. Use a perforated skimmer to lower the bagels into the water in batches of 2-3. Boil, uncovered, until they rise to the surface, about 1 minute. Turn them over once. Then remove from the pan, letting the water drain, and transfer to a lightly oiled baking sheet that has been sprinkled with corn meal. Bake 12-15 minutes. Remove bagels from oven. Using a brush, coat the bagels with the olive oil-garlic mixture. Return back to oven and back until golden—about 5 minutes. Remove and cool on a wire rack. Bagels can be kept in an airtight container in the refrigerator for up to 5 days.

Appetizers/Small Plates · Side Dish · Vegetables/Vegetarian

Oven Baked Potato Chips…..and an Interview.

Oven Baked Potato Chips

One of my greatest vices are Potato Chips.

Sour Cream and Cheddar, Kettle, Spicy Jalapeno.….I love them all. Salty, crunchy—and they’re so freaking addicting.

I’m not embarrassed to admit that I can polish off an entire bag by myself in one fell swoop. And I’m not talking about one of those small snack-bags either šŸ™‚

These Oven Baked Potato Chips are an easy and “healthier” way for me to fulfill my chips cravings. This is a basic recipe but would be great with the addition of herbs or even Parmesan cheese–YUM! Just be sure to keep a close eye on them while they’re baking as some can brown faster than others.

On another note, I recently participated in a fun event with Gordon Attard from Pimp That Food. Check out my interview with him as May’s Food Blogger of the Month. Thanks Gordon!

Food Blogger Interview

______________________________________

Oven Baked Potato Chips
Serves 2-3

Ingredients:

1 Large Russet Potato
Sea Salt
Cooking Spray

Preheat oven to 475 degrees.

Using a mandolin or very sharp knife, thinly slice the potatoes. Use paper towels to dry off any excess moisture from the potatoes.

Cover a large baking sheet with cooking spray. Place the potato slices in one layer on the baking sheet. Spray the slices with cooking spray.

Bake the potato slices for 15-20 minutes until golden brown. You may need to flip the slices every few minutes to evenly bake them. Keep a close eye on the potatoes, as some will crisp up faster than others. Once browned, remove them from the oven and immediately sprinkle them with sea salt.

Enjoy!

Seafood · Vietnamese

Chįŗ£ CĆ” Thăng Long (Vietnamese Style Fish with Turmeric & Dill)

Cha CĆ” Thang Long (Vietnamese Style Fish with Tumeric & Dill)

Chįŗ£ CĆ” Thăng Long (also known asĀ Chįŗ£ CĆ” LĆ£ Vį»ng and Chįŗ£ CĆ” HĆ  Nį»™i) is an infamousĀ HĆ  Nį»™i dish. At it’s originating roots from the 100+ year oldĀ Chįŗ£ CĆ” LĆ£ Vį»ng restaurant, turmeric marinaded fish is first grilled and then fried table-side. It’s served with tons of fresh dill, other herbs, crush peanuts, and rice noodles.

It wasn’t until I was in college that I began to truly appreciate this dish with it’s complex, yet well balanced, flavors. In Orange County, I would order it as a treat when I was out with my parents in Little SĆ i Gòn. The only popular place to getĀ Chįŗ£ CĆ” Thăng Long at that time was from Viį»…n ĐƓng Restaurant where it would come out on sizzling cast iron plates. Now,Ā Chįŗ£ CĆ” is pretty readily available at many Vietnamese restaurants.

Cha CĆ” Thang Long (Vietnamese Style Fish with Tumeric & Dill)

Traditionally, in HĆ  Nį»™i, this dish is made with cĆ” lóc –or snakehead fish. Which, on a random note, was my dad’s nickname in the navy. šŸ™‚

Here in the states, most restaurants will make it with catfish or other firm white fish. But mom also used to make it with salmon, too.

If you’ve never hadĀ Chįŗ£ CĆ” before, you may be surprised to see how much fresh dill is used. But trust in the process because it’s the plentiful dill and turmeric that makes this dish so special.

Cha CĆ” Thang Long (Vietnamese Style Fish with Tumeric & Dill)

Typically,Ā Chįŗ£ CĆ” is served with MįŗÆm NĆŖm—a very pungent, fermented anchovy sauce. I love the stuff but it’s definitely a flavor to get used to—even if you are Vietnamese! As such, you see this dish also served with a standard Nước Chįŗ„m which is much more mild compared to its counterpart.

Not up to mixing up a batch of your own MįŗÆm NĆŖm? No worries, I buy mine premixed and bottled. MįŗÆm NĆŖm is just one of those tricky things that I seem to never be able to get the right ratios down. šŸ™‚

Cha CĆ” Thang Long (Vietnamese Style Fish with Tumeric & Dill)

At home, you can cookĀ Chįŗ£ CĆ” in several different ways. Either on a grill (or grill pan), underneath the broiler, or simply pan fry like I did. But be sure to get all the crispy brown bits in your bowl because that’s what is packed full of yummy flavor.

Thanks for reading!

Cha CĆ” Thang Long (Vietnamese Style Fish with Tumeric & Dill)

On a side note, I’d like to dedicate this post/dish to our Mom who instilled in us the love for cooking and sharing food with loved ones. She would have turned 70 this coming Tuesday. Wasn’t she lovely? šŸ™‚

Happy Mother’s Day and Happy Birthday, Mom! We miss you and love you!

______________________________________________________

Chả CÔ Thăng Long (Vietnamese Style Fish with Turmeric & Dill)
Serves 4

Ingredients:

For Fish:
1 Pound Firm White Fish, cut into 2 inch pieces
3 Tablespoons Vietnamese Fish Sauce
1 Teaspoon Turmeric Powder
1 Tablespoon Fresh Garlic, finely minced
½ Tablespoon Fresh Ginger, finely grated
2 Tablespoons Shallots, finely diced
1 Tablespoon Fresh Dill Fronds, chopped (for marinade)
¼ Teaspoon Black Pepper
4 Scallions, sliced into 2 inch segments
1 Small White Onion, sliced
1 Large Bunch of Dill, without stems
3 Tablespoons Vegetable Oil, divided

Accouterments:
½ Cup Peanuts, toasted and roughly chopped
Fresh Dill Fronds, chopped
Red Thai Chiles, diced
Chili Paste
Nước Chįŗ„m (fish dipping sauce) or MįŗÆm NĆŖm (fermented anchovy dipping sauce)
1 Package Vermicelli Noodles, boiled according to package directions

In a large bowl, mix fish sauce, turmeric, garlic, ginger, shallots, dill fronds, and black pepper. Add fish and mix well. Cover the bowl with plastic wrap and refrigerate for 1-2 hours.

In a large skillet, heat 1 tablespoon of oil. Cook the white onions until lightly golden. Add 1/3 of the dill and ½ of the sliced scallions. Sauté for an additional 1-2 minutes. Plate the onions, scallions and dill on a serving platter.

Remove fish the refrigerator and drain off the marinade. Using paper towels, pat off any excess liquids. Using the same skillet, heat the remaining oil to medium high. Pan fry the fish—about 3-4 minutes on each side until the fish is evenly browned. Plate the fish on top of the bed of cooked onions, scallions and dill. Immediately top with the remaining fresh dill and scallions. Sprinkle peanuts on top and serve immediately with vermicelli noodles and sauces.


**This is my submission to Delicious Vietnam #13, a monthly blogging event celebrating Vietnamese cuisine which was started by Anh of A Food Lover’s Journey and Hong & Kim ofĀ  Ravenous Couple. For more information, please visit Delicious Vietnam**

Desserts/Pastries

Key Lime Cheesecake

Key Lime Cheesecake

I know I always harp on about it.

But I freaking love citrus.

In the foods I cook/eat, beverages I like to drink, fragrances for my hand soaps and lotions, and even for decor.

I’m a Citrus-a-holic.

Key Lime Cheesecake

I know. I’ve got issues šŸ™‚

Key Lime Cheesecake

Since Key Lime Pie ranks among one of my top favorite desserts, I wanted to take it’s bright flavors and marry it with one of my other favorite sweet treats—Cheesecake!

If you love citrus and limey things, this dessert is perfect for you! The tartness is fully pronounced but not overwhelming and the citrus-whipped cream is the ideal pairing.

As I mentioned in my post about Key Lime Pie with a Macadamia-GrahamĀ CrackerĀ Crust, it’s tough work to squeeze the juice out of those little buggers! But Key Limes have such a distinct flavor that I didn’t want to substitute them with Persian Limes. Lucky for me, my sis had just picked up a bottle of pure Key Lime juice from Williams Sonoma. And since I was intent on packing in as much citrus flavor into this cheesecake as I could, I also used Key Lime Extract. (My sis had given me a bottle as a gift since she knows what a key lime freak I am!)

Key Lime Cheesecake

Sure, if you just “kinda” like the flavors of citrus, you could decrease the amounts of juice, zest, or extract. But what fun would that be?

I myself, just might even try to add more zest next time. šŸ™‚

And with that my friends, thanks for reading and have a WONDERFUL MOTHER’S DAY WEEKEND!

__________________________________________

Key Lime Cheesecake
Makes one 9-inch Cheesecake

Ingredients:

Crust:
2 Cups Graham Cracker Crumbs
3 Tablespoons Sugar
6 Tablespoons Unsalted Butter, melted

Filling:
24 Ounces Cream Cheese, at room temperature
¼ Cup Sour Cream, at room temperature
1 Cup Sugar
3 Large Eggs, at room temperature
3 Tablespoons Key Lime Juice
2 Tablespoons Lime Zest
1½ Teaspoon Key Lime Extract

Whipped Cream:
1 Cup Heavy Cream, chilled
2 Tablespoons Sugar
1 Tablespoons Lime Zest
Preheat oven to 325 ˚F.

Combine the graham cracker crumbs, sugar and butter until moistened and resembles the texture of wet sand. Pour into a 9-inch springform pan and press crumbs into the bottom of the pan and about one inch up the sides. Bake for 8-10 minutes until golden and cool to room temperature.

Using a standing mixer fitted with the paddle attachment, whip the cream cheese and sour cream until its light and fluffy. Gradually mix in the sugar.Ā  Mix in the eggs one at a time, beating well after each addition. Ā Add the lime juice, lime extract and zest until well combined. Ā Pour the filling over the cooled crust.

Place the pan on the middle rack of the oven with a pan half full of hot water on the bottom rack of the oven. Bake for 50-60 minutes or until the center is set. Turn off the oven and allow the cake to sit in the oven with the door propped open for about 30 minutes. (To prop the oven door, I use a wooden handled spoon to keep it ajar a few inches). Remove from the oven and transfer to a wire rack. Ā Allow the cake to cool for an additional 30 minutes. Ā Wrap well with plastic film and foil. Refrigerate for at least 8 hours. Carefully remove the sides of the pan by running a hot knife around the outside of the cake.

When you are ready to serve, prepare the whipped cream. Using a standing mixer fitted with the whisk attachment, whip the chilled heavy cream on high until it just holds stiff peaks. Slowly sprinkle in the sugar until you reach a thick consistency. Add in the zest and whip until combined.

Pipe the whipped cream on top of the cheesecake and garnish with additional lime slices and zest.

Enjoy!

Breads · Pizzas · Pork

Sausage and Mushroom Pizza

Sausage and Mushroom Pizza

If you were to ask me, “What do you want on your pizza?”———–I will almost always say, Sausage and Mushrooms.

You just can’t go wrong with this delish combo.

I do, however, like to add a few special touches when I make my Sausage and Mushroom Pizzas. And those little extras comes in the form of roasted garlic and grape tomatoes. I try to squeeze in my veggies anyway I can.

Wait a second. Can I really consider garlic a “vegetable”?

Eh…… Sure, why not!? šŸ™‚

Sausage and Mushroom Pizza

For this pizza, I tried out the dough from Cooks Illustrated. I’m happy to report that it came together really easily—especially since I used my KitchenAid Stand Mixer with the dough hook attachment for the kneading. The dough came out beautifully silky before baking and had a wonderful texture when it was done. I definitely recommend it!

Stay tuned for Friday’s post where I take a spin on one of my all time favorite desserts šŸ™‚

______________________________________________

Sausage and Mushroom Pizza

Dough (From Cooks Illustrated):
½ cup warm water (for yeast)
2½ teaspoon instant yeast
1¼ cups water, at room temperature
2 tablespoons extra virgin olive oil
4 cups bread flour, plus more for dusting the work surface and hands
1½ teaspoon salt
olive oil for oiling the bowl
*Makes enough for 4 medium sized crusts

Toppings:
1 cup spicy Italian sausage, browned
1 cup Crimini mushrooms, sliced
1½ cups marinara sauce (more if you like it saucier)
1½ cups shredded mozzarella cheese
½ cup grape tomatoes, diced
¼ roasted garlic
¼ cup fresh Italian parsley, chopped
¼ cup yellow cornmeal
2 tablespoons olive oil

Prepare pizza dough. Measure the warm water into a 2-cup liquid measuring cup. Sprinkle in the yeast and let stand until the yeast dissolves and swells, about 5 minutes. Add room temperature water and oil and stir to combine. Combine the salt and half the flour in a deep bowl. Add the liquid ingredients and use a wooden spoon to combine. Add the remaining flour, stirring until a cohesive mass forms. Turn the dough onto a lightly floured work surface and knead until smooth and elastic, 7 to 8 minutes, using a little dusting flour as possible while kneading. Form the dough into a ball, put it in a deep oiled bowl, cover with plastic wrap and let rise until it doubles in size, about 2 hours.

Place pizza stone or large baking sheet in the middle rack and preheat oven to 400 degrees.

Lightly dust your surface area with flour. Divide the dough into quarters. Take one of the pieces and roll/toss/stretch the dough into your desired shape. Once the oven reaches its temperature, pull the baking stone/baking sheet out of the oven, and sprinkle cornmeal on the surface. Carefully slide the dough on top and bake for 5 to 10 minutes until the dough is lightly golden. Remove the crust from the oven and brush with olive oil over top. Spread the roasted garlic all over the crust. Cover the crust with an even layer of marinara sauce. Sprinkle the shredded mozzarella evenly over the dough, leaving a ½ -inch border around the perimeter. Top with the grape tomatoes, sausage, and mushrooms. Return the pizza back to the oven and bake for an additional 10-15 minutes until all the cheese has melted and pizza is golden brown. Sprinkle the pizza with Italian parsley and serve with additional parmesan cheese and red chili flakes.

Note: If you aren’t planning to use the extra dough right away, there are a few options for you. First, you can shape each piece and parbake them. Wrap them up tightly in plastic wrap and foil—then, throw into the freezer. Another option is to oil the inside of a Ziploc bag with cooking spray. Throw in one ball of dough per oiled bag and remove any excess air before sealing and place it in the freezer. Transfer it to the fridge the night before you want to use it. Then place it on the counter to get it to room temperature for 1-2 hours before you bake it.

Pork

Tonkatsu (Japanese Pork Cutlet)

Tonkatsu

Tonkatsu is such a delicious meal to pull together when I need a quick Japanese fix.

Since the pork used is so thin, it fries up in a flash! Even if you need to make your own sauce, you can have the whole dish done in 20 minutes. Which, let’s be honest, is “Buddha-sent” for weeknight meals.

A lot of Japanese markets carry a perfectly yummy bottled Tonkatsu sauce. But if you don’t have some on hand, it’s just as easy and delish to make. Though, I have been just as happy to dip the crispy cutlets into BBQ sauce.

_____________________________________

Tonkatsu (Japanese Pork Cutlet)
Serves 2

Ingredients:

Tonkatsu:
4 Pieces Pork Loin, ½ inch thin
1 Cup Panko Bread Crumbs
½ Cup Flour
2 Eggs
2 Tablespoons Milk
¼ Cup Vegetable Oil
Salt and Pepper

Tonkatsu Sauce:
2 Tablespoons Barbecue Sauce
2 Tablespoons Ketchup
½ Tablespoon Soy Sauce
1 Teaspoon Worcestershire Sauce
1 Teaspoon Rice Wine Vinegar
½ Tablespoon Sugar
½ Teaspoon Garlic Powder
¼ Teaspoon Black Pepper

Prepare the sauce by mixing whisking all the ingredients together in a bowl. Set aside while preparing the pork.

Place breadcrumbs in a shallow dish and place the flour in another. In a bowl, whisk together the eggs and milk. Season the pork with salt and pepper. Working in batches, dredge a few pieces of the pork in the flour, then the egg mixture, and finally the breadcrumbs to coat, shaking off the excess between each step. Ā Repeat with the remaining pork.

In a large skillet, heat the oil to medium high heat. Ā Slide in 2 pieces of pork and fry until golden brown, approximately 2-3 minutes on each side. Remove from pan and drain the cutlets on paper towels. Repeat with remaining pork.

Serve Tonkatsu with rice, sauce, and a squeeze of lemon.

Drinks · Pork · Sponsored

Fat TireĀ® Braised Carnitas Tacos with Fat TireĀ® Chavelas

Fat TireĀ® Braised Carnitas Tacos and Chavelas

I don’t indulge in beers too much these days. Let’s face it—without my college metabolism, it just doesn’t sit that well with me (or my hips!) anymore. But I do make exceptions for an occasional New CastleĀ® or Fat TireĀ® from time to time.

So you can imagine my delight when, as part of the Foodbuzz Tastemaker Program, I was challenged to create a dish that featured and paired with a New Belgium Brewing Company beer. Which includes Fat TireĀ®! šŸ™‚

Fat TireĀ® Braised Carnitas

I immediately knew that I wanted to incorporate the “hoppy” amber ale into a slow braise pork—ultimately to create Carnitas. By adapting David Lebovitz’ recipe, I was able to achieve tender, flavorful pork that was beautifully crispy on the outside. O…M…G.

Wrapped in warm tortillas and topped with a few spoonfuls of pico de gallo, salsa negra and a squeeze of lime—the Carnitas were Delicioso!!!

Fat TireĀ® Braised Carnitas Tacos

I confess, I turned to the local mercado for the fresh tortillas and salsas. I had every intention of making them myself but when I went to the mercado for some ingredients, I encountered these fabulous women making it all from scratch for a fraction of the cost it would take me to make.

Yep. I opted for the shortcut this time. But for the record……this gal can fix up some yummy salsas. šŸ™‚

To wash it all down, I whipped up an homage to Taqueria Tlaquepaque’s Chavelas. Tlaquepaque was one of my beloved taquerias in San Jose that served up AMAZINGLY fresh and delish food. But the food was only 1/2 of the reason why my dear gal friends and I would congregate there. The other half was for the Chavelas —Mexican beer mixed with fresh lime juice and salt. Very few things in life are more refreshing than a frosty goblet of Chavela. True Story.

Fat TireĀ® Chavelas

Turns out that Fat TireĀ® in a Chavela is PDA.Ā  (Translation: Pretty. Darn. Amazing.)

Fat TireĀ® Braised Carnitas Tacos & Chavelas

Incorporating Fat TireĀ® in a dish? Not as difficult as one would thinkĀ  šŸ™‚

And as luck would have it—just in time for Cinco de Mayo!!!

___________________________________________________________

Fat TireĀ® Braised Carnitas
Adapted from David Lebovitz

Ingredients:

5 Pounds Boneless Pork Shoulder, cut into 5-inch chunks, trimmed of excess fat
2-3 Tablespoon Sea Salt
2 Tablespoons Vegetable oil
2 Bottles Fat TireĀ® Ale (24 ounces)
1 Cup White Onion, diced
1 Tablespoon Fresh Garlic, finely diced
1 Teaspoon Chile Powder
¼ Teaspoon Paprika
¼ Teaspoon Cayenne Powder
¼ Teaspoon Ground Cumin
2 Bay Leaves

Using paper towels, dry off the pork and generously season with salt.

Heat the oil in a large dutch oven over medium-high heat. Cook the pieces of pork in a single layer until very well-browned, turning them as little as possible so they get nice and dark before flipping them around. If your cooking vessel is too small to cook them in a single-layer, cook them in two batches. Be sure to take your time to get a deep brown color as it enhances the flavor. This usually takes me about 30 minutes to properly brown all the meat.

Once all the pork is browned, remove them from the pot and blot away any excess fat with a paper towel. Discard all but one tablespoon of the grease that remains in the pot. Lower the heat to medium. Add the onions to the pot and cook until translucent. Add the garlic and cook for an additional one to two minutes. Ā Then pour in the beer, scraping the bottom of the pot with a wooden spoon to release all the brown bits.

Heat the oven to 350F degrees.

Add the pork back to the pot and add the remaining of the seasonings and spices. Braise in the oven uncovered for 3-3½ hours, turning the pork a few times during cooking, until much of the liquid is evaporated and the pork is falling apart. Remove the pan from the oven and lift the pork pieces out of the liquid and set them on a platter.

Once the pork pieces are cool enough to handle, shred them into bite-sized pieces discarding any big chunks of fat. Return the pork pieces back to the roasting pan and cook in the oven, turning occasionally, until the liquid has evaporated and the pork is crispy and caramelized.

Serve with corn tortillas and your choice of salsas and toppings.

___________________________________________________________

Fat TireĀ® Chavelas
Serves One

Ingredients:

1 Bottle Fat TireĀ® Ale (12 ounces)
2 Tablespoons Fresh Lime Juice
Sea Salt
Lime Wedges

Chill glass in the freezer for 15 minutes. Rim the glass using a lime wedge and dip into sea salt. Pour the lime juice in the bottom of the glass and pour well chilled Fat TireĀ® AleĀ  over it. Serve and garnish with lime wedges. Enjoy!