Miscellaneous

Thoughts on Cupcake Wars©….

As a self-proclaimed food television junkie and novice cupcake baker, it’s no shocker that I’ve tuned into the FoodNetwork’s latest show Cupcake Wars©. Per their site:

“Each week on Cupcake Wars, four of the country’s top cupcake bakers face off in three elimination challenges until only one decorator remains. The sweet prize: $10,000 and the opportunity to showcase their cupcakes at the winning gig.”


Image from http://www.foodnetwork.com

Conceptually, I was super excited to catch the premiere and couldn’t wait to be inspired by cupcakers around the country. But alas, after each episode I’m left with a “meh” feeling. I neither love it or dislike it…..all I know is that I kind of expected more. This isn’t to say that the challenges are a piece of cake (or “cupcake” in this case) because I know I sure as heck couldn’t bake and frost cupcakes within 45 minutes (or make a 1,000 in 3 hours for that matter!). Yet despite all of it, I’ve been a bit underwhelmed. Who knows….maybe it’s the “Simon Cowell” approach to judging that Chef Florian Bellanger is taking or the random hosting by Justin Willman that makes me kind of cringe.

Still, at the end of the day, I’d like to give big kudos to each of the contestants. Keep up the good work and I’ll keep tuning in.

So until next time Friends, this is Food Television Junkie signing off. 🙂

Drinks

White Wine Sangria with Nectarines and Peaches

If you ask those dear to me, they would say my poison of choice would be a nice glass of dry red wine or a Grey Goose cocktail (oh—and of course bubbly). But on those warm summer days, I find that a chilled fruity glass of White Wine Sangria is the perfect accompaniment to any occasion.

This quick and easy White Wine Sangria recipe serves as a great base for any direction you’d like to take this refreshing summer cocktail. Often times I’ll substitute the nectarines with sweet mangoes or leave out a bottle of the white wine at the beginning only to top it off before serving with a chilled bottle of Prosecco — for that added effervescent fun that only “bubbly” can offer. And finally, for those who enjoy sweeter wines, try adding a few tablespoons of simple syrup to round out the flavors of the fresh fruit.

With us well into the month of July….what are you waiting for? Mix up a pitcher of these and you’ll wonder why you ever waited so long to do so before. 🙂

Salut!

___________________________________________________

White Wine Sangria with Nectarines and Peaches
Serves: As many as you’re willing to share with 🙂

2 Bottles of White Wine (such as a Chardonnay or Sauvignon Blanc)
½ Cup Orange Liqueur
12 Ounces Peach Nectar
12 Ounces Club Soda
Juice of 1-2 Limes
1 Peach, sliced thinly
1 Nectarine, sliced thinly
½ Cup Fresh Mint Leaves, slightly bruised to release oils

Pour wine into pitcher and add Orange Liqueur, Peach Nectar, Club Soda, and Lime Juice. Stir well. Add in fruit slices and mint leaves. Chill for a minimum of 2-3 hours.

Serve over ice.

Seafood

Macadamia Crusted Tilapia

I’ve been cooking/baking a lot with Macadamia Nuts. Sure, I’m slightly swayed by recent visits to Hawai’i but not only are these nuts delicious but they also have health benefits, too. Deemed a “high energy food” chopped with protein and fiber, these nuts are good and good for you.

In an effort to mimic one of my favorite dishes from Asian Fusion restaurants, I decided to try my hand at lightly breading some tilapia. By mixing crushed macadamia nuts with panko breadcrumbs, I got a wonderfully crispy coating on the fish without that over greasy taste. A squeeze of lemon juice over the top and it almost had me feeling like I was back on the islands.

Need a little Island flavor in your week? Try this Macadamia Crusted Tilapia…..quick, easy, and delicious!

______________________________________

Macadamia Crusted Tilapia
Serves 2

Ingredients:

2 Fillets of Fresh Tilapia
1 Cup of Macadamia Nuts, crushed
½ Cup of Panko Breadcrumbs
1 Large Egg
2-3 Tablespoons of Low-fat Milk
Kosher Salt, Garlic Powder, Black Pepper
½ Cup of All Purpose Flour (dredging)
2 Tablespoons Olive Oil
2-3 Lemon Slices

Create a dredging process. In one shallow bowl, place flour and lightly season with salt ad pepper. In second shallow bowl, beat large egg and combine with milk. In third bowl, combine macadamia nuts with panko breadcrumbs.

Take first fillet of Tilapia and pat dry with a clean paper towel. Lightly season with salt, pepper, and garlic powder. Place in first shallow bowl and lightly coat with the seasoned flour, gently patting off any excess flour. Slide the fillet in egg mixture and lightly coat. Finally, transfer fillet to the last shallow bowl and cover thoroughly with the macadamia-panko mixture. Gently press the breading to the fish so that there is an even coat.

Heat a large nonstick skillet on medium to medium-high. Add olive oil and carefully slide tilapia fillets in. Cook for 4-5 minutes on each side, until crust is golden brown and fish flakes by fork.

Serve with lemon wedges. Enjoy!

Appetizers/Small Plates · Salads · Side Dish · Vegetables/Vegetarian

Roasted Corn and Avocado Salad

Roasted Corn & Avocado Salad


I’m always trying to incorporate a new side dish when making old favorite entrees—especially if that new side dish can offer a lighter alternative to the usual. So when the bf decided to fire up the BBQ to make his delicious Grilled Skirt Steak with a Chimichurri Sauce, I wanted to find a pairing that wasn’t heavy to accompany this delish entrée.


Roasted Corn & Avocado Salad

Sweet White Corn was in abundance at our local grocery store, so I picked up a couple ears and a few Haas Avocados in hopes of pulling together a bright salad to accent the Chimichurri. By grilling the corn, it gave a wonderful smoky flavor that paired so nicely with the smooth texture of the avocados and the bright vinaigrette. I also do a short cut when cooking the corn—by wrapping it in damp paper towels and throwing it in the microwave for a few minutes, you can cut down cook time on the grill. And let’s be honest, short cuts are blessings in the kitchen sometimes.

And how did it turn out? Instant, easy hit.


Roasted Corn & Avocado Salad


Next time you’re looking for a simple side dish to pair with some grilled goodness, give this Roasted Corn and Avocado Salad a try—it may just make you forget about coleslaw and potato salad.

________________________________________

Roasted Corn and Avocado Salad
Serves approximately 3

Ingredients:

vinaigrette:
2 tablespoons red wine vinegar
5 tablespoons extra virgin olive oil
½ tablespoon lime juice
zest of ½ a lime
½ tablespoon finely minced shallots
1 finely minced garlic clove
1 tablespoon minced cilantro leaves
½ teaspoon honey or agave
1/8 teaspoon ground cumin
1/8 teaspoon red pepper flakes

kosher salt
ground pepper
3 ears sweet corn, grilled and removed from the cob
1 cup ripe avocado, diced
fresh cilantro leaves
lime wedges

In a small bowl, combine vinaigrette ingredients and whisk together until  emulsified. Season with salt and pepper to taste. Set aside.

In a large bowl, carefully fold the corn and avocados together.  Add enough vinaigrette to lightly coat the salad. Check seasonings, add additional salt and pepper if needed. Garnish with cilantro leaves and lime wedges. Serve at room temperature.

**Photos updated May 2014

Desserts/Pastries

Red Velvet Cupcakes…Just in Time for the 4th of July!

Red Velvet Cupcakes with Cream Cheese Frosting


When the Cupcake Craze emerged, it resurrected the huge following of Red Velvet Cupcake goers. People just love them—and in fact, it’s my most requested cupcake.

There’s just something about that bright red color of the cake and mounds of frosting that really draw people in. I’m not sure if it’s more the flavor or the coloring that is the attraction—though I’m partial to the hue. Heck—I’m also the gal who can’t eat Mint Chip Ice Cream that isn’t the brightly colored green type! 🙂

Traditionally dyed with beet juice, Red Velvet Cake has come along way and is produced in variety of incarnations. Some prefer oil to butter, cake flour to all-purpose, buttermilk to regular milk, a ton of cocoa powder to a few spoonfuls……it can go on and on.  The particular version I gravitate towards uses a butter base in combination with sour cream. I find that this leaves the cake with a more rich and moist profile. I also love a deep intense color and tend to use more food coloring than others. This is also affected by the low amount of cocoa powder in this particular recipe. Whereas some prefer to use more cocoa powder, I am under the belief that it’s there just for a light flavoring.

These classic Red Velvet Cuppies have been a fav among my family and friends. Top them off with a few blueberries and they will be the perfect addition to any 4th of July Celebration!!!

Have a safe and HAPPY 4th of JULY!!!


_________________________________________________

Red Velvet Cupcakes
Makes approximately 18 Regular Sized Cupcakes

Ingredients:

Batter
1¼ Cups All Purpose Flour
½ Teaspoon Baking Soda
¼ Teaspoon Salt
1½  Tablespoons High Quality Unsweetened Cocoa Powder
½ Cup Unsalted Butter, room temperature
1 Cup Granulated Sugar
2 Large Eggs, room temperature
½ Cup Sour Cream
½ Cup Lowfat Milk
1 Teaspoon Vanilla Extract
2-3 Tablespoons Red Food Color, depending on desired intensity of color

Cream Cheese Frosting
8 Ounces of Cream Cheese, room temperature
4 Tablespoons Unsalted Butter, room temperature
2-3 Cups Confectioner Sugar, varies due to preferred frosting consistency
1 Teaspoon Vanilla Extract

Preheat the oven to 350°degrees and place paper liners in pans.

In a separate bowl, sift together the flour, cocoa powder, baking soda, and salt. Set aside.

In a standing mixer, beat butter and sugar until light and fluffy for about 3-4 minutes. Beat in eggs, one at a time. Add milk, sour cream, vanilla, and food color. Slowly incorporate dry ingredients until well blended.

Fill each lined cup 2/3 full. Bake for approximately 18-20 minutes, rotating halfway between baking time. Cupcakes are done when a toothpick inserted in the center comes clean. Cool completely in pans on top of a wire rack.

While cupcakes are baking, prepare the frosting. In an electric mixer fitted with the paddle attachment, cream together the cream cheese and butter until fluffy.  Add vanilla extract and gradually add in the confectioners’ sugar, a few tablespoons at a time. Continue adding sugar to desire consistency. Refrigerate for at least 10 minutes before use.

When cupcakes are thoroughly cooled either frost or pipe decorate swirls on top.

Enjoy!

Salads · Side Dish · Vegetables/Vegetarian

Easy Summer Salad

Despite what this blog may illustrate, we do eat veggies– I promise! And with Summer well on its way, light salads are the perfect accompaniment to the warm weather.

My approach to salads are similar to how I make pastas—-rummage through the fridge to see what you can throw in. From veggies to fruit to cheese–anything goes. And although there are a ton of great dressings available in any grocery store, I prefer to make a quick vinaigrette to highlight the produce.

This Easy Summer Salad was made to accompany some leftover pizza we had. Hey–I never said we were 100% healthy 🙂 The recipe is really just a starting point for you to tweak to your liking. Had we had some on hand, I would have loved to add some avocado and fresh mango slices. They would have been a great compliment to the crisp apples and slightly bitter grapefruit.  But at the end of the day, almost anything can go in a salad.

Moral of the Story: EAT YOUR VEGGIES! 🙂

_____________________________________

Easy Summer Salad
Serves 3-4

Ingredients:

Salad:
3 Cups Mixed Greens (such as baby lettuces, spinach, arugula, frisée, raddichio, etc.)
1/3 Cup Chopped Fuji Apples
1/3 Cup Pink Grapefruit, segmented
1/3 Cup Grape Tomatoes, halved
1/4 Cup Crumbled Feta Cheese

Vinaigrette:
1 Tablespoon White Wine Vinegar
3 Tablespoons Quality Extra Virgin Olive Oil
1 Teaspoon Dijon Mustard
Pinch of Garlic Powder
Salt and Pepper to Taste

In a small bowl, combine Vinaigrette and whisk together until slightly emulsified. Set aside.

Combine all ingredients for salad, except for Feta Cheese, lightly toss with vinaigrette. Use barely enough to lightly coat the greens. Sprinkle in Feta and toss lightly. Serve and Enjoy!

Breads · Breakfast/Brunch · Desserts/Pastries

Blackberry Muffins topped with Almond Streusel

photo

I try my hardest to eat what is in season and in doing so, I find that I get the best products at the lowest price. The other day while picking up some items at my local grocery store, I came across signs for fresh Blackberries at only $1 a basket! Now that was a deal I couldn’t pass up. I quickly filled my cart with 3 cartons without any idea on how I was going to use them.

The following work day, I decided to greet my new student staff with freshly baked muffins for our early morning meeting. I had never had a Blackberry Muffin before but thought it would be a great use of the fresh blackberries I had just picked up. Plus, I recalled a recipe from Williams Sonoma that featured this combination.

After a little digging around I found the recipe and quickly began making some modifications. The recipe is SUPER easy and I think the additions I made added a great flavor profile to the muffins.

The muffin was light, fluffy, and quite moist. The large blackberries were a nice surprise when biting into the muffin and I was pleased to see that my cautious folding of the batter yielded no “bleeding” from the berries. As for the almond streusel topping, well, what’s not to love about crunchy almonds, sugar and butter? The slight crunch added great texture and it seemed to be quite the favorite component with everyone.


image1

__________________________________________

Blackberry Muffins topped with Almond Streusel
Makes 12 Muffins

Ingredients:

Streusel Topping:
1/3 cup granulated sugar
2 tablespoons all purpose flour
1 heaping tablespoon brown sugar
½ teaspoon ground cinnamon
½ teaspoon fresh lemon zest
2 tablespoons unsalted butter, melted
½ cup sliced toasted almonds, roughly chopped

Batter:
2 cups all purpose flour
¾ cup granulated sugar (more if needed, depending on sweetness of berries)
1/4 cup light brown sugar
2 teaspoons baking powder
½ teaspoon baking soda
1 teaspoon ground cinnamon
1/8 teaspoon ground nutmeg
½ teaspoon fresh lemon zest
¼ teaspoon salt
1 egg, beaten
5 tablespoons unsalted butter, melted
1 cup buttermilk
1 tablespoon vanilla extract
2 cups fresh blackberries


Preheat an oven to 375°F. Place 12 paper liners in a standard muffin tin. Using a cooking spray, lightly spray the cups and pan. Set aside.

Prepare the topping. In a small bowl, stir together the sugars, flour, cinnamon and lemon zest. Stir in the melted butter until the mixture is crumbly. Stir in almonds and set aside.

Prepare the batter. In a small bowl, whisk together the buttermilk and vanilla extract. In a larger bowl, stir together the flour, sugars, baking powder, baking soda, cinnamon, nutmeg, lemon zest and salt. Make a well in the center and add the egg, melted butter and buttermilk mixture. Stir just until evenly moistened. The batter will be fairly lumpy. Carefully sprinkle in the blackberries (reserving 12 of the berries aside) and gently fold into the batter with a large rubber spatula just until evenly distributed. Take care not to break up the fruit.

Spoon and divide evenly the batter into the prepared muffin cups. Gently place one berry on top of each muffin and lightly press down with your finger until it is submerged. Proceed to cover each muffin with the streusel topping, dividing it evenly .

Bake until the muffins are golden and a toothpick inserted into the center comes out clean, 25 to 30 minutes. Transfer the pan to a wire rack and let cool for 10 minutes. Unmold the muffins. Serve warm or at room temperature.

Enjoy!

Just missing a steaming cup of Joe 🙂

Beef · Pork

The Onion Burger…a Childhood Favorite

Growing up in an immigrant family in Minnesota, our meals primarily consisted of Vietnamese food. Occasionally we would have an “American” dish that my mom and sisters learned to prepare from our sponsors or friends. Those dishes such as lasagna, sloppy joes, “steak-umms”, and spaghetti bring back such vivid memories for me at that young age as they would be “treats” from our standard Vietnamese fare. But as life would have it, I would gladly trade any of those “American” items to enjoy those old dishes again…..well, with the exception of our lasagna and onion burgers.

Our lasagna recipe is Top Secret–but trust me, it’s darn good. Now our onion burgers, that’s a whole different story. Why? Well, because the recipe is printed on a box—a Lipton Onion Soup Mix Box to be exact.

Ok, ok….we can’t really claim it to be “our” own recipe. But growing up, this is how I knew homemade burgers to taste like. So when we moved to California and I had other homemade burgers, I was underwhelmed. Where’s the seasoning? Where’s that great flavor in the patty? Needless to say, we continued making these onion burgers–with slight tweaks to the boxed recipe.

However, there’s good news for you dear friends. You, too, can get your little hands on this  yummy burger. It’s tasty and super easy to make. Let’s not forget to mention that you’ll have this on the table within a half hour. 30 Minute Meals has nothing on this burger! 🙂

So get those grills (or grill pans) ready because Summertime = Burger Time!

____________________________________________

Onion Burgers
Serves 4

Ingredients:

Patty:
1 Pound Ground Beef (80/20 mix)
1 Packet Lipton® Onion Soup Mix (or your preferred brand)
2 Teaspoons Garlic, finely minced
1 Teaspoon Ground Black Pepper
Liquid Smoke (optional)

Fixings:
Grilled Onions
Crispy Bacon
Lettuce
Provolone Cheese
BBQ Aioli Dressing (combine 3 Tablespoons BBQ Sauce & 2 Tablespoons Mayo)
Ciabatta Rolls (or your choice of bread), toasted

Combine all ingredients for the patty, except the liquid smoke. Divide the mixture into four equal patties. Flatten patties and make a small indentation in the center. This is to help the patties from “puffing up” when they cook. If cooking on a grill, place patties directly on oiled grate and cook approximately 3-5 minutes on each side or until the internal temperature reaches 165 degrees.  If cooking on a stove top with grill pan, heat pan to medium high and cover lightly with cooking spray. Brush each patty with the liquid smoke (optional) and cook for about 5 minutes on each side or until the internal temperature reaches 165 degrees. *For both methods, place a slice of cheese on top of each patty during the last minute of cooking.

Spread a spoonful of the BBQ Aioli Dressing on the bottom of each toasted roll and place patty on top. Continue adding the remaining accoutrements. Serve with chips and pickle spears.

ENJOY!

Desserts/Pastries

“I’m a Big Boy” Cupcakes

Last month my friend Ashley put in a unique cupcake request to celebrate a momentous occasion in her eldest son’s life—Potty Training! In an effort to get him excited about this new phase in his life, she was throwing him a “Bye-Bye Diapers” celebration and wanted cuppies with some undies on them 🙂

I was intrigued and quickly accepted the challenge. Instead of worrying about cake flavors and frosting types (like I usually do when filling orders), I was consumed with how to best illustrate these whimsical cuppies and enlisted the help of the BF. Isaiah is quite artsy and always is able to create some beautiful work. And yes, I realize that I’m a lucky gal for dragging in the BF to not only decorate cupcakes but make BVDs!

For the cake, I settled on a simple Vanilla batter as I find that kids “J’s” age gravitate more to the classics–chocolate, vanilla, or strawberry. Amy Sedaris’ Vanilla Cupcakes were just the trick to a quick and tasty Vanilla cuppie. As for the frosting, kids typically like frosting better than the cake–and usually the sweeter the better! My standard quick-vanilla-butter cream-frosting was in order.

And finally, the decorations—which turned out to be the most difficult decision. I knew I would be happier with the overall look if I used Fondant for it’s smooth, clean lines and it would be much easier to cut shapes out of it. However, if you’re anything like me, I really am not a fan of the taste or texture of eating fondant. And if I don’t like it, I can’t expect the kiddies to either. After much deliberation, I settled on a diplomatic compromise. For the “flavor”, half the cupcakes would have a big mound of butter cream frosting and be topped with a “BVD” fondant  decoration. For the “look”, the other half of the cupcakes would be covered in all fondant.

The process with the fondant was actually quite fun! One just needs a bit of cornstarch to ensure it doesn’t stick while rolling it out and you need to be sure to store the unused fondant in airtight containers to prevent it from drying out. Isaiah and I got a pretty nice assembly line pumping them out, too. I’d primarily roll out the fondant and cut the “BVD” shapes and he would pipe the red accents using colored royal icing. For these cuppies, I used Martha Stewart’s Royal Icing recipe as it uses meringue powder instead of egg whites. This is particular nice since some folks are wary of using/eating raw eggs.

We were quite happy with the end result of our “I’m a Big Boy Cupcakes”.  It had a great playfulness from the bright colors we chose and of course, because of the “BVDs”. The Big Guy also seemed to enjoy them as he took a big whomping bite directly from the top–frosting, fondant, and all!

Just goes to show–No decoration is too silly. And in fact, the more silly–the better!!!

Wishing you tons of Luck, “J”! You’re a BIG BOY, now! 🙂

Cupcakes packed and ready to go!


“J” Approved 🙂 Pic courtesy of his proud, Mama.

Desserts/Pastries

Key Lime Pie with Macadamia-Graham Cracker Crust

I have always loved the bright and vibrant flavors of citrus, particularly Limes. And in this gal’s humble opinion, very few desserts can bring such a smile to my face like a good piece of Key Lime Pie. The creamy, sweet, and tart flavors balance so well with the traditional graham cracker crust. Just absolute Yum! So when the Memorial Holiday Weekend came up, I couldn’t think of a better dessert to accompany our barbecue dinner.

Traditional Key Lime Pies are fairly easy to make but I have had so many that fell short on that true “in your face tart flavor”. Therefore, I wanted to ensure that I didn’t skimp on the Key Lime juice—a flavor quite unique to its more commonly found relative the Persian or Tahitian Lime. But have any of you ever attempted to squeeze your own Key Limes? It’s a laborious task! Those little buggers are quite small and often need to be worked quite a bit to release its juices. In fact, after squeezing 28 entire Key Limes, I was only left with a little over 1/4 cup of juice! Yikes! My confession to you all is that I actually supplemented the rest of the juice with Persian Limes. Hey–at least I was honest!

But for those of you who need to stay true to the Key Lime, you can also buy bottled Key Lime Juice at many grocery specialty stores. Just be sure to read the label and not buy the pre-sweetened type.

As for the crust, I wanted to add a unique spin to my version of the Key Lime Pie. Recently equipped with heavy bags of Macadamia Nuts from our visit to Hawai’i, I decided to incorporate these tropical nuts into the crust. I think the addition was quite delicious—offering a little nutty flavor to the party.

And how was it? I LOVED this Pie. Seriously, LOVED IT! If you’re a fan of Key Lime Pie, or any Citrus Desserts, you’ve GOT to try this little goodie. It’s seriously “Nam Tested and Approved“.  And no, I won’t tell anyone if you decide to use all Persian Lime Juice instead of battling it out with the tiny Key Limes. It’ll be our little secret 🙂

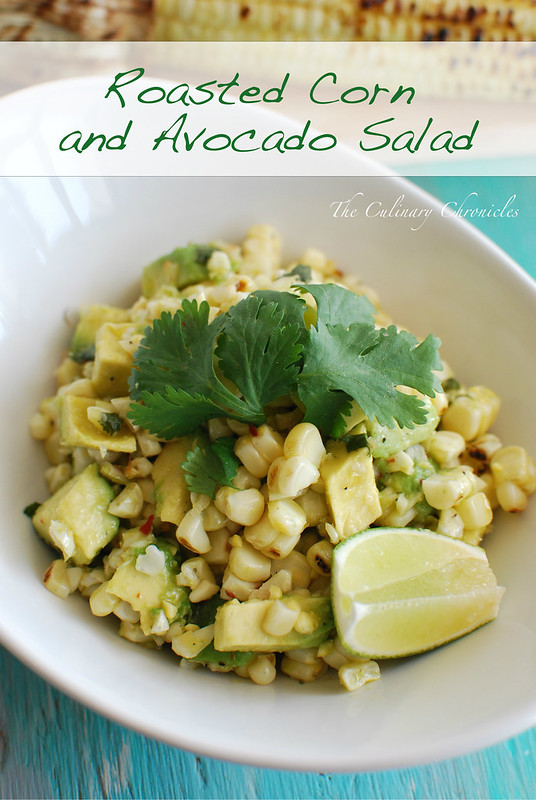
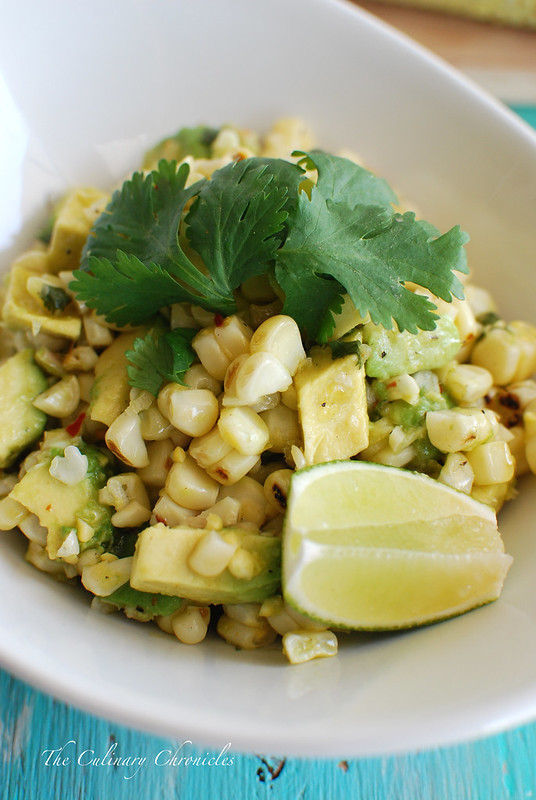
A Lime Party in a Bowl

Proof that I actually squeezed them all


Macadamia-Graham Cracker Crust ready to be filled


Tart-Citrus-Creamy Goodness!

_____________________________________________________

Key Lime Pie with Macadamia-Graham Cracker Crust
Serves 8

Ingredients:

Crust
½ Cup Roasted Macadamia Nuts
9 Graham Cracker (2 1/4-inch by 4 3/4-inch crackers)
1 Tablespoons Granulated Sugar
5 Tablespoons Unsalted Butter, melted

Filling
14 Ounces Sweetened Condensed Milk
4 Large Egg Yolks, Room Temperature
½ Teaspoon Lime Zest
½ Cup Key Lime Juice

Garnish
1 Cup Heavy Cream, chilled
2 Tablespoons Granulated Sugar
1 Teaspoon Vanilla Extra
¼ Cup Crushed Macadamia Nuts
Lime Zest
Lime Slices

Preheat oven to 350° degrees.

For Crust: In a food processor, grind Macadamia Nuts until fine. Add Graham Crackers and continue to process until contents reach the consistency of sand. Place mixture into a bowl and add sugar and butter until combined well. Transfer mixture onto the bottom of a 9-inch glass pie plate and firmly press the crust together to cover the bottom of the pan and up the sides. It is extremely important to press the mixture evenly–the flat side of a metal measuring cup can assist in this process. Bake the pie crust for about 10 minutes or until golden. Remove from oven and cool on a rack.

For Filling: Whisk together condensed milk and yolks in a bowl until combined well. Add juice, lime zest and whisk until combined well.  Pour filling into crust and bake in middle of oven 15 minutes. Cool pie completely on rack. The filling will continue to set as it cools. Once it reaches room temperature, transfer to the refrigerator and chill for at least 2 hours.

Final Touches: Just before serving, prepare the whipped cream. In a stand mixer, whisk the heavy cream on high until it just holds stiff peaks. Slowly sprinkle in sugar. Add vanilla. Pipe the whipped cream on top of the chilled pie and garnish with remaining crushed macadamia nuts, lime zest and lime slices.

I wish I had a slice right now 🙂