Sunday Family Dinner

Family Dinner Brings On the FIRES OF MORDOR!!!!!!

August 2015 Family Dinner

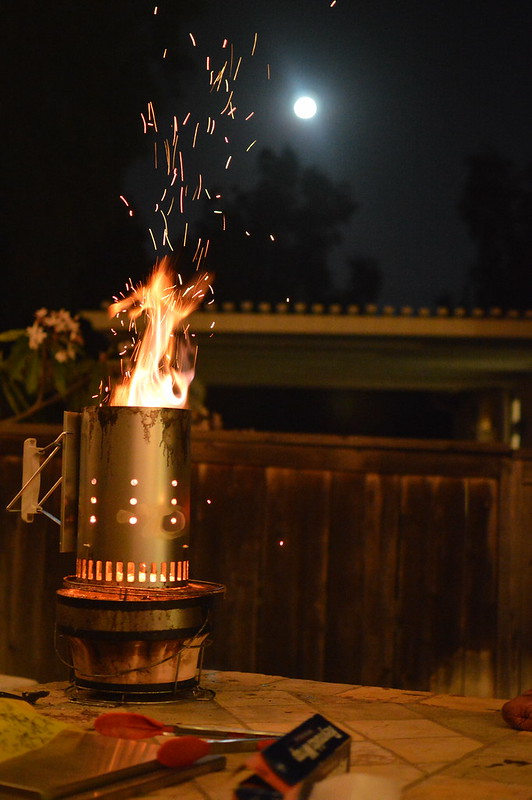
The Fires of Mordor!!!!

Only a little bit of it….but still– THE FIRES OF MORDOR!!!!!

But I’ll get to that in a bit.

It’s been a few weeks since we had our last Family Dinner and I have to admit, I want EVERY THING from that menu EVERY.SINGLE.DAY.

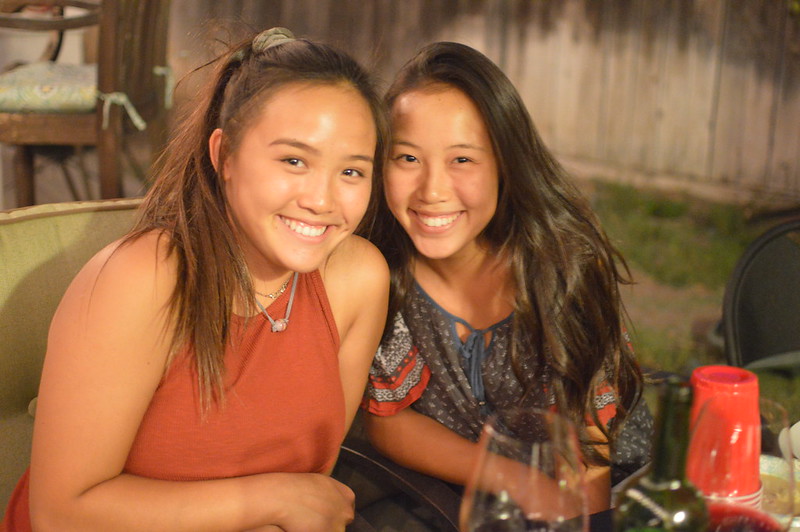
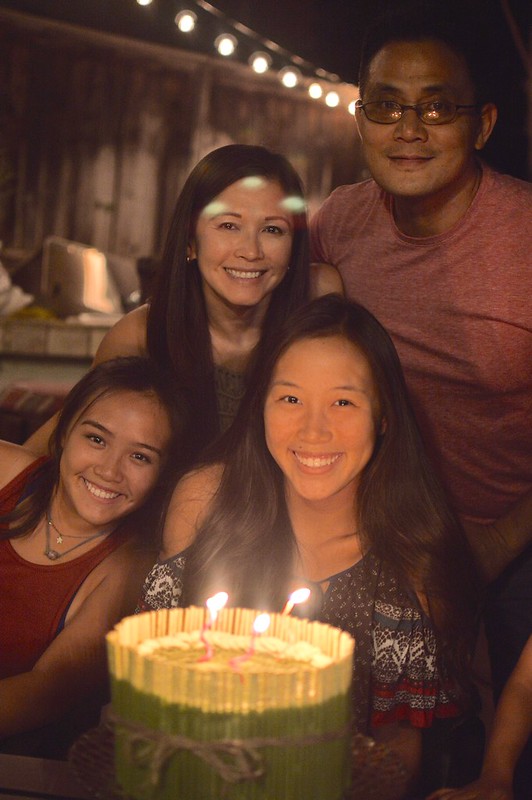
Since it was August, we were celebrating this pretty gal’s birthday. Yes folks, my little Nina is now 17. How is this even possible?! I feel like it was only the other day that I was zerberting my baby niece’s cheeks and now she’s a senior in high school, preparing to apply to college and driving me around. Well, the latter definitely has its perks.

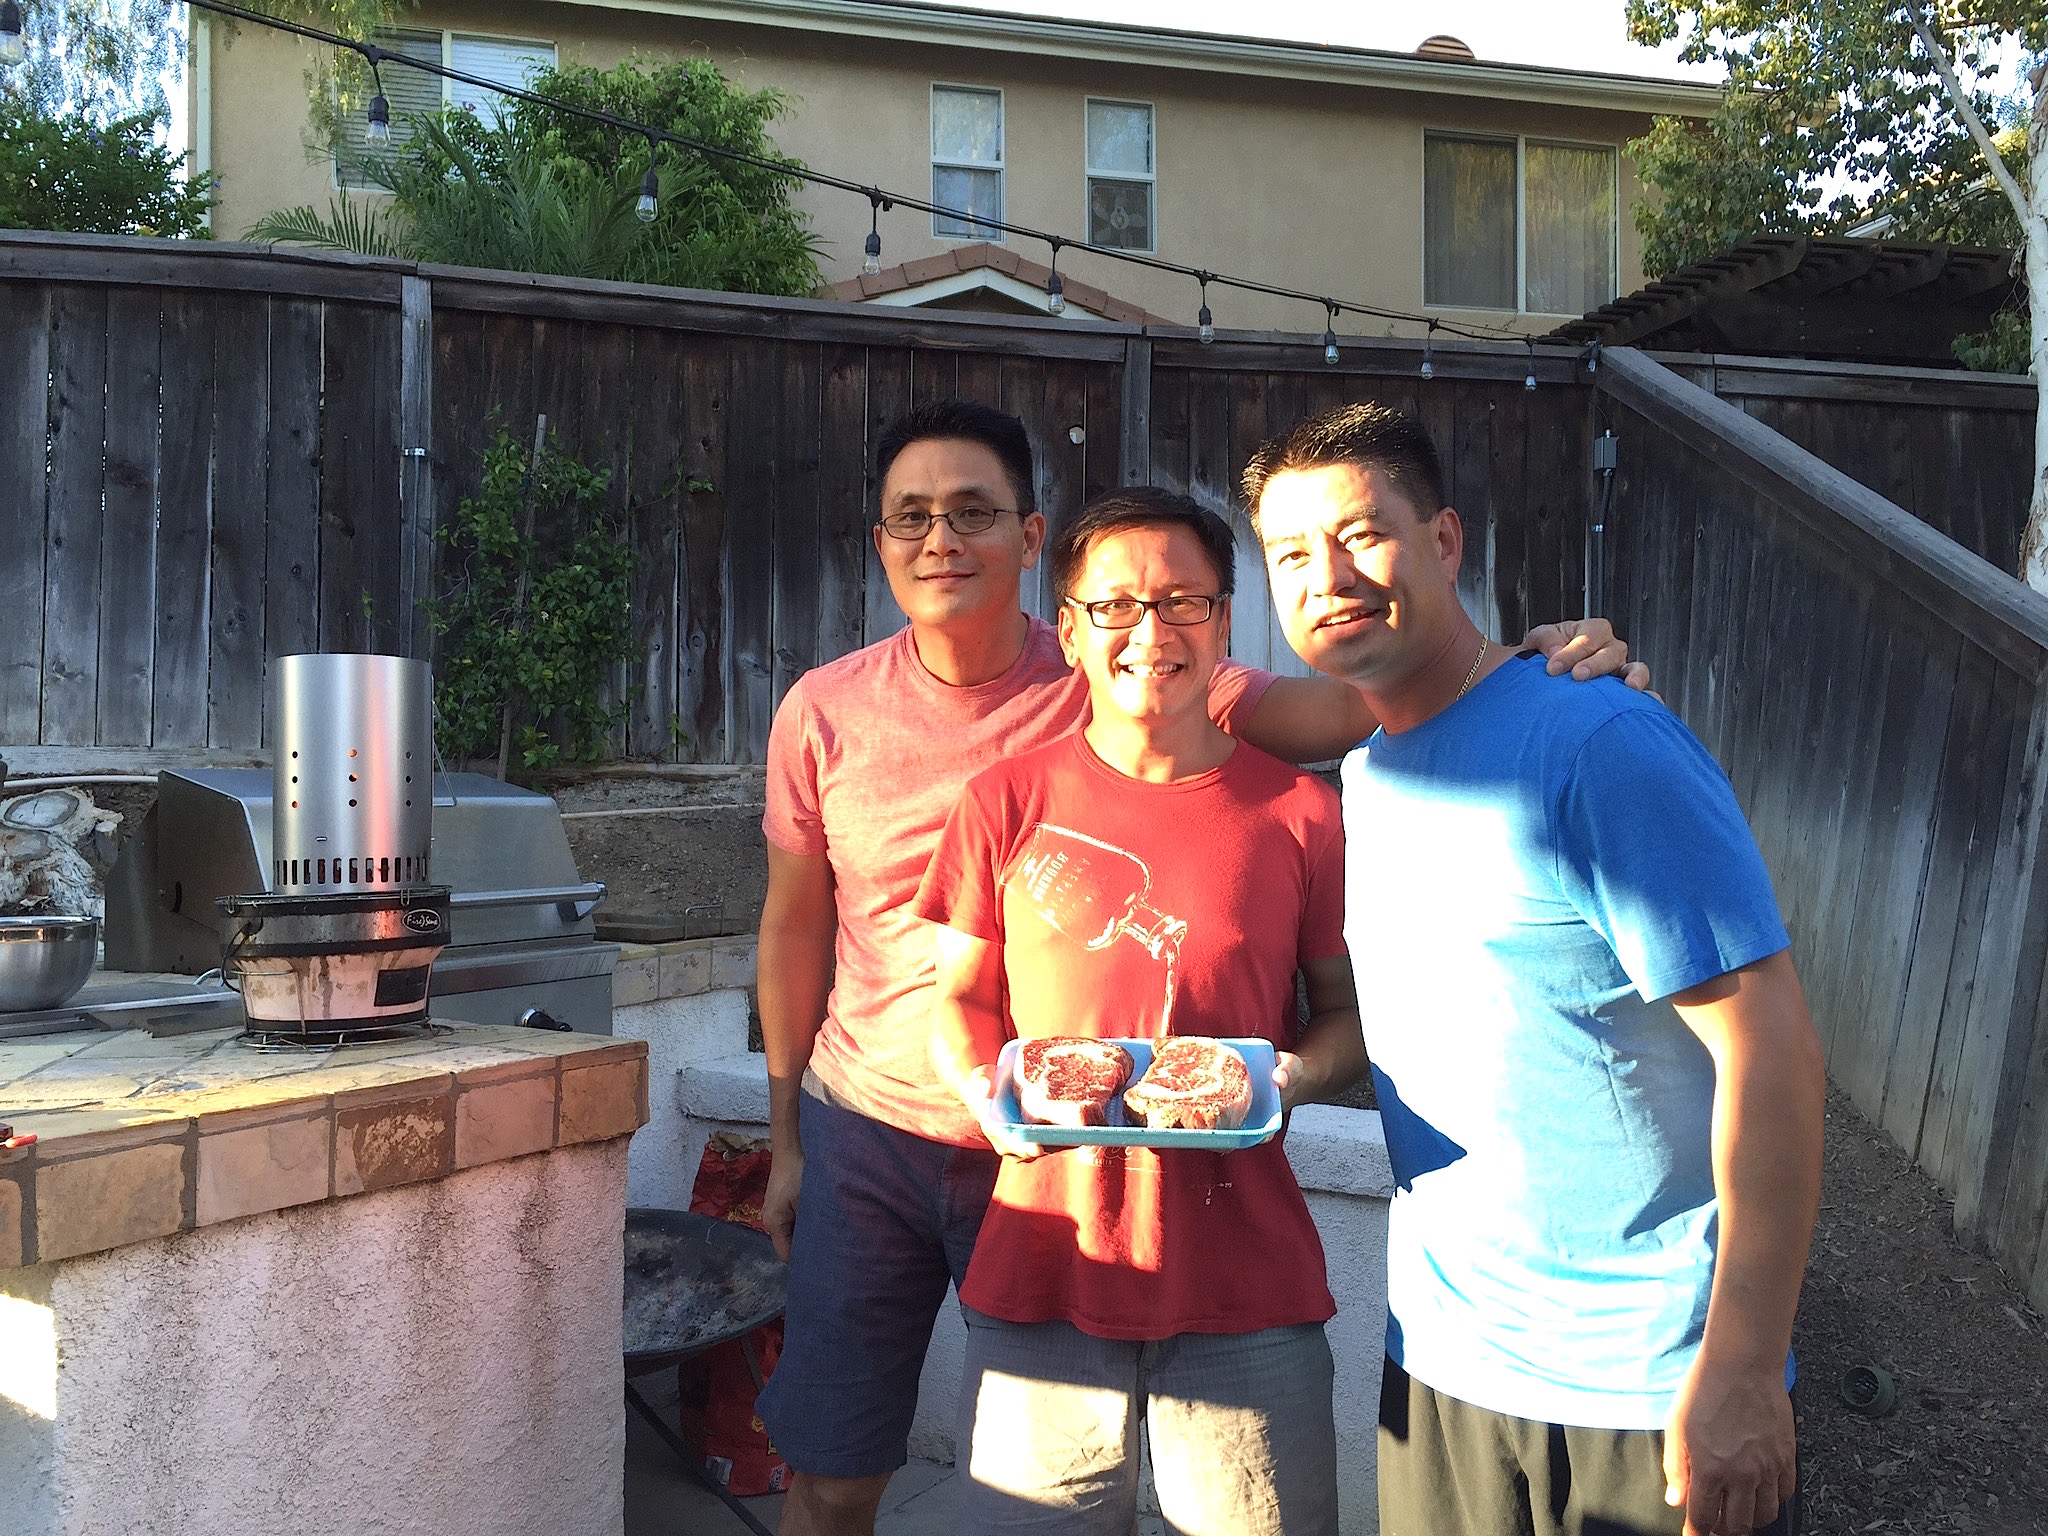
So, the gang gathered at T’s house on a warm August afternoon for Family Dinner and birthday festivities.

August 2015 Family Dinner

There were cousins selfies……

August 2015 Family Dinner

Cuddle time…..

August 2015 Family Dinner

A little smooching…… (barf)…..

August 2015 Family Dinner

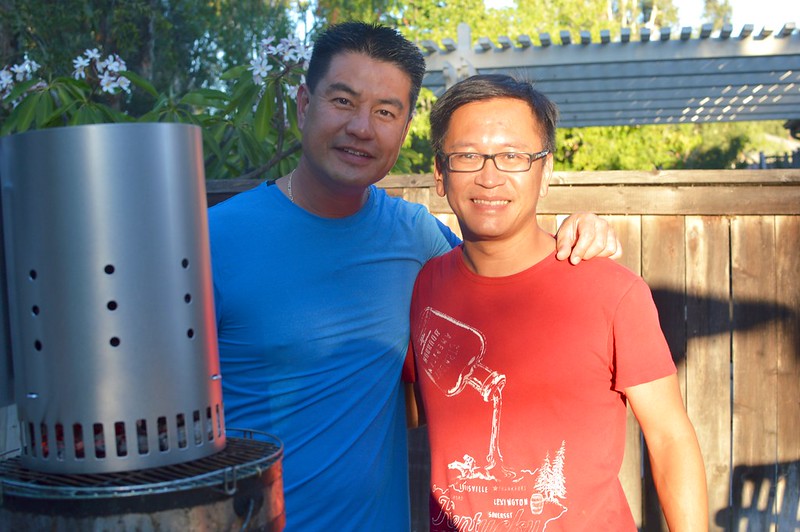
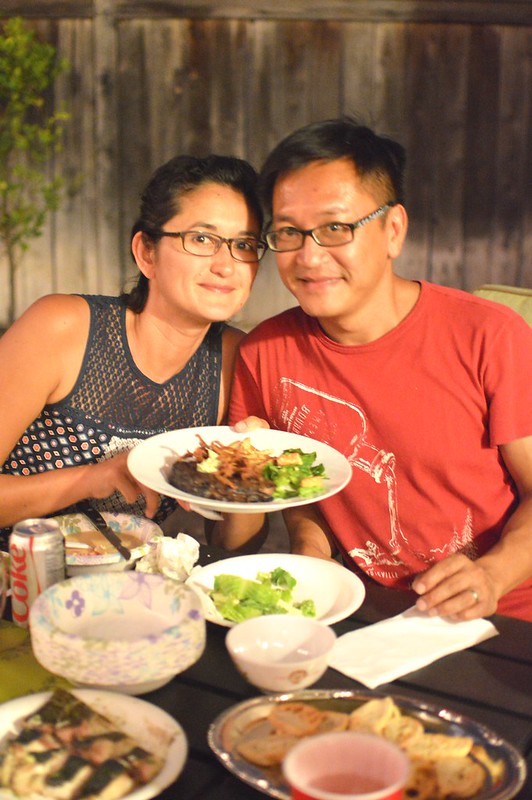
Dudes hanging out by the grill……..

August 2015 Family Dinner

Puppies running around and going BONKERS………

August 2015 Family Dinner

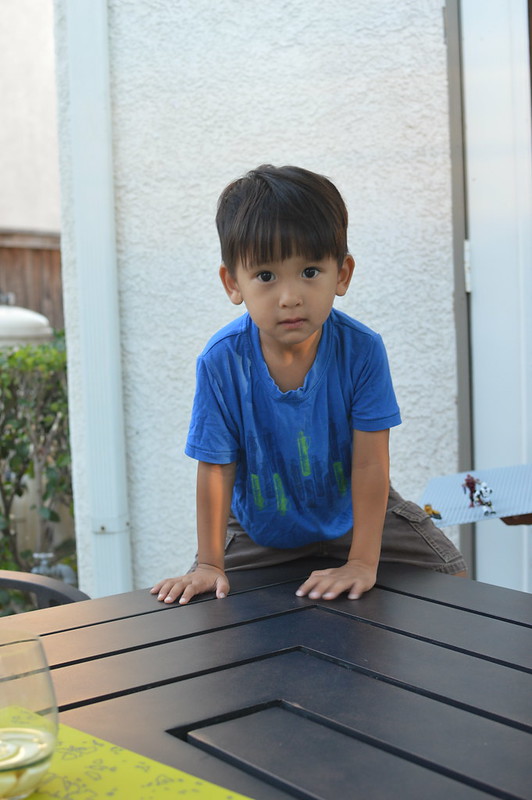
Leo-nators climbing on patio furniture….

August 2015 Family Dinner

Nini and Maya  time…….

August 2015 Family Dinner

And lots of QT with this cutie..

August 2015 Family Dinner

We had A LOT going on.

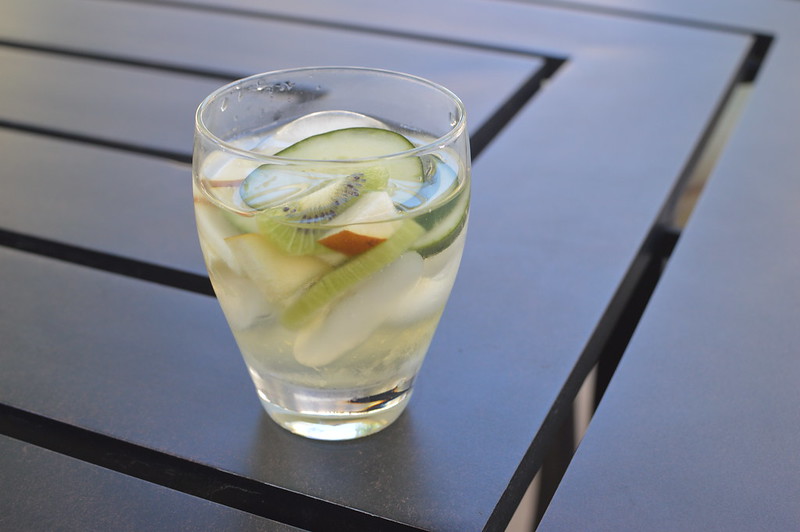
Good thing T made a bunch of Green Sangria for us to sip on. It was filled with kiwis, cucumbers, pears and white vino. Light and perfect for the HOT day we had.

August 2015 Family Dinner

As you may recall, if it’s your birth month, we usually create a menu with your favorite things for Family Dinner.

But the challenge you face when you raise little foodie-lings is that they end up having a taste for high end ingredients and dishes.
August 2015 Family Dinner

Nina loves lobster, uni, premium steaks, sashimi, poke….

Don’t get me wrong, I ADORE all of those things too but I don’t recall having such a refined palate at our munchkins’ ages.

So her birthday dinner of choice was not something your average teenager would have.

Lucky girl.

August 2015 Family Dinner

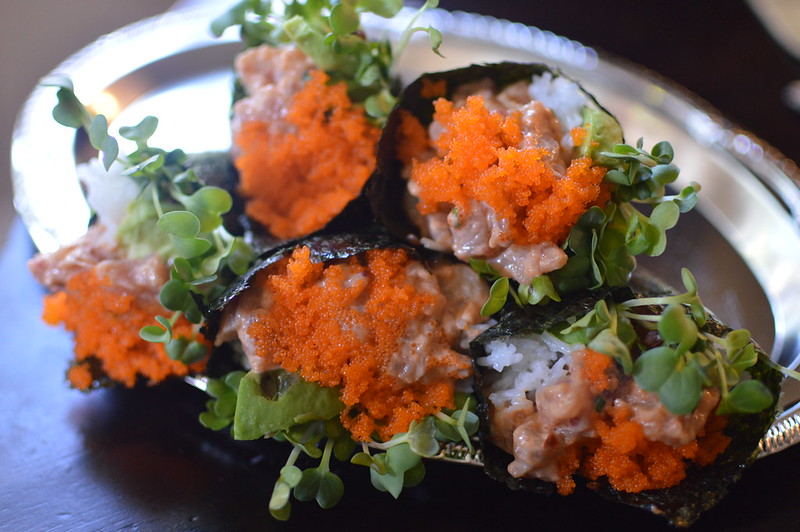
Seester T’s neighbor had just gone deep sea fishing and they gifted her with a bunch of fresh yellowfin tuna. Now that’s a neighbor I would TOTALLY want!

We took a few pounds of it and my niece Nini made her infamous Spicy Tuna Hand Rolls for us to snack on as appetizers.

SO. FREAKING. GOOD.

I love that Nini has such a great palate and makes THE BEST Spicy Tuna Hand Rolls.… like, EVER. They far surpass any that I’ve had at sushi joints and it’s all because of that “crack sauce” she makes. And lucky for you all, she’s agreed to allow me to share the recipe {coming soon}.

Did I mention she’s only 15?

August 2015 Family Dinner

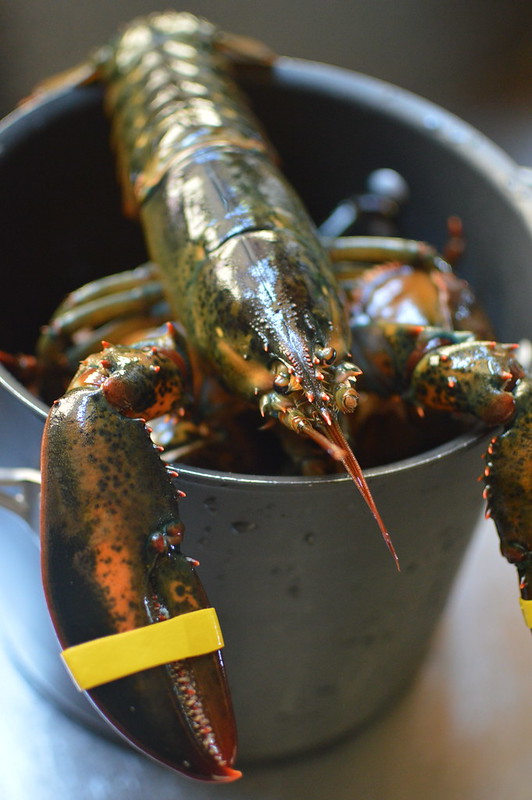
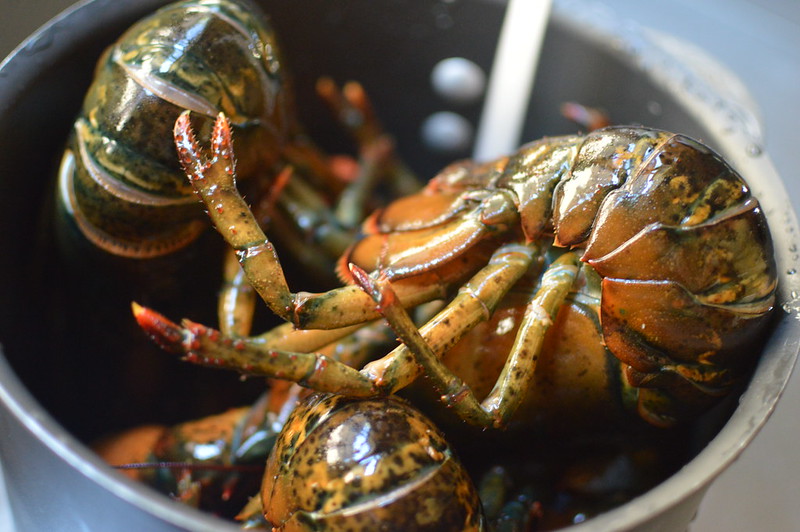
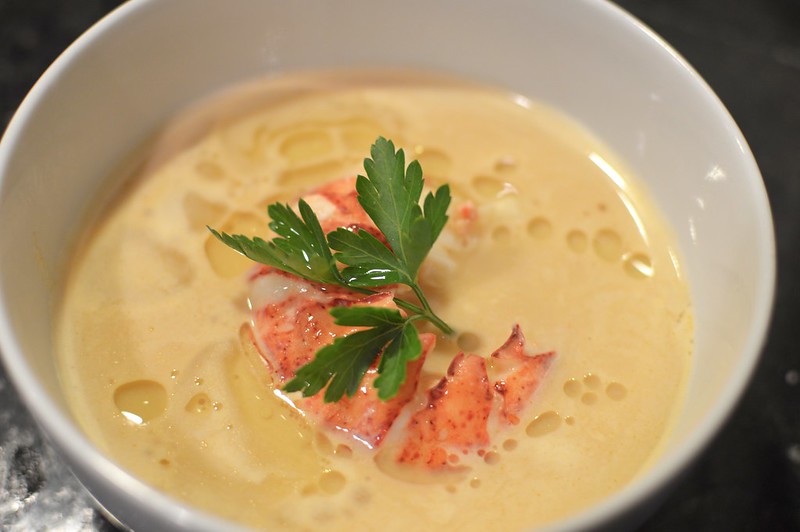
Remember those lobsters from a few photos up?

Seester N took those buggers and made a wonderful Lobster Bisque filled with chunks of lobster meat and finished with a drizzle of truffle oil.

Lobsters and Truffle Oil?!?

Yea…just keep thinking “17 year old birthday dinner”…..

August 2015 Family Dinner

And because that Lobster Bisque was so nice, I had to show it twice.

August 2015 Family Dinner

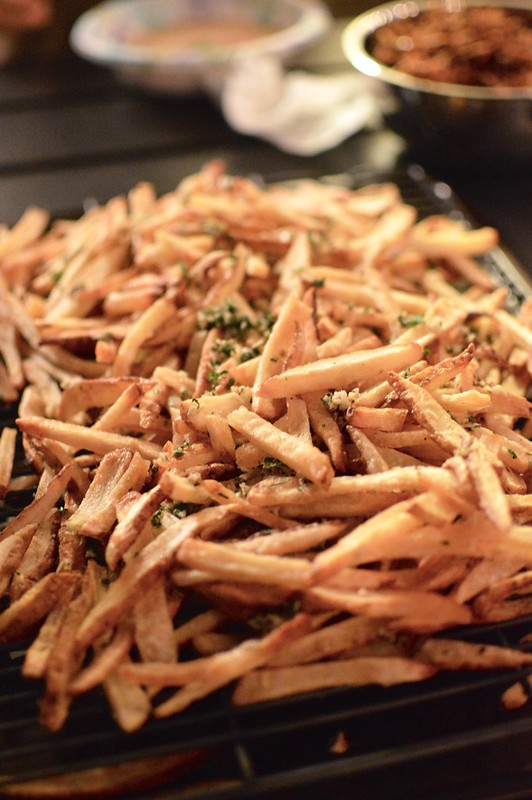
One of the sides for dinner were twice fried Parmesan Garlic Truffle Fries.

Go Big or Go Home.

Well, we went Big and then went home.

August 2015 Family Dinner

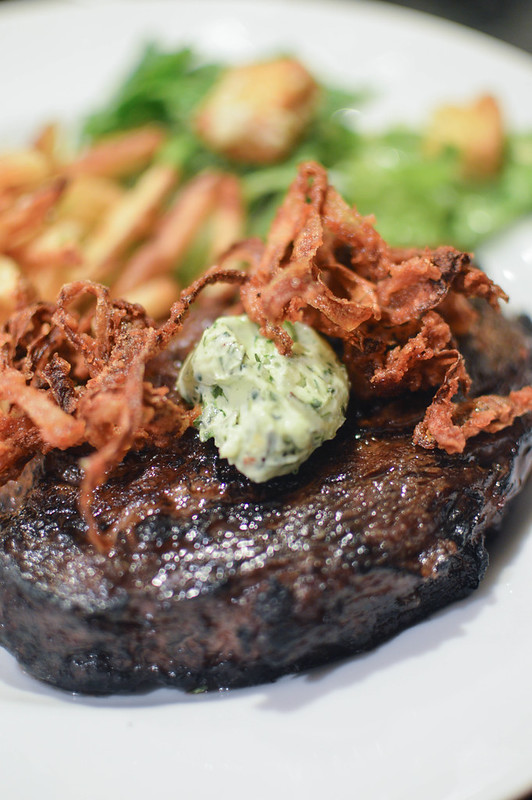
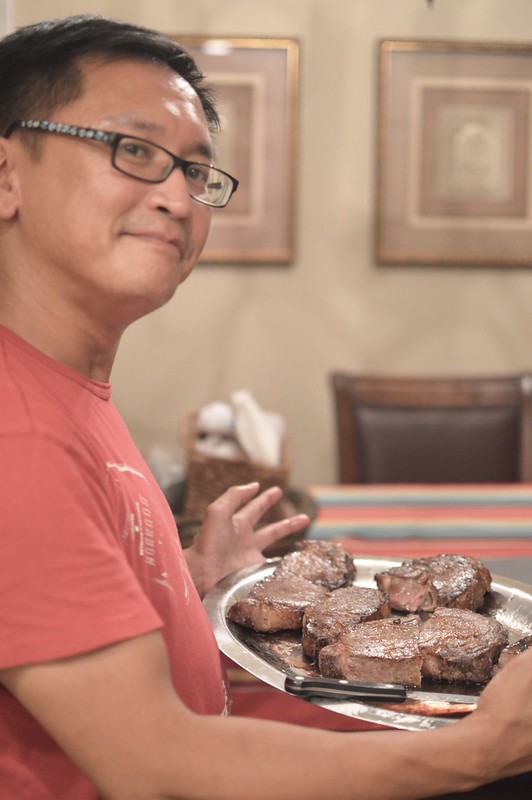
As for the main course, Nina is like her grandma and ADORES beef. She always wants some kind of steak on her special day.

So she got this beauty below. Dry-aged, Prime Ribeye Steaks with herb butter and crispy onion strings on top.

I’ll pause a moment to allow you to lick the screen……

Oh! And there was a Caesar Salad for a bit of greens.

August 2015 Family Dinner

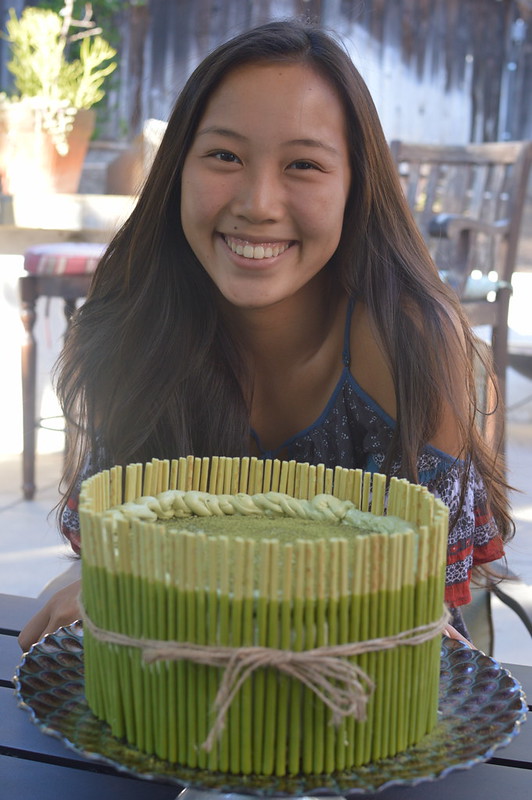
And to wrap up the whole meal, a decadent birthday cake. Nina loves and I mean LOVES chocolate and green tea. With that in mind, I made her a rich chocolate cake and filled the layers with a matcha mousse. It was then frosted with a matcha buttercream and adorned with Matcha Pocky Sticks.

Not to toot my own horn but it was pretty fantastic.

August 2015 Family Dinner

Now, let’s spend some more time talking about those mouth watering, juicy steaks.

When we first started talking about the menu for Family Dinner, we knew steaks had to be on the menu. But we make steaks all the time–a TON of different ways. We had to do something special for Nina and that’s where my brother comes into the picture.

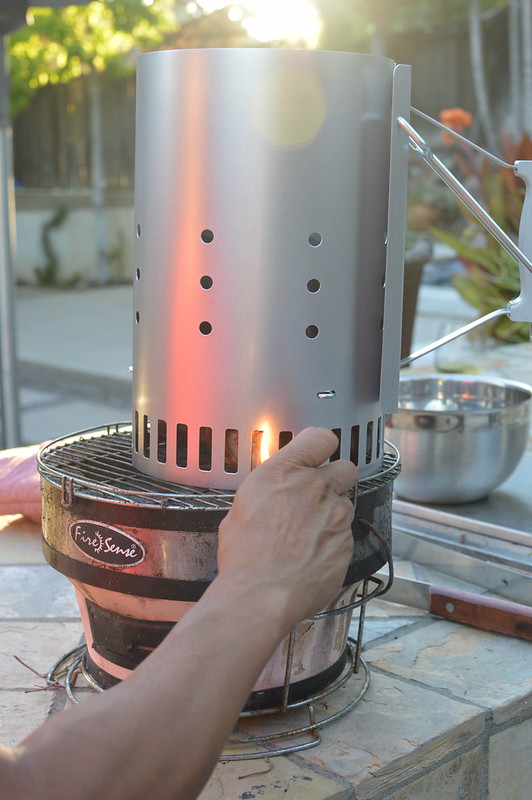
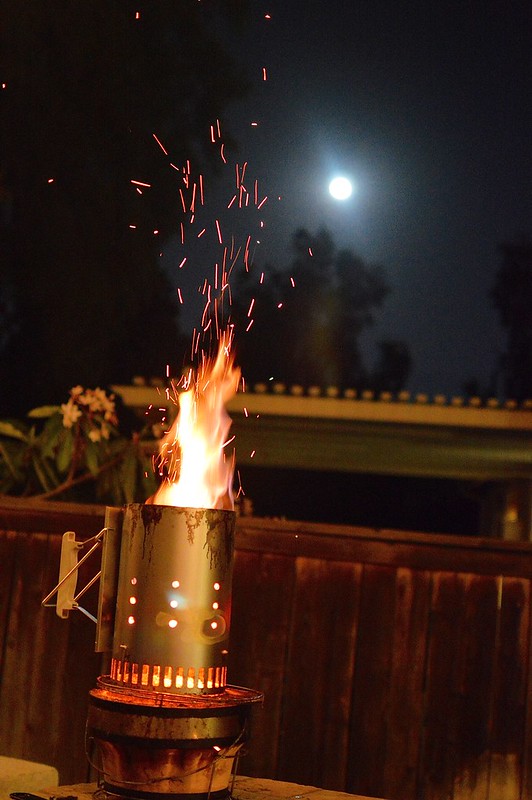
He and I have talked numerous times about that one episode of Good Eats where Alton Brown uses a chimney starter to “grill” porterhouse steaks.

Yup, you read correctly. A chimney starter that you typically use to heat up coals for a BBQ grill.

And what’s fantastic is that the thick steaks cook in 5 minutes!

August 2015 Family Dinner

It all started with the beef.

Now, Alton used porterhouse steaks but that ended up being tough for V to find that were prime and not choice or select. Why do you want prime beef, particularly for this method of cooking? Because of all that beautiful marbling in the meat. Lots of lovely marbling = taste bombs exploding in your mouth.

We ended up using prime ribeye steaks which were fantastic. V took those beauties and dry aged them in the refrigerator for four days. Click here to find out how A.B. dry ages steaks.

IMG_6193

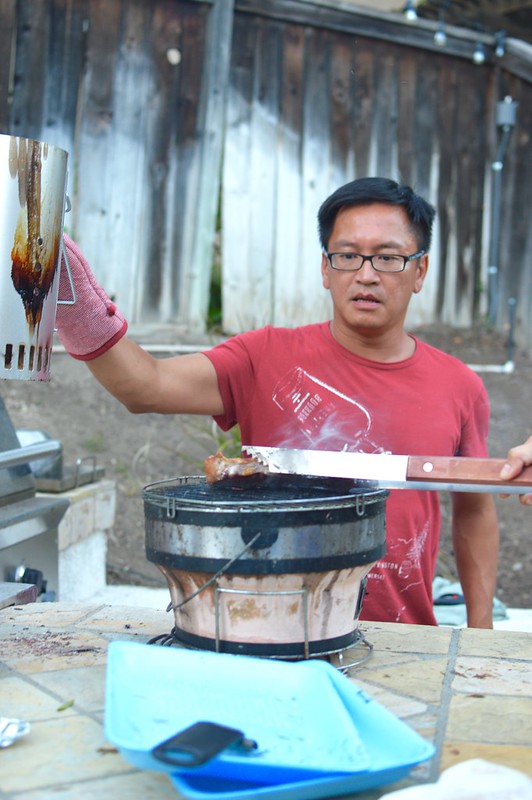
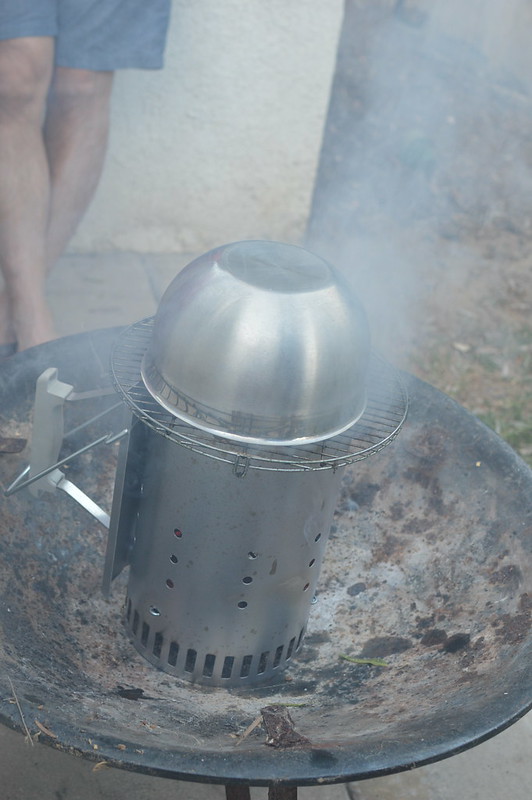
This is where the chimney comes in .

He filled the inside with a layer of natural lump coal………..

August 2015 Family Dinner

Then stuffed the bottom with newspaper…. well, actually, it was an old Trader Joe’s bag……..

IMG_5678

Then he lit the paper and allowed the coals to burn.

August 2015 Family Dinner

And this is where the magic begins.

He lifted the chimney and placed one steak on the grill before placing it back over the beef.

Screen Shot 2015-09-17 at 10.50.43 AM

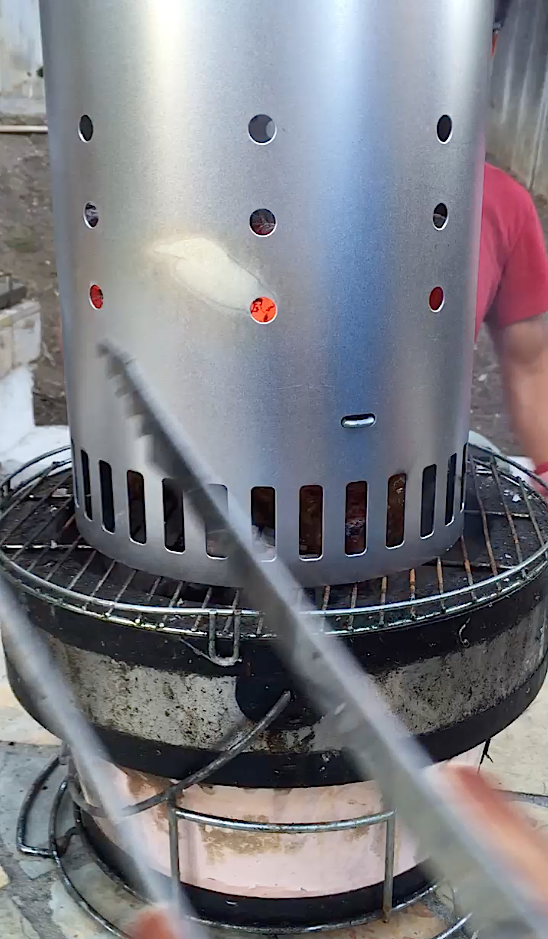
He allowed the steak to grill for 90 seconds and then flipped them….

August 2015 Family Dinner

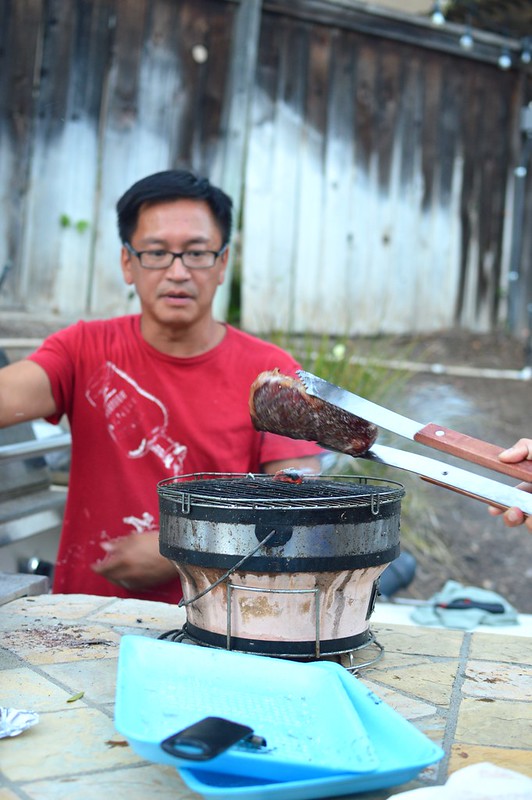
Then the chimney goes back over the steak for another 90 seconds….

August 2015 Family Dinner

Then he took the chimney off, placed the grate on top of the chimney and placed the steak on top………..

August 2015 Family Dinner

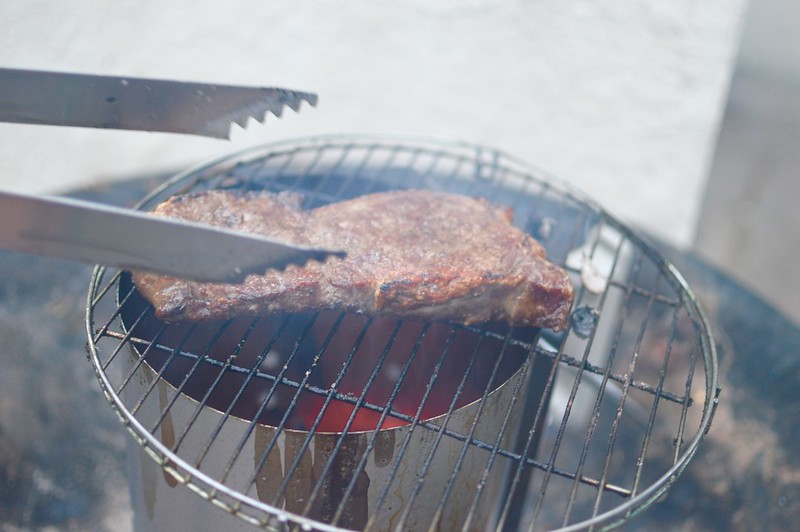
Then threw a metal bowl to cover the steak. It grilled for 60 seconds, the bowl was removed, the steak was flipped, the bowl was slapped back on top and then the steak grilled for a final 60 seconds.

August 2015 Family Dinner

And that’s it! The steaks were then rested before we dove in.

August 2015 Family Dinner

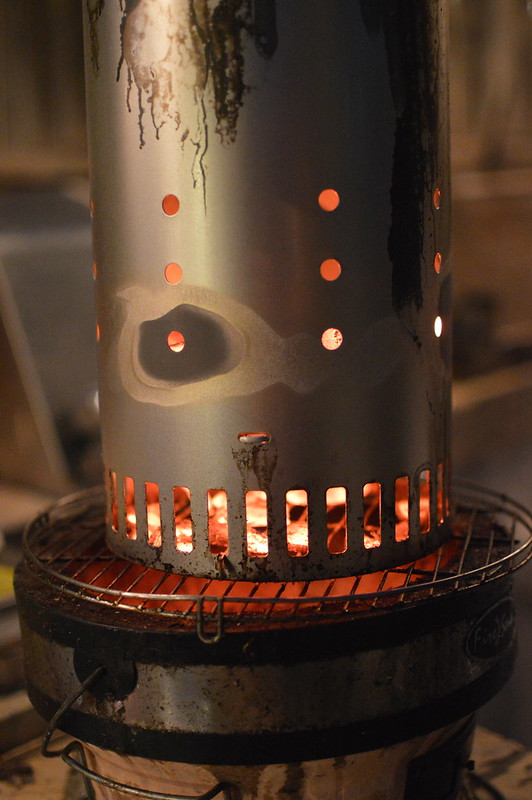
Wasn’t that freaking AWESOME!!!???

Not only did it produce a commercial-kitchen-salamander affect on the beef but it was SO FUN to do!!!

August 2015 Family Dinner

In fact, it was SO fun that I had to make a quick video about it. Check it out below and let me know what you think 🙂

All in all, it was a show stopping dinner.

August 2015 Family Dinner

Filled with kids inhaling pounds of lobsters.

August 2015 Family Dinner

And lots of laughter and vino.

August 2015 Family Dinner

Big, BIG thanks to my bro for overseeing our awesome steaks!

August 2015 Family Dinner

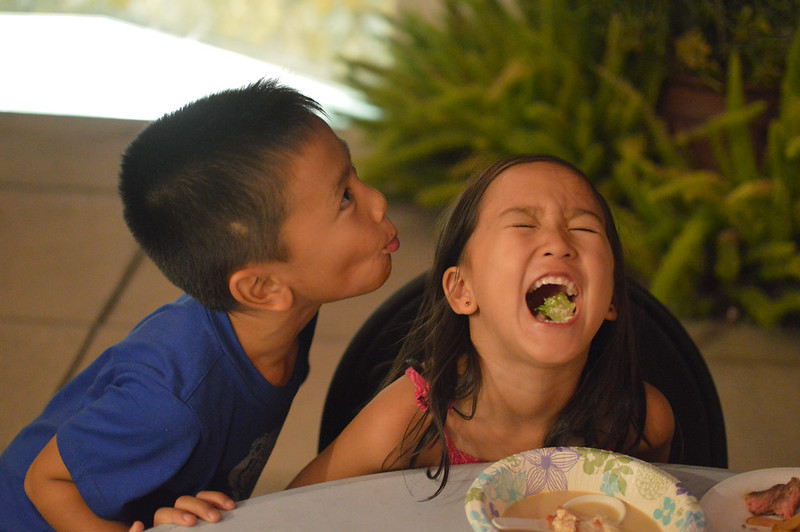
And I don’t know what’s happening in the picture below but I can’t stop cracking up over it.

August 2015 Family Dinner

And don’t forget about cake time!

August 2015 Family Dinner

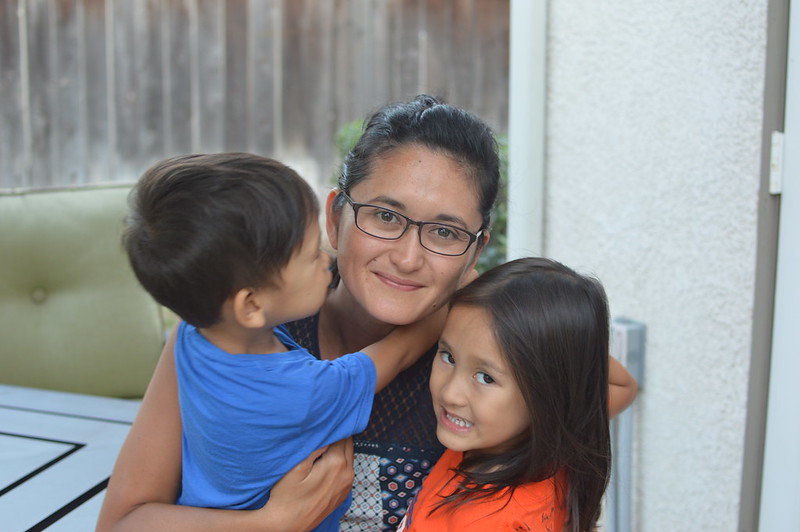
Look at Luna and Leo’s faces below.

They kill me.

August 2015 Family Dinner

Happy Birthday Nina Love!

Speaking of love, take a look at the little photo bomber on the right.

Precious.

August 2015 Family Dinner

Delicious food, learning new cooking techniques, hanging out with the fam–it was a memorable summer family dinner.

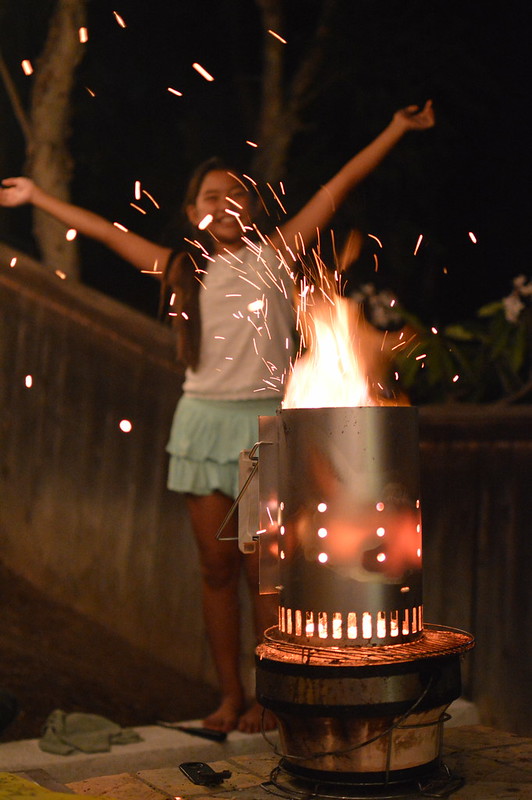
With the fires of Mordor….

August 2015 Family Dinner

And Maya dancing behind them. 😉

August 2015 Family Dinner

Until next time gang!

xoxo ❤

This Month’s Family Dinner Menu

Cocktails: Green Sangria
Appetizers: Spicy Tuna Hand Rolls and Lobster Bisque
Entrees: Grilled Ribeye Steaks with Crispy Onion Strings, Caesar Salad & Truffle Parmesan Fries
Dessert: Matcha Chocolate Pocky Cake

Breads · Breakfast/Brunch

Alton Brown’s “Overnight Cinnamon Rolls”

Alton Brown's "Overnight Cinnamon Rolls"

<Sigh>…….I had high hopes for these. My boy, Alton Brown, rarely leads me astray. But after a 14-hour process that included triple proofing of the dough, these rolls just fell short.

In truth, I’m not sure what went wrong. The reviews of the recipe were raving and I even watched the video. I followed every detail to the tee (something you definitely need to do when making Alton’s recipes) and used newly purchased yeast. The rolls did rise but not nearly as high as the ones from the show—despite the extra time I gave, too. And the end results were rather dense….no soft pillows of goodness as I had hoped. I did, however, like the icing as the cream cheese gave the slight tang that was a nice addition.

Will I try it again? Eh…I’m not sure. I’ve been eyeing  America’s Test Kitchen’s Cinnamon Rolls for some time now and I’m more inclined to give that one a spin before coming back to this one. Especially since there’s no yeast or proofing involved!

Sorry Alton….you’re still my Boo though. 🙂

__________________________________________________

Overnight Cinnamon Rolls
From Alton Brown

Ingredients:

Dough
4 Large Egg Yolks, room temperature
1 Large Whole Egg, room temperature
2 Ounces Sugar, approximately ¼ cup
3 Ounces Unsalted Butter, melted, approximately 6 tablespoons
6 Ounces Buttermilk, room temperature
20 Ounces All-Purpose Flour, approximately 4 cups, plus additional for dusting
1 Package Instant Dry Yeast, approximately 2¼ teaspoons
Teaspoons Kosher Salt
Vegetable oil or Cooking Spray

Filling
8 Ounces Light Brown Sugar, approximately 1 cup packed
1 Tablespoon Ground Cinnamon
Pinch Salt
¾ Ounce unsalted butter, melted, approximately 1½ tablespoons

Icing
2½ Ounces Cream Cheese, softened, approximately ¼ cup
3 Tablespoons Milk
5½ Ounces Powdered Sugar, approximately 1½ cups

For the dough: in the bowl of a stand mixer with the whisk attachment, whisk the egg yolks, whole egg, sugar, butter, and buttermilk. Add approximately 2 cups of the flour along with the yeast and salt; whisk until moistened and combined. Remove the whisk attachment and replace with a dough hook. Add all but 3/4 cup of the remaining flour and knead on low speed for 5 minutes. Check the consistency of the dough, add more flour if necessary; the dough should feel soft and moist but not sticky. Knead on low speed 5 minutes more or until the dough clears the sides of the bowl. Turn the dough out onto a lightly floured work surface; knead by hand about 30 seconds. Lightly oil a large bowl. Transfer the dough to the bowl, lightly oil the top of the dough, cover and let double in volume, 2 to 2 1/2 hours.

Combine the brown sugar, cinnamon and salt in a medium bowl. Mix until well incorporated. Set aside until ready to use.

Butter a 9 by 13-inch glass baking dish. Turn the dough out onto a lightly floured work surface. Gently shape the dough into a rectangle with the long side nearest you. Roll into an 18 by 12-inch rectangle. Brush the dough with the 3/4-ounce of melted butter, leaving 1/2-inch border along the top edge. Sprinkle the filling mixture over the dough, leaving a 3/4-inch border along the top edge; gently press the filling into the dough. Beginning with the long edge nearest you, roll the dough into a tight cylinder. Firmly pinch the seam to seal and roll the cylinder seam side down. Very gently squeeze the cylinder to create even thickness. Using a serrated knife, slice the cylinder into 1 1/2-inch rolls; yielding 12 rolls. Arrange rolls cut side down in the baking dish; cover tightly with plastic wrap and store in the refrigerator overnight or up to 16 hours.

Remove the rolls from the refrigerator and place in an oven that is turned off. Fill a shallow pan 2/3-full of boiling water and set on the rack below the rolls. Close the oven door and let the rolls rise until they look slightly puffy; approximately 30 minutes. Remove the rolls and the shallow pan of water from the oven.

Preheat the oven to 350 degrees.

When the oven is ready, place the rolls on the middle rack and bake until golden brown, or until the internal temperature reaches 190 degrees on an instant-read thermometer, approximately 30 minutes.

While the rolls are cooling slightly, make the icing by whisking the cream cheese in the bowl of a stand mixer until creamy. Add the milk and whisk until combined. Sift in the powdered sugar, and whisk until smooth. Spread over the rolls and serve immediately.

Alton Brown's "Overnight Cinnamon Rolls"A shame really as they don’t look too bad. <Sigh>…back to the drawing board!

Beef · Breakfast/Brunch

Act 2: Corned Beef Hash

Feeling pretty good about the outcomes of our Corned Beef and Cabbage, we eagerly embarked on our original objective — Corned Beef Hash!

We looked at a couple recipes and settled on a hybrid of a few. And as my sister had suggested months back, we used heavy cream to get that extra crispy profile that makes Corned Beef Hash so delish! The method described below is pretty straight forward but since we had so much to make, we didn’t have a large enough skillet to allow the hash space/surface area to crisp up. But, no biggie! We transferred the items to a large baking sheet and placed it under the broiler for a few minutes. And Voila! Deliciously yummy and crispy hash–100% from scratch, too!

Sure, this was an eleven day breakfast in the making but when the yolks from your “eggs over easy” run all over, you will be in heaven!

________________________________________________

Corned Beef Hash
Serves 6-8

Ingredients:

2 Pounds Potatoes, peeled and cut into 1/4-inch dice
2 Pounds Cooked corned beef, cut into chunks
2 Cups Yellow Onion, diced
1 Tablespoon Garlic, minced
2 large Red Bell Pepper, cut to match potatoes
4 Tablespoons Unsalted Butter
½ Cup Heavy Cream
3 Scallions, chopped
2 Tablespoon Parsley, finely chopped
Salt and Pepper to taste

Cook potatoes in boiling salted water to cover until just tender, about 3 minutes, then drain. Roughly chop corned beef.

Sauté onion and bell pepper in butter in a 12-inch nonstick skillet over moderately high heat, stirring, until lightly browned, about 5 minutes. Add garlic and sauté for additional 2 minutes. Add potatoes and sauté over moderately high heat, stirring occasionally, until browned, about 5 minutes. Stir in corned beef and salt and pepper to taste, then cook, stirring occasionally, until browned. Add cream and cook, stirring, 1 minute. Add scallions and sprinkle hash with parsley.

Serve with eggs of your choice.

Beef · Soups/Stews

Act 1: Corned Beef with Cabbage

Corned Beef and Cabbage

The Objective: Corned Beef Hash

The Method: Brine brisket for 10 days and make Corned Beef with Cabbage for dinner. Use the leftovers the next morning for Corned Beef Hash.

Seems like a long and tedious process to get to the original desired dish, right? But we’ve been wanting to make corned beef from scratch for a long time and this was a great excuse. And since we couldn’t get less than 4 pounds of brisket from the butcher, two dishes from one protein was a “Nguyen-Win Situation“!

After much deliberation, we turned to our guy, Alton Brown for his take on Corned Beef and Cabbage. Why Alton? Well…..because I actually have never even eaten Corned Beef Cabbage and Alton is a reliable guy. 🙂

The brining process was actually quite fun and I enjoyed peeking into the fridge every day to check on the brisket. And when the day finally came for us to cook the beef,  I was filled with anticipation! What would it taste like? Did the brine work? After 4 hours of braising the corned beef on the stove (which made the house smell delicious!), we filled our bowls and dug right in.

How would I describe it? Two words….Comfort Food. The beef and root vegetables were so tender–and the broth was simply yummy.  The pickling spices were on the lighter side but overall, we really enjoyed it. Sure, it was a long process but it was fairly simple and the end product was a dish that can warm the soul. Not bad considering Corned Beef Cabbage wasn’t even our first objective 🙂

Next up–Corned Beef Hash!

Desserts/Pastries

A.B.’s Chewy Chocolate Chip Cookies

Some things just don’t get old…..

For me, that list includes my Jack Johnson albums, watching “The Breakfast Club”,  Foster Farm Chicken Commercials, and perusing through the Sunday morning Target ads. Oh, and of course, Chocolate Chip Cookies.

Very few things beat the beautiful aromas of freshly baked chocolate chip cookies 🙂

So, when one of my Besties was driving through town on a road trip with her family, I thought I would pack them a little basket of snacks that would include a few cookies. If anything, I thought it would occupy her beautiful little daughter on the car ride down to the aquariums, too.

Now, everyone has their texture preference of a chocolate chip cookie. I prefer the slightly crunchy outside and chewy interior—with of course, TONS of ooey-gooey chips! I initially wanted to give the NY Times Best Chocolate Chip Cookie recipe a go but quite frankly, didn’t have the extra 24 hours to age the dough. Eh, there’s always next time.

I decided to give our boy, Alton Brown’s, recipe a try. With over 600+ reviews and a title of “chewy”, I figured it couldn’t be bad.

And it wasn’t.

That Alton. He always gets me. 🙂

True to form, crispy on the outside—chewy on the inside. With two…count them, TWO cups of chocolate chips. Mmmm….

A few things to note:

  • I didn’t have Bread Flour on hand, so per Joy of Baking, I substituted with All Purpose Flour. Not exact but the ratios are pretty close.
  • I had wanted to add a little Fleur de Sel over the cookies before they baked but had run out. So, I used a bit of course Kosher Salt but since it’s flaked—it melted into the cookie too much. Meh, now I know better 🙂
  • Although the recipe said you can get 2½ dozen cookies, I only got 20. Pretty typical results for me actually—I never get the amount recipes quote.

And of course, while you enjoy them, don’t forget an extra large and icy glass of milk. 🙂

Cheers!

A shower of chocolate chips

I like to use an ice cream scooper for nice, round cookies

6 will fit on one Silpat covered baking sheet

These cookies took about 12 minutes–turning the sheet once half way through the baking time

Mmmm….Cookies….

Chewy Chocolate Chip Cookies
From Alton Brown
Makes 20 Cookies

Ingredients
2 Sticks Unsalted Butter
2¼ Cups Bread Flour
1 Teaspoon Kosher Salt
1 Teaspoon Baking Soda
¼ Cup Sugar
1¼ Cups Brown Sugar
1 Egg
1 Egg Yolk
2 Tablespoons Milk
1½ Teaspoons Vanilla Extract
2 Cups Semisweet Chocolate Chips

Heat oven to 375 degrees F.

Melt the butter in a heavy-bottom medium saucepan over low heat. Sift together the flour, salt, and baking soda and set aside.

Pour the melted butter in the mixer’s work bowl. Add the sugar and brown sugar. Cream the butter and sugars on medium speed. Add the egg, yolk, 2 tablespoons milk and vanilla extract and mix until well combined. Slowly incorporate the flour mixture until thoroughly combined. Stir in the chocolate chips.

Chill the dough, then scoop onto parchment-lined baking sheets, 6 cookies per sheet. Bake for 14 minutes or until golden brown, checking the cookies after 5 minutes. Rotate the baking sheet for even browning. Cool completely and store in an airtight container.

And to make them EXTRA special, package them in clear bags with a pretty little ribbon

Condiments/Sauces · Pork

Celebrating National Corndog Day

National Corndog Day……yes, it does exist.

According to the National Corndog Day website, “National Corndog Day coincides with the Saturday of the final 32 teams in NCAA basketball tournament (this year it’s March 20th).” True, I can’t say that I am an avid college basketball fan but I am a huge supporter of any themed “food” day. So, in honor of this esteemed event, we made corndogs. 🙂

Ironically, I typically don’t enjoy corndogs—except for the ones served at Disneyland…mmm, those are amazing. Usually the batters are either too thick or don’t have enough flavor to them. But some time ago I came across an episode of Alton Brown’s “Good Eats” where he had such an interesting take on the corndog batter. And this particular holiday was the perfect reason to give Alton’s version a try.

We also decided to step up our game by making a homemade ketchup (or is it catsup?). It’s so easy to make without using any preservatives that I wonder why more people don’t do it. Plus, you can add just about anything to make a kicked-up ketchup……peppers, horseradish, curry powder, etc.

As for the corndogs…..wow, they were amazing. The batter had the perfect level of crispiness and was still crunchy 20-30 minutes after being fried. The textures that the canned corn and jalapenos gave were fantastic—which helped the batter to not be too thick or “doughy”. Alton used chopsticks to spear the hotdogs but I ended up using a few sturdy wooden coffee stirrers—courtesy of my local chained coffee shop 🙂 My one warning if you do decide to give this recipe a try (and I truly hope you will) is to be EXTREMELY careful when dropping the corndogs into the hot grease. Due to the whole corn kernels in the batter, the oil was popping like crazy! Definitely proceed with caution and wear a long sleeve shirt in case you get a little residual splatter. Lastly, when you drop the hot dogs in the oil, try and hold it in the grease with a pair of tongs for a little while before letting them go. If you don’t, the hotdogs will settle on the bottom of your pot and the batter will stick to the pot and not your hotdog. It happened to me and it was No Bueno.

These little bad boys will become a regular in mi casa for game days, movie nights—and any other time I can find an excuse to make them. You can probably cut the hotdogs in half, too, should you choose to make mini-corndogs.

So to you my friends, HAPPY NATIONAL CORNDOG DAY!!!

Prepping the batter.

The batter needs to rest for at least 10 minutes.

The hot dogs dredged in cornstarch.

Compiling the ketchup ingredients.

The ketchup needs to chill in the fridge for at least 30 minutes for the flavors to meld.

Ta-Da!!! Crispy Corndogs and Homemade Ketchup

______________________________________________

Corndogs
From Alton Brown

Ingredients

1 Gallon Peanut Oil (I used 1 quart of canola oil)
1 Cup Yellow Cornmeal
1 Cup All-Purpose Flour
2 Teaspoons Kosher Salt
1 Teaspoon Baking Powder
¼ Teaspoon Baking Soda
½ Teaspoon Cayenne Pepper
2 Tablespoons Jalapeno Pepper, seeded and finely minced
1 (8.5-ounce) Can Cream-style Corn
1/3 Cup Finely Grated Onion
1½ Cups Buttermilk
4 Tablespoons Cornstarch, for dredging
8 Beef Hot Dogs (I used Hebrew National)

Pour oil into a deep fryer or large heavy pot and heat to 375 degrees F. In a medium mixing bowl, combine the cornmeal, flour, salt, baking powder, baking soda, and cayenne pepper. In a separate bowl, combine the jalapeno, corn, onion, and buttermilk. Add the dry ingredients to the wet ingredients all at once, and stir only enough times to bring the batter together; there should be lumps. Set batter aside and allow to rest for 10 minutes.

Scatter the cornstarch into a dry pie pan. Roll each hot dog in the cornstarch and tap well to remove any excess.

Transfer enough batter to almost fill a large drinking glass. Refill the glass as needed. Place each hot dog on chopsticks, and quickly dip in and out of the batter. Immediately and carefully place each hot dog into the oil, and cook until coating is golden brown, about 4 to 5 minutes. With tongs, remove to cooling rack, and allow to drain for 3 to 5 minutes.

Ketchup

Ingredients

6 Ounces Tomato Paste
2-3 Tablespoons Rice Wine Vinegar (to taste)
1 Tablespoon Brown Sugar
2 Tablespoons Water
1 Teaspoon Soy Sauce
1 Teaspoon Garlic Powder
1 Teaspoon Onion Powder
Salt and Pepper to taste

In a small food processor, combine all ingredients until well incorporate. Refrigerate ketchup for 30 minutes before serving.

Note: For this particular batch, I added 1 teaspoon of prepared horseradish.