Beef · Condiments/Sauces · Pork · Sponsored

Double Jalapeno-Bacon Cheeseburgers with Roasted Poblano Aioli

Double Jalapeno Bacon Cheeseburgers

Summer has been beating down my door lately with gorgeous sunny days and warm weather. And of course, what’s better to do in the summer than grilling up some delicious eats?

So when this glorious box of Farmer John Jalapeno Bacon showed up at the doorstep, it was a no brainer what had to be done.

Jalapeno Bacon

Burgers.

Ultimate, jalapeno bacon loaded burgers.

With a bit of heat.

Awwww yea….

Double Jalapeno Bacon Cheeseburgers

These decadent burgers are not only topped with a pile of crispy jalapeno bacon but there’s also chopped up bacon INSIDE the patty!!

Yea, I totally went there.

Poblano

And because burgers are the perfect canvas to go BIG, I dressed these bad boys up with spicy pepper cheese, crispy cornmeal onion strings, peppery arugula and a creamy roasted poblano aioli.

Double Jalapeno Bacon Cheeseburgers

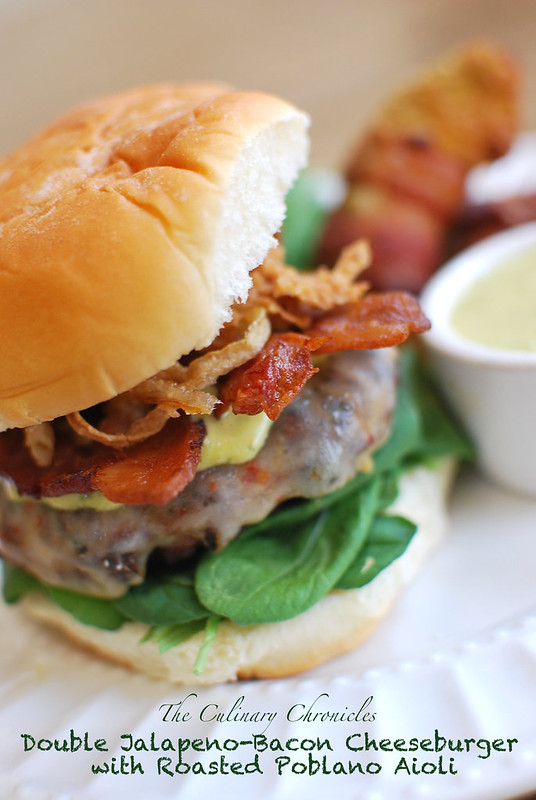
These burgers not only have a ton of great textures, a balanced level of heat, but were ultimately bacon-licious! The jalapeno component to the bacon was not at all overpowering but rather mild. Perfect for folks who just want a tad of heat.

And if you think these burgers are bacon-riffic, just wait for my upcoming post on Jalapeño-Bacon wrapped Avocado Fries!

Have a fantastic weekend folks!!
________________________
Double Jalapeño-Bacon Cheeseburgers with Roasted Poblano Aioli
Serves 4

Ingredients:

1 large poblano pepper
½ tablespoon minced garlic
1 cup mayonnaise
½ tablespoon Dijon mustard
½ tablespoon fresh lemon juice
1 tablespoon finely chopped fresh cilantro
kosher salt
black pepper
1 pound ground beef (80/20 blend)
½ tablespoon garlic salt
½ tablespoon garlic powder
½ tablespoon onion powder
¼ teaspoon cayenne powder
1 tablespoon worcestershire sauce
1 pound cooked jalapeno bacon
vegetable oil
1 small yellow onion, thinly sliced into rings
½ cup flour
½ cup yellow corn meal
4 slices pepper jack cheese
1½ cups fresh arugula
4 burger buns, split and toasted

Prepare the aioli. On your stovetop range, char the poblano pepper on all sides. This can also be done under your oven broiler. Once charred, place in a bowl and cover with plastic wrap for 10 minutes. This will help the skin loosen from the pepper. Once cooled, peel the skin from the pepper and discard along with the stem and seeds. Finely chop up the pepper and transfer to a clean bowl. Whisk in the garlic, mayonnaise, mustard, lemon juice and cilantro. Season with kosher salt and pepper. Cover with plastic wrap and refrigerate for at least one hour.

In a large bowl, mix the ground beef, garlic salt, garlic powder, onion powder, cayenne and Worcestershire. Season generously with kosher salt and pepper. Take ½ of the bacon and roughly chop into small pieces. Add the bacon to the beef and mix until just combined. Form the meat into 4 patties and create a small indentation in the center of each patty. This is to help the patties from puffing up. Transfer them to a plate and refrigerate for about 30 minutes.

Prepare the onion strings. Fill a heavy bottomed pot with 2 inches of oil. Heat to 375 degrees F. In a bowl, whisk together the flour, cornmeal, ¼ teaspoon black pepper, and ½ teaspoon kosher salt. In batches, place the onions into the dry ingredients, tossing well to coat. Gently shake out the excess and carefully lower into the oil. Fry the onions for about 5-6 minutes, stirring every so often until golden brown. Drain the onions on a plate lined with paper towels and season immediately with additional salt. Repeat until all the onions have been fried. Transfer the onion strings to a large baking sheet. Keep warm in a 200 degree F oven while you grill the patties.

Remove the patties from the refrigerator and lightly brush them with vegetable oil. Light your grill (or preheat grill pan). Place the patties over medium heat and grill on each side for about 4-5 minutes. About 1-2 minutes before the second side is done, lay one slice of cheese over each patty. Cover the grill and cook until the cheese has melted. Remove the patties and tent with aluminum foil while you’re assembling the burgers.

On a toasted bun, place a small mound of the arugula and then lay a patty on top. Spread a few spoonfuls of the aioli on top of the patty before adding a few strips of the remaining bacon. Next, add a small pile of the crispy onion strings and then top off with the other side of the bun. Serve immediately.

 **Disclosure: I did receive products from Farmer John, but as always, my opinions are my own.**

Appetizers/Small Plates · Pork

The Ultimate Baked Potato Dip for Game Day!!

The Ultimate Baked Potato Dip

Man, oh man—I’m ready for some football!

And pizza….and hoagies…and dip…and nachos…and wings…and cocktails…and……..

Yea…I’m ready for a lot of goodness!!!

The Ultimate Baked Potato Dip

If you’re looking for some ehr-my-gawd deliciousness to whip up for Game Day, you’re going to LOVE this Ultimate Baked Potato Dip.

This crowd pleaser is jammed pack with your classic baked potato toppings and is just begging for a crunchy ‘tater chip to scoop it all up. And once your peeps take a bite, they will be so overcome by your awesomeness that they’ll be wearing jerseys with your name on it and cheering you on for days. True Story.

Need some more ideas for game day? Check out these goodies here

Laters, Taters!

________________________________________

The Ultimate Baked Potato Dip

Ingredients:

24 ounces sour cream
1 packet ranch dressing mix
½ teaspoon black pepper
½ teaspoon paprika
¼ teaspoon cayenne powder
1-2 tablespoons hot sauce
1 heaping cup chopped scallions
1½ cups shredded sharp cheddar cheese
½ cup shredded pepper jack cheese
1½ heaping cups chopped crispy bacon

In a large bowl, stir together the sour cream, ranch dressing mix, pepper, paprika, cayenne and hot sauce until combined. Fold in the scallions, cheeses, and bacon. Cover and refrigerate for a minimum of 4 hours.

15 minutes before serving, remove from the refrigerator and stir to take off some of the chill. Garnish with additional cheese, scallions and serve with your choice of chips. Enjoy!

Breakfast/Brunch · Pork · Sponsored

Bacon Egg Cups—Oh Me, Oh My!

Bacon Egg Cups

I absolutely ADORE breakfast foods but I am the grumpiest person in the morning. Which is why brunch is so fantabulous!

Check out my guest post here for our friends at Safest Choice® Eggs where I sing the praises of easy Brunch Entertaining. And the bonus? I share this delicious and no-fuss recipe for Bacon Egg Cups.

Trust me. Your guests will love you.

Happy Brunching!

Poultry

Roasted Cornish Game Hens with Bacon-Herb Butter

Roasted Cornish Game Hens with Bacon-Herb Butter

I have vivid memories waking up when I was a kid to the smell of turkey roasting on Thanksgiving morning.

Our clan would arrive to my folks house around lunchtime and we would begin enjoying several delicious Vietnamese dishes, courtesy of mom and the aunties. While waiting for the turkey, we would watch movies, play games, snack, and catch up with the latest gossip.

We would then feast again once the turkey came out of the oven—a turkey with Asian flavors that Mom created with five-spice and tons of garlic. To this day, Mom’s turkey is still the juiciest and most flavorful I’ve ever had.

After the turkey and sides were devoured, we would continue with the chatting and games. And hours later, believe it or not, the family would have one last meal. Usually Cháo (Vietnamese rice porridge) or Bún Bò Huế (Spicy Beef Noodle Soup)–something warm and comforting to close out the night.

Needless to say, it was among my favorite times of the year. Not just because of the incredible food (and trust me, it was incredible) but because of the memories that surrounded these feasts.

Roasted Cornish Game Hens with Bacon-Herb Butter

But if prepping a turkey appears too daunting for you, opt for roasting a chicken or a few Cornish game hens. Either will provide a succulent alternative and can be roasted in a fraction of the time.

And because I subscribe to the belief that bacon makes EVERYTHING better, try out this compound butter filled with fresh herbs and smoked bacon I used on game hens I made for dinner for some friends. The smokiness from the bacon and bright herbs were wonderful with the hens.

With that Friends, stay tuned for Wednesday’s post as I share a scrumptious and easy dessert that could be appreciated at any Thanksgiving feast. And because I love y’all, I’ll be announcing a gorgeous giveaway, too. True Story!

Happy Monday and here’s to a short work week! Yippee!!!

_____________________________________________

Roasted Cornish Game Hens with Bacon-Herb Butter
Serves 4

Ingredients:

½ cup unsalted butter, softened
2 strips thick-sliced smoked bacon, roughly chopped
1 tablespoon chopped fresh sage
½ tablespoon chopped fresh oregano
1 teaspoon fresh thyme leaves
kosher salt
black pepper
2 Cornish game hens, cleaned and dried
1 small yellow onion, quartered
extra virgin olive oil

Preheat oven to 425 degrees F.

In a food processor, pulse together the butter, bacon, and herbs until combined. Season the mixture with ½ teaspoon kosher salt and ½ teaspoon of black pepper.

Take each hen and slide your fingers between the skin and breast meat to loosen. Be careful not to tear the skin. Gently rub 2-3 tablespoons of the butter mixture underneath the skin. Inside the cavity, heavily salt and pepper the hen. Stuff the cavity with the remaining butter mixture and quartered onion. Rub the exterior of the hens with olive oil and generously season with kosher salt and black pepper. Truss the hens with kitchen twine.

Place the hens on a large, rimmed baking sheet or shallow roasting pan. Rotating the pan halfway through cooking, roast the hens until a thermometer inserted into thickest part of the thigh registers 170 degrees–about 45-50 minutes. Carefully remove the hens and rest on a cutting board. Loosely tent with aluminum foil and allow hens to rest for 10-15 minutes before serving.

Breakfast/Brunch · Pizzas · Pork

Breakfast Pizza + Nambé Giveaway WINNER!

Breakfast Pizza

You could throw an egg on anything and it would be freaking delicious. Sandwiches, ramen noodles, pasta, rice……

Seriously.

Breakfast Pizza

So when I dove into Motorino’s Pizza al’ Uovo on my recent trip to NYC— I was in HEAVEN. Oooey-gooey fried eggs that just spilled into a crisp pizza covered with pancetta, basil and pecorino. SOOO good! I was hell bent on making my own version when I got home though I did make a few ingredients substitutions based upon my personal flavor preference. True– it’s nearly impossible to achieve the same type of crust that a wood fire oven can produce but overall I was very happy with it. You’ll be surprised to see how easy this is to make and it’s a guaranteed crowd-pleaser at your next brunch party.

But now for what you all have been waiting for….the winner of the fabulous Nambé Fish Platter

Drum Roll please………….

CONGRATS Jessica who said she would serve Gambas al Ajillo on the Nambé Fish Platter. Jessica, you will have until 5pm PST on Wednesday, July 25th to respond to our email and accept or another winner will be selected.

THANK YOU to everyone who participated! And THANK YOU Nambé !

__________________________________________

Breakfast Pizza
Serves 2

Dough:
1 Cup Lukewarm Water
1 Packet Instant Yeast
2 Cups Bread Flour, plus more for dusting the work surface and hands
2 Tablespoons Olive Oil
1½ Teaspoon Kosher Salt
½ Tablespoon Sugar
*Makes approximately 3 medium-sized pizzas

Toppings:
1 Tablespoon Corn Meal
Olive Oil
2 Large Eggs, crack into individual small bowls
2 Ounces Fresh Mozzarella, sliced and patted dry
4-5 Slices Bacon, par cooked and cut into large pieces
2 Tablespoons Grated Parmesan Cheese
Fresh Basil Leaves
Black Pepper

Prepare the pizza dough. Combine the water with the yeast and let set for 10 minutes until the yeast is dissolved and bubbly. Combine the rest of the ingredients in the bowl of a stand mixer fitted with a dough hook attachment. Add the yeast-water and mix until the ingredients have just combined. Cover and allow to rest in a warm area until it doubles in size—about one hour.

One hour before baking, preheat the oven to 500 degrees F with a pizza stone on the lower rack. If cooking the pizza on a baking sheet, preheat 30 minutes before baking.

When the dough has rested, take approximately 1/3 of the dough and flatten it with your hands on a floured surface. Use a floured rolling pin to gently roll the crust about 1/8 of an inch. Transfer the dough to a pizza peel (if baking directly on stone) or onto a baking sheet that has been sprinkled with corn meal. Gently brush the crust with olive oil.

Lower the oven temperature to 450 degrees F. If using a pizza peel, carefully slide the pizza in the oven on the stone. If using a baking sheet, place pizza in the oven. Par bake for about 6-8 minutes until slightly golden. Pull from the oven and carefully pour the eggs on top. Place the fresh mozzarella cheese and bacon around the pizza and sprinkle with the grated parmesan cheese. Return to oven and continue baking for an additional 6-8 minutes or until the eggs have just set and the bacon has crisped. When done, remove the pizza and top with fresh basil leaves and black pepper. Serve immediately.

Appetizers/Small Plates · Condiments/Sauces · Pork · Seafood · Sunday Family Dinner

Bacon wrapped Shrimp with Pesto…..and our new Family tradition.

Bacon wrapped Shrimp with Pesto

I love the movie Soul Food and have watched it at least a cajillion times. Sure, it had some predictable spin of dramas but I always envied the Sunday family dinner at Big Mama’s house with all the delish soul food and of course–the family time.

Since moving back down to Southern California, I have really appreciated the frequency and quality time I get to spend with my family—and in particular, my nieces and nephew. Because of the distance, I only used to see them on sporadic weekend trips for holidays or special occasions. And it was because of this that I was always worried that I was missing out on seeing them grow up.

Now that I’m only about an hour’s drive away, I try to see them as often as possible—for “non-holiday” visits. And truth be told, I’m trying to squeeze in as much time as possible since my older nieces (now 13 and 11) will soon get to the age where it won’t be cool for them to hang out with their auntie. Eeek! Add that with the fact that we’re all busier than ever, it is so  important that we establish some type of traditions to keep our family ties strong.

So, with a little inspiration from Soul Food, I cajoled my siblings into agreeing on having a monthly Sunday dinner—something that is established and routine so that no matter what invitations roll in or events arise, we would say– “Sorry, I’ve got to pass—it’s my family dinner.”

Several weeks ago we kicked off our first family dinner and it was a great start to a new tradition. We cooked together (getting the kids involved, too), lounged about, sped “plasma cars” up and down the street, searched frantically for the eclipse, and of course–delved into some delish eats. Grilled steaks topped with blue cheese & fried onions, “dirty rice”, corn, bacon wrapped shrimp and strawberry pastries. YUM! Unfortunately our sister P  (who lives in SF) and our brother V and his family (who live in NYC) weren’t physically at dinner—they were sure there in spirit. Plus, I’m hoping they’ll plan their future visits so that it’ll land on a Sunday Family Dinner.

I’m pretty sure Mom would have loved the idea of us coming together to keep the family close—-and of course, that it’s an event that revolves around food. After all, we are her kids and the apple doesn’t fall far from the tree 🙂


This Month’s Family Dinner Menu

Cocktails:  Vino
Appetizers: Bacon wrapped Shrimp with Pesto
Entrees: Grilled Steaks topped with Bleu Cheese & Fried Onions, Dirty Rice, Corn
Dessert: Strawberry Pastries

___________________________________________

Bacon wrapped Shrimp with Pesto

Ingredients:

1 Pound Shrimp, cleaned with tails left on (about 24-30)
12 Slices Bacon
Black Pepper
Cooking Spray

Pesto:
2½ Packed Cups Sweet Basil
½ Cup Roasted Pine Nuts, unsalted
2-3 Garlic Cloves, finely diced
½ Cup Grated Parmesan Cheese
Juice from 1/2 Lemon
Approximately ½ – ¾ Cup Extra Virgin Olive Oil
Kosher Salt and Pepper to taste

Soak wooden skewers in water for 10-15 minutes.

Prepare  the Pesto. In a food processor, pulse garlic and nuts. Add basil, cheese, lemon juice, and salt/pepper. With the food processor on, stream in olive oil and blend until the pesto is fully incorporated. Be sure to scrape down sides in between steps. More olive oil can be added if a smoother, loose texture is desired. Refrigerate until ready to be used.

Preheat your oven broiler.

Season the shrimp with black pepper. In batches, line a plate with paper towels and lay slices of bacon on top. Cover with additional paper towels and microwave for about 2 minutes so that the bacon is slightly cooked but still pliable.  Cut each slice of bacon into half and wrap the half around each shrimp. Skewer the shrimp in a fashion so that the bacon stays secure. Approximately 3 bacon wrapped shrimp should fit on a skewer. *Alternatively, you can use soaked toothpicks and secure each shrimp individually.

Place the skewers on a aluminum foil-lined baking sheet that has been lightly covered with cooking spray. Place the sheet directly under the broiler and cook the shrimp for 8-10 minutes (flipping halfway through) until the bacon has crisped and the shrimp have turned pink.

Slide the shrimp off the skewers and serve immediately with the Pesto.

Pastas/Noodles · Pork

Linguine alla Carbonara

Linguine alla Carbonara

I’d like to think that I was Italian in one of my former lives.

Truly, it would help explain my love and addiction for Italian foods and all pastas.

In fact, most people make sandwiches–or even quick stir frys when they want something fast or need to empty out their fridges. Nope–not me. I make pastas.

Linguine alla Carbonara

And when something is as quick and yummy as this Linguine alla Carbonara, how can you blame me? Rich, simple, delicious—and there’s BACON!

Oh those Italians. Just Brilliant.

_____________________________________

Linguine alla Carbonara
Serves approximately 2

Ingredients:

1/3 Pound Linguine (or other long pasta)
4 Strips Thick Cut Bacon, diced
3 Tablespoons Shallots, chopped finely
2 Garlic Cloves, diced finely
¼ Teaspoon Dried Chili Flakes
2 Fresh Eggs, room temperature
1/3 Cup Parmesan Cheese, finely grated
2 Tablespoons Fresh Italian Parsley, chopped
Kosher Salt and Pepper
Additional Parsley and Parmesan Cheese for Garnish

In a large bowl, whisk together eggs and parmesan cheese. Once combined, mix in parsley. Set bowl aside.

Add bacon to a large pan and turn burner to medium heat. Slowly sauté the bacon until it becomes crispy and the fat has rendered down—about 10 minutes.  While the bacon is browning, begin boiling the linguine in a large pot of salted water. Once bacon is finished, use a slotted spoon and transfer it to a plate covered with paper towels. Reserve one tablespoon of bacon drippings in the pan and discard the rest. Sauté shallots in the bacon drippings until translucent. Add garlic and cook for an additional two minutes. Add chili flakes and cook for an additional minute. Transfer shallots/garlic mixture to a bowl.

Once cooked, drain the hot pasta and quickly toss it in the eggs/cheese mixture until the “sauce” has thickened. Add all but two tablespoons of the crispy bacon and shallots/garlic mixture. Continue to mix until all items have been thoroughly incorporated. Check for seasonings and adjust with salt and pepper accordingly. Plate the pasta and sprinkle with extra cheese, parsley, and remaining bacon.  Serve immediately.

Note: It is important to use the freshest eggs possible when making Carbonara. The heat from the hot pasta will warm the eggs but not thoroughly cook it. If you are wary of eggs that are not fully cooked, then Carbonara may not be the dish for you.

Breads · Pizzas · Pork

Margherita Pizza with Crispy Bacon

Margherita Pizza with Crispy Bacon

One afternoon while having lunch, we caught an episode of America’s Test Kitchen where they made a Pizza Bianco. It looked so easy and delicious that I stopped mid bite of my sandwich and feverishly began jotting down the recipe for the pizza dough. I was drawn to it as it almost had a focaccia-like consistency.

A few weeks later, with some more time on my hands and ambition at my side, I decided to give A.T.K.’s pizza dough a spin. True to form, like many of their recipes, it was easy. However, it was VERY time consuming. Mix this, wait 5 minutes….spin that, wait 2 minutes, flip 101 times….you get the point. But I must admit that the end result was well worth the wait.

I also opted out of their “bianco” style pizza in lieu of a tomato based sauce I created myself. To honor the Margherita Pizza, I used homegrown basil, creamy Bocconcini Mozzarella, and quickly roasted sliced tomatoes. And for that added extra punch, I topped it all off with crumbled crispy bacon. Why? Because I LOVE bacon.

WE LOVED IT! It was so savory, gooey from the cheese, bright from the basil and 95% homemade so you know where everything comes from. Incidentally, I didn’t make the cheese though I have ALWAYS wanted to try! There’s always next time. We also drizzled some of the baked pizza with some deliciously high quality finishing olive oil….very Italiano!

Word to the wise, start this recipe when you aren’t the least bit hungry. Having to wait for the dough to rise is quite time consuming and could be a monster if you’re hungry! 🙂

Adding the fixings

Enjoy!

Margherita Pizza with Crispy Bacon
Serves Approximately 4

Pizza Dough (From America’s Test Kitchen)
3 Cups All Purpose Flour
1 ¼ Teaspoon Salt
1 ⅔ Cups Water
1 ½ Teaspoon Yeast
1¼ Teaspoon Sugar
2 Tablespoon Olive Oil (extra for greasing)
2 Tablespoons Corn Meal (finely ground)

Tomato Sauce
1 32 Ounce Can of Plum Tomatoes
1 Tablespoon of Extra Virgin Olive Oil
1 Clove Finely Dice Garlic
1 Teaspoon Red Chili Flakes
1 Teaspoon Dried Oregano
¼ Teaspoon Dried Fennel
Salt and Pepper to taste

Toppings
12 Fresh Bocconcini Mozzarella (cut in half)
1 Plum Tomato, sliced, and slightly roasted at 400 degrees for 10 minutes
4 Slices Bacon, cooked, and crumbled into large pieces
5-6 Fresh Basil Leaves

Preheat Oven to 450 degrees for one hour before you are ready to bake the pizza (preferably with a Pizza Stone).

In Mixer using a Dough Hook, combine flour, salt, and water just to combine. Approximately 3-4 minutes. Let rest for an additional 20 minutes.  Add yeast and sugar. Mix for 2 minutes. Turn on Mixer on High Speed and mix for an additional 6-10 minute until dough is glossy & smooth. Dough should begin pulling away from bowl. In another large bowl, oil the surface with 1 Tablespoon of Olive Oil Bowl. Transfer dough to bowl, add another 1 Tablespoon to the top. Cover with plastic wrap and let triple in volume – approximately 2-2 ½ hours.

While dough is resting, prepare tomato sauce. In a sauce pot, heat olive oil for 1 minute. Add garlic and cook until fragrant. Add chili flakes and heat for an additional minute. Add the entire can of tomatoes with liquids to the pot. Let simmer for 2-3 minutes. With the back of a wooden spoon (or potato masher), break down and crush the tomatoes. Add oregano and fennel and simmer on low for an additional 5 minutes. Remove from heat. In a food processor or blender, carefully puree the tomato mixture. Leave thick so that it spreads well over the dough. Salt and pepper to taste.

Cover a baking pan with 2 Tablespoons of Olive Oil. Sprinkle corn meal evenly across the pan and turn dough into pan. Lightly and gently spread dough across pan. If the dough does not hold shape and snaps back, let rest for an additional 5 minutes. Once the dough has been spread onto the pan, let it sit on countertop for another 5-10 minutes until it gets good and bubbly.

Dock the dough 30-40 times and parbake for about 15 minutes. It should be lightly brown on the top. Pull from oven and spread the Tomato sauce to cover.  Add roasted sliced tomatoes, cheese, and bacon. Put back into the oven for about 5-10 minutes until cheese is lightly brown. Add fresh basil and continue cooking for an additional 5 minutes.

Remove from oven and let cool in pan for a few minutes before transferring to a cutting board. Cut with a Pizza Slicer (or bread knife) and Enjoy!