Breakfast/Brunch

Blackberry-Banana Pancakes

Blackberry-Banana Pancakes

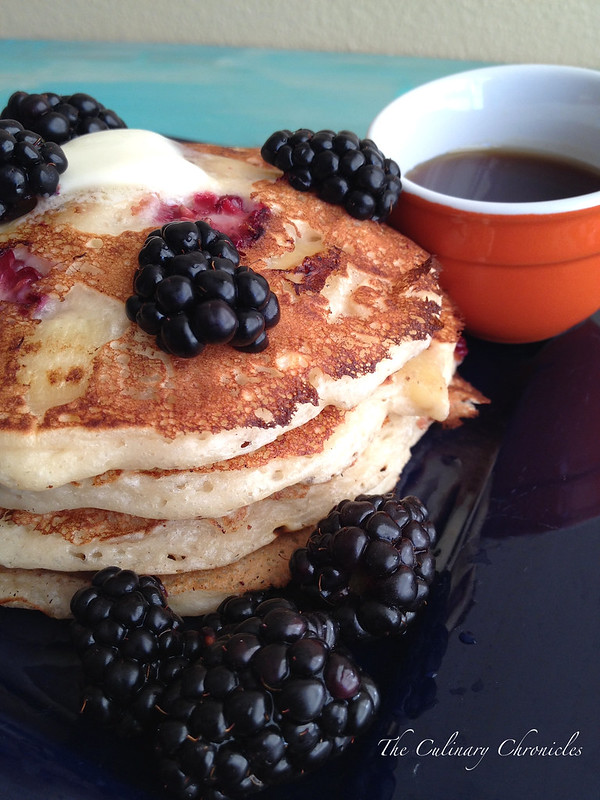
Every day is the perfect day for pancakes.

Especially when there’s bananas and fresh blackberries involved.

And butter. And syrup.

Blackberry-Banana Pancakes

I recently caught up with some girlfriends over brunch at The Naked Cafe in Solana Beach. It was a gorgeous, sunny day overlooking the beach –definitely the perfect backdrop to a scrumptious meal.

I ended up ordering a bunch of random à la carte items but the most memorable dish were their buttermilk banana & blackberry pancakes. HOLY MOLY–they were the fluffiest things ever! And why have I never made this fruit combination before in a pancake?

Blackberry-Banana Pancakes

The situation needed to be rectified….immediately! I turned to my tried and true Blueberry Pancakes recipe from Cooks Illustrated and did a little tweaking. An extra splash of vanilla extract here and some lemon zest there –heavenly!

Blackberry-Banana Pancakes

And don’t hesitate to make a double batch! Pancakes freeze quite well –just place a piece of wax paper between each cake and throw them into resealable freezer bags. You can have a pile o’ pancakes whenever your heart desires.

Or your tummy.

But really, aren’t they the same thing? 🙂

________________________________________

Blackberry-Banana Pancakes
Makes approximately 16 pancakes

Ingredients:

2 cups all-purpose flour
3 tablespoons sugar
2 teaspoons baking powder
½ teaspoon baking soda
½ teaspoon salt
1 large egg
2 cups buttermilk
3 tablespoons unsalted butter, melted and cooled slightly
1 teaspoon vanilla extract
zest of 1 lemon
1 cup fresh blackberries, sliced
2 cups sliced bananas
vegetable oil
Serve with butter, extra fruit, and maple syrup

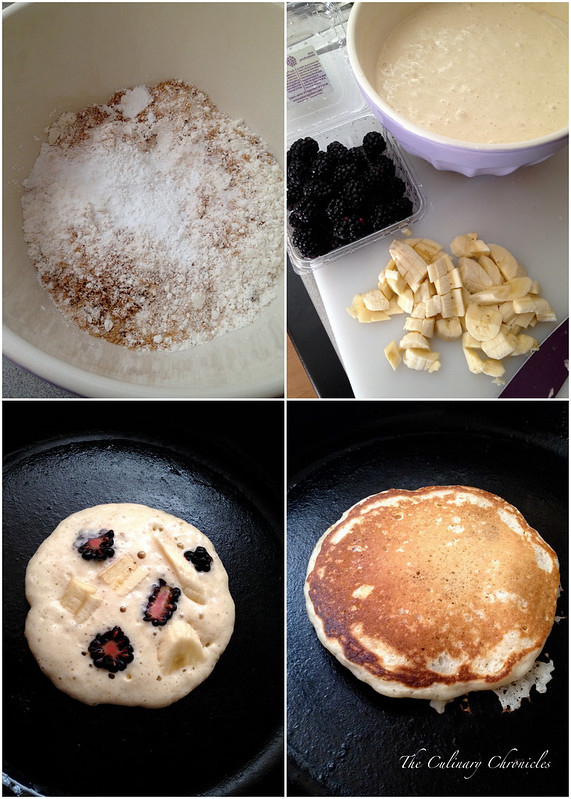
In a medium bowl, sift the flour, sugar, baking powder, baking soda and salt together. In a separate bowl, whisk together the egg, buttermilk milk, and melted butter. Stir in the vanilla extract and lemon zest. Add the dry ingredients to the wet and whisk gently just until combined. The batter will be quite lumpy.

Heat about 1 teaspoon of the oil in a 12-inch nonstick skillet set over medium heat. Once the oil starts shimmering, use paper towels to wipe the pan so only a thin, even coating of oil covers the bottom and sides. Use a ¼ cup measure to portion the batter and pour into the center of the pan. Top each pancake with a layer of blackberries and sliced bananas, gently pressing them into the batter. Cook on the first side until the edges are set and bubbles form on the surface, about 1-2 minutes. Use a spatula to flip the pancakes and cook for 1-2 minutes on the second side, or until golden brown and cooked through. Repeat with remaining batter, more oil to the pan if necessary. Serve pancakes with tabs of butter, additional fruit and maple syrup.

Adapted from Cooks Illustrated

Desserts/Pastries

Mixed Berry Hand Pies for π Day!

Mixed Berry Hand Pies

HOLY COW!!! I almost missed it—again! But thanks to my fab Twitter feed, I was reminded in the nick of time that today is…….. π (Pi) Day!!!!

Yup, the mathematical constant π (Pi) that is approximately 3.14159 is celebrated every year on March 14th. 3/14 = 3.14 Get it????? Oh so clever!

Mixed Berry Hand Pies

So, what does one do to celebrate π Day? Well– I guess if you’re a big math fanatic, you may spend your day racing through equations or preparing for the next Math Olympics. OR you can spend your day baking and eating delicious pies.

Seeing how I’m rather mathematically inept, I chose the latter and made these fun Mixed Berry Hand Pies. Crispy, flaky crust filled with tart fresh berries. Scrumptious!

And in case you’re feeling extra naughty today, you can choose to deep fry the hand pies instead of baking them. Why the π not?

Mixed Berry Hand Pies

And with that Friends, Happy π (Pi) Day!!!

ps. Obviously I was too busy shoving my face with these hand pies to wipe my fingers clean of powdered sugar before snapping this pic. Ooops!

_________________________________________

Mixed Berry Hand Pies
Makes 10-12 pies

Ingredients:

2 cups diced fresh strawberries
1 cup diced fresh blackberries
½ teaspoon lemon zest
seeds from ½ vanilla bean pod
1½ tablespoons sugar (more if berries are too tart)
1½ teaspoons cornstarch
flour for dusting
1 pound pie dough*
1 egg, beaten
1 tablespoon heavy cream or water
powdered sugar

Preheat oven to 400 degrees F. Line a baking sheet with parchment paper or silicon mat.

In a bowl, gently mix together the berries, lemon zest, vanilla beans, sugar and cornstarch. Depending on the sweetness of the berries, more sugar may be added. Set aside.

Dust a workspace with flour and roll the pie dough to about 1/8 inch thickness. Use a 5-6 inch round cookie cutter to cut circles out of the dough. Place about 2 spoonfuls of the berry mixture in the center of a pastry circle. Fold over the dough to cover the filling and gently press the edges together to seal. You may also use a fork to crimp the edges to secure the seal. Repeat with the remaining dough.

Transfer the hand pies to the baking sheet. In a small bowl, whisk together the egg and heavy cream/water. Brush the tops of the hand pies with the egg wash and make a small nick with a sharp knife on top to allow the steam to release while the pies bake.

Bake the hand pies for 20 minutes or until golden brown. Don’t worry if some of the berry filling bubbles out. Once done, allow the hand pies to cool on racks for about 10 minutes. Dust the hand pies with powdered sugar and serve.

Fried Option: If you opt to deep fry your hand pies, do not brush them with the egg wash or cut an air vent in the filled pies. Once formed, refrigerate them for at least 20 minutes. Fill a heavy bottom pot with 2 inches of vegetable oil and heat to 375 degrees F. In batches, fry the hand pies for 1-2 minutes on each side or until golden brown. Transfer the hand pies to cooling racks to drain excess oil. After 5 minutes, dust them with powdered sugar and serve.

*When it comes to pie dough, I’m a big fan of using Cook’s Illustrated’s Foolproof Pie Dough recipe or Martha Stewart’s Patee Brisee recipe. Both yield great results AND they’re both ideal to make double batches of to freeze when you need them.

Desserts/Pastries

Vanilla Bean Crème Brûlée for Leonidas.

Vanilla Bean Creme Brulee


In a Vietnamese family, the Đích Tôn is a position that holds a great deal of honor and duty. He is the eldest grandson by the eldest son and is responsible to not only carry on the family name but also our traditions and history.

And this past December, my parents’ Đích Tôn made his debut in the world– Leonidas Knox Nguyen.


Creme Brulee

Of course, Dad was thrilled beyond belief. And how could he not be? Leo is freaking adorable and such an alert little guy. And those cheeks! I could just squeeze and zerbert them all day!

D7K_6300

A month after his arrival, my brother and his fam came from NYC for an extended stay so that we could all meet Leo and spend time with his big sis, Luna. While they were here, V and L held a small gathering with the immediate family in Leo’s honor. It gave the fam an opportunity to give our blessings, best wishes and words of us advice to Leo.

Admittedly, there’s a lot resting on the little guy’s shoulder. But at just 3 months, I can tell he will far exceed anything we could possibly hope for.


photo2

Oh! And as for the Vanilla Bean Crème Brûlée–I whipped up a few batches for Leo’s gathering. Don’t worry Leo, as soon as those teeth come in, Cô Nam will be stuffing you with goodies. xoxo!

________________________________________

Vanilla Bean Crème Brûlée
Serves 6

Ingredients:

1 Large Egg
4 Large Egg Yolks
½ Cup Sugar, plus 1 tablespoon for each serving
3 Cups Heavy Cream
2 Vanilla Bean Pods, split lengthwise with beans scraped out
1 Pint Fresh Berries, washed and dried

Preheat the oven to 300 degrees F.

In the bowl of an electric mixer fitted with the paddle attachment, mix the egg, egg yolks, and ½ cup of the sugar together on low speed until just combined. Meanwhile, scald the cream in a small saucepan with the emptied vanilla bean pods and beans until it’s very hot to the touch but not boiled. Remove the vanilla bean pods and with the mixer on low speed, slowly add the cream to the eggs. Pour into 6 to 8-ounce ramekins until almost full.

Place the ramekins in a baking pan and carefully pour boiling water into the pan to come halfway up the sides of the ramekins. Bake for 35 to 40 minutes, until the custards are set when gently shaken. Remove the custards from the water bath, cool to room temperature, and refrigerate until firm.

To serve, spread 1 tablespoon of sugar evenly on the top of each ramekin and heat with a kitchen blowtorch until the sugar caramelizes evenly. Allow to sit at room temperature for a minute until the caramelized sugar hardens. Serve with fresh berries on top.

Slightly adapted from Ina Garten

Desserts/Pastries

Fresh Fruit Tart with Pastry Cream

Fresh Fruit Tart with Pastry Cream

My cousin, T, recently graduated from optometry school.

And to be honest, it kind of trips me out. I still remember him following me and his sister around when he was a kid and now he’s all grown up and taking care of people’s eyeballs.

Yup, I said “eyeballs“. 🙂

Fresh Fruit Tart with Pastry Cream

For T’s graduation party, I gave him a few options of desserts to choose from for me to make. He chose a fruit tart which worked out great for me since I had been wanting to try out this pastry cream recipe for some time now. It came together beautifully—silky, rich, and delicious. And since it’s so easy to pull together, I turned to Alice Medrich’s  recipe for a shortbread-like tart crust. Buttery goodness!

Fresh Fruit Tart with Pastry Cream

And not only was this tart delicious but it’s quite a looker, too! 🙂

Have a great week, Friends!

______________________________________________
Fresh Fruit Tart with Pastry Cream
Makes one 10-inch tart

Ingredients:

Pastry Cream (America’s Test Kitchen):
2 Cups Half-and-Half
½ Cup Sugar
Pinch Salt
5 Large Egg Yolks
3 Tablespoon Cornstarch
4 Tablespoon Cold Unsalted Butter, cut into 4 pieces
1½ Teaspoon Vanilla Extract

Crust (From Alice Medrich):
8 Tablespoons Unsalted Butter, melted
¼ Cup Sugar
1/8 Teaspoon Salt
¾ Teaspoon Pure Vanilla Extract
1 Cup All Purpose Flour

Topping:
Fresh Blueberries
Fresh Raspberries
Fresh Blackberries
Kiwis, peeled and sliced
½ Cup Apple Jelly

Prepare the pastry cream. Bring the half-and-half, 6 tablespoons of the sugar, and the salt to a simmer in a medium saucepan over medium high heat, stirring occasionally. As the half-and-half mixture begins to simmer, whisk the egg yolks, cornstarch, and remaining 2 tablespoons of sugar together in a medium bowl until smooth. Slowly whisk about 1 cup of the simmering half-and-half mixture into the yolks to temper, then slowly whisk the tempered yolks back into the simmering saucepan. Reduce the heat to medium and cook, whisking vigorously, until the mixture is thickened and a few bubbles burst on the surface, about 30 seconds. Off the heat, stir in the butter and vanilla. Transfer the mixture to a medium bowl, lay a sheet of plastic wrap directly on the surface, and refrigerate the pastry cream until chilled and firm, about 3 hours.

While the pastry cream chills, repare the crust. Position a rack in the lower third of the oven and preheat the oven to 350°F. Mix the butter, sugar, salt, and vanilla in a medium bowl with a fork. Add the flour and mix just until well blended with a pastry blender or a large fork. Don’t worry if the dough seems too soft. Press all of the dough very thinly and evenly into the sides and bottom of an 10-inch tart pan. If it seems like the butter is getting too oily and it’s becoming difficult to manipulate the dough, simply put it in the fridge for a few minutes, it’ll become easier to handle. Using a fork, prick the dough all over the bottom and sides. Place a large piece of parchment paper on top of dough and fill with pie weights or dry beans. Press weights to the edges of dough and bake in the oven for 15 minutes. Remove parchment and weights and continue baking until deeply golden in color, approximately 10 minutes longer. Remove from oven and place on cooling rack.

To assemble, spread the chilled pastry cream evenly over the bottom of the cooled tart shell. Shingle the kiwis around the edge, then a row of blackberries, then raspberries, and finally pile the blueberries in the center. Melt the jelly in a small saucepan over medium-high heat, stirring occasionally to smooth out any lumps. Using a pastry brush, dab the melted jelly over the fruit. Enjoy!

Breads · Breakfast/Brunch · Desserts/Pastries

Blackberry Muffins topped with Almond Streusel

photo

I try my hardest to eat what is in season and in doing so, I find that I get the best products at the lowest price. The other day while picking up some items at my local grocery store, I came across signs for fresh Blackberries at only $1 a basket! Now that was a deal I couldn’t pass up. I quickly filled my cart with 3 cartons without any idea on how I was going to use them.

The following work day, I decided to greet my new student staff with freshly baked muffins for our early morning meeting. I had never had a Blackberry Muffin before but thought it would be a great use of the fresh blackberries I had just picked up. Plus, I recalled a recipe from Williams Sonoma that featured this combination.

After a little digging around I found the recipe and quickly began making some modifications. The recipe is SUPER easy and I think the additions I made added a great flavor profile to the muffins.

The muffin was light, fluffy, and quite moist. The large blackberries were a nice surprise when biting into the muffin and I was pleased to see that my cautious folding of the batter yielded no “bleeding” from the berries. As for the almond streusel topping, well, what’s not to love about crunchy almonds, sugar and butter? The slight crunch added great texture and it seemed to be quite the favorite component with everyone.


image1

__________________________________________

Blackberry Muffins topped with Almond Streusel
Makes 12 Muffins

Ingredients:

Streusel Topping:
1/3 cup granulated sugar
2 tablespoons all purpose flour
1 heaping tablespoon brown sugar
½ teaspoon ground cinnamon
½ teaspoon fresh lemon zest
2 tablespoons unsalted butter, melted
½ cup sliced toasted almonds, roughly chopped

Batter:
2 cups all purpose flour
¾ cup granulated sugar (more if needed, depending on sweetness of berries)
1/4 cup light brown sugar
2 teaspoons baking powder
½ teaspoon baking soda
1 teaspoon ground cinnamon
1/8 teaspoon ground nutmeg
½ teaspoon fresh lemon zest
¼ teaspoon salt
1 egg, beaten
5 tablespoons unsalted butter, melted
1 cup buttermilk
1 tablespoon vanilla extract
2 cups fresh blackberries


Preheat an oven to 375°F. Place 12 paper liners in a standard muffin tin. Using a cooking spray, lightly spray the cups and pan. Set aside.

Prepare the topping. In a small bowl, stir together the sugars, flour, cinnamon and lemon zest. Stir in the melted butter until the mixture is crumbly. Stir in almonds and set aside.

Prepare the batter. In a small bowl, whisk together the buttermilk and vanilla extract. In a larger bowl, stir together the flour, sugars, baking powder, baking soda, cinnamon, nutmeg, lemon zest and salt. Make a well in the center and add the egg, melted butter and buttermilk mixture. Stir just until evenly moistened. The batter will be fairly lumpy. Carefully sprinkle in the blackberries (reserving 12 of the berries aside) and gently fold into the batter with a large rubber spatula just until evenly distributed. Take care not to break up the fruit.

Spoon and divide evenly the batter into the prepared muffin cups. Gently place one berry on top of each muffin and lightly press down with your finger until it is submerged. Proceed to cover each muffin with the streusel topping, dividing it evenly .

Bake until the muffins are golden and a toothpick inserted into the center comes out clean, 25 to 30 minutes. Transfer the pan to a wire rack and let cool for 10 minutes. Unmold the muffins. Serve warm or at room temperature.

Enjoy!

Just missing a steaming cup of Joe 🙂