Desserts/Pastries

Cooks Illustrated Triple-Chocolate Mousse Cake

October 2017 Fam Din
We’re Chocoholics.

Every single one of us.

October 2017 Fam Din
From Ôn and Mệ (our paternal grandparents) that would give us Andes chocolates as goodies….

To our Folks…(particularly Dad these days…)

To all five Sibbies

and especially all of our Munchkins.

Triple-Chocolate Mousse Cake
Mmmm….Chocolate.

Triple-Chocolate Mousse Cake
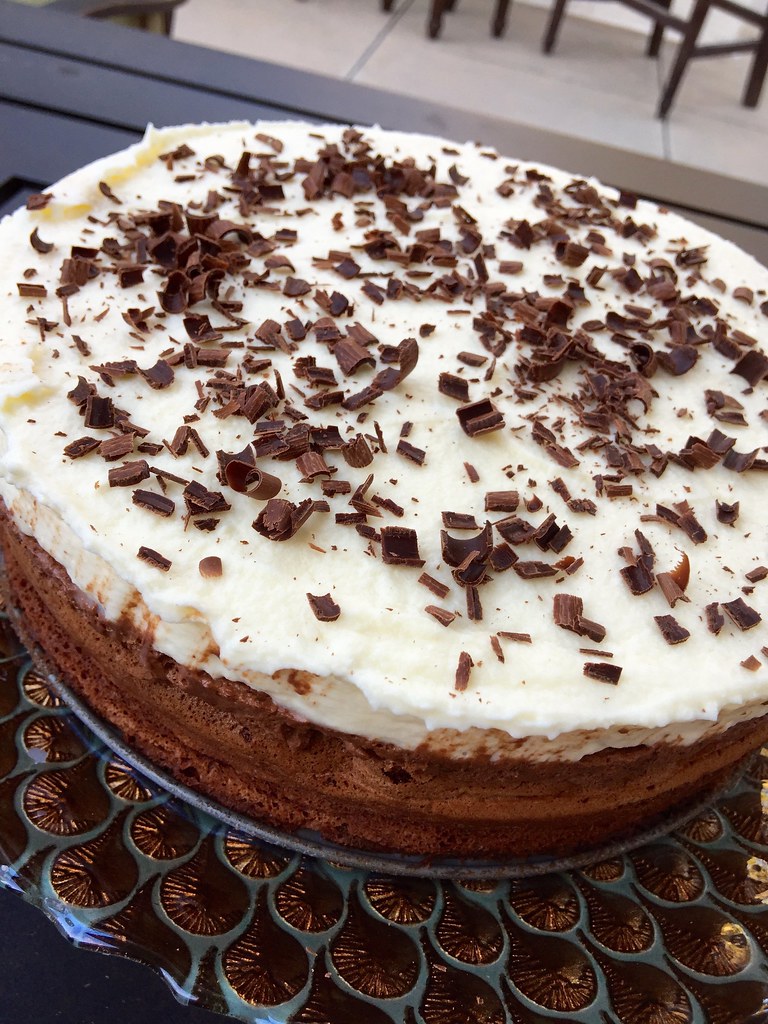
So when we discovered the Triple Chocolate Mousse Cake from Porto’s Bakery –it became a staple at our celebrations!

Triple-Chocolate Mousse Cake
A rich chocolate cake layer base….

Topped by a chocolatey mousse layer…

Then topped with another white chocolatey mousse layer.

Triple-Chocolate Mousse Cake
Perfection.

Triple-Chocolate Mousse Cake
A while back, seester asked me to make a version of our beloved cake. Which was perfect timing because I had just stumbled across a version by Cooks Illustrated that I really wanted to try out.

October 2017 Fam Din
Their recipes are very specific and detailed….but for this recipe, not difficult at all. Just takes some time. Trust the process, it’s so worth it.

Oh–and don’t skimp out on the quality chocolate peeps. Since it’s the star of the show, indulge a bit.

October 2017 Fam Din
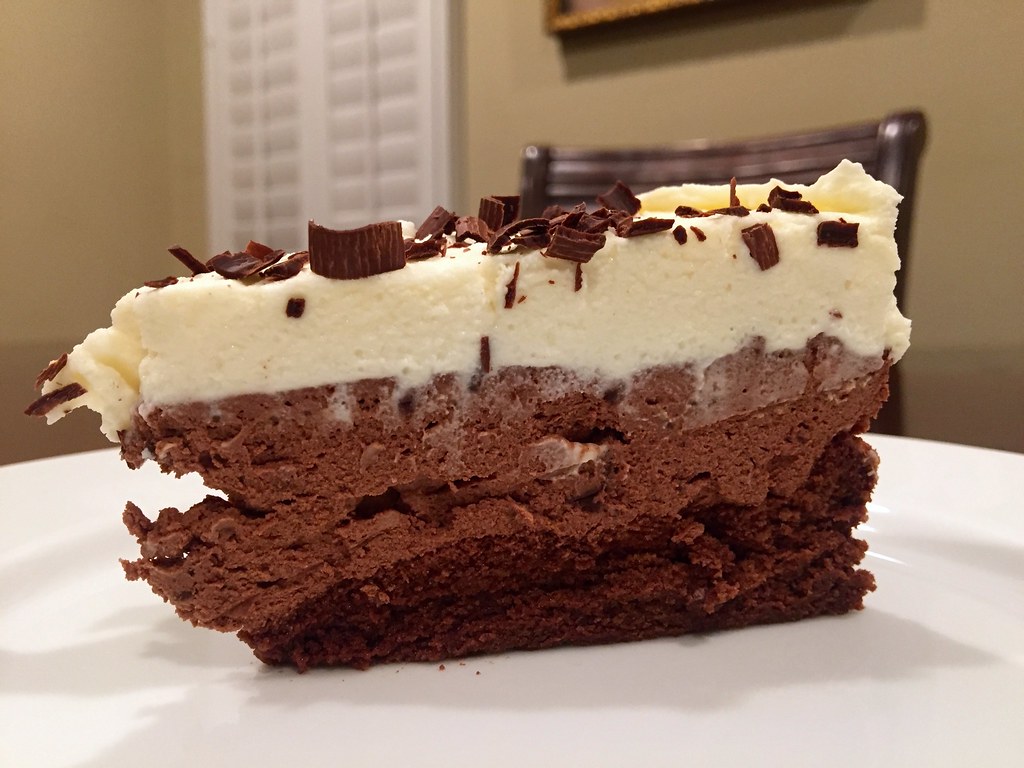
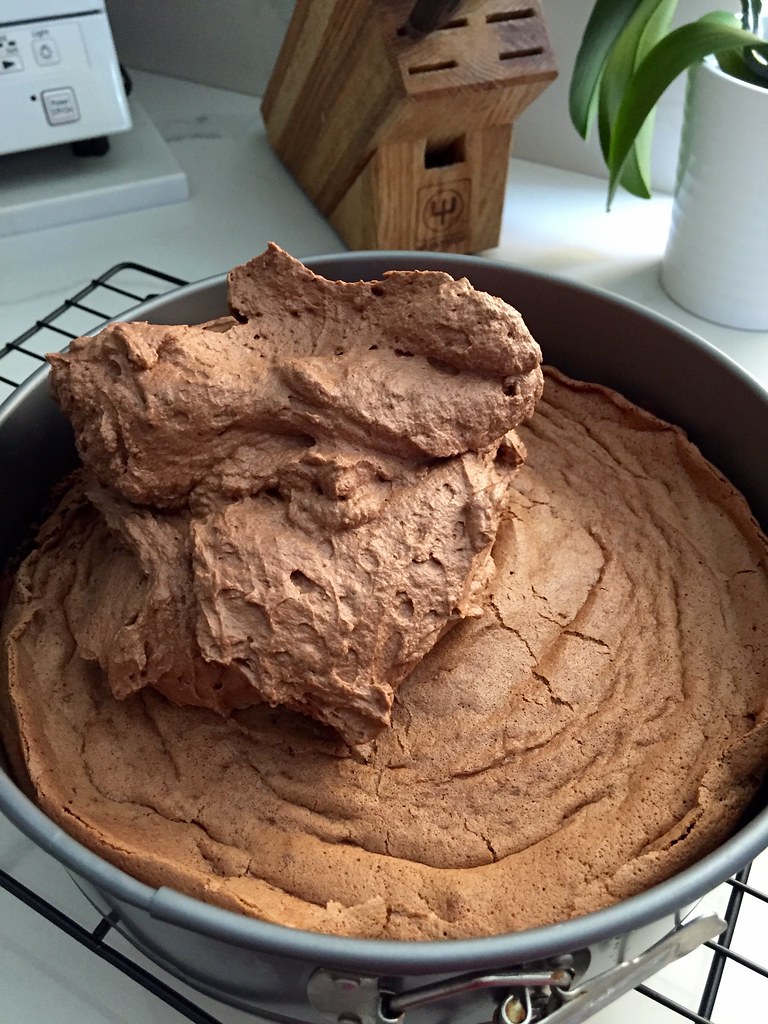
The bottom layer is a flourless chocolate cake.

Decadent and delicious.

October 2017 Fam Din
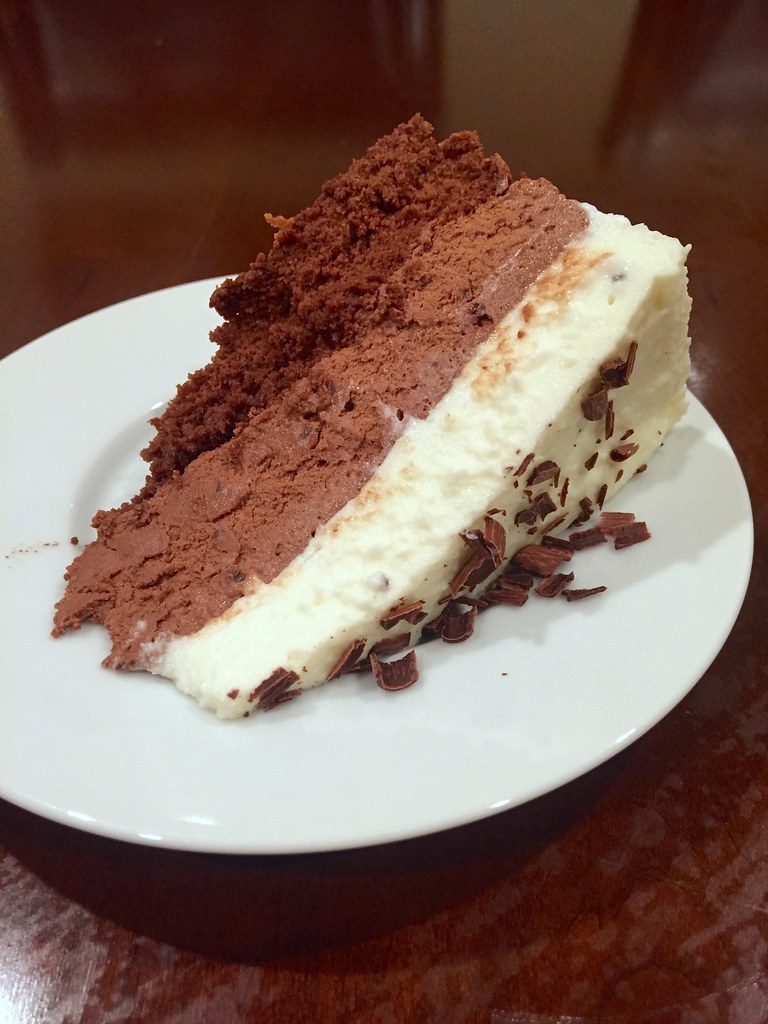
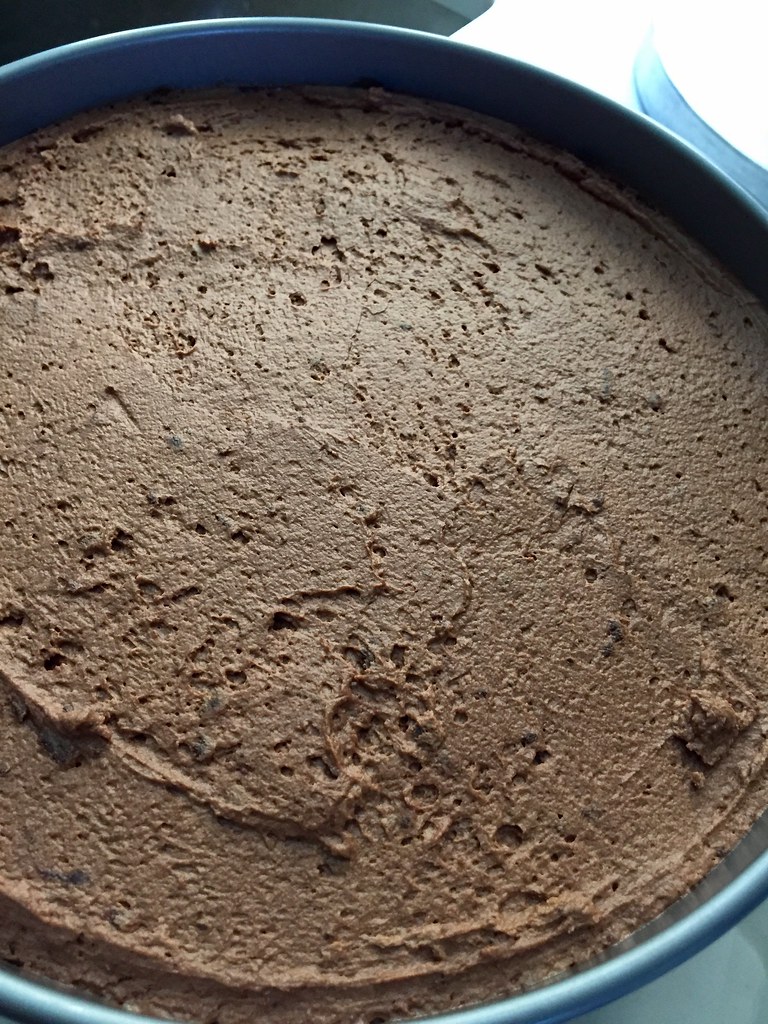
The second layer, is a rich and scrumptious bittersweet chocolate mousse.

So velvety divine.

October 2017 Fam Din
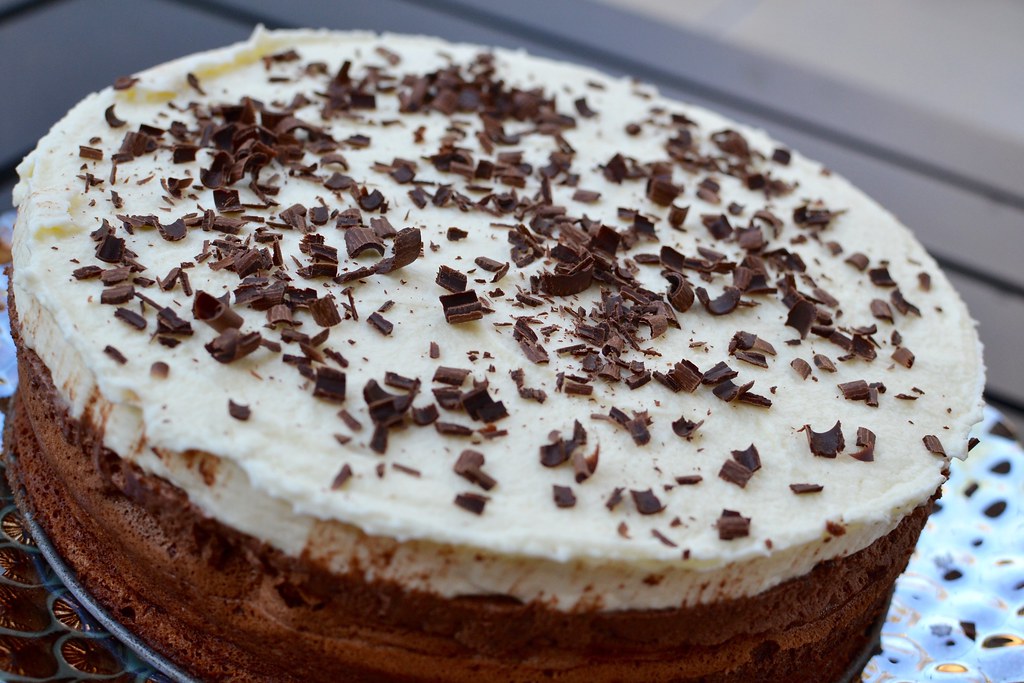
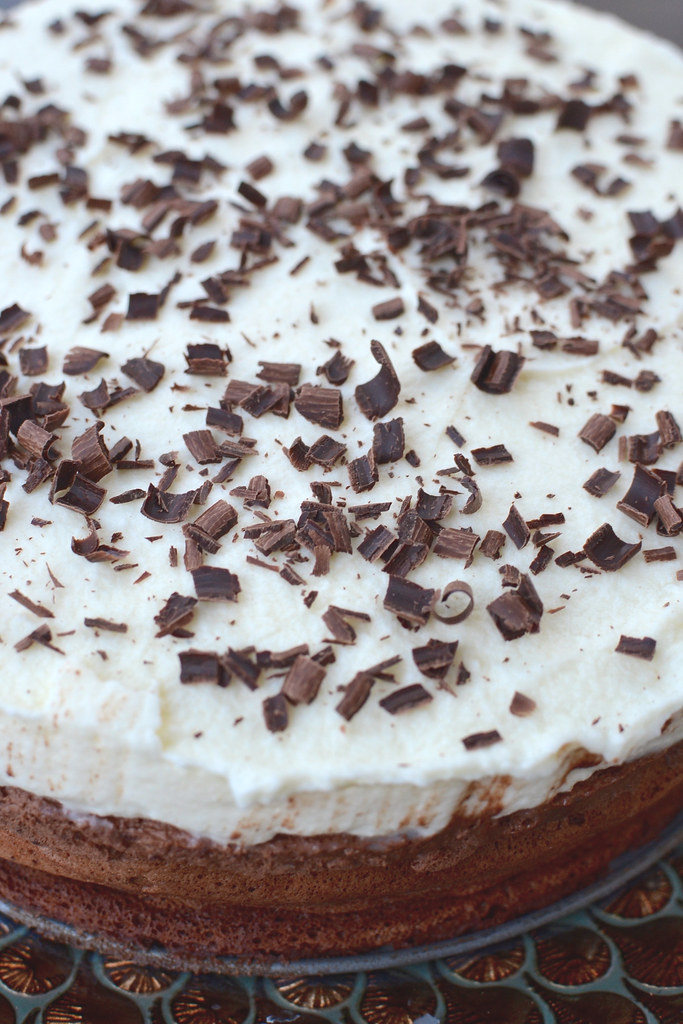
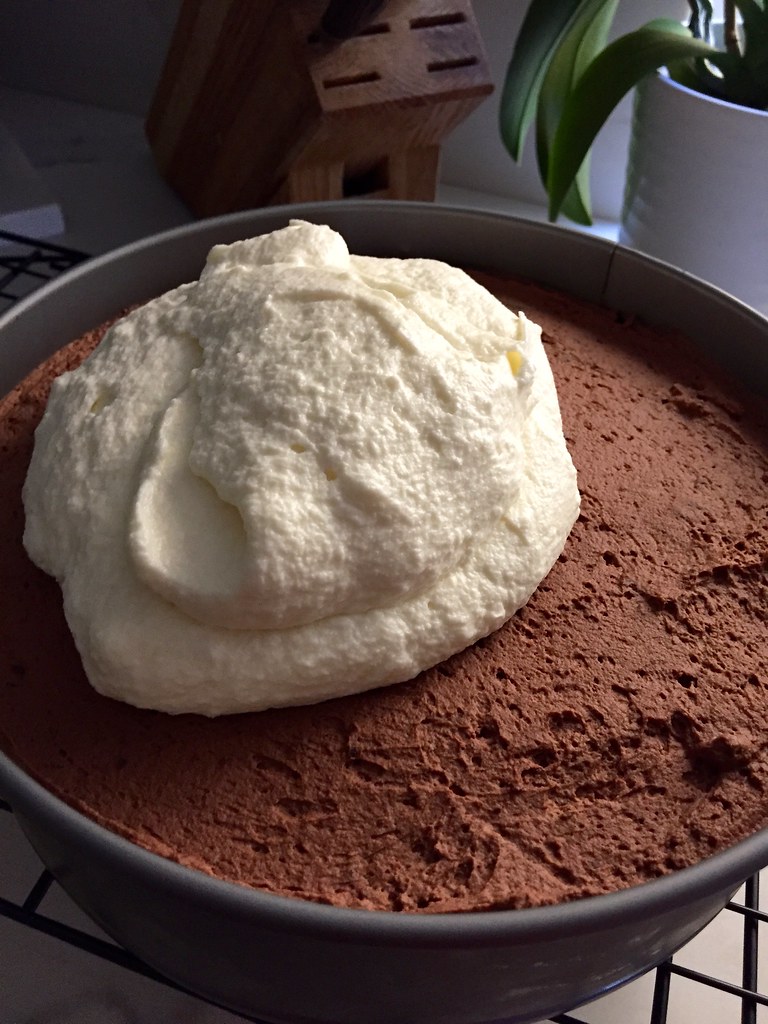
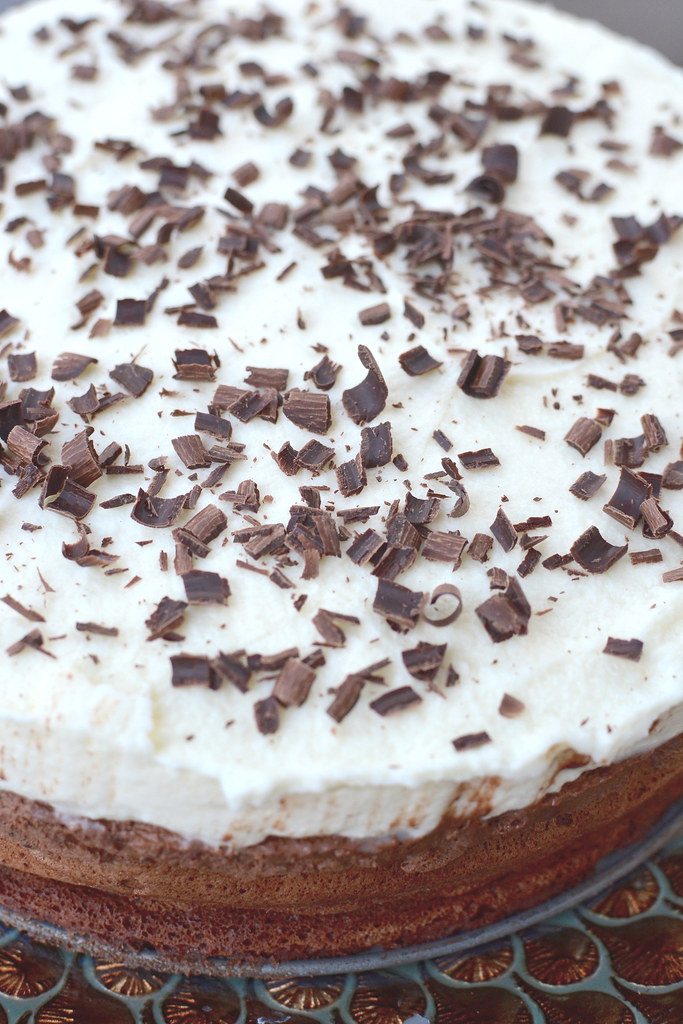
Next is the fluffy white chocolate mousse layer — airy and dreamy.

And don’t forget the chocolate shavings to garnish!

October 2017 Fam Din
And now that I’m looking at these pictures — I’m wondering why the heckI haven’t made it recently again?! Must fix that soon!

Happy Chocolate Dreams!!! ❤

___________________________________________________________________

Triple-Chocolate Mousse Cake
Serves 12-16

Ingredients:

BOTTOM LAYER
6 tablespoons (3/4 stick) unsalted butter, cut into 6 pieces, plus extra for greasing pan
7 ounces bittersweet chocolate, chopped fine
¾ teaspoon instant espresso powder
1½ teaspoons vanilla extract
4 large eggs, separated
pinch table salt
⅓ cup packed (about 2 1/2 ounces) light brown sugar, crumbled with fingers to remove lumps

MIDDLE LAYER
2 tablespoons cocoa powder, preferably Dutch-processed
5 tablespoons hot water
7 ounces bittersweet chocolate, chopped fine
1½ cups cold heavy cream
1 tablespoon granulated sugar
⅛ teaspoon table salt

TOP LAYER
¾ teaspoon powdered gelatin
1 tablespoon water
6 ounces white chocolate chips
1½ cups cold heavy cream

Shaved chocolate or cocoa powder for serving, optional

FOR THE BOTTOM LAYER:

Adjust oven rack to middle position and heat oven to 325 degrees. Butter bottom and sides of 91/2-inch springform pan. Melt butter, chocolate, and espresso powder in large heatproof bowl set over saucepan filled with 1 inch of barely simmering water, stirring occasionally until smooth. Remove from heat and cool mixture slightly, about 5 minutes. Whisk in vanilla and egg yolks; set aside.

In stand mixer fitted with whisk attachment, beat egg whites and salt at medium speed until frothy, about 30 seconds. Add half of brown sugar and beat until combined, about 15 seconds. Add remaining brown sugar and beat at high speed until soft peaks form when whisk is lifted, about 1 minute longer, scraping down sides halfway through. Using whisk, fold one-third of beaten egg whites into chocolate mixture to lighten. Using rubber spatula, fold in remaining egg whites until no white streaks remain. Carefully transfer batter to prepared springform pan, gently smoothing top with offset spatula.

Bake until cake has risen, is firm around edges, and center has just set but is still soft (center of cake will spring back after pressing gently with finger), 13 to 18 minutes. Transfer cake to wire rack to cool completely, about 1 hour. (Cake will collapse as it cools.) Do not remove cake from pan.

FOR THE MIDDLE LAYER:

Combine cocoa powder and hot water in small bowl; set aside. Melt chocolate in large heatproof bowl set over saucepan filled with 1 inch of barely simmering water, stirring occasionally until smooth. Remove from heat and cool slightly, 2 to 5 minutes.

In clean bowl of stand mixer fitted with whisk attachment, whip cream, granulated sugar, and salt at medium speed until mixture begins to thicken, about 30 seconds. Increase speed to high and whip until soft peaks form when whisk is lifted, 15 to 60 seconds.

Whisk cocoa powder mixture into melted chocolate until smooth. Using whisk, fold one-third of whipped cream into chocolate mixture to lighten. Using rubber spatula, fold in remaining whipped cream until no white streaks remain. Spoon mousse into springform pan over cooled cake and gently tap pan on counter 3 times to remove any large air bubbles; gently smooth top with offset spatula. Wipe inside edge of pan with damp cloth to remove any drips. Refrigerate cake at least 15 minutes while preparing top layer.

FOR THE TOP LAYER:

In small bowl, sprinkle gelatin over water; let stand at least 5 minutes. Place white chocolate in medium bowl. Bring ½ cup cream to simmer in small saucepan over medium-high heat. Remove from heat; add gelatin mixture and stir until fully dissolved. Pour cream mixture over white chocolate and whisk until chocolate is melted and mixture is smooth, about 30 seconds. Cool to room temperature, stirring occasionally, 5 to 8 minutes (mixture will thicken slightly).

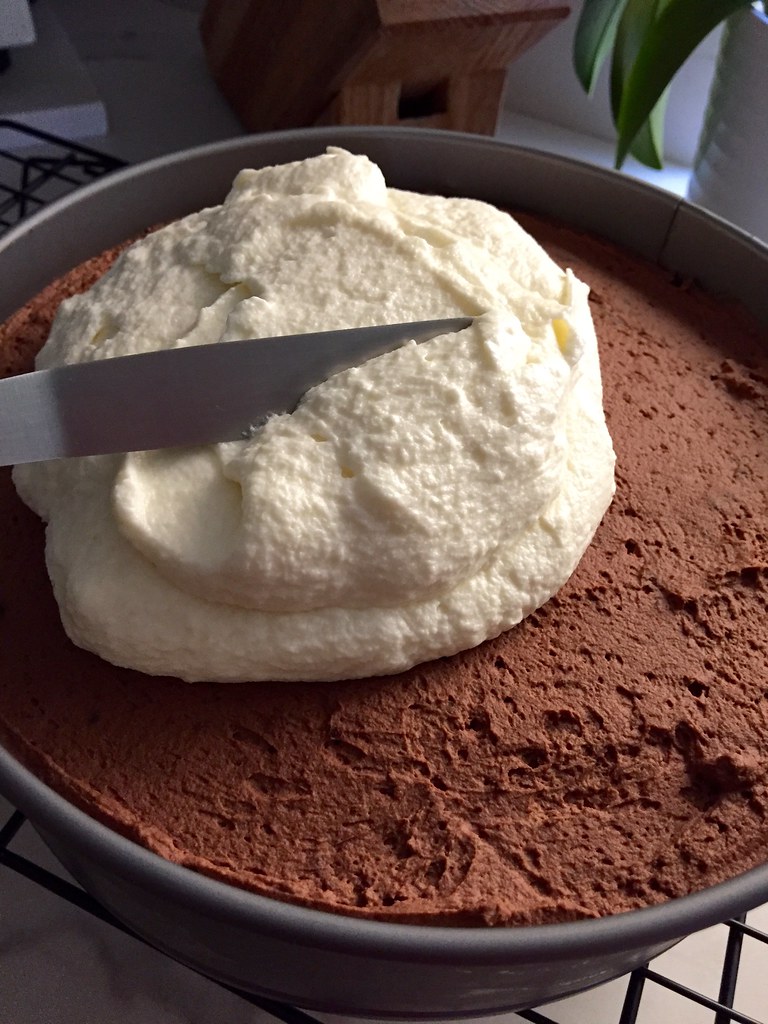
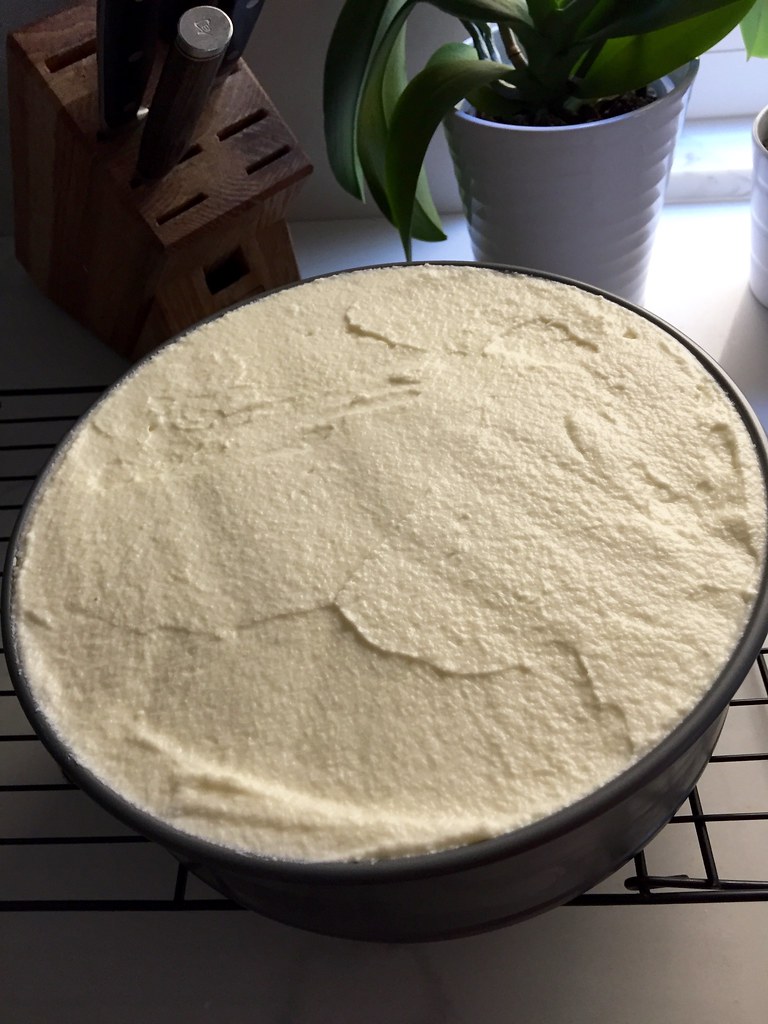
In clean bowl of stand mixer fitted with whisk attachment, whip remaining cup cream at medium speed until it begins to thicken, about 30 seconds. Increase speed to high and whip until soft peaks form when whisk is lifted, 15 to 60 seconds. Using whisk, fold one-third of whipped cream into white chocolate mixture to lighten. Using rubber spatula, fold remaining whipped cream into white chocolate mixture until no white streaks remain. Spoon white chocolate mousse into pan over middle layer. Smooth top with offset spatula. Return cake to refrigerator and chill until set, at least 2½ hours.

TO SERVE:

If using, garnish top of cake with chocolate curls or dust with cocoa. Run thin knife between cake and side of springform pan; remove side of pan. Run cleaned knife along outside of cake to smooth sides. Cut into slices and serve.

NOTE:

This recipe requires a springform pan at least 3 inches high. It is imperative that each layer is made in sequential order. Cool the base completely before topping it with the middle layer. We recommend Ghirardelli Bittersweet Chocolate Baking Bar for the base and middle layers; our other recommended brand of chocolate, Callebaut Intense Dark L-60-40NV, may be used, but it will produce drier, slightly less sweet results. Our preferred brand of white chocolate is Guittard Choc-Au-Lait White Chips. For best results, chill the mixer bowl before whipping the heavy cream. The entire cake can be made through step 8 and refrigerated up to a day in advance; leave it out at room temperature for up to 45 minutes before releasing it from the cake pan and serving. For neater slices, use a cheese wire or dip your knife in hot water before cutting each slice.

Recipe: Cooks Illustrated. Instructional Video available here.


Breads · Desserts/Pastries

Nutella Swirled Banana Bread

Nutella Swirled Banana Bread

I’m Bananas…..

For Nutella.

Shocking— I know.

Nutella Swirled Banana Bread

So why not add Nutella to Banana Bread? Seemed like a Win-Nguyen Situation to me.

And it sure was 🙂

______________________________________

Nutella Swirled Banana Bread
Makes one 9-inch loaf

Ingredients:

2 cups unbleached all-purpose flour
3/4 cup sugar
3/4 teaspoon baking soda
1/2 teaspoon salt
3 very ripe, soft, darkly speckled large bananas, mashed well
1/4 cup plain yogurt
2 large eggs, beaten lightly
3/4 stick (6 tablespoons) unsalted butter, melted and cooled, plus more for the pan
1 teaspoon vanilla extract
6 tablespoons Nutella

Adjust an oven rack to the lower-middle position and heat the oven to 350°F (175°C) degrees. Butter the bottom and sides of a 9 by 5-inch loaf pan. Dust the pan with flour, tapping out the excess.

Whisk the flour, sugar, baking soda, and salt together in a large bowl. Mix the mashed bananas, yogurt, eggs, butter, and vanilla with a wooden spoon in a medium bowl. Lightly fold the banana mixture into the dry ingredients with a rubber spatula until just combined and the batter looks thick and chunky. Spoon 1/2 the batter into the prepared loaf pan. Spread 1/2 the Nutella on top and lightly swirl the Nutella into the batter with a butter knife. Do not over mix. Spoon the rest of the batter on top and repeat with Nutella swirls.

Bake until the loaf is golden brown and a toothpick inserted in the center comes out clean, about 60 minutes. Cool in the pan for 5 minutes, then transfer to a wire rack. Serve warm or at room temperature. (The bread can be wrapped with plastic wrap and stored at room temperature for up to 3 days.)

Slightly adapted from Cooks Illustrated

Desserts/Pastries

Reese’s Pieces-Peanut Butter Cookies

Reese’s Pieces-Peanut Butter Cookies

E.T. was the first movie that I have actual memories of watching.

And I’m not embarrassed to admit…..it scared the BEJESUS out of me. No joke.

Sure, to some, he may be a cute little extra-terrestrial that was just trying to phone home. But to a 4 year old, he was a scary little creature scampering about and hiding in stuff animals.

No bueno.

Reese’s Pieces-Peanut Butter Cookies

But you know what, that little guy had some great taste in candy—–Reese’s Pieces to be exact. Lately, my co-workers have fallen into some Reese’s Pieces kick so I took it upon myself to make last week’s “Smart Cookie Award” with these delish peanut butter candies.

By tweaking my favorite peanut butter cookie recipe (courtesy of Cooks Illustrated) with a hefty amount of Reese’s Pieces, my co-workers were super happy campers!

And although I can’t say for certain, I’m pretty darn sure, E.T. would approve. 🙂

__________________________________________

Reese’s Pieces-Peanut Butter Cookies
Adapted from Cooks Illustrated
Makes 2 dozen

Ingredients:

2½ Cups All-Purpose Flour
½ Teaspoon Baking Soda
½ Teaspoon Baking Powder
½ Teaspoon Salt
1 Cup Unsalted Butter, at room temperature
1 Cup Packed Brown Sugar
1 Cup Granulated Sugar
1 Cup Peanut Butter
2 Large Eggs, at room temperature
2 Teaspoons Vanilla Extract
1 Cup Reese’s Pieces Candy

Adjust oven rack to low center position; heat oven to 350 degrees. Sift flour, baking soda, baking powder, and salt in medium bowl.

In bowl of electric mixer or by hand, beat butter until creamy. Add sugars; beat until fluffy, about 3 minutes with electric mixer, stopping to scrape down bowl as necessary. Beat in peanut butter until fully incorporated, then eggs, one at a time, then vanilla. Gently stir dry ingredients into peanut butter mixture. Add candies and stir gently until just incorporated.

Working with 2 tablespoons dough at a time, roll into large balls, placing them 2 inches apart on a parchment-covered cookie sheet. Gently flatten each dough ball with the bottom of a glass. Bake until cookies are puffed and slightly brown along edges, but not top, 10 to 12 minutes (they will not look fully baked). Cool cookies on cookie sheet until set, about 4 minutes, then transfer to wire rack to cool completely. Cookies will keep, refrigerated in an airtight container, up to 7 days.

Desserts/Pastries · Ice Cream

Strawberry Ice Cream

Strawberry Ice Cream

Have I ever mentioned that I’m the youngest of 5?

Over the years, it’s really had its perks. Don’t let people tell you otherwise. 🙂

Sure, I’ve had my share of hand-me-downs. But by the time my parents got to me, they were way too worn out by my sibs…..so admittedly, I had it MUCH easier than them. My grandparents babied me and in fact, even my elder sibs were known to indulge me from time to time.

When I was in kindergarten, my sis P, would often meet me at my bus stop to walk me home. And on some occasions, she would make a pit stop at Dairy Queen on our way home to indulge me in some VERY special treats. I would fluctuate between ordering a Lime Mister Misty Float—a Peanut Buster Parfait-–or even a simple Dipped Cone. All of them were amazing delights!

Strawberry Ice Cream

So when I began making a Strawberry Ice Cream the other day (due to our excess of berries from Tanaka Farms), my sis P said the house smelled like Dairy Queen.

Quite the compliment, if I do say myself.

Sweet. Tangy. Fragrant.

Just how strawberries should smell.

And the end result tasted even better than it smelled. Creamy and packed FULL of berry flavor. Due to our super fresh berries, I even halved the amount of sugar in the recipe. But if you find that your berries are slightly lacking in punch—by all means, go the full amount.

In my opinion, iconic desserts like this should always evoke childhood memories. But I do wonder, did Dairy Queen put vodka in their ice creams too? 🙂

_____________________________________

Strawberry Ice Cream
From America’s Test Kitchen

Ingredients:

1 ½ Cups Heavy Cream
1 ¼ Cups Whole Milk
1 Cup Sugar
6 Whole Egg Yolks
1 Quart Strawberries, hulled and sliced
Pinch of Salt
1 Teaspoon Vanilla Extract
1 Teaspoon Lemon Juice
3 Tablespoons Vodka

Set a fine mesh strainer over a medium sized bowl and set the bowl over a large container of ice water. Heat the cream, milk, and ¼ cup sugar in a medium size sauce pan over medium heat stirring occasionally to dissolve the sugar, until steam appears and the liquid is hot (175 degrees) about 5 minutes.

When the milk mixture is hot, in a separate bowl, whisk the yolks and remaining ¼ cup of sugar together until smooth. Slowly whisk about 1 cup of the hot milk mixture (temper) into the yolks. Then slowly whisk the tempered yolk mixture back into the remaining hot milk mixture. Continue to cook the custard mixture over medium heat until it is very hot but not simmering (180-185 degrees).

Strain the custard mixture into the bowl set in the ice bath and let cool, stirring occasionally, for about 10 minutes. Remove the custard mixture from the ice bath, cover tightly with plastic wrap and refrigerate for about 3 hours.

Meanwhile, bring the strawberries, salt, and remaining sugar to a simmer in a medium sized saucepan over medium-high heat. Cook, smashing the berries slightly, until they have released their juices and are broken down, about 5 minutes. Transfer to a small bowl, cover with plastic wrap, and refrigerate until needed.

Strain the berry mixture through a fine mesh strainer. Stir the strained juices, vanilla, and lemon into the chilled custard mixture. Pour the mixture into the ice cream canister and churn following the manufacturers instructions until the mixture resembles soft served ice cream. Toss the strained strawberries with the vodka and add to the machine when there is about 2 minutes remaining before the churning is complete.

Transfer the ice cream to an airtight container and press plastic wrap against the surface. Cover the container and freeze the ice cream until it is firm—about 3 hours.

Breads · Pizzas · Pork

Sausage and Mushroom Pizza

Sausage and Mushroom Pizza

If you were to ask me, “What do you want on your pizza?”———–I will almost always say, Sausage and Mushrooms.

You just can’t go wrong with this delish combo.

I do, however, like to add a few special touches when I make my Sausage and Mushroom Pizzas. And those little extras comes in the form of roasted garlic and grape tomatoes. I try to squeeze in my veggies anyway I can.

Wait a second. Can I really consider garlic a “vegetable”?

Eh…… Sure, why not!? 🙂

Sausage and Mushroom Pizza

For this pizza, I tried out the dough from Cooks Illustrated. I’m happy to report that it came together really easily—especially since I used my KitchenAid Stand Mixer with the dough hook attachment for the kneading. The dough came out beautifully silky before baking and had a wonderful texture when it was done. I definitely recommend it!

Stay tuned for Friday’s post where I take a spin on one of my all time favorite desserts 🙂

______________________________________________

Sausage and Mushroom Pizza

Dough (From Cooks Illustrated):
½ cup warm water (for yeast)
2½ teaspoon instant yeast
1¼ cups water, at room temperature
2 tablespoons extra virgin olive oil
4 cups bread flour, plus more for dusting the work surface and hands
1½ teaspoon salt
olive oil for oiling the bowl
*Makes enough for 4 medium sized crusts

Toppings:
1 cup spicy Italian sausage, browned
1 cup Crimini mushrooms, sliced
1½ cups marinara sauce (more if you like it saucier)
1½ cups shredded mozzarella cheese
½ cup grape tomatoes, diced
¼ roasted garlic
¼ cup fresh Italian parsley, chopped
¼ cup yellow cornmeal
2 tablespoons olive oil

Prepare pizza dough. Measure the warm water into a 2-cup liquid measuring cup. Sprinkle in the yeast and let stand until the yeast dissolves and swells, about 5 minutes. Add room temperature water and oil and stir to combine. Combine the salt and half the flour in a deep bowl. Add the liquid ingredients and use a wooden spoon to combine. Add the remaining flour, stirring until a cohesive mass forms. Turn the dough onto a lightly floured work surface and knead until smooth and elastic, 7 to 8 minutes, using a little dusting flour as possible while kneading. Form the dough into a ball, put it in a deep oiled bowl, cover with plastic wrap and let rise until it doubles in size, about 2 hours.

Place pizza stone or large baking sheet in the middle rack and preheat oven to 400 degrees.

Lightly dust your surface area with flour. Divide the dough into quarters. Take one of the pieces and roll/toss/stretch the dough into your desired shape. Once the oven reaches its temperature, pull the baking stone/baking sheet out of the oven, and sprinkle cornmeal on the surface. Carefully slide the dough on top and bake for 5 to 10 minutes until the dough is lightly golden. Remove the crust from the oven and brush with olive oil over top. Spread the roasted garlic all over the crust. Cover the crust with an even layer of marinara sauce. Sprinkle the shredded mozzarella evenly over the dough, leaving a ½ -inch border around the perimeter. Top with the grape tomatoes, sausage, and mushrooms. Return the pizza back to the oven and bake for an additional 10-15 minutes until all the cheese has melted and pizza is golden brown. Sprinkle the pizza with Italian parsley and serve with additional parmesan cheese and red chili flakes.

Note: If you aren’t planning to use the extra dough right away, there are a few options for you. First, you can shape each piece and parbake them. Wrap them up tightly in plastic wrap and foil—then, throw into the freezer. Another option is to oil the inside of a Ziploc bag with cooking spray. Throw in one ball of dough per oiled bag and remove any excess air before sealing and place it in the freezer. Transfer it to the fridge the night before you want to use it. Then place it on the counter to get it to room temperature for 1-2 hours before you bake it.

Pork · Poultry · Seafood

Cook’s Illustrated Paella

Spanish Paella prepared in a Dutch Oven

I’ll tell ya…..the holidays were quite productive in our kitchen. From sweets to savories to old time classics and new Foodventures. What a whirlwind!

On one particular evening, we were able to check off another dish off my “must make” list—PAELLA! We turned to Cook’s Illustrated version of Paella since it didn’t require the traditional paella pan but used a heavy dutch oven instead. It was perfect because although I love the look of paella pans I don’t have the storage space to keep them.

We were all very happy with the end results of the dish. Especially because we achieved the coveted soccarat–the crunchy rice that forms at the bottom of the pan!

I did have two “uh-oh” moments that were completely my fault. First, we added much more seafood than the recipe called for. When it comes to seafood in my family—more is better. As a result of the extra seafood, we had so much excess liquid in the pot. We ended up having to spoon out some of the liquid because too much moisture equals no soccarat.

The second challenge we needed to problem solve was that I left the lid on during step 6. The lid trapped the steam into the pot and would have never allowed the lovely soccarat layer to form. Per my sister’s quick thinking, we took off the lid and returned the pot into the oven under the broiler setting. The paella was left under the broiler until it browned and then we switched it back to the stove (lid off!) to complete step 6. PHEW! Luckily it all worked! Lesson learned.

This Paella was just a Pot of Goodness. You’re going to want to make this one. For Reals. Like right now.

Just learn from my mistakes and read each step carefully 🙂

Cheers Friends!

_______________________________

Paella
From Cooking at Home with America’s Test Kitchen 2006

This paella recipe calls for making it in a Dutch oven (the Dutch oven should be 11 to 12 inches in diameter with at least a 6-quart capacity). With minor modifications, it can also be made in a paella pan. Cured Spanish chorizo is the sausage of choice for paella, but fresh chorizo or Portuguese linguiça is an acceptable substitute.

Soccarat, a layer of crusty browned rice that forms on the bottom of the pan, is a traditional part of paella. In our paella, soccarat does not develop because most of the cooking is done in the oven. We have provided instructions to develop soccarat in step 5; if you prefer, skip this step and go directly from step 4 to step 6.—the Editors of Cook’s Illustrated

Ingredients:

1 Pound Extra-Large Shrimp (21 to 25 per pound), peeled and deveined
Salt and Ground Black Pepper
Olive Oil
8 or 9 Medium Garlic Cloves, minced or pressed through a garlic press (2 generous tablespoons)
1 Pound Boneless Skinless Chicken Thighs, each thigh trimmed of excess fat and halved crosswise
1 Red Bell Pepper, stemmed, seeded, and cut pole to pole into 1/2-inch-wide strips
8 Ounces Spanish Chorizo, sliced 1/2 inch thick on the bias
1 Medium Onion, chopped fine (about 1 cup)
One 14.5 Ounce Can Diced Tomatoes, drained, minced, and drained again
2 Cups Valencia or Arborio Rice
3 Cups Low-Sodium Chicken Broth
1/3 Cup Dry White Wine
1/2 Teaspoon Saffron Threads, crumbled
1 Dried Bay Leaf
1 Dozen Mussels, scrubbed and debearded
1/2 Cup Frozen Peas, thawed
2 Tablespoons Chopped Fresh Parsley Leaves
1 Lemon, cut into wedges, for serving

1. Adjust an oven rack to the lower-middle position; heat the oven to 350°F (175°C). Toss the shrimp, 1/4 teaspoon salt, 1/4 teaspoon pepper, 1 tablespoon oil, and 1 teaspoon of the garlic in a medium bowl; cover with plastic wrap and refrigerate until needed. Season the chicken thighs with salt and pepper; set aside.

2. Heat 2 teaspoons oil in a large Dutch oven over medium-high heat until shimmering but not smoking. Add the pepper strips and cook, stirring occasionally, until the skin begins to blister and turn spotty black, 3 to 4 minutes. Transfer the pepper to a small plate and set aside.

3. Add 1 teaspoon oil to the now-empty Dutch oven; heat the oil until shimmering but not smoking. Add the chicken pieces in a single layer; cook, without moving the pieces, until browned, about 3 minutes. Turn the pieces and brown on the second side, about 3 minutes longer; transfer the chicken to a medium bowl. Reduce the heat to medium and add the chorizo to the pot; cook, stirring frequently, until deeply browned and the fat begins to render, 4 to 5 minutes. Transfer the chorizo to the bowl with the chicken and set aside.

4. Add enough oil to the fat in the Dutch oven to equal 2 tablespoons; heat over medium heat until shimmering but not smoking. Add the onion and cook, stirring frequently, until softened, about 3 minutes; stir in the remaining garlic and cook until fragrant, about 1 minute. Stir in the tomatoes; cook until the mixture begins to darken and thicken slightly, about 3 minutes. Stir in the rice and cook until the grains are well coated with the tomato mixture, 1 to 2 minutes. Stir in the chicken broth, wine, saffron, bay leaf, and 1/2 teaspoon salt. Return the chicken and chorizo to the pot, increase the heat to medium-high, and bring to a boil, uncovered, stirring occasionally. Cover the pot and transfer it to the oven; cook until the rice absorbs almost all of the liquid, about 15 minutes.

5. Remove the paella from the oven (close the oven door to retain heat). Uncover the paella; scatter the shrimp over the rice, insert the mussels hinged-side down into the rice (so they stand upright), arrange the bell pepper strips in a pinwheel pattern, and scatter the peas over the top. Cover and return to the oven; cook until the shrimp are opaque and the mussels have opened, 10 to 12 minutes.

6. Optional: If soccarat (see headnote) is desired, set the Dutch oven, uncovered, over medium-high heat for about 5 minutes, rotating the pot 180 degrees after about 2 minutes for even browning.

7. Let the paella stand, covered, about 5 minutes. Discard any mussels that have not opened and the bay leaf, if it can be easily removed. Sprinkle the paella with the parsley and serve, passing the lemon wedges separately.

Breads · Side Dish

Cheddar Cheese Drop Biscuits…REDEMPTION!

Cheddar Cheese Drop Biscuits

Man, oh man… You’re going to really want to make these. For real.

Some of you may recall a few months ago when I tried to make a knockoff of Red Lobster’s Cheddar Biscuits. They were good—but not great. And lucky for everyone, this gal was determined to find a better version. I was on a mission. And Hallelujah! I’ve found it!

Thanks to a little tweaking and edits to Cooks Illustrated Drop Biscuits, I am happy to share these little goodies with you all. Cheesy, flavorful and super easy to make. And since they’re “drop biscuits”, you don’t have to mess around with rolling out the dough.

I’m a happy camper! In fact, I’ve got to show you them again. Just indulge me, okay?

Cheddar Cheese Drop Biscuits

And of course, these would be fabulous for any upcoming holiday festivities. 🙂

______________________________________________

Cheddar Cheese Drop Biscuits
Adapted from Cooks Illustrated
Makes approximately 12 biscuits

Ingredients:

2 Cups Unbleached All-Purpose Flour
2 Teaspoons Baking Powder
½ Teaspoon Baking Soda
1 Teaspoon Sugar
¾ Teaspoon Table Salt
½ Tablespoon Garlic Powder, plus 1 teaspoon to be added to the 2 tbsp melted butter for brushing biscuits
1 Cup Cold Buttermilk
1 Cup Shredded Cheddar Cheese
2 Tablespoons Chopped Chives (or scallions)
8 Tablespoons Unsalted Butter, melted and cooled slightly, plus 2 tablespoons melted butter for brushing biscuits

Adjust oven rack to middle position and heat oven to 475 degrees. Whisk flour, baking powder, baking soda, sugar, garlic powder and salt in large bowl. Combine buttermilk and 8 tablespoons melted butter in medium bowl, stirring until butter forms small clumps.

Add buttermilk mixture to dry ingredients and stir with rubber spatula until just incorporated and batter pulls away from sides of bowl. Fold in cheese and chives. Using greased ¼ cup dry measure, scoop level amount of batter and drop onto parchment-lined rimmed baking sheet (biscuits should measure about 2¼  inches in diameter and 1¼ inches high). Repeat with remaining batter, spacing biscuits about 1½  inches apart. Bake until tops are golden brown and crisp, 12 to 14 minutes.

Brush biscuit tops with a mixture of the remaining 2 tablespoons melted butter & 1 teaspoon garlic powder. Transfer to wire rack and let cool 5 minutes before serving.

Desserts/Pastries

Big, Super-Nutty Peanut Butter Cookies

Growing up in Minnesota, I spent a lot of time with my paternal grandparents. Not only would they would watch over me while my folks were at work but they were my playmates since my elder siblings were way too cool to hang out with their baby sister 🙂

Sure, I admit it now; I was somewhat the quintessential baby sister feigning hurt feelings and tears when I was left out from my older siblings’ adventures. And what were the results? Comfort in the form of kind words from my grandparents followed by secret consolation treats like Fig Newtons and Andes Mint Candies—which I happily accepted. In fact, many foods have childhood memories directly associated to them.

One, for example, are Peanut Butter Cookies. They were my grandpa’s (who we called “Ôn”) favorite sweet treat that my sisters often baked for him. Sometimes they even let me make the traditional tracked prints on the top with a fork—a HUGE honor and joy for a 6 year old. To this day, I can’t eat a Peanut Butter Cookie without thinking about Ôn. And this particular recipe from Cooks Illustrated would have pleased him greatly. First discovered by my sister, this recipe has made its way as one of my favorite cookies to make. A tad laborious (like all Cooks Illustrated recipes!) but the end results are second to none and pack HUGE peanut butter flavors. Super buttery, great texture from the chopped nuts and crunchy peanut butter, slightly crisp on the outside, chewy on inside….yummy.

Delicious on its own and also as a vessel for ice cream sandwiches, I know any Peanut Butter fanatic will just L-O-V-E these.

This one’s dedicated to my gentle hearted, WWF wrestling-watching grandpa. We miss and love you, Ôn!

______________________________________________________________

Super-Nutty Peanut Butter Cookies
From Cooks Illustrated
Makes approximately 30 Large Cookies

Ingredients:

2½ Cups All-Purpose Flour
½ Teaspoon Baking Soda
½ Teaspoon Baking Powder
½ Teaspoon Salt
½ lb. Butter, salted
1 Cup Packed Dark Brown Sugar
1 Cup Ganulated Sugar
1 Cup Extra-Crunchy Peanut Butter
2 Large Eggs
2 Teaspoons Vanilla Extract
1 Cup Roasted Salted Peanuts (ground in food processor to resemble bread crumbs)

Adjust oven rack to low center position; heat oven to 350 degrees. Sift flour, baking soda, baking powder, and salt in medium bowl.

In bowl of electric mixer or by hand, beat butter until creamy. Add sugars; beat until fluffy, about 3 minutes with electric mixer, stopping to scrape down bowl as necessary. Beat in peanut butter until fully incorporated, then eggs, one at a time, then vanilla. Gently stir dry ingredients into peanut butter mixture. Add ground peanuts; stir gently until just incorporated.

Working with 2 tablespoons dough at a time, roll into large balls, placing them 2 inches apart on a parchment-covered cookie sheet. Press each dough ball with back of dinner fork dipped in cold water to make crisscross design. Bake until cookies are puffed and slightly brown along edges, but not top, 10 to 12 minutes (they will not look fully baked). Cool cookies on cookie sheet until set, about 4 minutes, then transfer to wire rack to cool completely. Cookies will keep, refrigerated in an airtight container, up to 7 days.