Breakfast/Brunch

I’ll Make You Red Velvet Banana Pancakes….

Red Velvet Banana Pancakes


Because it’s almost Valentine’s Day and because Jack Johnson is so darn dreamy, I’d like to give you all this yummy Valentine—

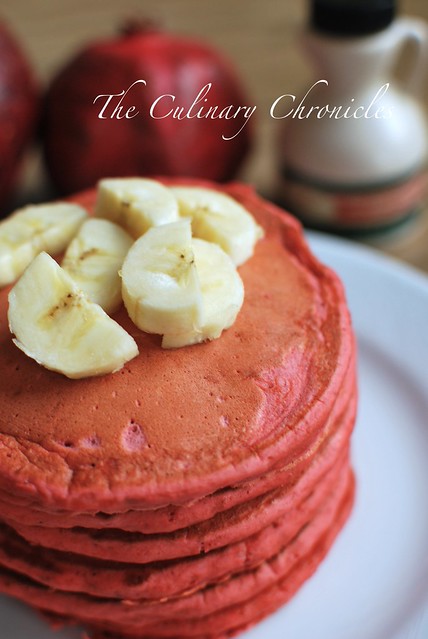
Red Velvet Banana Pancakes.


Red Velvet Banana Pancakes

I mean, c’mon now. Doesn’t this just scream L-O-V-E???? And the only thing that could possibly make this breakfast even better would be delish mimosas.

And maybe some Bacon. But that’s a whole different Valentine Story. 🙂

Red Velvet Banana Pancakes

HAPPY VALENTINE’S DAY!!!!!!

____________________________________________

Red Velvet Banana Pancakes
Makes approximately 16 pancakes

Ingredients:

2 Cups All-purpose Flour
1 Tablespoon Cocoa Powder
3 Tablespoons Granulated Sugar
2 Teaspoons Baking Powder
½ Teaspoon Baking Soda
½ Teaspoon Salt
2 Cups Buttermilk
1 Egg
3 Tablespoons Unsalted Butter, melted and cooled slightly
½ Tablespoon Red Food Color
2 Cups Sliced Bananas
Vegetable Oil
Maple Syrup

In a medium bowl, sift the flour, cocoa powder, sugar, baking powder, baking soda and salt together. In a separate bowl, whisk together the egg, buttermilk milk, melted butter, and food coloring. Add the dry ingredients to the wet and whisk gently just until combined.

Heat oil in a 12-inch nonstick skillet set over medium heat. Once the oil starts shimmering, use paper towels to wipe the pan so only a thin, even coating of oil covers the bottom and sides. Use a ÂĽ cup measure to portion the batter into the pan. Top each pancake with a layer of sliced bananas, gently pressing them into the batter. Cook on the first side until the edges are set and bubbles form on the surface, about 2 minutes. Use a spatula to flip the pancakes and cook for 1-2 minutes on the second side, or until golden brown and cooked through. Repeat with remaining batter, adding the rest of the oil to the pan if necessary. Serve pancakes with additional banana slices and maple syrup.

 Adapted from Cooks Illustrated

Desserts/Pastries

Red Velvet Cupcakes with White Chocolate Buttercream

Red Velvet Cupcakes with White Chocolate Buttercream

It’s hard to believe but it’s been over a year since I’ve made a batch of Red Velvet Cupcakes.

Crazy, eh?

But I think at some point, I had just overdosed on them.

Yes, My Friends…….I had too much of a good thing.

Red Velvet Cupcakes with White Chocolate Buttercream

But then the next thing I knew it, the holidays were smacking me upside the head. Everywhere you looked it was hues of blues, silvers….green, red. I just had to bring out my tried and true Red Velvet recipe to ring in the holiday cheer. The beautiful color is just so darn festive.

And let’s face it. It would be near “Grinch-like” if I didn’t.

Red Velvet Cupcakes with White Chocolate Buttercream

To add a little different flair to my Red Velvet Cuppies, I decided to swap out my favorite cream cheese frosting with a super decadent and sweet White Chocolate Buttercream. It was a nice change from the tangy cream cheese but if you don’t like sweet frostings or want to cut back a bit, you may want to stick with the classic.

But c’mon now—it’s the holidays! I won’t tell if you don’t 🙂

________________________________________________

Red Velvet Cupcakes with White Chocolate Buttercream
Makes approximately 18-20 Regular Sized Cupcakes

Ingredients:

Batter:
1ÂĽ Cups All Purpose Flour
½ Teaspoon Baking Soda
ÂĽ Teaspoon Salt
1½  Tablespoons High Quality Unsweetened Cocoa Powder
½ Cup Unsalted Butter, room temperature
1 Cup Granulated Sugar
2 Large Eggs, room temperature
½ Cup Sour Cream
½ Cup Milk
1 Teaspoon Vanilla Extract
2-3 Tablespoons Red Food Color, depending on desired intensity of color

White Chocolate Buttercream:
10 Ounces Unsalted Butter, room temperature
6 Ounces White Chocolate, melted and cooled
3-4 Cups Sifted Confectioner Sugar, varies due to preferred frosting consistency
1 Teaspoon Vanilla Extract
2-3 Tablespoons Milk, if needed

*Optional: White Chocolate Shavings to top the cupcakes.

Preheat the oven to 350°degrees and place paper liners in pans.

In a separate bowl, sift together the flour, cocoa powder, baking soda, and salt. Set aside.

In a standing mixer, beat butter and sugar until light and fluffy for about 3-4 minutes. Beat in eggs, one at a time. Add milk, sour cream, vanilla, and food color. Slowly incorporate dry ingredients until well blended.

Fill each lined cup 2/3 full. Bake for approximately 18-20 minutes, rotating halfway between baking time. Cupcakes are done when a toothpick inserted in the center comes clean. Cool completely in pans on top of a wire rack.

While cupcakes are baking, prepare the frosting. In an electric mixer fitted with the paddle attachment, cream together the vanilla and butter until fluffy.  Add the white chocolate and whip until combined. Gradually add in the confectioners’ sugar, a few tablespoons at a time. Continue adding sugar to desire consistency. Should the buttercream appear dry, whip in a tad of milk.

When cupcakes are thoroughly cooled, frost or pipe decorate swirls on top. Sprinkle with white chocolate shavings.

Happy Holidays!!

Desserts/Pastries

Red Velvet Cheesecake

Red Velvet Cheesecake


Red Velvet Cake/Cupcakes? Check!

Red Velvet Cookies? Check!

So it makes perfect sense that I test out some Red Velvet Cheesecake. 🙂

I took the lead from Southern Living but chose to top the cheesecake with fresh whipped cream as opposed to their additional top layer of cream cheese mixture. For some added fun, I also made them individual sized—no sharing required!

The recipe was easy to follow and did not require a water bath method when baking. However, I did choose to bake the crust for 6 minutes on 325 degrees to ensure crispiness. As for the “cake”, their method gave a nice creamy texture with a slight tangy flavor profile—-I’d assume from the addition of buttermilk.

I don’t think I’ll give up my favorite cheesecake (white chocolate-raspberry cheesecake) for this one but it’s definitely a fun twist. Plus–with Halloween around the corner, the “blood red” hue would be fantastic!

_____________________________________

Red Velvet Cheesecake
From Southern Living

Ingredients:

Crust:
1½ Cups Chocolate Graham Cracker Crumbs or Chocolate Wafters
¼ Cup Unsalted Butter, melted
1 Tablespoon Granulated Sugar

Filling:
24 Ounces Cream Cheese, softened
1½ Cups Granulated Sugar
4 Large Eggs, lightly beaten
3 Tablespoons Unsweetened Cocoa
1 Cup Sour Cream
½ Cup Buttermilk
2 Ounces Red Food Coloring

Fresh Whipped Cream:
1 Cup Heavy Cream, chilled
1 Tablespoon Granulated Sugar
1 Teaspoon Pure Vanilla Extra

Stir together graham cracker crumbs, melted butter, and 1 tablespoon granulated sugar; press mixture into bottom of a parchment paper lined pan. Bake crust for 6-7 minutes at 325 degrees. Cool completely.

Beat  cream cheese and 1½ cups granulated sugar at medium-low speed with an electric mixer. Add eggs and the rest of the listed ingredients, mixing on low speed just until fully combined. Pour batter into prepared crust.

Bake at 325° for 10 minutes; reduce heat to 300°, and bake for 1 hour and 15 minutes or until center is firm. Run knife along outer edge of cheesecake. Turn oven off. Let cheesecake stand in oven 30 minutes. Remove cheesecake from oven; cool in pan on a wire rack 30 minutes. Cover and chill 8 hours.

Prepare  whipped cream. In a stand mixer, whisk the heavy cream on high until it just holds stiff peaks. Slowly sprinkle in sugar. Add vanilla. Pipe the whipped cream on top of unmolded cheesecake.

ENJOY!

**Since I chose to make individual sized cheesecakes, I only needed to prepare half of the filling amount.


Red Velvet Cheesecake

Desserts/Pastries

Red Velvet Shortbread Cookies

Red Velvet Shortbread Cookies

One of my staff members L-O-V-E-S cupcakes…Red Velvet, in particular. And for the past two years, I have made her Red Velvet cuppies to celebrate her birthday. But this year had to be fabulous for “P” so I was on the hunt to take a different spin on the old favorite.

Inspired by the recent swarm of postings featuring Red Velvet Cake Pops, Red Velvet Cookies, and Red Velvet Ice Cream, I decided to try out Better Homes and Gardens’ “Red Velvet Shortbread Cookies”. I liked the idea of a small cookie that “P” could enjoy that wasn’t too sweet but paid homage to her beloved favorite cuppie.

The BHG recipe was pretty easy to make but I found that it wasn’t exactly accurate.

  • They said to use a 1½ inch round cutter but I found that it was too small–especially compared to the photo of the cookie that they displayed . A 2½ inch round cutter was much more accurate for the quoted 2 dozen cookies
  • 3 ounces of white chocolate is definitely not enough to dip the cookies in—double it!

The recipe I included below is directly from BHG. A few of my suggestions to enhance the recipe would be:

  • Use an additional 3 tablespoons of butter.
  • Up the granulated sugar to ½ cup.
  • Add 1 teaspoon of vanilla extract.
  • I like my red velvets REALLY red and used an additional ½ tablespoon of red food coloring

Overall, these cookies were pretty fun and “P” enjoyed them. I think with the listed modifications, they would be awesome! I also liked how the white chocolate was reminiscent of the cream cheese frosting found on traditional red velvet cupcakes. Will it replace the beloved Red Velvet Cuppie? Maybe not. But it does offer a fun alternative–and who couldn’t use a new makeover every once in awhile? 🙂


Red Velvet Shortbread Cookies

____________________________________________________

Red Velvet Shortbread Cookies
From Better Homes and Garden

Ingredients:

1ÂĽ Cups All-Purpose Flour
1/3 Cup Sugar
2 Tablespoons  Unsweetened Cocoa Powder
ÂĽ Teaspoon Salt
½ Cup Unsalted Butter, cut up
1 Tablespoon Red Food Coloring
3 Ounces White Chocolate, coarsely chopped
1½ Teaspoons Shortening
Finely Chopped Pistachios or Rainbow Nonpareils (optional)

Preheat oven to 325 degrees F. In a food processor, combine flour, sugar, cocoa powder, and salt. Cover and process with on/off turns until combined. Add butter and red food coloring. Process with on/off turns until mixture resembles fine crumbs. Process until mixture just forms a ball.*

On a lightly floured surface, knead dough lightly until nearly smooth. Roll or pat dough to a 1/2-inch thickness. Using a floured 1-1/2-inch round cutter, cut out dough. Place cutouts 1 inch apart on an ungreased cookie sheet. Press scraps together and reroll.

Bake in the preheated oven for 20 to 25 minutes or until centers are set. Transfer cookies to a wire rack; let cool.

In a heavy small saucepan, melt white chocolate and shortening over low heat, stirring constantly. Dip half of each cookie into melted chocolate. If desired, sprinkle with pistachios or nonpareils. Let stand on waxed paper until set. Makes about 24 cookies.

UPDATE: If the dough is too soft to roll out, chill it in the fridge for a 5-10 minutes. Also, if you taste them directly after baking, they will be really crumbly and almost flavorless. These shortbread cookies need to be “aged” a bit and will improve in flavor/texture the next day after they’re baked.

Desserts/Pastries

Red Velvet Cupcakes…Just in Time for the 4th of July!

Red Velvet Cupcakes with Cream Cheese Frosting


When the Cupcake Craze emerged, it resurrected the huge following of Red Velvet Cupcake goers. People just love them—and in fact, it’s my most requested cupcake.

There’s just something about that bright red color of the cake and mounds of frosting that really draw people in. I’m not sure if it’s more the flavor or the coloring that is the attraction—though I’m partial to the hue. Heck—I’m also the gal who can’t eat Mint Chip Ice Cream that isn’t the brightly colored green type! 🙂

Traditionally dyed with beet juice, Red Velvet Cake has come along way and is produced in variety of incarnations. Some prefer oil to butter, cake flour to all-purpose, buttermilk to regular milk, a ton of cocoa powder to a few spoonfuls……it can go on and on.  The particular version I gravitate towards uses a butter base in combination with sour cream. I find that this leaves the cake with a more rich and moist profile. I also love a deep intense color and tend to use more food coloring than others. This is also affected by the low amount of cocoa powder in this particular recipe. Whereas some prefer to use more cocoa powder, I am under the belief that it’s there just for a light flavoring.

These classic Red Velvet Cuppies have been a fav among my family and friends. Top them off with a few blueberries and they will be the perfect addition to any 4th of July Celebration!!!

Have a safe and HAPPY 4th of JULY!!!


_________________________________________________

Red Velvet Cupcakes
Makes approximately 18 Regular Sized Cupcakes

Ingredients:

Batter
1ÂĽ Cups All Purpose Flour
½ Teaspoon Baking Soda
ÂĽ Teaspoon Salt
1½  Tablespoons High Quality Unsweetened Cocoa Powder
½ Cup Unsalted Butter, room temperature
1 Cup Granulated Sugar
2 Large Eggs, room temperature
½ Cup Sour Cream
½ Cup Lowfat Milk
1 Teaspoon Vanilla Extract
2-3 Tablespoons Red Food Color, depending on desired intensity of color

Cream Cheese Frosting
8 Ounces of Cream Cheese, room temperature
4 Tablespoons Unsalted Butter, room temperature
2-3 Cups Confectioner Sugar, varies due to preferred frosting consistency
1 Teaspoon Vanilla Extract

Preheat the oven to 350°degrees and place paper liners in pans.

In a separate bowl, sift together the flour, cocoa powder, baking soda, and salt. Set aside.

In a standing mixer, beat butter and sugar until light and fluffy for about 3-4 minutes. Beat in eggs, one at a time. Add milk, sour cream, vanilla, and food color. Slowly incorporate dry ingredients until well blended.

Fill each lined cup 2/3 full. Bake for approximately 18-20 minutes, rotating halfway between baking time. Cupcakes are done when a toothpick inserted in the center comes clean. Cool completely in pans on top of a wire rack.

While cupcakes are baking, prepare the frosting. In an electric mixer fitted with the paddle attachment, cream together the cream cheese and butter until fluffy.  Add vanilla extract and gradually add in the confectioners’ sugar, a few tablespoons at a time. Continue adding sugar to desire consistency. Refrigerate for at least 10 minutes before use.

When cupcakes are thoroughly cooled either frost or pipe decorate swirls on top.

Enjoy!