Appetizers/Small Plates · Giveaways · Vegetables/Vegetarian

Sriracha Deviled Eggs + The Pioneer Woman Holiday Cookbook GIVEAWAY!

Sriracha Deviled Eggs

As my nephew, Lucasaurus, would say…..

Oh Yea! Oh Yea! Oh Yea!

The other week I came home to a package on my doorstep from the fabulous Ree Drummond (The Pioneer Woman). Within seconds I ripped it open to find a lovingly signed copy of her new cookbook – The Pioneer Woman Cooks: A Year of Holidays

Sriracha Deviled Eggs

Over a 100+ lip-smackingly delicious recipes that are just darn gorgeous. And perfect for any holiday from Valentine’s Day to Cinco de Mayo to Turkey Day and heck–even game day!

I was already drooling from the ravishing photos when I came across the page for Sriracha Deviled Eggs. Sriracha? Deviled Eggs? Football Finger Foods? YES, PLEASE!

And let me tell ya……they are darn good and so quick and easy to make! Ree describes them as “with a Spicy Asian kick“—just like me 🙂

Sriracha Deviled Eggs

In celebration of Ree’s new cookbook, I’m giving away (3) signed copies of it! Yup–you read correctly… THREE COPIES!

There are six (6) different ways to enter (increase those odds, Baby!) To Enter, please be sure to leave a separate comment for each indicating which of the below you did This Giveaway has ended- THANKS!

  1. Leave a comment sharing what is your favorite holiday dish to make;
  2. Subscribe to The Culinary Chronicles & get automatic emails when new posts are published (If you already Subscribe, leave a comment indicating so);
  3. Like our Facebook Fan Page (If you already “Like” us, leave a comment indicating so);
  4. Follow @CulinaryChron on Twitter (If you already Follow us, leave a comment indicating so);
  5. Follow our boards on Pinterest (If you already Follow us, leave a comment indicating so);
  6. Follow us on Instagram (If you already Follow us, leave a comment indicating so

The deadline to enter is Thursday, November 7th at 5pm (PST) This Giveaway has ended – THANKS! and the winners will be notified the next day. Good Luck!

Thanks so much to The Pioneer Woman for sponsoring this giveaway! And don’t worry Bella, I won’t give away our copy.

Bella

___________________________

Sriracha Deviled Eggs
Makes 24

Ingredients:

1 dozen hard-boiled eggs (peeled, sliced open, and yolks removed)
1/4 cup mayonnaise
3 tablespoons Sriracha
1 teaspoon rice vinegar
Salt and pepper to taste
Black sesame seeds, for garnish

Mix the yolks with the mayonnaise and Sriracha. Then add the rice vinegar, salt, and pepper. Mash it and mix it together until the mixture is smooth. It will be a little on the thin side. Spoon the filling into the egg halves. Then sprinkle a few black sesame seeds on top.

Note: I opted to use a piping bag with a decorative tip to fill the eggs and topped them with a sprinkle of paprika and some chives—but the eggs are just as delish as is.

Recipe from The Pioneer Woman Cooks: A Year of Holidays

Appetizers/Small Plates · Beef · Sunday Family Dinner

Papas Rellenas – Cuban Potato Balls

Papas Rellenas - Cuban Potato Balls

Not gonna lie….I could really use a Papas Rellena right now.

Or two, or three—okay….probably 4. Well, for now at least.

We made Papas Rellenas {Cuban Potato Balls} for our June Sunday Family Dinner as an homage to Porto’s Bakery. Papas Rellenas are incredibly addictive crispy, mashed potato balls that are stuffed with a savory meat filling. At Porto’s Bakery, they fill their Papas with ground beef, veggies, and spices.

Papas Rellenas - Cuban Potato Balls

I had stumbled upon a wonderful recipe for Papas Rellenas from Jonathan over at The Candid Appetite. If you haven’t seen his site, you must check it out. But be warned, whether you read it on a full stomach or not, his posts will leave you drooling!

As for the Papas, not only was his post incredibly informative but his step by step photos were gorgeous! I was so inspired that I had to try and take pics along the way as well. Clearly mine weren’t nearly as stunning but let’s just go with it.

On to the Papas!

After washing, cubing and boiling a ton of potatoes–smash them up to smithereens! Then, get started on the aromatics.

Papas Rellenas - Cuban Potato Balls

You’ll want the aromatics nice and fine. Throwing them into a food processor will definitely make life easier but if you’re a glutton for punishment, take a chefs knife and go at it!

After you pulse each item, you’ll want to drain it through a very fine sieve to get rid of any excess liquid. Sound crazy? Nope, it’s brilliant.

Papas Rellenas - Cuban Potato Balls

After everything is prepped, begin browning the beef in a large skillet. I drain the liquid from the beef before adding in the chopped onions and garlic. Once the onions become translucent, add the red and green peppers into the party.

Papas Rellenas - Cuban Potato Balls

Once the filling has been seasoned and cooked down, you’re ready to start assembling. Lucky for me, I enlisted the help of my niece, Nini, to join the Papas Rellenas Assembly Line. She also served as the hand model for the next series of photos.

Huh…what if this is the catalyst to her budding Hand Modeling career? Um, don’t tell my sister.

Papas Rellenas - Cuban Potato Balls

Back to the Papas……

To get uniformed potato balls, grab an ice cream scoop. Porto’s Bakery make their Papas Rellenas quite large but I opted for a smaller size for a 1-2 bite. Using the gadget of your choice, scoop out a dome of the cooled mashed potato mixture.

Papas Rellenas - Cuban Potato Balls

Using the palm of your hand, try to flatten it out into an even round—about 1/4 – 1/3 inch thick.

Papas Rellenas - Cuban Potato Balls

Place a heaping spoonful of the cooled filling in the center of the potato.

Now let me warn you, despite what every fiber in your body says–DON’T OVER STUFF them! If you do, they won’t seal properly and things will get down right wonky.

Willy Wonky!

Papas Rellenas - Cuban Potato Balls

Carefully fold the sides over the filling.

This is where you’ll kick yourself if you overfill it.

Papas Rellenas - Cuban Potato Balls

Then gently roll it into an even, smooth ball.

Papas Rellenas - Cuban Potato Balls

Once all the potato balls have been filled, start the 3-step process to bread them.

Flour. Egg Wash. Bread Crumbs.

Papas Rellenas - Cuban Potato Balls

After the Papas have chilled for several hours, it’s time for a 3-5 minute “soak” in an oil jacuzzi that’s been heated to 375 degrees F until they’ve become golden brown.

Bada-Bing! Bada-Boom!

That’s it!

On a random note (as if I wasn’t random enough), my other niece, Nina, took over hand modeling for the “completed” Papas pics. What can I say? I’m prepping the kids for the Hand Modeling Olympics.

Papas Rellenas - Cuban Potato Balls

These Papas Rellenas can be served at room temp with a sprinkle of freshly chopped cilantro & a few lime wedges. You can also serve them with a Mojo dipping sauce or by itself.

And the kicker? They can definitely made in advance and frozen so that you can fry them whenever you get a Cuban Hankering! So double the recipe! You’ll thank me…..or maybe you should thank Jonathan since it’s his recipe 🙂

Want to know how to make these golden delicious Papas Rellenas? Pop on over to here.

HAPPY FRIDAY, FRIENDS!

Appetizers/Small Plates · Pork · Sponsored

Crunchy Jalapeno-Bacon wrapped Avocado Fries

Crunchy Jalapeno-Bacon wrapped Avocado Fries

Remember when I made the Double Jalapeno-Bacon Cheeseburgers using Farmer John Jalapeno Bacon? The burgers were so baconlicious that plain ol’ fries just wouldn’t cut it.

Because once you decide to go big, you’ve got to go all in.

Crunchy Jalapeno-Bacon wrapped Avocado Fries

And in this case, going “all in” comes in the form of crunchy avocado “fries” that are wrapped with bacon. I know it sounds like a food stand at the summer fair but before you totally nix it, you’ve got to give them a try.

It’s the only Bacon thing to do, after all.

Crunchy Jalapeno-Bacon wrapped Avocado Fries

These “fries” have a great play on textures. Super crunchy from the panko breadcrumbs & crispy bacon balanced by the buttery avocado. Dunk them in a Roasted Poblano Aioli or a cool Cilantro Ranch Dressing and you have a perfect appetizer or side.

Have a Baconriffic Day!

__________________________________________

Crunchy Jalapeno-Bacon wrapped Avocado Fries
Serves 2

Ingredients:

1 large avocado
1 large egg
1 tablespoon water
1/2 cup flour
1/4 teaspoon cayenne pepper
kosher salt and pepper
1 cup Panko breadcrumbs
4 slices jalapeno bacon, cut in half
vegetable oil

Slice the avocado into 8 equal wedges. Place on a plate, cover with plastic wrap and freeze for 20 minutes.

In a shallow dish, whisk together the egg and water. Place the Panko breadcrumbs and flour into two separate shallow dishes. Season the flour with cayenne pepper, kosher salt and black pepper.

Once the avocados have chilled, take one wedge and dredge it into the flour. Gently shake off the excess flour before dipping it in the egg wash. Roll the avocado wedge in the Panko and gently shake off the excess. Set aside. Continue dredging the remaining avocados.

Take a 1/2 slice of bacon, wrap around each wedge of avocado using toothpicks to secure them together. Place back into the freezer for another 10 minutes.

Fill a heavy bottom pot with 2 inches of vegetable oil. Heat until the oil reaches 350 degrees F.

Fry the avocado fries for 4-5 minutes, turning them from time to time until they become golden brown. Remove the fries and drain them on a wire rack or plates lined with paper towels. Season with additional kosher salt immediately when they come out of the oil and carefully remove & discard the toothpicks. Serve warm with Roasted Poblano Aioli or condiments of your choice.

 **Disclosure: I did receive products from Farmer John, but as always, my opinions are my own.**

Appetizers/Small Plates · Pork · Sunday Family Dinner

Croquetas de Chorizo & Our Tapas themed Family Dinner

Croquetas de Chorizo

Truth be told, my sibs and I have had to handle our share of road bumps these past few years. Things way out of our control—which is a real pain for a family full of Type A personalities.

We’re cute–but Type A through and through.

May 2013 Sunday Family Dinner-Tapas

So we started our monthly Sunday Family Dinners.

It gave us an opportunity to spend the day shopping for groceries, catching up, venting to each other, sipping cocktails, teaching the kids kitchen tips, gorging on food and well–just spending quality time together.

May 2013 Sunday Family Dinner-Tapas

We began by just throwing together menus of dishes we liked to eat and now it’s morphed into different monthly themes covering cuisines around the world. We’ve thrown caution to the wind creating dishes we’ve never attempted before with just the shells of recipes and our kitchen instincts. Pretty extensive menus if I do say so myself.

May 2013 Sunday Family Dinner-Tapas

We’ve had a lot of memorable times through our Sunday Family Dinners from a full-on Cajun Seafood Boil in the backyard to a small kitchen fire from roasting our Porchetta to a Japanese Spread that would probably even make my favorite sushi chef, Tenchu, smile.

May 2013 Sunday Family Dinner-Tapas

And before we knew it, our 1 year anniversary of Fam-Din had arrived. Unfortunately our brother and his fam couldn’t fly back from NY but our sis P was able to make the trip down.

To celebrate one year of delicious eats and new foodventures, we put together a scrumptious Tapas Dinner.

May 2013 Sunday Family Dinner-Tapas

We started off with a few pitchers of my Red Wine Sangria that had steeped overnight. This liquid goodness is no joke, Friends. Sweet, fruity, and packs a punch!

Sangria

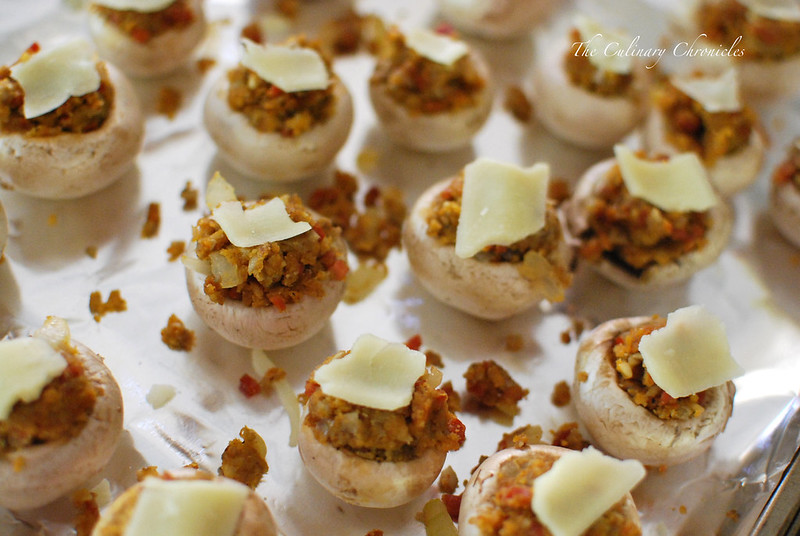
Next on the menu were Spanish Chorizo Stuffed Mushrooms.

Chorizo Stuffed Mushrooms

Spanish Chorizo gets its hue and rich flavor from the smoky Spanish paprika.

Chorizo Stuffed Mushrooms

Then came the Grilled Flank Steak drizzled with an herbaceous Salsa Verde.

Flank Steak with Salsa Verde

And then there were Baby Octopus seasoned with Spanish paprika, lemon zest, parsley and olive oil.

Baby Octopus with Paprika and Lemon

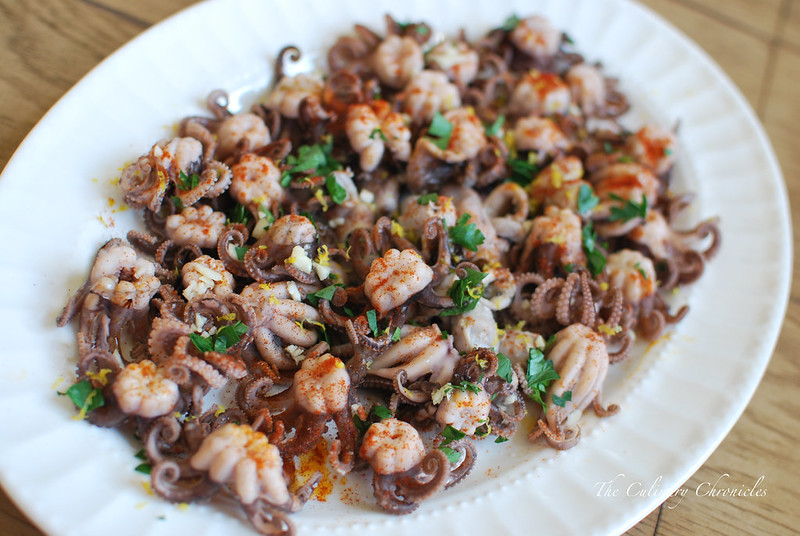
Did you know that when simmering octopus you should throw a wine cork in the pot to help tenderize it while still maintaining its toothsome texture? Supposedly it has something to do with the enzymes breaking down the octopus tissue.

Is it true? Um…not 100% sure but if European grandmas have been doing this for centuries–who am I to disagree?

Baby Octopus

Then we had the sleeper dish.

The dish we all underestimated and didn’t think much of until we took a bite– Saffron Clams. HOLY COW!

Of course big seester cooked the clams perfectly so that they were still wonderfully tender but it was the broth that was the kicker. Mind-blowingly fragrant and multi-layered from the saffron threads, white wine, lemon and herbs.

Total underdog and one of the MVPs of the night.

Saffron Clams

And what’s a Tapas dinner without Paella? This is a tried and true recipe we’ve done many times before but it’s just so-darn-wonderful!

Paella

And you know who prepared the Paella?

My 14 & 13 year old nieces– Nina and Nini!

Yup, I’ll wait while you scroll up and take another look at the Paella photo………..

Impressive, right?

May 2013 Sunday Family Dinner-Tapas

And because we all have quite a sweet tooth—other big seester made homemade Churros con Chocolate.

Crispy fried dough dunked into a rich chocolate sauce? YES, PLEASE!!!

Churros con Chocolate

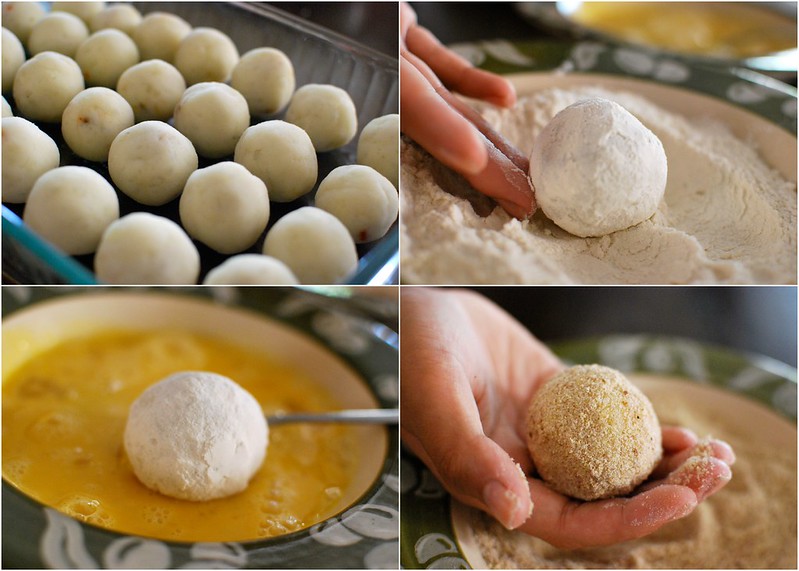
As for me, my other contribution to our dinner were crispy Croquetas de Chorizo –because I’m the family’s Potato Monster.

Croquetas de Chorizo

To make these Spanish themed croquettes, I start off by mashing up a few boiled Russet Potatoes.

May 2013 Sunday Family Dinner-Tapas

After adding some spices, herbs, and other goodies, I begin forming the little potato logs and stuff them with Spanish Chorizo and cheese. Depending on how you get your Spanish Chorizo, you can either cube it, slice them, or even mince them up.

Croquetas de Chorizo

After the croquetas have been formed, toss them in the refrigerator so that they can chill and firm up. This helps them keep their shape during the frying process.

Croquetas de Chorizo

Next, enlist your 8 year old niece (like Maya) to help you dredge the croquetas. After they’re well coated, fry them until golden brown.

Don’t worry, I fried them 🙂

May 2013 Sunday Family Dinner-Tapas

Once golden brown, serve them up with this floral and rich Saffron Aioli.

Saffron Aioli

Was our Tapas Dinner delicioso? Absolutely!

But the best thing about it (other than hanging out with the Fam while sipping Sangria) is that the kids played such a huge role in the preparation of our dinner. Although it’s bittersweet to see them grow up so quickly, we’re all so proud of them!

May 2013 Sunday Family Dinner-Tapas

Moral of the story? When life gives you lemons–cook every delicious thing in the world with your family.

I can’t wait for what the next year has to come.

Now if I could only convince one of my seesters to let me to dig a hole in their backyard to make an imu to roast a pig. Wouldn’t that be rad??

This Month’s Family Dinner Menu

Cocktails: Red Wine Sangria
Appetizers: Croquetas de Chorizo with Saffron Aioli
Tapas: Baby Octopus, Grilled Flank Steak with Salsa Verde, Spanish Chorizo Stuffed Mushrooms, Saffron Clams, Paella
Dessert: Churros con Chocolate

__________________________________________________

Croquetas de Chorizo
Makes approximately 16 croquetas

Ingredients:

3 medium sized Russett potatoes, peeled and cut into large chunks
3 eggs, divided
3 tablespoons olive oil
2 tablespoons finely minced Italian parsley
¼ teaspoon smoked paprika, divided
¾ teaspoon kosher salt, divided
¼ teaspoon white pepper
¼ teaspoon garlic powder
¼ teaspoon onion powder
8 ounces cured Spanish Chorizo, diced
4 ounces shaved Manchego or Parmesan cheese
vegetable oil
¼ teaspoon black pepper
1 cup flour
1 cup bread crumbs
chopped chives, to garnish

Add the potatoes to a large pot of water. Partially cover the pot and bring to a boil. Reduce heat to medium and cook for about 15 minutes or until the potatoes are tender. Carefully drain the pot and mash the potatoes (or put them through a ricer). Set aside to cool for 10 minutes.

Beat one egg together with the olive oil. Add the mixture to the mashed potatoes with the parsley, 1/8 teaspoon paprika, ½ teaspoon kosher salt, ¼ teaspoon white pepper, garlic powder, and onion powder. Mix until combined.

Take about a golf ball sized amount of the potato mixture into one hand. Flatten it out into your palm in an even, oblong shape that is about ¼ inch thick. Add a few pieces of the chorizo and cheese in the center. Mold the potato mixture into a log shape, folding the sides to enclose the filling. Place the croqueta on a large platter and repeat the process until all of the croquetas have been formed. Cover the platter with plastic wrap and refrigerate for an hour.

Fill a large, heavy bottom pot with 2 inches of vegetable oil. Heat until the oil reaches 350 degrees F.

In a shallow dish, whisk together the remaining two eggs. Place the breadcrumbs and flour into two separate shallow dishes. Season the flour with the remaining kosher salt, paprika and black pepper.

Take one croqueta and dredge it into the flour. Gently shake off the excess flour before dipping it in the egg wash. Roll the croqueta in the bread crumbs and gently shake off the excess. Set aside. Continue dredging the croquetas until you have enough to fit in the frying pot.

Fry the croquetas for 3-4 minutes, turning them from time to time until they become golden brown. Remove the croquetas and drain them on a rack or plates lined with paper towels. Optional: Once they come out of the fryer, sprinkle the croquetas with additional paprika. Continue the process until all of the croquetas have been fried. Garnish with a sprinkle of fresh chives and serve with the Saffron Aioli.

Appetizers/Small Plates · Pork · Seafood · Sunday Family Dinner

Pork & Shrimp Gyoza and Our Kid Chefs

Pork and Shrimp Gyoza

One of the neatest things about our family dinners is seeing how accomplished my neices have become in the kitchen. We got them involved quite young with baking, creating their own pizzas, and so forth—and I think that it’s really helped them become more at ease with cooking.

Fast forward to today where Nina (14 years old) and Nini (13 years old) have developed their own specialities in the kitchen. Nina can whip up a wonderful dressing and a to die for chocolate cake. Nini is a whiz at shucking oysters, cupcake decorating, and quite recently has become a dumpling-making pro.

Nini and Nina

With the endless things that had to be done at our last family dinner, I needed some help finishing the Gyozas. I showed Nini only once how to fold a Gyoza and the next thing I knew it, she had completed an entire tray of dumplings for me–and they were perfect!

Gyozas are the Japanese version of delish panfried dumplings. They can be filled with a variety of proteins and are wrapped with thin dumpling skins made from flour, salt, and boiling water. Here’s how I make them:

Start off by creating the filling. I like to do a Vietnamese-Japanese fusion and mix ground pork, roughly chopped shrimp, shiitake mushrooms, fish sauce, soy and a variety of other aromatics and spices. The shrimp adds a slight sweetness and great texture. Once the filling has been thoroughly mixed, it’s time to assemble the gyozas.

Pork and Shrimp Gyoza

Place one gyoza wrapper on a flat surface. Dip your finger in water and moisten the edge of the wrapper. Place 1 heaping teaspoon of the filling in the center. Be careful to not over stuff your dumplings or else the filling will burst from the seams.

Pork and Shrimp Gyoza

Pick up the gyoza and fold it in half.

Um…I really should have gotten a manicure before I took these pics.

Pork and Shrimp Gyoza

Start pleating the top layer of the gyoza wrapper. After each pleat, fold, and firmly press the edges together, ensuring that that the gyoza is well sealed.

Pork and Shrimp Gyoza

Place the gyoza on a baking sheet that has been sprinkled with either flour or cornstarch to prevent them from sticking. Cover the sheet with a dish towel while you finish making the rest of the gyozas.

Pork and Shrimp Gyoza

After the gyozas have been pan fried, serve them up with a soy-vinegar sauce or my preferred sauce– ponzu.

Pork and Shrimp Gyoza

These gyozas have a wonderful flavor and all of your loved ones will gobble them up. And if given the chance, get the kids involved and exposed to the cooking process. They’ll have a lot of fun and take pride that they are eating what they helped to make.

I wouldn’t be surprised if, like our aunties, we can retire from cooking duty soon so that the kiddos can take over. Now if we could only get them as excited to do the dishes.

One step at a time. 🙂

___________________________________________

Pork and Shrimp Gyozas
Makes approximately 40 dumplings

Ingredients:

¼ pound shrimp, shelled and devined
½ pound ground pork
1 heaping cup finely chopped cabbage
1 heaping cup finely chopped shiitake mushrooms
½ cup finely diced scallions
¼ cup diced shallots
1 tablespoon minced garlic
½ tablespoon finely grated ginger
1 tablespoon soy sauce
1½ tablespoon fish sauce
1 tablespoon sake
1 teaspoon toasted sesame oil, additional (for frying)
¼ teaspoon red pepper flakes
½ teaspoon black pepper
1 package gyoza wrappers (50 count)
vegetable oil (for frying)
water (for frying)
ponzu sauce, or your choice of dipping sauces
chives

Chop the shrimp into small pieces and add them to a large bowl. Add in the pork, cabbage, mushrooms, scallions, shallots, garlic, ginger, soy sauce, fish sauce, sake, sesame oil, red pepper flakes and black pepper. Using your cleans hands, mix the filling until thoroughly combined.

To make the gyozas, lay one gyoza wrapper on a flat surface. Dip your finger in water and moisten the edge of the wrapper. Place about 1 heaping teaspoon of the filling in the center. Pick up the gyoza and fold it in half. Pleat – fold – and press the edges together, ensuring that you seal the gyoza tightly. Place the gyoza on a baking sheet sprinkled with cornstarch or lined with parchment paper to avoid them sticking to the pan. Repeat until all of the filling has been used.

Heat a large frying pan to medium heat with vegetable oil. Place a layer of the gyozas in the pan. Fry the gyozas for 1-2 minutes until the bottoms are golden. Add about 3-4 tablespoons of water and immediately place the lid on the pan. Lower the heat to medium-low and allow the gyozas to steam until almost all of the water has evaporated.

Remove the lid, turn the heat back up to medium and lightly drizzle sesame oil around the inner edge of the pan. Continue cooking until remaining water has evaporated. Plate and garnish with chives or scallions. Serve immediately with ponzu sauce.

Appetizers/Small Plates · Poultry · Sponsored

Spicy Chicken Flautas – ¡Olé!

Spicy Chicken Flautas

I’m kind of a fanatic when it comes to Mexican food. And lucky for me, I live in San Diego where I can get lots of it!

There’s something wonderful about the cuisine that really strikes the perfect balance in each dish. Bright, rich….acidic, salty….spicy, sweet. And the condiments—oh, the condiments! So many options to accompany each bite.

Just perfecto!

Spicy Chicken Flautas

When I’m not ordering fish or al pastor tacos, I’m reaching for a plate of flautas–crispy rolled tacos.

Now here’s the million dollar question. Are they “flautas” or “taquitos”?

I’ve done some research on the matter (okay, I’ve just Googled it and have asked every restaurant I order them from) and there seems to be some mixed thoughts. One school of thought believes that when corn tortillas are involved they become taquitos and are called flautas when flour tortillas are used. Some say it depends on the size and others say it’s regional.

Spicy Chicken Flautas

So since I use flour tortillas, I’ll call mine flautas 🙂

And in my humble opinion, what makes a great flauta is not just a crispy exterior but also one that has a really flavorful filling. I start by roasting bone-in chicken breasts that have been seasoned with tons of spices. After shredding it, I combine it with sauteed aromatics, herbs, more spices and lots of cheese.

I’m a big fan of using Sargento’s Mexican Cheese as it contains a blend of Monterey Jack, Cheddar, Queso Quesadilla and Asadero cheeses. More types of cheese = more flavor.

Spicy Chicken Flautas

Of course, one shouldn’t enjoy flautas without fantastic sides. I serve mine with fresh pico de gallo, luscious guacamole and a dollop of sour cream to cool down the spices.

And with that Friends, you’ve got a meal with the perfect symphony of flavors! ¡Olé!

___________________________________________

Spicy Chicken Flautas
Serves 4

Ingredients:

2 chicken breasts, bone-in and skin on
2 tablespoons olive oil, divided
¾ tablespoon garlic salt, divided
¾ teaspoon ground cumin, divided
¾ teaspoon cayenne pepper, divided
1½ teaspoons onion powder
½ teaspoon black pepper, divided
1½teaspoons kosher salt, divided
1 cup diced white onion
1 jalapeno pepper, minced*
1 serrano pepper, minced*
1 tablespoon minced garlic
¼ cup chopped cilantro
2 scallions, chopped
1 tablespoon lime juice
1½ cups Sargento® shredded 4-Mexican Cheese, or cheeses of your choice
vegetable oil
12 small flour tortillas

Preheat oven to 350 degrees F.

Coat the chicken breasts with 1 tablespoon olive oil. Sprinkle the chicken with ¼ tablespoon garlic salt, ¼ teaspoon cumin, ¼ teaspoon cayenne pepper, 1 teaspoon onion powder, ¼ teaspoon black pepper, and 1 teaspoon kosher salt. Use your hands to rub each chicken breast to thoroughly distribute the oil and seasonings. Place the chicken on a rimmed baking sheet and roast for 40-45 minutes or until the thickest part of the breast reaches 165 degrees F. Once cooled, remove and discard the skin and bones. Shred the chicken into small pieces and place in a large bowl.

Heat a skillet to medium heat and add the remaining olive oil. Sauté the onions, jalapeno and serrano until the onions are just translucent. Add the garlic and sauté for an additional minute. Transfer the mixture to the bowl with the shredded chicken.

To the chicken, add the remaining garlic salt, ground cumin, cayenne pepper, black pepper, and kosher salt. Stir in the cilantro, scallions, lime juice and cheeses until combined.

Heat a heavy bottomed pot with 2 inches of vegetable oil to 375 degrees F.

Working in batches, place 2 heaping spoonfuls of the chicken mixture in the center of each tortilla. Tightly roll up each tortilla and use toothpicks to secure them closed. You may need to slightly heat the tortillas so that they become pliable to roll.

Fry the flautas for 2-3 minutes until they become golden brown. Transfer to a platter lined with paper towels to drain off the excess oil. Serve warm with pico de gallo, guacamole and sour cream.

*The amount of peppers can be adjusted depending on heat preference.

Appetizers/Small Plates · Condiments/Sauces · Seafood

Decadent Oysters with Asian inspired Mignonette

Decadent Oysters with Asian inspired Mignonette

I live for oysters.

So when I saw an instagram post by a friend who snapped pics of them topped with uni– I gasped! It was brilliant and I just had to make them for our Japanese themed Fam Din.

Decadent Oysters with Asian inspired Mignonette

Using the gorgeous oysters we nabbed from Dry Dock Fish Co., I put together a simple mignonette with Asian flavors that provided the right amount of acidity and heat to the briny shellfish. Topped with an unctuous piece of uni and dollop of tobiko,  these oysters brought decadence and indulgence to a whole new level!

A bit over the top?

Maybe.

Deliciously gluttonous?

Absolutely!

_________________________________________________

Decadent Oysters with Asian inspired Mignonette

Ingredients:

Mignonette:
¼ cup ponzu sauce
1 tablespoon minced shallots
½ teaspoon freshly cracked coriander
¼ teaspoon finely minced Thai chili pepper
½ teaspoon finely chopped chives

2 dozen oysters (cleaned, shucked, on ½ shell)
5 ounces fresh uni (sea urchin roe)
tobiko
chives, cut into 1 inch pieces

Prepare the mignonette by whisking together all the ingredients until combined.  Chill until ready for use.

Fill a large platter with ice. Lay the oysters on top of the ice and drizzle each with some of the mignonette. Lay pieces of uni on top of each oyster and top with a small dollop of tobiko. Garnish with the chives and serve immediately.

Appetizers/Small Plates · Salads · Seafood

Spicy Crab & Avocado Salad

Spicy Crab & Avocado Salad

More times than not, I’ve got a lot to say about everything. And when it comes to food– fuggedaboutit!

But then there are times when I take a bite of something and there are really just no words needed. Like with this Spicy Crab and Avocado Salad. MMMMMMM!!!!!!

Spicy Crab & Avocado Salad

TONS of sweet lump crab meat, paired with the creaminess of avocado, a slight crunch from the serranos and a kick of spice. Perfection!

Okay, okay. Maybe I do have a few words but trust me, one bite and you’ll know exactly what I mean.

By the way, in case you’re wondering–Why do I call this a “crab salad”? Well…the same reason why they call chicken salad, “chicken salad”. And yes, I may be trying to avert the question. 🙂

Laters!

____________________________________

Spicy Crab and Avocado Salad
Serves 2

Ingredients:

5 ounces cooked lump crab meat
1 scallion, diced
1 teaspoon finely minced serrano pepper
1 tablespoon mayonnaise
1 teaspoon hot sauce
½ tablespoon lime juice
¼ teaspoon Old Bay Seasonings
kosher salt and pepper to taste
1 large avocado, halved and seeded
garnish with chives and additional Old Bay Seasonings

In a bowl, gently combine the crab, scallion, serrano pepper, mayonnaise, hot sauce, lime juice and Old Bay Seasonings. Taste and season with additional salt and pepper. Refrigerate the crab mixture for 30 minutes.

Spoon half of the crab mixture into each of the avocado halves. Sprinkle with a dash of Old Bay Seasonings and top with chives. Enjoy!

Appetizers/Small Plates · Seafood

Ringing in Tết with Crispy Crab & Avocado Wontons

Crispy Crab & Avocado Wontons


Chúc Mừng Năm Mới!!

That’s right, dear friends! It’s Tết – the Lunar New Year!

I have to admit, I just barely finished scrubbing down my home yesterday. As I’ve shared before, one of the rituals leading up to Tết involves some serious housekeeping. And heck–I do whatever I can to ensure that my loved ones and I will have a lucky and prosperous new year. No bad ju-ju here!

Crispy Crab & Avocado Wontons

My clan won’t be gathering until next week but my mouth is already watering just thinking about all of the delicious traditional eats that are in my near future. Rice cakes, roasted pig, sticky rice…..yummers.

Since I’ll be getting my fill of all of the traditional Tết fixins’ next week, I thought I would whip up some quick, yet satisfying bites to pay homage to the Lunar New Year. These Crispy Crab & Avocado Wontons fit that bill! I figure that since dumplings are traditionally served during Chinese New Year to symbolize money, the same may go for these lovely wontons. After all, they are gold and look like little purses 🙂

The fried wontons are filled with lump crab and pairs beautifully with the creaminess from the avocados. The sriracha adds a slight kick and when dipped into the tamarind chili sauce–perfection!

Crispy Crab & Avocado Wontons

And with that dear friends, please allow me to wish you a very Happy, Healthy, Meaningful, Joyful, and Adventurous Year of the Snake!

_____________________________________

Crispy Crab & Avocado Wontons
Serves 4

Ingredients:

Wontons:
6 ounces cooked lump crab meat
½ tablespoon sriracha hot sauce
½ cup diced avocados
1 tablespoon minced chives
1 teaspoon fresh lime juice
kosher salt and pepper to taste
12 wonton skins
vegetable oil for frying

Tamarind Chili Sauce:

3 tablespoons tamarind juice concentrate
1½ tablespoons fish sauce
1 tablespoon warm water
½ tablespoon lime juice
1 tablespoon palm sugar
1 teaspoon minced garlic
1 red chili, minced finely

In a bowl, gently combine the crab, sriracha, avocados, chives and limejuice. Season with salt and pepper.

Take one wonton skin and brush the edge of each side with water. Place about 1 heaping tablespoon of the mixture in the center of the skin. Fold the ends of the wrapper together, pinching to seal. Fold the other ends together to make a little parcel. Use your fingers and pinch together all the seams to thoroughly seal. Repeat with the remaining wonton skins.

Heat the oil in a heavy bottom pot to 375 degrees F.

While the oil comes to temperature, prepare the Tamarind Chili Sauce. In a bowl, whisk together all the items and refrigerate for 10 minutes. Sauce can be stored in the refrigerator for up to one week.

Once the oil is ready, fry the wontons in batches for about 2 minutes until golden brown. Remove to a plate lined with paper towels to drain. Repeat until all wontons have been fried and serve with immediately with the Tamarind Chili Sauce.

Appetizers/Small Plates · Pork

The Ultimate Baked Potato Dip for Game Day!!

The Ultimate Baked Potato Dip

Man, oh man—I’m ready for some football!

And pizza….and hoagies…and dip…and nachos…and wings…and cocktails…and……..

Yea…I’m ready for a lot of goodness!!!

The Ultimate Baked Potato Dip

If you’re looking for some ehr-my-gawd deliciousness to whip up for Game Day, you’re going to LOVE this Ultimate Baked Potato Dip.

This crowd pleaser is jammed pack with your classic baked potato toppings and is just begging for a crunchy ‘tater chip to scoop it all up. And once your peeps take a bite, they will be so overcome by your awesomeness that they’ll be wearing jerseys with your name on it and cheering you on for days. True Story.

Need some more ideas for game day? Check out these goodies here

Laters, Taters!

________________________________________

The Ultimate Baked Potato Dip

Ingredients:

24 ounces sour cream
1 packet ranch dressing mix
½ teaspoon black pepper
½ teaspoon paprika
¼ teaspoon cayenne powder
1-2 tablespoons hot sauce
1 heaping cup chopped scallions
1½ cups shredded sharp cheddar cheese
½ cup shredded pepper jack cheese
1½ heaping cups chopped crispy bacon

In a large bowl, stir together the sour cream, ranch dressing mix, pepper, paprika, cayenne and hot sauce until combined. Fold in the scallions, cheeses, and bacon. Cover and refrigerate for a minimum of 4 hours.

15 minutes before serving, remove from the refrigerator and stir to take off some of the chill. Garnish with additional cheese, scallions and serve with your choice of chips. Enjoy!