Appetizers/Small Plates · Beef · Sunday Family Dinner

Papas Rellenas – Cuban Potato Balls

Papas Rellenas - Cuban Potato Balls

Not gonna lie….I could really use a Papas Rellena right now.

Or two, or three—okay….probably 4. Well, for now at least.

We made Papas Rellenas {Cuban Potato Balls} for our June Sunday Family Dinner as an homage to Porto’s Bakery. Papas Rellenas are incredibly addictive crispy, mashed potato balls that are stuffed with a savory meat filling. At Porto’s Bakery, they fill their Papas with ground beef, veggies, and spices.

Papas Rellenas - Cuban Potato Balls

I had stumbled upon a wonderful recipe for Papas Rellenas from Jonathan over at The Candid Appetite. If you haven’t seen his site, you must check it out. But be warned, whether you read it on a full stomach or not, his posts will leave you drooling!

As for the Papas, not only was his post incredibly informative but his step by step photos were gorgeous! I was so inspired that I had to try and take pics along the way as well. Clearly mine weren’t nearly as stunning but let’s just go with it.

On to the Papas!

After washing, cubing and boiling a ton of potatoes–smash them up to smithereens! Then, get started on the aromatics.

Papas Rellenas - Cuban Potato Balls

You’ll want the aromatics nice and fine. Throwing them into a food processor will definitely make life easier but if you’re a glutton for punishment, take a chefs knife and go at it!

After you pulse each item, you’ll want to drain it through a very fine sieve to get rid of any excess liquid. Sound crazy? Nope, it’s brilliant.

Papas Rellenas - Cuban Potato Balls

After everything is prepped, begin browning the beef in a large skillet. I drain the liquid from the beef before adding in the chopped onions and garlic. Once the onions become translucent, add the red and green peppers into the party.

Papas Rellenas - Cuban Potato Balls

Once the filling has been seasoned and cooked down, you’re ready to start assembling. Lucky for me, I enlisted the help of my niece, Nini, to join the Papas Rellenas Assembly Line. She also served as the hand model for the next series of photos.

Huh…what if this is the catalyst to her budding Hand Modeling career? Um, don’t tell my sister.

Papas Rellenas - Cuban Potato Balls

Back to the Papas……

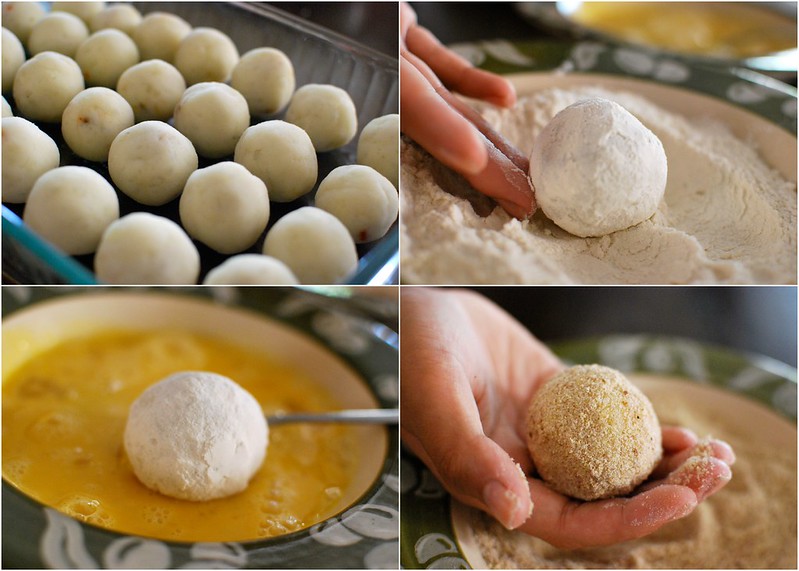
To get uniformed potato balls, grab an ice cream scoop. Porto’s Bakery make their Papas Rellenas quite large but I opted for a smaller size for a 1-2 bite. Using the gadget of your choice, scoop out a dome of the cooled mashed potato mixture.

Papas Rellenas - Cuban Potato Balls

Using the palm of your hand, try to flatten it out into an even round—about 1/4 – 1/3 inch thick.

Papas Rellenas - Cuban Potato Balls

Place a heaping spoonful of the cooled filling in the center of the potato.

Now let me warn you, despite what every fiber in your body says–DON’T OVER STUFF them! If you do, they won’t seal properly and things will get down right wonky.

Willy Wonky!

Papas Rellenas - Cuban Potato Balls

Carefully fold the sides over the filling.

This is where you’ll kick yourself if you overfill it.

Papas Rellenas - Cuban Potato Balls

Then gently roll it into an even, smooth ball.

Papas Rellenas - Cuban Potato Balls

Once all the potato balls have been filled, start the 3-step process to bread them.

Flour. Egg Wash. Bread Crumbs.

Papas Rellenas - Cuban Potato Balls

After the Papas have chilled for several hours, it’s time for a 3-5 minute “soak” in an oil jacuzzi that’s been heated to 375 degrees F until they’ve become golden brown.

Bada-Bing! Bada-Boom!

That’s it!

On a random note (as if I wasn’t random enough), my other niece, Nina, took over hand modeling for the “completed” Papas pics. What can I say? I’m prepping the kids for the Hand Modeling Olympics.

Papas Rellenas - Cuban Potato Balls

These Papas Rellenas can be served at room temp with a sprinkle of freshly chopped cilantro & a few lime wedges. You can also serve them with a Mojo dipping sauce or by itself.

And the kicker? They can definitely made in advance and frozen so that you can fry them whenever you get a Cuban Hankering! So double the recipe! You’ll thank me…..or maybe you should thank Jonathan since it’s his recipe 🙂

Want to know how to make these golden delicious Papas Rellenas? Pop on over to here.

HAPPY FRIDAY, FRIENDS!

Beef · Condiments/Sauces · Pork · Sponsored

Double Jalapeno-Bacon Cheeseburgers with Roasted Poblano Aioli

Double Jalapeno Bacon Cheeseburgers

Summer has been beating down my door lately with gorgeous sunny days and warm weather. And of course, what’s better to do in the summer than grilling up some delicious eats?

So when this glorious box of Farmer John Jalapeno Bacon showed up at the doorstep, it was a no brainer what had to be done.

Jalapeno Bacon

Burgers.

Ultimate, jalapeno bacon loaded burgers.

With a bit of heat.

Awwww yea….

Double Jalapeno Bacon Cheeseburgers

These decadent burgers are not only topped with a pile of crispy jalapeno bacon but there’s also chopped up bacon INSIDE the patty!!

Yea, I totally went there.

Poblano

And because burgers are the perfect canvas to go BIG, I dressed these bad boys up with spicy pepper cheese, crispy cornmeal onion strings, peppery arugula and a creamy roasted poblano aioli.

Double Jalapeno Bacon Cheeseburgers

These burgers not only have a ton of great textures, a balanced level of heat, but were ultimately bacon-licious! The jalapeno component to the bacon was not at all overpowering but rather mild. Perfect for folks who just want a tad of heat.

And if you think these burgers are bacon-riffic, just wait for my upcoming post on Jalapeño-Bacon wrapped Avocado Fries!

Have a fantastic weekend folks!!
________________________
Double Jalapeño-Bacon Cheeseburgers with Roasted Poblano Aioli
Serves 4

Ingredients:

1 large poblano pepper
½ tablespoon minced garlic
1 cup mayonnaise
½ tablespoon Dijon mustard
½ tablespoon fresh lemon juice
1 tablespoon finely chopped fresh cilantro
kosher salt
black pepper
1 pound ground beef (80/20 blend)
½ tablespoon garlic salt
½ tablespoon garlic powder
½ tablespoon onion powder
¼ teaspoon cayenne powder
1 tablespoon worcestershire sauce
1 pound cooked jalapeno bacon
vegetable oil
1 small yellow onion, thinly sliced into rings
½ cup flour
½ cup yellow corn meal
4 slices pepper jack cheese
1½ cups fresh arugula
4 burger buns, split and toasted

Prepare the aioli. On your stovetop range, char the poblano pepper on all sides. This can also be done under your oven broiler. Once charred, place in a bowl and cover with plastic wrap for 10 minutes. This will help the skin loosen from the pepper. Once cooled, peel the skin from the pepper and discard along with the stem and seeds. Finely chop up the pepper and transfer to a clean bowl. Whisk in the garlic, mayonnaise, mustard, lemon juice and cilantro. Season with kosher salt and pepper. Cover with plastic wrap and refrigerate for at least one hour.

In a large bowl, mix the ground beef, garlic salt, garlic powder, onion powder, cayenne and Worcestershire. Season generously with kosher salt and pepper. Take ½ of the bacon and roughly chop into small pieces. Add the bacon to the beef and mix until just combined. Form the meat into 4 patties and create a small indentation in the center of each patty. This is to help the patties from puffing up. Transfer them to a plate and refrigerate for about 30 minutes.

Prepare the onion strings. Fill a heavy bottomed pot with 2 inches of oil. Heat to 375 degrees F. In a bowl, whisk together the flour, cornmeal, ¼ teaspoon black pepper, and ½ teaspoon kosher salt. In batches, place the onions into the dry ingredients, tossing well to coat. Gently shake out the excess and carefully lower into the oil. Fry the onions for about 5-6 minutes, stirring every so often until golden brown. Drain the onions on a plate lined with paper towels and season immediately with additional salt. Repeat until all the onions have been fried. Transfer the onion strings to a large baking sheet. Keep warm in a 200 degree F oven while you grill the patties.

Remove the patties from the refrigerator and lightly brush them with vegetable oil. Light your grill (or preheat grill pan). Place the patties over medium heat and grill on each side for about 4-5 minutes. About 1-2 minutes before the second side is done, lay one slice of cheese over each patty. Cover the grill and cook until the cheese has melted. Remove the patties and tent with aluminum foil while you’re assembling the burgers.

On a toasted bun, place a small mound of the arugula and then lay a patty on top. Spread a few spoonfuls of the aioli on top of the patty before adding a few strips of the remaining bacon. Next, add a small pile of the crispy onion strings and then top off with the other side of the bun. Serve immediately.

 **Disclosure: I did receive products from Farmer John, but as always, my opinions are my own.**

Beef

On Tiny Giants, Mom’s Birthday, and Petite Filet Mignon….

sc012fd96501

Today is Mom’s 72nd Birthday–though she probably wouldn’t have been too happy with me that I shared her actually age. But let’s be honest, Mom always looked a decade younger than she really was.

Mom

I find that the older I get, the more nostalgic I become. Funny enough, I don’t seem to recall the characteristics about Mom that drove me nuts when I was a quasi-rebellious teenager. It’s the quirky things I tend to reminisce about her that make us all crack up.

Mom

Like how she used to have the coldest little feet (even in the summer!) and would always find the need to prop them on our bare legs to warm them up. BRRRR!

Or how she would schmooze with strangers and hustle for us when it was fundraising time. She sold over 100+ pies each year for my cheerleading fundraisers and would be top in BINGO sales for our high school. Yup, don’t even try to step up to her.

girls

Or how she would always call everyone người đẹp (beautiful) instead of using their names.

Mom would also constantly rearrange all the furniture in the house and reposition her incredible bonsai collection. Seriously, I would come home on the weekends from college and there would be a new configuration in the living room—EVERY time! One minute she would bring in a bonsai arrangement into a room and then next, she would have switched it out for a different one. When I used to ask her what she was doing, she would just laugh and say “I’m having fun.”

I guess she was “playing house” in her house.

71_20856415480_1709_n

And boy, did this woman love her steaks. I mean seriously love her steaks.

Without fail, for Mother’s Day or her birthday, we would be off to some restaurant to celebrate. Now granted, she would do the “mom” thing and say it didn’t matter where we would take her out (or even that we didn’t have to) but the moment we’d be seated at a restaurant, she’d always order a filet mignon or bone-in ribeye.

Petite Filet Mignon

So in honor of Mom’s birthday and her carnivorous love of steaks, I made this tender Petite Filet Mignon. After soaking up some great flavors for a few hours, I seared the filets on a screaming hot cast iron pan and finished it off in the oven.

Absolutely delicious and Mom would have loved it.

Petite Filet Mignon

Have you heard that wonderful saying that I am who I am today because I stand on the shoulders of Giants?

Well, it just so happens that one of my main Giants was a little 4’9” Vietnamese woman. Vivacious, tough, loyal, tenacious—and of course, steak-loving.

Happy Birthday, Mom. We all love and miss you.

542895_10151658797575481_1938271687_n

______________________________________

Petite Filet Mignon
Serves 2

Ingredients:

1 tablespoon minced garlic
10-12 sprigs fresh thyme
1 tablespoon minced chopped sage
½ teaspoon red chili flakes
kosher salt
fresh cracked black pepper
½ cup extra virgin olive oil
2 6-ounce petite filet mignon steaks
3 tablespoons unsalted butter
1 tablespoon vegetable oil
course sea salt (optional)

In a resealable plastic bag, add the garlic, herbs, chili flakes, 1/2 tablespoon kosher salt, 1 teaspoon black pepper and filets. Rub the marinade all over the filets. Squeeze out as much air as possible and then seal the bag. Refrigerate for at least 4 hours.

Place a cast iron skillet on the middle rack of the oven and preheat to 400 degrees F.

Remove the filets from the plastic bag and discard the marinade. Use paper towels to dry off some of the marinade and then liberally season the filets with additional black pepper. Allow the filets to sit out at room temperature for 15 minutes.

After the cast iron skillet has heated in the oven for 15-20 minutes, carefully remove the skillet and place on a burner over medium-high heat. Add the butter, oil and allow it to melt together before placing the filets in. Sear the filets for 2-3 minutes on each side. While the filets are searing, repeatedly spoon the butter/oil over the tops of the meat to baste. Once both sides have seared, transfer the skillet with the filets back into the oven.

Roast the filets at 400 degrees F for 7-8 minutes or until the internal temperature reaches 135 degrees F for medium-rare. Allow the filets to rest for 5-10 minutes and sprinkle the tops with sea salt to finish (optional). Serve warm.

Beef · Vietnamese

Bò Lúc Lắc Xà Lách Son (Vietnamese Shaking Beef over Watercress)

Bò Lúc Lắc Xà Lách Son (Vietnamese Shaking Beef over Watercress)

Bò Lúc Lắc was a staple in our house growing up. Mom would make it in several different variations depending on her mood—with tofu, mushrooms, fried potatoes, or over a bed of fresh and peppery watercress.

The three key components to Bò Lúc Lắc are simple and straightforward. First, you need a high-quality cut of beef for a deliciously tender Bò Lúc Lắc. Mom preferred Filet Mignon but ribeye can be substituted. Second, due to the quality of the beef, you have to stirfry the meat quickly and over high heat. And lastly, the Maggi. Completely unique in flavor, the Maggi Seasoning Sauce is referred to as xì dầu” (soy sauce) in Vietnamese–although completely different in flavor profile than your average soy sauce. In dire circumstances, you could substitute Maggi with light soy sauce. However I would highly recommend stocking up on a bottle if you ever plan on cooking Vietnamese cuisine. Trust me, it’s totally worth it.

Have a great week!

 __________________________________________________________

Bò Lúc Lắc Xà Lách Son (Vietnamese Shaking Beef over Watercress)

Ingredients:

1 Pound Filet Mignon or Ribeye Beef, cubed
1 Tablespoon Fresh Garlic, minced
1 Shallot, thinly sliced
1 Tablespoon Unsalted Butter
Maggi Seasoning Sauce
1 Bunch Fresh Watercress, washed and dried (about 3 cups)
2 Tablespoons Rice Wine Vinegar
Black Pepper
Vegetable Oil
Fried Shallots (optional)

In a large bowl, mix beef, garlic, sliced shallots, and 1 tablespoon oil. Season heavily with pepper.

Heat a large wok over medium-high heat. Add a tablespoon of oil to the pan and when it begins to slightly smoke, carefully toss in the beef. Quickly stir-fry for 2-3 minutes and remove from heat. Stir in the butter and add several dashes of Maggi to taste. In a separate bowl, quickly toss the watercress with the rice vinegar and plate. Pour the beef and the juices over the top of the watercress and season with additional black pepper. Optional: Sprinkle the top with the fried shallots.

Beef · Pastas/Noodles

Orecchiette Bolognese

Orecchiette Bolognese

Weekends are for slowly cooked meals.

Meals that emit utterly delicious aromas throughout your home for hours that once it’s finally finished cooking, you can barely wait to tear into it. And when you take that first bite, you just know that it was totally worth the wait.

This Bolognese fits that bill perfectly. Utterly rich, savory, and meaty.

I like serving this with Orecchiette because it’s the type of pasta that can hold up to such a hearty sauce and envelopes the meaty goodness. Yup…I said “meaty goodness” but you can use whichever type of pasta that tickles your fancy.

And although this Bolognese does take some time to make, it freezes beautifully. So make a double batch and store the extra in your freezer for a tummy warming, weekday dinner.

Now excuse me as I lick my computer screen 🙂

______________________________________________

Orecchiette Bolognese
Serves 6-8

Ingredients:

1 Pound Ground Beef
½ Pound Ground Veal
1 Cup White Onion, finely minced
1 Cup Celery, finely minced
1 Cup Carrots, finely minced
1 Tablespoon Fresh Garlic, finely minced
3 Tablespoons Olive Oil
½ Teaspoon Dried Red Chili Flakes (or less depending on your heat preference)
2 Dried Bay Leaves
1 Tablespoon Fresh Thyme Leaves
2 Tablespoon Tomato Paste
1 Cup Milk or Cream
1 Cup Dry Red Wine
1 28-Ounce Can Crushed Tomatoes
1 Pound Orecchiette Pasta, cooked al dente
Kosher Salt and Black Pepper to taste
2 Tablespoons Fresh Italian Parsley, chopped
2-3 Tablespoons Grated Parmesan Cheese

Heat olive oil in a large heavy pot. Add onions, carrots, celery, and garlic. Saute until softened but not browned. Add chili flakes and sauté for an additional minute. Add beef, veal, and ½ teaspoon of kosher salt. Use a wooden spoon to crumble the meat and break into small pieces.  Once the meat is no longer pink, add thyme and bay leaves. Add tomato paste and cook for an additional 2-3 minutes.

Add the milk and bring to a simmer. Continue simmering until all the milk has evaporated and only clear juices remain—about 10 minutes. Add the wine and bring to a simmer. Continue simmering until all the wine has evaporated—about 10 minutes.

Add tomatoes with its juices and bring to a boil, then place the heat at the lowest setting. Continue on this very low simmer for 2 – 2 ½ hours, stirring every 20 minutes until you get a rich, thick meaty sauce. Check for seasonings and add kosher salt and pepper accordingly.

Toss the cooked Orecchiette in the Bolognese sauce and serve topped with Parmesan cheese. Garnish with Italian parsley and Enjoy!

Beef · Vietnamese

Thịt Bò Nướng Lá Lốt (Vietnamese Grilled Beef Wrapped in Betel Leaves)

Thịt Bò Nướng Lá Lốt (Vietnamese Grilled Beef Wrapped in Betel Leaves)


Growing up, whenever my family celebrated a special occasion or holiday, we would head out to enjoy Bò 7 Món – 7 courses of beef. This may seem strange as Vietnamese cuisine isn’t really known for heavy amounts of beef but maybe that’s why this specialty is often saved for momentous occasions.

These days you can find many restaurants that offer Bò 7 Món, but in my family’s opinion, no one does it better than Pagolac Restaurant in Westminster, California.


Thịt Bò Nướng Lá Lốt (Vietnamese Grilled Beef Wrapped in Betel Leaves)

My family has been coming to Pagolac Restaurant for over 20 years. Most of the dishes you order, you cook yourself on table top grills or mini boiling pots of vinegar water. All proteins are meant to be wrapped in the rice paper sheets with assorted veggies then dipped in a very pungent and savory sauce called mắm nêm.

And although there are a standard set of items when eating  Bò 7 Món, my family typically orders à la carte as there are some of the dishes that just aren’t our fav. We always order the thinly sliced beef, shrimp, squid, meatballs with shrimp crackers—and my personal favorite, Thịt Bò Nướng Lá Lốt  or Grilled Beef Wrapped in Betel Leaves. I would always plead for my mom to order extra plates of it as the dish was amazing to me. Just the right mixture of spices in the beef and all enveloped in the fragrant betel leaves that tasted even better slightly charred from the grill.

Thịt Bò Nướng Lá Lốt (Vietnamese Grilled Beef Wrapped in Betel Leaves)

Betel leaves are used quite often in Việt Nam in food, medicine and also as a “chew” to produce a kind of stimulant.Though, the latter does cause some serious ICK counter effects over extended amounts of time such as black teeth.  Yikes! However, the leaves are quite fragrant and literally produces a trigger effect for my mouth to start watering when I smell it being grilled.  🙂

Thịt Bò Nướng Lá Lốt (Vietnamese Grilled Beef Wrapped in Betel Leaves)

Once wrapped and grilled up, Thịt Bò Nướng Lá Lốt can be enjoyed a number of ways…..with rice or vermicelli noodles and even as a đồ ăn nhậu (beer food). But my favorite is to wrap some in Rice Paper Sheets (bánh tráng) and throw in a few veggies such as the pickled cucumbers or carrots. Delicious balance in texture and taste!

Thịt Bò Nướng Lá Lốt (Vietnamese Grilled Beef Wrapped in Betel Leaves)

Truth be told, I can’t recall a time when Mom made Thịt Bò Nướng Lá Lốt at home but that doesn’t stop me from associating them with her.  Because when I think about this dish,  it makes me reflect on happy, celebratory times and images of Mom come flooding back to me as she stood over the table top grills at Pagolac Restaurant laughing and distributing all the sizzling items to our plates.

And when all is said and done, anything that can evoke those precious images while making my tummy happy is a  Nguyen-Win Situation. 🙂

_______________________________________________________________

Thịt Bò Nướng Lá Lốt (Vietnamese Grilled Beef Wrapped in Betel Leaves)
Serves approximately 4

Ingredients:

2-3 Dozen Betel Leaves, washed and thoroughly dried
½ Pound Ground Beef
2 Cloves Fresh Garlic, finely minced
1 Tablespoon Shallots, finely minced
1 Tablespoon Lemongrass, very finely minced (s bm)
1 Scallion, chopped
1½ Teaspoon Fish Sauce (nước mm), or more to taste
½ Teaspoon Curry Powder
1 Teaspoon Fresh Cracked Pepper
¼ Cup Green Onion infused Oil (hành mơ)*

Accouterments
1 Cup Slightly Pickled Carrots and Cucumbers**
¼ Cup Roasted Peanuts, crushed
1 Cup Dipping Sauce (nước chấm)***
Rice Paper Sheets (bánh tráng)

In a large bowl, combine the first 8 ingredients. Mix well and allow to sit for at least 20 minutes. While beef is marinating, prepare the accouterments:

Scallion Oil (hành m
ơ): In a sauté pan, slowly heat ¼ cup of canola oil. Add ½ cup chopped scallions. Cook the scallions on very low heat until they are wilted but still bright green. Approximately 2-3 minutes. Pull from heat and set aside.

Pickled Carrots and Cucumbers: Cut carrots and cucumbers into small matchsticks and place in a small bowl. Cover them with Rice Wine Vinegar and a pinch of Sugar.

Dipping Sauce (n
ước chấm): Combine ½ Cup Fish Sauce (nước mm), ½ Cup Sugar, ½ Cup Fresh Lime Juice, ¼ Cup Warm Water and stir until sugar is dissolved. Add 1 Teaspoon Chili Paste. Adjust amounts to desired to taste.

To assemble the rolls, take one betel leaf and place it shiny side down. Scoop out about ¾ tablespoon of the beef mixture and shape it towards the center of the leaf in a row. Slowly and tightly roll the leaf from tip to base. Once you get to the base, use a toothpick to prick a hole in the center of the roll and tuck the stem of the betel leaf in the hole to secure it. (Alternatively, you can use soaked toothpicks or skewers to hold the rolls together).

Cover a baking sheet with foil and brush it with the scallion oil (hành mơ). Place the rolls, seam side down, on the sheet and brush them with additional scallion oil (hành mơ).

If cooking with an oven: Turn broiler on high and place baking rack directly underneath it. Transfer baking sheet with rolls to the oven. Broil for 6-8 minutes, turning the rolls every 1½ minute to cook evenly and prevent burning.

If cooking on a grill: Place rolls in a wire mesh grilling basket. Grill rolls on each side for 1 minute.

Transfer rolls to a plate and brush with scallion oil (hành mơ) and sprinkle with crushed peanuts. Serve with nước chấm, pickled vegetables and moistened rice paper sheets.


**This is my submission to Delicious Vietnam #19 a monthly blogging event celebrating Vietnamese cuisine which was started by Anh of A Food Lover’s Journey and Hong & Kim of  Ravenous Couple. For more information, please visit Delicious Vietnam Thanks to  Sandy from ginger and scotch for hosting this month!**

Beef · Vegetables/Vegetarian

Ribeye Steak and Frites

Ribeye Steak & Frites


I love steaks—-I am, after all, my mother’s daughter.

But I don’t eat it very often and I sure as heck don’t make it enough. Which is really unfortunate because it’s so easy and makes your home smell delicious. In fact, it took longer to bake my frites than it did for me to prepare and sear my Ribeye Steak.

So next time, forgo the bougie steakhouses. You’ll save a few bucks and no one will look at you weird if you’re wearing your pajamas at the dinner table. 🙂

———————————————————–

Ribeye Steak and Frites
Serves 2

Ingredients:

2 Ribeye Steaks, approximately 1.5 inches thick and at room temperature
1 Cup Crimini Mushrooms, sliced
1 Large Russet Potato, peeled and cut into ¼ inch long strips
2 Tablespoons Fresh Garlic, minced finely
1 Tablespoon Shallots, diced
1 Tablespoon Fresh Thyme Leaves
¼ Cup Red Wine or Beef Stock
¼ Cup Heavy Cream
1 Tablespoon Unsalted Butter
1 Tablespoon Olive Oil
4 Tablespoons Vegetable Oil, divided
Kosher Salt and Fresh Cracked Pepper

Preheat oven to 425 degrees. In a large bowl, toss the potatoes with in 2 tablespoons of oil and garlic. Season with salt and pepper. Spread them in one even layer on a baking sheet and bake for 40-45 minutes. Stir every 10-15 minutes to ensure all sides are baked even.

While the frites are baking, rub the steaks with the remaining oil. Heavily season all sides with salt and pepper. Heat a cast iron pan to high heat. Add the steaks to the pan and sear each side for 2-3 minutes. You want to develop a golden brown crust. Move the pan to the oven and bake until the internal temperature reaches 130-135 degrees (medium rare) or 140-145 degrees (medium). Remove the steaks to a clean plate and tent with aluminum foil. Allow the steaks to rest for 5-10 minutes.

While the steaks are resting, melt the butter and olive oil in a skillet over medium heat. Saute the mushrooms and shallots until they are golden brown. Add thyme leaves, wine, and cream. Cook until the sauce reduces by half. Season with salt and pepper.

Plate the steaks with a few spoonfuls of the mushroom sauce and frites.


Beef · Vietnamese

Thịt Bò Xào Khoai Tây (Vietnamese Stir Fry Beef and Potatoes)

Thịt Bò Xào Khoai Tây (Vietnamese Stir Fry Beef and Potatoes)

Growing up, our normal dinners would include several family-style dishes to be eaten with rice (cơm). We always had some type of soup (canh), vegetable dish, and a protein dish. This is what standard Vietnamese meals were for us and were referred to as “ăn cơm” or “to eat rice”.

Of course there were dishes that my siblings and I all dreaded…..Canh mướp đắng (Bittermelon Soup) being one of them. But then there were some that were general favorites……Mực nhồi (Stuffed squid), Tôm lăn bột (Battered fried shrimp), and of course Thịt Bò Xào Khoai Tây (Stir Fry Beef and Potatoes). In fact, the latter was my personal favorite.

What I loved most about this dish was the “gravy” that it produced…..which is ironic because it’s the gravy-like sauces of many Chinese dishes that turn me off from that cuisine! But somehow, this beef gravy was liquid gold as a kid and when you mixed it up with your rice–delish! In fact, I would always request that my mom make sure that the dish had lots of “gravy”.

The key to making a killer Thịt Bò Xào is a high quality beef—ribeye or filet mignon was my mom’s personal choice. Since the meat needs to be cut so thin and cooked quickly at high heat, other cuts aren’t as successful. It may seem a tad pricey for a beef stir fry but when you take into account how many people this dish will feed, it’s well worth the extra few dollars. And when you bite into the meat, you’ll be pretty darn happy with the tenderness of it. As for the added bit of cornstarch and butter at the end (optional), it will assist in making the coveted gravy.

And when that gravy is soaked up into the potatoes—SOOO GOOD! It won’t be long before Thịt Bò Xào Khoai Tây is your favorite dish when you “ăn cơm”.

Tip: My local Vietnamese grocery store sells ribeye packages that are already thinly sliced. But if your store doesn’t or you can’t convince your butcher to slice it for you, pop your beef into the freezer for a few minutes before you start slicing it. Slightly chilled meat is a lot easier to make thin slices out of—just be sure to use a super sharp knife.

——————————————————————————————–

Thịt Bò Xào Khoai Tây (Vietnamese Stir Fry Beef and Potatoes)
Serves approximately 6-8

Ingredients:

1 Pound Thinly Sliced Ribeye Beef
1 Small Yellow Onion, quartered
1 Large Tomato, sliced into wedges
1½ Cups Mushrooms, roughly chopped
1 Tablespoon Fresh Garlic, finely minced
1½  Teaspoons Cornstarch
3 Tablespoons Vegetable Oil, plus additional to fry potatoes
2-3 Tablespoons Maggi or Soy Sauce
Fresh Cracked Pepper
2 Large Russet Potato, peeled and cut into ¼ inch wide strips
1 Tablespoon Unsalted Butter, optional

In a bowl, mix together beef, garlic, cornstarch, and 1 tablespoon of vegetable oil. Season with freshly cracked pepper and set aside.

Heat 2 inches of oil in a heavy pot until it reaches 375 degrees. Carefully add a handful of the potatoes into the pot stirring occasionally, until they are golden brown–about 7 to 8 minutes. Drain the potatoes on paper towels and keep warm on a baking sheet in a 200 degree oven while frying remaining batches.  *If you prefer to bake your potatoes, toss the potatoes strips in 2 tablespoons of vegetable oil. Spread them in one even layer on a baking sheet and place in a 450 degree oven for 40-45 minutes. Stir every 10-15 minutes to ensure all sides are baked even.

Heat 2 tablespoons of vegetable oil in a large wok over medium heat. Add onions and mushrooms and cook until both have softened but not browned, approximately 4-5 minutes. Add tomatoes and cook for an additional 2 minutes. Push the items to the side of your wok (or remove to a plate if your wok is not large enough) and add the beef. Quickly stir fry the beef for 1-2 minutes or until lightly brown—this should not take a long time since the beef is so thin.  Stir in the onion/tomato/mushroom mixture and combine well. Add the butter (optional) and remove from heat. Stir in Maggi  (to taste) and additional cracked black pepper.

To serve, place potatoes in a layer on a plate. Pour beef stir fry over the top and garnish with additional cilantro.

Beef

Shepherd’s Pie (Cottage Pie)

Shepherd's Pie

Who doesn’t love comfort food? Especially during these chilly months when all you want is some good “stick to your ribs” kind of goodness. After all, we have all of spring to eat light!

Shepherd’s Pie fits the bill perfectly. You can essentially put anything and everything in it. And, if you assemble it on a lazy Sunday, you can have a filling and yummy dinner later on in the week!

I threw this little number together by digging around in the kitchen. With a few leftovers, frozen veggies, and a couple pantry staples, this Shepherd’s Pie was ready to fill the tummies of our little munchkins in no time!
Shepherd's Pie


Note: Eeek! I stand corrected! After posting this, I was reminded that if made with beef, this is actually called “Cottage Pie”. Shepherd’s Pies are traditionally made with lamb. I jokingly said that if made with turkey, it’s called “Thanksgiving Pie”. 🙂

_________________________

Shepherd’s Pie
Serves Approximately 6-8

Ingredients:

1 Pound Lean Ground Beef (or substitute with Ground Turkey)
½ Cup Yellow Onions, diced
½ Cup Celery, diced
1 Tablespoon Garlic, minced
1 Teaspoon Fresh Thyme
2 Tablespoons Worcestershire Sauce
1 Tablespoon Vegetable Oil
1½ Cups Frozen Vegetables (Peas, Corn, Carrots, etc.)
1½ Cups Beef Gravy
3 Cups Mashed Potatoes
3 Tablespoons Parmesan Cheese, finely grated
Salt and Pepper to taste

Preheat oven to 375 degrees.

In a large skillet, heat oil. Add onions, celery, and garlic and cook until they are translucent but not browned—approximately 5-6 minutes. Remove to a clean dish. In the same skillet, add the ground beef and cook until browned. Using a large spoon, discard any excess fat/grease. Add the onions, celery, and garlic mixture back to skillet and stir well. Add the worcestershire sauce, thyme and cook for an additional minute. Add frozen vegetables and gravy and cook for an additional 2-3 minutes. Season with salt and pepper.

Cover a large casserole dish with cooking spray. Pour the ground beef/vegetable mixture into the dish and spread evenly. Spoon the mashed potatoes on top and carefully spread to create an even layer. Sprinkle parmesan cheese all over the top and place the dish in the preheated oven. Bake for 25-30 minutes. Turn the oven broiler on and brown the top of the Shepherd’s Pie until it turns an even golden brown color.

Remove from the oven and allow to set for 5-10 minutes before serving. Enjoy!


Beef · Pastas/Noodles

Short Rib Ragu with Pappardelle

Short Rib Ragu with Pappardelle

The kitchen is a perfectly acceptable place for Do-Overs. You know, a chance to go back and remake/retry a dish.

When I first made Bobby Flay’s Short Rib Ragu with Pappardelle, I was quite happy with the results. It was hearty and savory–comforting for the chillier months. There were, however, a few things that I wanted to change the next time I made it. And it was because of this that I called a “Do-Over“!

A few things that I did that I truly believe are a MUST include:

  • Constant skimming of the fat and oil
  • Addition of Red Chili Flakes
  • Shredding of the cooked meat to remove extra fat & gristle
  • Substituting Beef Broth for the Port

This recipe is not difficult to make but it does take time—especially with the extra steps I added (and trust me, those added steps were worth it). But once it’s in the oven for those 3+ hours, your house will be filled with such a lovely aroma that it’ll make you forget how much time you spent browning the ribs and chopping all of the mirepoix. 🙂

And on a random note, does any one else experience challenges when trying to snap photos in poor lighting, when you don’t want to use a flash, and when you need to do it quickly so that the food doesn’t become stone cold? My last few photos have suffered such issues and I debated on even posting the photos. But alas, photos are a better illustration than my words alone so they were included–overly yellow/orange cast and all.  Oh the trials of being a novice photographer…. 🙂

______________________________________________

Short Rib Ragu with Pappardelle
Adapted from Bobby Flay
2 Tablespoons Vegetable Oil
4 Pounds Short Ribs, each about 2-inches long, cut flanken style, across the ribs
Salt and freshly Ground Pepper
2 Dried Bay Leaf
2 Sprigs Fresh Rosemary
5 Sprigs Fresh Thyme
2 Sprigs Fresh Flat-Leaf Parsley
4 Small Carrots, diced
2 Stalks Celery, diced
1 Medium Onion, diced
2 Medium Shallots, diced
½ Teaspoon Red Chili Flake
1 Tablespoon All-Purpose Flour
2 Tablespoons Tomato Paste
2 Cups Red Wine
½ Head Garlic, cloves separated and peeled
4 Cups Homemade Beef Stock
1 Pound Pappardelle
Chopped Parsley
Grated Pecorino Romano, for garnish


Heat oven to 325 degrees F.

Place a 5-quart casserole or Dutch oven over medium heat. Add oil, and heat until it is almost smoking. Season short ribs generously with salt and pepper. Working in batches if necessary, add short ribs to the hot oil. Cook ribs until browned on both sides. Remove ribs from casserole, and transfer to a large bowl. Set aside.

Meanwhile, prepare bouquet garni: Place bay leaves, rosemary, thyme, and parsley in the center of a square of cheesecloth. Bring edges together, and tie with kitchen string. Set bouquet garni aside.

Add carrots, celery, onion, and shallots to oil in the casserole, and cook over medium heat, stirring occasionally, until vegetables are softened and golden, about 10 minutes. Add chili flakes and cook for an additional 2 minutes. Add flour and tomato paste to the casserole, and stir to combine. Add ½ cup beef broth; stir with wooden spoon until all browned bits have been scraped from the pan and the bottom of the casserole is clean. Add red wine, and simmer until the liquid is reduced by half. Skim off any grease and discard. Add garlic, remaining beef stock, and the reserved bouquet garni.

Return browned ribs to the casserole. Bring the liquid to a simmer over medium-high heat. Skim off any grease and discard. Cover the casserole, and place it in the oven. Cook until ribs are very tender, about 3 hours.

Remove the cooked ribs from the casserole. Set the casserole on the stove top over medium heat, and simmer to thicken sauce just slightly. As soon as the short ribs are cool enough to handle, remove the meat from the bones, and shred into small pieces. Degrease the sauce and discard the bouquet garni. Return shredded meat to casserole, and simmer to reduce sauce by about half. Check seasonings and add salt/pepper if necessary.

Fill a large pot with water and add a few tablespoons of salt. Set over high heat, and bring to a boil. Salt well, and stir in pasta. Cook until pasta is al dente. Drain pasta, and serve with short-rib ragu, sprinkle with the parsley. Serve with freshly grated Percorino Romano .