
A few years ago, my office did a staff teambuilding retreat at Emile’s Restaurant in downtown San Jose. The Chef guided us through the process of creating a three-course meal from start to finish. It was quite fun to work in a professional kitchen that had all the bells and whistles but what I remembered the most was the Gnocchi. Soft, pillows of potato dumplings…..who knew it was so easy?
Yet here I am, years later, and I have still yet to create Gnocchi at home. I blame it on two things really—Laziness and Trader Joe’s. Why make it at home when their frozen Gnocchi Al Gorgonzola is so yummy and quick?
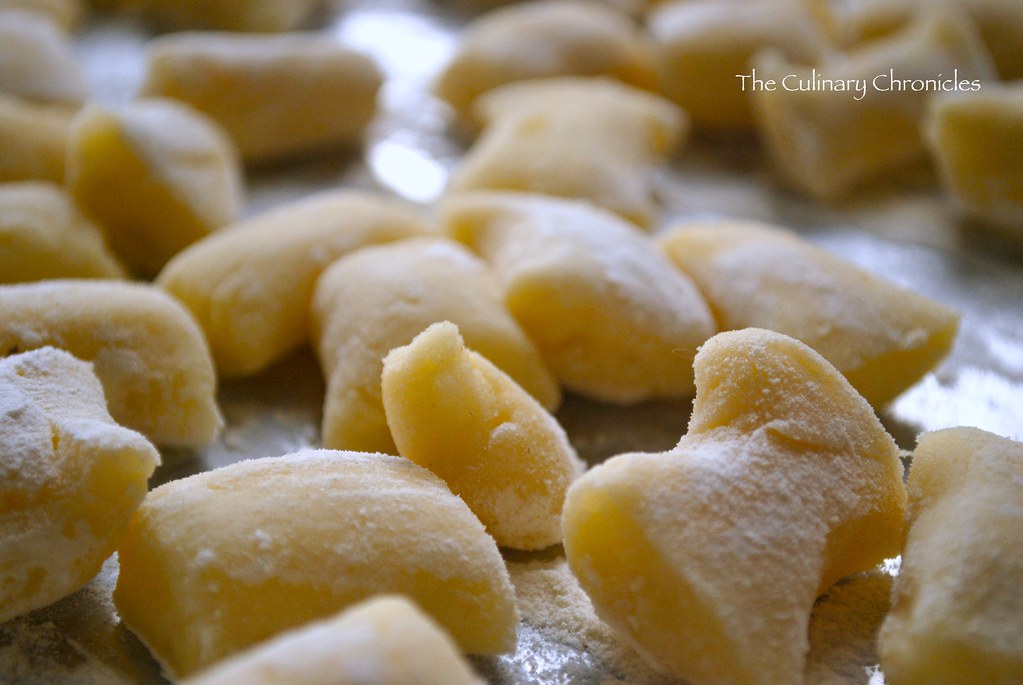
 As luck would have it, I have had some time on my hands and thought this would be a great opportunity to give them a try. Many recipes for Gnocchi have you boil the potatoes but the Chef insisted that baking them yielded better results—less liquid and fluffier product. He also suggested breaking down the potatoes while they were still hot—though that is a tad easier said than done. Speaking of breaking down the potatoes, it’s best to peel them after they’re baked and run them through a potato ricer. If you don’t have a ricer, you can also use a potato masher —being thorough to remove all the lumps. However, I found that cutting the potatoes in half (skin on) and using a fork to scrape the meat out works quite well, too. And although the recipe I list below isn’t what we used years ago, it’s still just as easy and delicious. The quick mushroom sauce was a great earthy pairing for the gnocchi—simple and to the point. Since I didn’t have a gnocchi paddle (and wasn’t too successful using the tines of a fork), I went “rustic” and made straight cuts.
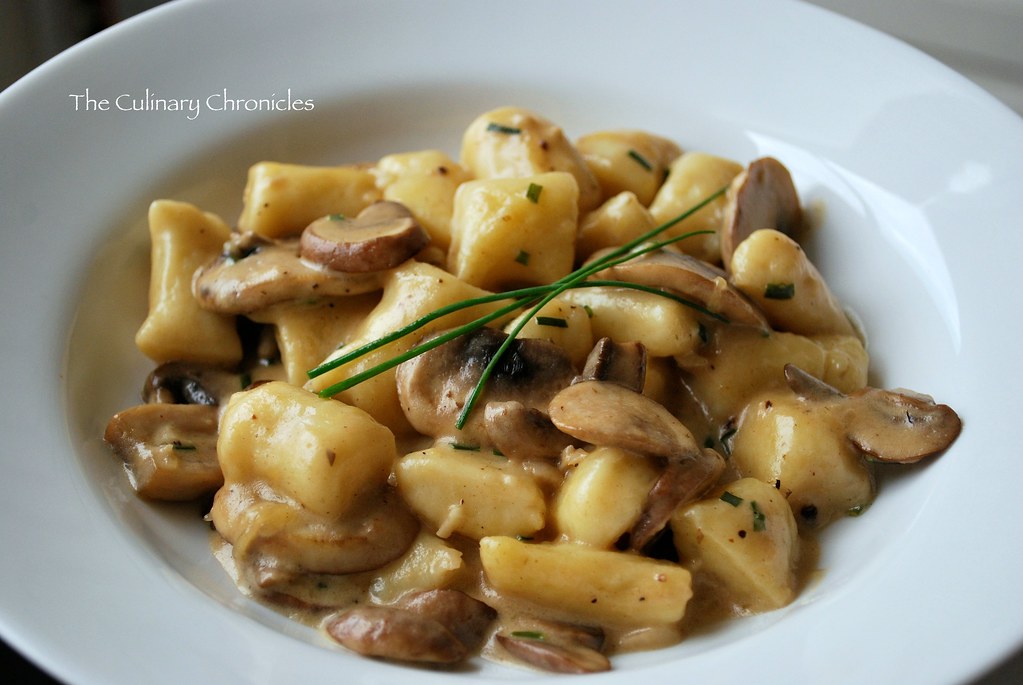
YUM. Potato Pillows….seriously.
I guess I’ll be taking a break from T.J.’s Gnocchi. 🙂
_________________________________________________
Fresh Gnocchi with Mushroom Cream Sauce
Serves 4
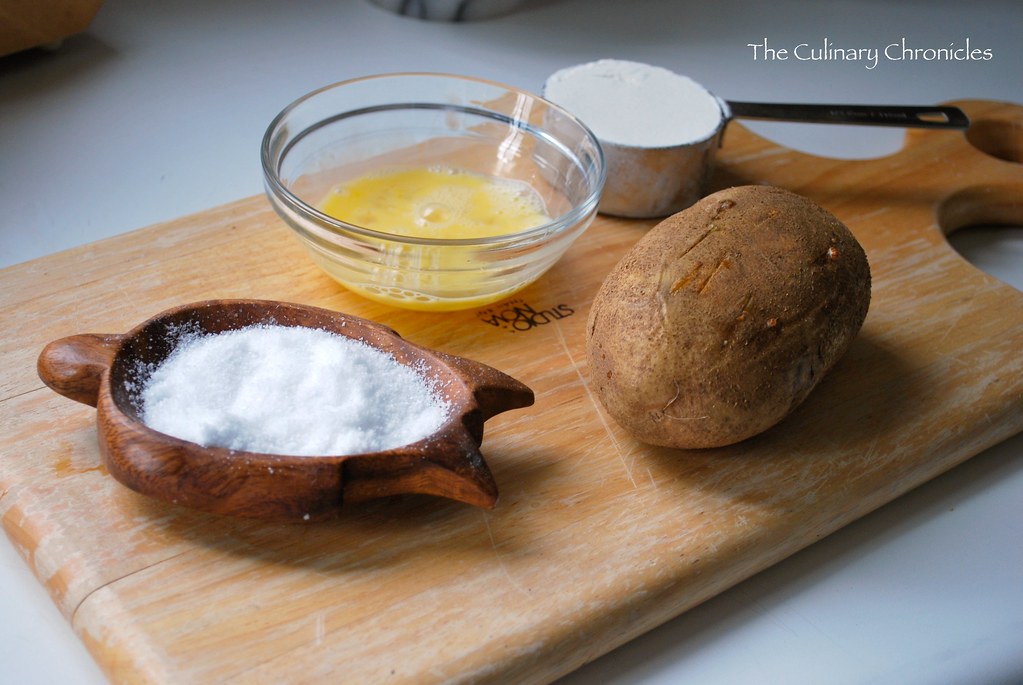
Ingredients:
Gnocchi:
1 Pound Russet Potatoes
1 Egg, beaten lightly
½ – ¾ Cup All Purpose Flour (plus more for dusting)
1 Teaspoon Kosher Salt
Mushroom Cream Sauce:
2½ Cups Sliced Mushrooms (I used Brown & White Mushrooms)
1 Cup Vegetable Stock (I used Mushroom Stock)
¼ Cup Heavy Cream
1 Tablespoon Fresh Chives, diced
½ Teaspoon Dried Thyme
¼ Cup Parmesan Cheese, grated
1 Teaspoon Garlic, finely minced
1 Tablespoon Unsalted Butter
2 Tablespoon Olive Oil
Salt and Pepper to taste
Bake potatoes at 375 degrees for 50 minutes or until tender when pierced with a knife. Remove from oven and cool just enough to handle but the potatoes should still be warm.
Peel potatoes and put them through a potato ricer. Sprinkle in half of the flour and make a well in the center of the bowl. Add egg and salt. Fold mixture, adding more flour if needed. Texture should be like Play-Doh. Gently knead the mixture by hand a few times and form into a ball. On a floured surface, roll dough into long logs about ½ – ¾ inch in diameter. Cut the logs into 1 inch pieces. *I found it easier to cut the gnocchi using a pastry scraper versus a regular knife.
Cook the gnocchi in a large pot of salted, boiling water. This may need to be done in batches to not crowd the pot. The gnocchi will float to the top when they are cooked–approximately 2-3 minutes. Remove with a slotted spoon and place them into an ice bath. Continue until all gnocchi have been cooked. Drain the gnocchi from the water and lightly toss in oil. Set aside until sauce is ready.
Melt butter in a large saucepan with olive oil over medium heat. Add garlic, chives, thyme and mushrooms and cook until tender. Add stock and heat on medium-high. Once the stock comes to a slow boil reduce heat and add cream. Simmer for 1-2 minutes. Add gnocchi and heat until warmed through. Toss in cheese, ensuring the gnocchi is well coated. Season with salt and pepper to taste. Garnish with additional chives and enjoy!


