Pastas/Noodles · Seafood

20-Minute Garlicky Shrimp Scampi with Spinach

Untitled

When I was in the elevator at work yesterday, I overheard someone saying how they made their grandma’s famous linguine alle vongole for Easter Dinner.

And then it was over.

I craved pasta all day long.

Preferably a pasta that someone’s grandma made but beggers can’t be choosers–I had to settle for something I could wrangle up.

20-Minute Garlicky Shrimp Scampi with Spinach

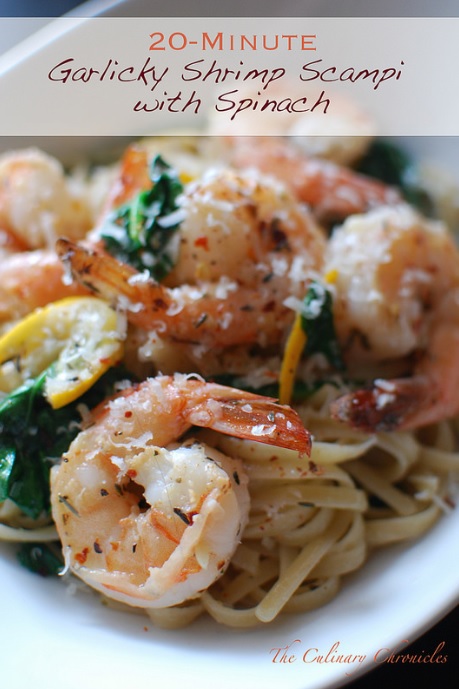
So as I drove home I did a quick inventory of what I had in the fridge/freezer and decided upon a quick shrimp scampi. I have a delish recipe for Shrimp Scampi on the blog already but I wanted to change it up a bit.

I opted to throw in some fresh spinach leaves at the end for a bit of greens. I had originally played around with the idea of adding peas but went for the spee-natch instead. But who knows, I may throw some peas in next time for some oohs and ahhs.

Peas and thank you!

20-Minute Garlicky Shrimp Scampi with Spinach

The pasta was bright, citrus-y, uber garlicky (vampires beware) and totally satisfying. And the best thing? Despite me calling this a 20-Minute Garlicky Shrimp Scampi with Spinach, you can probably have it done in 15. But why not pour yourself a glass of wine during the process and take the few extra minutes?

Cheers!

_______________________________________________

20-Minute Garlicky Shrimp Scampi with Spinach
Serves 2

Ingredients:

kosher salt
4 ounces dry linguine or spaghetti pasta
½ pound shrimp, cleaned and deveined
1½ tablespoons minced garlic
½ teaspoon red pepper flakes, more to garnish
1/8 teaspoon dried thyme
½ teaspoon garlic salt
2 tablespoons olive oil
4-5 thin slices lemon
½ cup white wine
1 tablespoon fresh lemon juice
2 tablespoons unsalted butter
black pepper
2 handfuls (about 2 cups) spinach leaves
fresh grated parmesan cheese

Boil the pasta for approximately 8-10 minutes in heavily salted water until al dente. Drain the pasta and reserve ¼ cup of the starchy water that the pasta was cooked in.

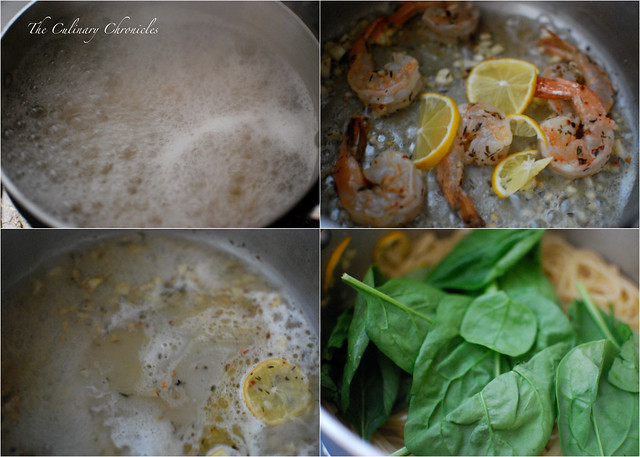
While the pasta boils, mix the shrimp, garlic, red pepper flakes, thyme, and garlic salt together in a bowl. In a large skillet, heat the oil to medium heat. Add the shrimp (with all the garlic and herbs) and lemon slices* to the skillet. Cook the shrimp on both sides until they turn pink—approximately a minute on each side. Remove the shrimp to a clean bowl/plate.

Turn the heat to high and pour the the wine into the skillet. Use a wooden spoon and scrape the bottom of the skillet to release all the brown bits. Allow the wine to come to a boil and add the lemon juice. Reduce the liquid for 2-3 minutes on the high heat. Add the butter and whisk/melt it into the reduced wine.

Turn the heat to medium-low and toss in the cooked/drained pasta. Vigorously toss the pasta with the sauce, adding a tablespoon at a time of the pasta water until you reach your desired consistency. Season the pasta with additional kosher salt and black pepper as needed. Toss in the spinach and plate the pasta with the light sauce.

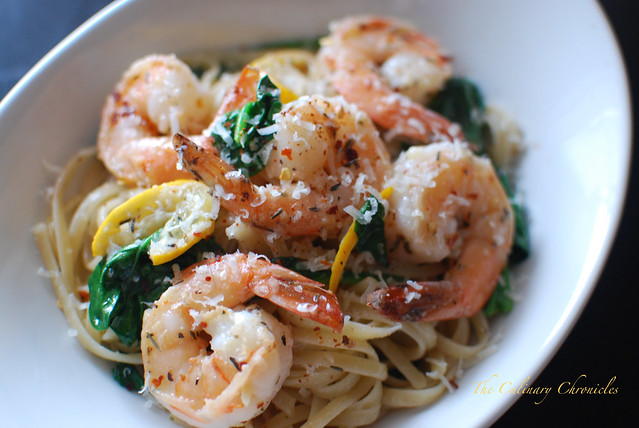
Top each dish with the cooked shrimp. Sprinkle the top with additional red pepper flakes and parmesan cheese. Serve immediately.

*While plating the pasta, you can remove the cooked lemon slices. Some do not enjoy the slight bitter taste of biting into cooked lemons but I’m all about it.

Seafood · Vietnamese

Cá Kho Tộ {Vietnamese Clay Pot Braised Catfish}

Cá Kho Tộ {Vietnamese Clay Pot Braised Catfish}

Growing up, our daily family dinners typically consisted of rice (cơm) served with a stir-fried dish (món xào), a soup dish (món canh), and sometimes a braised dish (món kho). Pretty standard menu for a Vietnamese meal.

Truthfully, I took it for granted back then as I preferred to have lasagna, McDonald’s or even Dairy Queen for dinner. Hey- I was a little kid growing up in Minnesota after all.

But as I get older, those are the dishes I crave the most–even if I don’t make them too often. One of those nostalgic dishes is Cá Kho – braised fish. There’s a ton of variations to Cá Kho and it can change depending on the household. I like it two ways–the first in a very salty broth that you eat with vermicelli noodles or Cá Kho Tộ where the fish is braised in a salty sweet sauce.

Cá Kho Tộ {Vietnamese Clay Pot Braised Catfish}

Cá Kho Tộ is traditionally made with catfish and uses a combination of nước màu (caramel sauce), tons of fish sauce, shallots and coconut juice. Although it’s meant to be cooked in a claypot (tộ), you can use any heavy bottom pot that you have on hand.

We use Coco Rico (coconut soda) in a lot of our kho dishes in lieu of coconut juice but if you can’t find it at your local ethnic grocery store, the latter should work out fine. You can also substitute the catfish for salmon, seabass or any fatty fish that can hold up to braising.

Cá Kho Tộ {Vietnamese Clay Pot Braised Catfish}

Once done, the fish is really tender and I love to spoon the thick, salty/sweet sauce over rice. So good! But just a suggestion, be sure to turn on your kitchen fan while you’re cooking up cá kho because the aroma can be a bit strong. 🙂

Ăn Ngon, Folks!

______________________________________________

Cá Kho Tộ {Vietnamese Clay Pot Braised Catfish}
Serves 4

Ingredients:

salt
2 pounds catfish steaks, washed and patted dried
1 tablespoon palm sugar (or brown sugar)
1/4 cup diced shallots
1 tablespoon minced garlic
1/4 cup chopped scallions, divided
3 tablespoons fish sauce, more to taste
2 tablespoons nước màu, divided
1/2 teaspoon black pepper
2 tablespoons vegetable oil
12 ounces Coco Rico soda
1 tablespoon fresh ginger, cut into matchsticks
3-4 red Thai chiles, more to taste
fresh cilantro leaves

Liberally sprinkle salt over the catfish steaks. Rub the salt all over the fish and rinse off with cool water. Pat the fish dry with paper towels. The salt “exfoliate” is a great way to clean fish and other meats.

Place the washed fish into a large bowl. Add in the palm sugar, shallots, garlic, all but 1 tablespoon of scallions, fish sauce, 1 tablespoon of nước màu and black pepper. Coat the fish well in the marinade and cover the bowl with plastic wrap. Refrigerate the fish and allow to marinate for 45 minutes to an hour.

Heat the oil over medium heat in a large clay pot or other heavy bottom pot. Place the catfish steaks in a single layer and sear 1 minute on each side. Pour all the marinade over the fish, the remaining nước màu and the Coco Rico soda. Add the ginger, chiles and allow the liquids to come to a boil. Lower the heat to medium-low and simmer, covered for about 30 minutes. Gently flip the catfish steaks halfway through the cooking time.

Once the fish has cooked through and the sauce has reduced and thickened, taste and add more fish sauce as needed. Sprinkle the remaining scallions, additional chiles (to taste), and cilantro leaves on top. Serve warm with rice.

Seafood

Shrimp Pot Pie for π (Pi) Day!

Shrimp Pot Pie

Excuse me while I geek out because today is π (Pi) Day!!!!!!!!!!!!!!

3.14 – you know it!

Shrimp Pot Pie

To be honest, I can’t say I love math……. but I can’t help but adore kitschy humor.

And I love pie.

Shrimp Pot Pie

So if given the opportunity to celebrate pie–I’ll take it!

Last year I celebrated the mathematical constant with these Mixed Berry Hand Pies that were not only scrumptious but just so darn cute and portable.

Shrimp Pot Pie

This year I opted for the savory route and made a batch of Shrimp Pot Pie. Luscious, decadent shrimp filling topped with a flaky puff pastry crust.

Shrimp Pot Pie

So good, so easy, so π-licous.

Happy π (Pi) Day!!!

_______________________________________

Shrimp Pot Pie

Ingredients:

2 tablespoons unsalted butter
1 tablespoon vegetable oil
1½ cup diced celery
1½ cup diced carrots
2 cups chopped leeks, thoroughly washed and dried
1 tablespoon minced garlic
¼ teaspoon red chili flakes
5 sprigs fresh thyme
2 cups diced red potatoes
½ cup white wine
1 pound shrimp, peeled and deveined
1/8 teaspoon cayenne pepper
¼ cup flour
2 cups seafood stock
½ cup heavy cream
kosher salt
black pepper
1 cup frozen peas
½ cup chopped fresh parsley
1 egg, beaten
1 package frozen puff pastry

In a pot, melt the butter with the olive oil over medium heat. Add the celery, carrots, leeks and garlic. Sauté until softened but not browned—about 5-7 minutes. Add the red chili flakes, thyme sprigs, potatoes and cook for 2-3 minutes, stirring frequently.

Pour in the wine . Continue simmering until the wine has reduced and nearly evaporated. While the wine cooks, sprinkle the cayenne pepper over the shrimp and toss until evenly coated. Next, whisk the flour and seafood stock together in a bowl.

When the wine has evaporated, pour in the flour/stock mixture and stir while the liquids come to a soft boil. Continue cooking and stirring over medium heat for 5 minutes. Pour in the cream and cook for an additional 2-3 minutes until the mixture has thickened to the desired consistency.

Pull the pot off the heat and remove the thyme sprigs. Stir in the shrimp, 1 teaspoon kosher salt (more to taste), ½ teaspoon black pepper (more to taste), frozen peas and fresh parsley.

Ladle the filling into a casserole dish or other types of individual ramekins/ovenproof dishes. Brush the outside edges of the dishes/ramekins with the beaten egg. Trim the puff pastry sheets about ½ inch larger than the tops of each of the dishes/ramekins. Cover each dish/ramekin with the puff pastry and press around the edges to seal.

Brush the tops of each of the pies with the beaten egg and use a sharp knife to make small slits on top. Place the pie/pies on a baking sheet lined with aluminum foil and transfer to an oven that has been preheated to 400 degrees F.

Bake the pie/pies for 30-40 minutes or until the crusts are golden brown.

Appetizers/Small Plates · Seafood

Thai Fried Fish Cakes

Thai Fried Fish Cakes

Oh…Hey.

So, do you remember when my Fam Bam did a Thai themed Family Dinner? Because if you don’t, let me tell ya it was DEE-LICOUS!

Totes ONE NIGHT IN BANGKOK……

And as I said before, my MVP dish of the night goes to my seester’s fried fish cakes. Although humble at first glance, these scrumptious bites are out of this world. Definitive seafood flavor punched with kaffir and something subtly rich—coconut milk.

I wish I had them right now…..like a dozen of them! These beauties poof up when you them and settle down to an even “fritter like” consistency.  And trust me, double the batch because you’ll want more!

______________________________________

Thai Fried Fish Cakes
From About.com

1 lb (.454 kg) white-fleshed fish fillets
6 kaffir lime leaves, snipped into thin strips
3 tablespoon coconut milk
2 tablespoon fish sauce
1/2 teaspoon shrimp paste or 1 extra tablespoon fish sauce
1/2 tablespoon chili powder
1/3 teaspoon ground cumin
1/4 teaspoon ground coriander
1/2 teaspoon brown sugar
3 green onions, sliced
1 thumb-size piece galangal OR ginger, grated
3 cloves garlic
1 red chili, sliced or 1/2 teaspoon dried crushed chili
1/3 to 1/2 cucumber (to accompany cakes)
oil for high temp. frying
To SERVE: Thai sweet chili sauce, lime wedges, handful fresh coriander

Rinse fish and pat thoroughly dry (if using frozen, the fish will be more moist so be sure to dry it as well as you can). Cut into chunks and place in food processor or large food chopped.

In a cup, combine the coconut milk, fish sauce, shrimp paste, chili powder, cumin, ground coriander, and brown sugar. Stir with a fork to combine, then pour into the processor over the fish.

Add remaining ingredients (kaffir lime leaf strips, green onion, galangal/ginger, garlic, and chili). Pulse to create a thick fish paste.

Picking up a small amount in your hand (about the size of a golf ball) pat the paste into a small cake and set on a clean plate. Note that traditional Thai fish cakes are small (about 2 inches in diameter and 3/4 to 1 inch thick) and not too thick. Tips: If your paste is too wet to easily form into cakes, add a little flour or breadcrumbs to the mix. As you continue making the cakes, it helps to rinse your hands every so often with cool water to prevent paste from sticking.

Set plate of cakes in the refrigerator for 10 minutes to firm up. Meanwhile, prepare your pan for frying as well as your garnishes. Cut the cucumber length-wise, then dice up into small cubes and set aside. Pour oil into a small frying pan or wok (at least 1 inch deep).

Heat oil. When hot enough (a breadcrumb should sizzle and cook immediately when dropped in), gently place cakes in oil. Allow to fry 30 seconds to 1 minute before turning, gently lifting cakes from the bottom of the pan (they may stick a little). Fry until golden-brown and drain on paper towel.

Serve fish cakes immediately with the chopped cucumber and Thai sweet chili sauce drizzled over. Top with fresh coriander and a squeeze of lime juice just before eating. Excellent like this, or served with rice for a main course dish. ENJOY!

Make Ahead Tip: You can make the fish paste up to 24 hours in advance. Cover and set in the refrigerator, then form into cakes and fry.

Pork · Seafood

“Lickety-Split” Clams with Spicy Italian Sausage

Clams with Spicy Italian Sausage

I think that daylight savings actually stole time from me instead of giving a few extra hours of light. Lately, I feel like I’ve been scrambling around trying to get things done and my overwhelming “to-do” pile is now as enormous as Santa’s delivery list.

Oy vey….

Thankfully, I’ve got some clutch recipes like this Clams with Spicy Italian Sausage in my back pocket that I can whip out on days when I’m racing time. Quick and easy recipes that are no fuss, are scrumptious and can be done in no time flat.

This surf and turf little beauty can be pulled together in under 20 minutes. YUP! True Story! That’s less time than it would take for me to go and grab some take out. And let’s face it, so much tastier too.

While the Italian sausage browns, you can chop up the necessary aromatics and give the clams a little scrub down. And while the clams are bubbling away in the glorious broth, throw your baguettes (or bread of your choice) in the toaster oven to brown. No time wasted here!

The briny clams pair so well with the spicy sausage and the fresh herbs and tomatoes add a brightness and subtle acidity to the dish. And the broth–OH the broth! Quite amazing how much flavor you can get in 20 minutes when you pair sausage, wine and seafood stock. Perfect to dunk your crunchy bread into.

Heck–you’ll save so much time on your meal prep that you can take a few moments to sit down and enjoy a glass of vino. After all, you had to open the bottle to deglaze the pot.

Totally reasonable.

And with that, have a great weekend, Friends!

_________________________________

Clams with Spicy Italian Sausage
Serves 2

Ingredients:

2 tablespoons extra virgin olive oil
¼ pound hot Italian sausage
½ cup diced red onion
1 tablespoon minced garlic
½ teaspoon red chili flakes
1 cup dry white wine
2 cups seafood stock or clam juice
2 pounds fresh clams, scrubbed and debearded
¼ cup chopped Italian parsley, plus more for garnish
3 Roma tomatoes, diced and seeded (about 1 cup)
kosher salt
black pepper

Heat a heavy bottom pot with the olive oil over medium-high heat. Add in the sausage and use a wooden spoon to crumble up the meat while it’s browning. Once browned, use a slotted spoon to remove the sausage to a plate that has been lined with paper towels to drain.

Lower the heat to medium and cook the onions for 1-2 minutes until tender but not browned. Add in the garlic, chili flakes and cook for an additional minute. Turn the heat back up to high. Deglaze the pan with the white wine and use the wooden spoon to scrape up the brown pits. Reduce the liquids by half.

Add in the clam juice and once the liquids come to a slow boil, carefully add in the clams, and parsley. Stir in the cooked sausage and cover the pot with a lid. Cook for 4-5 minutes until the clams have opened.

Once the shells have opened, remove the clams and divide them between two bowls. Stir the diced tomatoes into the broth. Check the for seasonings and adjust as needed with kosher salt and pepper. Ladle the broth over the clams and garnish with additional parsley. Serve immediately with toasted bread (baguettes or ciabatta).

Seafood · Soups/Stews · Sunday Family Dinner

Korean Feast for Sunday Family Dinner + Happy Birthday Nina!

August 2013 Korean Family Dinner

My eldest niece, Nina, turns 15 today *gulp*

Don’t ask me how it happened but within a blink of the eye, our super chubby little baby turned into a beautiful and intelligent young woman. The bday gal requested Korean for last week’s Sunday Family Dinner and we willingly obliged.

We LOVE Korean food! And as I’ve shared before, our mom went through an extensive phase where she cooked all types of Korean dishes to dazzle her guests.

August 2013 Family Dinner

As always, we cooked way too much food. But what can we say, we wanted a “little” bit of everything and leftovers are a good thing in our book. A HUGE thanks to Emily Kim, author and founder of Maanchi, whose recipes were heavily used in our menu that night.

As for the menu…..

What’s a Korean meal without some type of Kimchi? Eldest seester started a week before our dinner and prepared a ridiculous amount of Kimchi—and I mean a TON OF KIMCHI! Though I’m not complaining as we each got to take a jar home.

Kimchi

We had crispy, Grilled Pork Belly served with an acidic, vinegar based dipping sauce…….

Grilled Pork Belly

A huge pot of bubbling Soondubu Jjigae – Soft Tofu Stew with lots of seafood……

Soondubu Jjigae - Soft Tofu Stew

Plates of Haemul Pajeon – Seafood Pancake……….

Haemul Pajeon - Seafood Pancake

You can see that the there’s definitely more “filling” than batter in these pancakes.

Haemul Pajeon - Seafood Pancake

And there was a huge pan of Ddeokbokki – Spicy Rice Cakes which is one of my personal faves. Mimi (my oldest friend/ex-roomie) used to make this all of the time for me in grad school and it’s carboliciously, delicious.

Ddeokbokki - Spicy Rice Cakes

We also had Galbijjim – Braised Beef Short Ribs that just fell off the bone. Slightly sweet and incredibly tender. Man, my mouth is watering just remember this goodness…..

Galbijjim - Braised Beef Short Ribs

And there was some Kimchi Bokkeumbap – Kimchi Fried Rice.

Kimchi Bokkeumbap

And last, for dessert, Patbingsu – shaved ice. We adorned ours with sweet red beans, fresh fruits, mochi, tapioca and a drizzle of condensed milk.

Patbingsu - Shaved Ice

And that’s how we roll–Korean style!

Happy 15th Birthday Nina-love!!!! May this year bring you success in school (and tennis), laughter, happiness and adventures (in moderation, of course 🙂 )

xoxo!

August 2013 Family Dinner

This Month’s Family Dinner Menu

Cocktails: Watermelon Soju-tinis
Appetizers: Haemul Pajeon (Seafood Pancake), Homemade Kimchi, Grilled Pork Belly, Soondubu Jjigae 
Entrees: Ddeokbokki, Galbijjim, Kimchi Bokkeumbap
Dessert: Patbingsu, Red Velvet Cake

Appetizers/Small Plates · Pork · Seafood · Sunday Family Dinner

Pork & Shrimp Gyoza and Our Kid Chefs

Pork and Shrimp Gyoza

One of the neatest things about our family dinners is seeing how accomplished my neices have become in the kitchen. We got them involved quite young with baking, creating their own pizzas, and so forth—and I think that it’s really helped them become more at ease with cooking.

Fast forward to today where Nina (14 years old) and Nini (13 years old) have developed their own specialities in the kitchen. Nina can whip up a wonderful dressing and a to die for chocolate cake. Nini is a whiz at shucking oysters, cupcake decorating, and quite recently has become a dumpling-making pro.

Nini and Nina

With the endless things that had to be done at our last family dinner, I needed some help finishing the Gyozas. I showed Nini only once how to fold a Gyoza and the next thing I knew it, she had completed an entire tray of dumplings for me–and they were perfect!

Gyozas are the Japanese version of delish panfried dumplings. They can be filled with a variety of proteins and are wrapped with thin dumpling skins made from flour, salt, and boiling water. Here’s how I make them:

Start off by creating the filling. I like to do a Vietnamese-Japanese fusion and mix ground pork, roughly chopped shrimp, shiitake mushrooms, fish sauce, soy and a variety of other aromatics and spices. The shrimp adds a slight sweetness and great texture. Once the filling has been thoroughly mixed, it’s time to assemble the gyozas.

Pork and Shrimp Gyoza

Place one gyoza wrapper on a flat surface. Dip your finger in water and moisten the edge of the wrapper. Place 1 heaping teaspoon of the filling in the center. Be careful to not over stuff your dumplings or else the filling will burst from the seams.

Pork and Shrimp Gyoza

Pick up the gyoza and fold it in half.

Um…I really should have gotten a manicure before I took these pics.

Pork and Shrimp Gyoza

Start pleating the top layer of the gyoza wrapper. After each pleat, fold, and firmly press the edges together, ensuring that that the gyoza is well sealed.

Pork and Shrimp Gyoza

Place the gyoza on a baking sheet that has been sprinkled with either flour or cornstarch to prevent them from sticking. Cover the sheet with a dish towel while you finish making the rest of the gyozas.

Pork and Shrimp Gyoza

After the gyozas have been pan fried, serve them up with a soy-vinegar sauce or my preferred sauce– ponzu.

Pork and Shrimp Gyoza

These gyozas have a wonderful flavor and all of your loved ones will gobble them up. And if given the chance, get the kids involved and exposed to the cooking process. They’ll have a lot of fun and take pride that they are eating what they helped to make.

I wouldn’t be surprised if, like our aunties, we can retire from cooking duty soon so that the kiddos can take over. Now if we could only get them as excited to do the dishes.

One step at a time. 🙂

___________________________________________

Pork and Shrimp Gyozas
Makes approximately 40 dumplings

Ingredients:

¼ pound shrimp, shelled and devined
½ pound ground pork
1 heaping cup finely chopped cabbage
1 heaping cup finely chopped shiitake mushrooms
½ cup finely diced scallions
¼ cup diced shallots
1 tablespoon minced garlic
½ tablespoon finely grated ginger
1 tablespoon soy sauce
1½ tablespoon fish sauce
1 tablespoon sake
1 teaspoon toasted sesame oil, additional (for frying)
¼ teaspoon red pepper flakes
½ teaspoon black pepper
1 package gyoza wrappers (50 count)
vegetable oil (for frying)
water (for frying)
ponzu sauce, or your choice of dipping sauces
chives

Chop the shrimp into small pieces and add them to a large bowl. Add in the pork, cabbage, mushrooms, scallions, shallots, garlic, ginger, soy sauce, fish sauce, sake, sesame oil, red pepper flakes and black pepper. Using your cleans hands, mix the filling until thoroughly combined.

To make the gyozas, lay one gyoza wrapper on a flat surface. Dip your finger in water and moisten the edge of the wrapper. Place about 1 heaping teaspoon of the filling in the center. Pick up the gyoza and fold it in half. Pleat – fold – and press the edges together, ensuring that you seal the gyoza tightly. Place the gyoza on a baking sheet sprinkled with cornstarch or lined with parchment paper to avoid them sticking to the pan. Repeat until all of the filling has been used.

Heat a large frying pan to medium heat with vegetable oil. Place a layer of the gyozas in the pan. Fry the gyozas for 1-2 minutes until the bottoms are golden. Add about 3-4 tablespoons of water and immediately place the lid on the pan. Lower the heat to medium-low and allow the gyozas to steam until almost all of the water has evaporated.

Remove the lid, turn the heat back up to medium and lightly drizzle sesame oil around the inner edge of the pan. Continue cooking until remaining water has evaporated. Plate and garnish with chives or scallions. Serve immediately with ponzu sauce.

Seafood · Sponsored

Crispy Fish Sliders + New Foodventures with King’s Hawaiian

Crispy Fish Sliders on Kings Hawaiian Rolls

Happy Earth Day Folks!

I am thrilled to be sharing that I have the honor to join the wonderful o’hana at King’s Hawaiian as one of their Featured Bloggers. As y’all know, I’m OBSESSED with the ono King’s Hawaiian products & since my visit with them back in August, I have gained the utmost respect for the organization and the Taira O’hana.

Check out my first post here where I share my experience with Aloha ‘Aina and a fun recipe for Crispy Fish Sliders.

Stay tuned for more posts to come! Alohas!

Appetizers/Small Plates · Condiments/Sauces · Seafood

Decadent Oysters with Asian inspired Mignonette

Decadent Oysters with Asian inspired Mignonette

I live for oysters.

So when I saw an instagram post by a friend who snapped pics of them topped with uni– I gasped! It was brilliant and I just had to make them for our Japanese themed Fam Din.

Decadent Oysters with Asian inspired Mignonette

Using the gorgeous oysters we nabbed from Dry Dock Fish Co., I put together a simple mignonette with Asian flavors that provided the right amount of acidity and heat to the briny shellfish. Topped with an unctuous piece of uni and dollop of tobiko,  these oysters brought decadence and indulgence to a whole new level!

A bit over the top?

Maybe.

Deliciously gluttonous?

Absolutely!

_________________________________________________

Decadent Oysters with Asian inspired Mignonette

Ingredients:

Mignonette:
¼ cup ponzu sauce
1 tablespoon minced shallots
½ teaspoon freshly cracked coriander
¼ teaspoon finely minced Thai chili pepper
½ teaspoon finely chopped chives

2 dozen oysters (cleaned, shucked, on ½ shell)
5 ounces fresh uni (sea urchin roe)
tobiko
chives, cut into 1 inch pieces

Prepare the mignonette by whisking together all the ingredients until combined.  Chill until ready for use.

Fill a large platter with ice. Lay the oysters on top of the ice and drizzle each with some of the mignonette. Lay pieces of uni on top of each oyster and top with a small dollop of tobiko. Garnish with the chives and serve immediately.

Seafood

Fish Tacos with Avocado-Cabbage Slaw

Fish Tacos with Avocado-Cabbage Slaw

I spent a good part of Saturday gallivanting around Old Town San Diego TAH-KEY-LA tasting with some fab friends. The beautiful California sun was shining and we were getting to know the lovely complexities of Blanco, Reposado, and Añejo.

But want to know my little secret? After all that “training” I still don’t know anything and will continue to judge different tequilas based on the following responses I give after tasting it –“Meh“, “ACKK!!”, or “MAKE IT A DOUBLE!”

Totally scientific.

But amidst all the tequila-shenanigans, I did get down on some delish Fish Tacos–a west coast treasure. And I am pretty much obsessed with all types of fish tacos— grilled, blackened, seared, and of course Baja style which is lightly beer battered then fried.

Fish Tacos with Avocado-Cabbage Slaw

This is one of the ways I prepare Fish Tacos when I’m a tad short on time and are in one of my über avocado moods. Which let’s be honest, is all the time.

I make a quick cabbage slaw with a creamy and slightly tangy avocado dressing and pile it on top of fish that has been marinated and broiled. Super crunchy, super bright, super tangy, and SUPER DELICIOSO!!

I may have overdone it with the “supers” but you get the drift. 🙂

_______________________________________

Fish Tacos with Avocado-Cabbage Slaw
Serves 2

Ingredients:

Tacos
½ pound firm white fish fillets, such as cod or tilapia
2 garlic cloves, finely minced
1 teaspoon lime zest
2 tablespoons chopped cilantro, plus more for garnish
¼ teaspoon red pepper flakes
2 pinches ground cumin
2 tablespoons vegetable oil
kosher salt and pepper, to taste
4 flour or corn tortillas
1 cup chunky salsa
lime wedges

Avocado-Cabbage Slaw
1 cup ripe avocado, diced
¼ cup Mexican crema or sour cream
¼ cup fresh cilantro, chopped
½ jalapeno pepper, finely diced and seeded
1 tablespoon lime juice
½ tablespoon agave or honey
kosher salt and pepper, to taste
2 cups shredded cabbage

In a shallow dish, coat the fish with garlic, lime zest, cilantro, red pepper flakes, cumin, and oil. Season with kosher salt and pepper. Allow to marinate for 20 minutes in the refrigerator.

In a blender, puree the avocado, crema, cilantro, jalapeno pepper, lime juice and agave until smooth. Season with salt and pepper. In a large bowl, toss the cabbage with a few spoonfuls of the avocado puree until lightly coated. Cover the bowl with plastic wrap and refrigerate.

Preheat the oven broiler and arrange the marinated fish on a baking sheet. Place the baking sheet a few inches away from the broiler, and broil the fish for 2-3 minutes on each side or until the fish becomes opaque and flakes easily with a fork.

Warm the tortillas. Divide the fish, salsa and slaw amongst the tortillas. Sprinkle each taco with the extra chopped cilantro and serve warm with lime wedges on the side.