Pork

Slow Cooker Kālua Pig

Kālua Pig


It’s ALOHA FRIDAY and what better way to kick off the weekend with some island grindz? And it sure doesn’t get any easier or more ono-licious than Kālua Pig made in a Crock Pot!


Sure, you could go traditional and dig an imu in your backyard to channel the Hawaiian spirit. And heck – I would definitely be the first to give you mad props if you did! But as my family have continually denied my pleas to dig a large hole in their yards, I’ve had to settle for conventional methods and use slow cookers.

Kālua Pig

It really is a fool proof method of creating delicious Kālua Pig since you throw everything into the pot and then twiddle your thumbs for the next 10 hours. But the secret is the addition of banana leaves and liquid smoke which truly impart the authentic flavors an imu provides.

I like to serve my Kālua Pig over sticky rice with mac salad or sandwiched in my beloved Kings Hawaiian rolls with a tangy slaw. However you choose to serve it, your loved ones will adore you for channeling the flavors of the islands onto their plates.

Alohas!!!

___________________________________________________

Slow Cooker Kālua Pig

Ingredients:

5 pounds boneless pork shoulder, trimmed of excess fat
sea salt (Hawaiian sea salt if possible)
black pepper
3-4 banana leaves
½ small white onion, thinly sliced
5 garlic cloves, smashed
1 teaspoon black peppercorns
2 dried bay leaves
4-5 dashes liquid smoke
Using paper towels, dry off the pork and generously season with the sea salt and black pepper.

Line the bottom of the slow cooker with banana leaves, setting aside one to top off the pork. Place the seasoned pork shoulder in the cooker and top with the onions, garlic, peppercorns and bay leaves. Wrap the remaining banana leaf over the top and cover the slow cooker. Cook the pork on low heat for 10 – 12 hours.*

Once done, carefully remove the pork from the slow cooker and place on a platter or large dish. Using two forks, shred the meat into pieces.

Skim and discard the fat and oil from the liquids left in the slow cooker. Pour the liquid over the shredded pork and stir in the liquid smoke. Taste and season with additional sea salt as needed.

Serve over rice or my favorite Kings Hawaiian sweet rolls.

*You can also cook the pork over high heat for about 5-6 hours but I prefer the texture of the low and slow method.

Poultry · Salads · Vegetables/Vegetarian

Cobb Salad – Taste the Rainbow

Cobb Salad

I made a Rainbow.

Well….a huge salad that looked like a Rainbow.

Cobb Salad

And the thing is….I wasn’t intending to write about it but after I assembled everything, I said to myself:

“Damn. That is a good-looking bowl o’ goodness.”

Cobb Salad

So here it is.

My Cobb Salad.

Nothing crazy, nothing shocking but darn delicious. And like all great Foodies and Nutritionists will tell ya –each meal should cover the Rainbow.

__________________________________

Cobb Salad
Serves 2

Ingredients:

Vinaigrette
1 tablespoon finely minced shallots
1 garlic clove, finely minced
2 tablespoons finely minced parsley
1/2 teaspoon lemon zest
1/4 teaspoon red pepper flakes
1 heaping teaspoon Dijon mustard
1/4 cup red wine vinegar
1/2 cup extra virgin olive oil
1/8 teaspoon black pepper
1/4 teaspoon kosher salt

Salad
5 cups roughly chopped Romaine lettuce
1 cup arugula leaves
1/2 cup diced cucumbers
1 small avocado, diced
1/2 cup diced bell peppers (I like to use orange and yellow peppers)
1/2 cup grape tomatoes, sliced in half
1 cup diced grilled chicken
1/4 cup thinly sliced red onions
1/4 cup blue cheese crumbles
3 crispy bacon strips, roughly chopped
2 hard boiled eggs, sliced

In a bowl, whisk together all of the ingredients of the vinaigrette. Taste and add more kosher salt and black pepper as needed. (I also like to add the ingredients into a mason jar and shake it up–it’s a wonderful alternative to emulsify the vinaigrette but it serves as the perfect storage vessel for the remaining dressing.)

In a large bowl, add the Romaine lettuce and arugula. Add enough of the vinaigrette to lightly coat the greens. Toss to evenly cover and plate between two bowls.

Divide the remaining ingredients between the two bowls. Serve additional vinaigrette alongside each bowl. Enjoy!

Seafood · Vietnamese

Cá Nướng {Vietnamese Roasted Fish}

Cá Nướng {Vietnamese Roasted Fish}

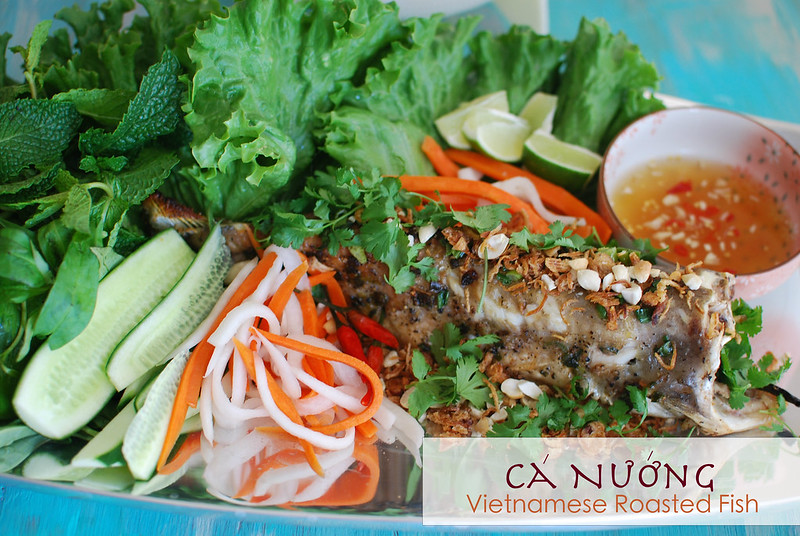
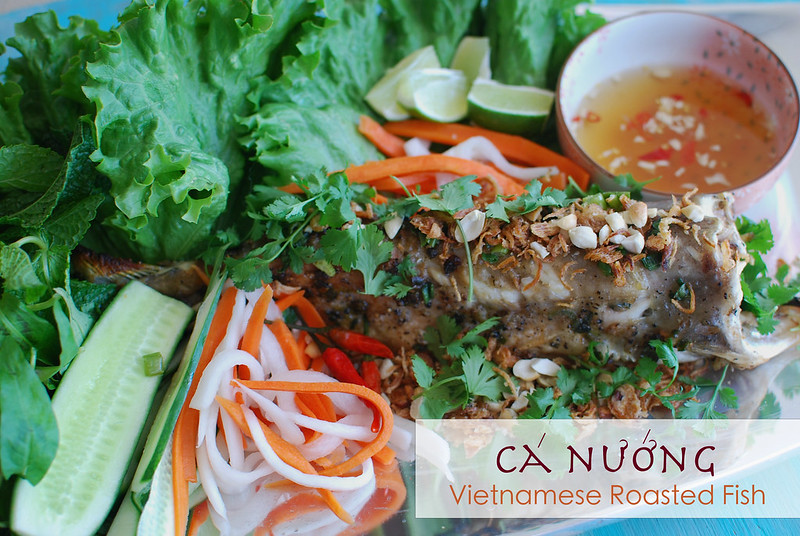
Cá Nướng is a really common Vietnamese dish of roasted fish. And although it’s most often made with catfish because of its firm and somewhat fatty flesh, you can use any fish that can hold up to high heat while still staying moist.

When given the choice, I recommend roasting a whole fish. Not only does it help retain moisture but you’ll almost always get a better flavor when you cook your proteins bone-in.

Cá Nướng {Vietnamese Roasted Fish}

This is when it’s so nifty to have a trusted fishmonger — or in my case, an Asian grocery store, nearby. The latter almost always has live catfish on hand (so you’ll know it’s super fresh) and both options can do the dirty work for you –which I totally appreciate as I hate cleaning fish.

And don’t be surprised to see your once silver/black catfish “turn” white when it comes back cleaned for you. Many fishmongers will scrub the catfish skin to remove the dark outer layer. Although it’s completely edible, the darker skin does make your fish taste a tad “fishier” so the extra scrub down is a good thing.

Cá Nướng {Vietnamese Roasted Fish}

I’ve adopted my eldest seester’s method of preparing Cá Nướng which is not only easy to do but is rather simple when seasoning the fish. A lot of folks will use a variety of aromatics and spices to marinate it. But since you’ll typically dunk the roasted fish into a nước chấm (dipping sauce), you can stick with a minimal preparation before cooking the fish as the sauce will provide the extra flavor punch.

Cá Nướng {Vietnamese Roasted Fish}

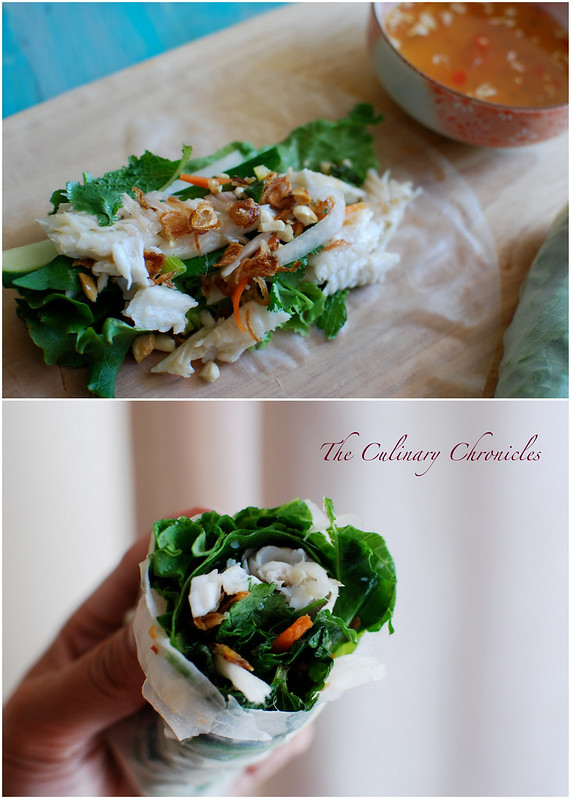
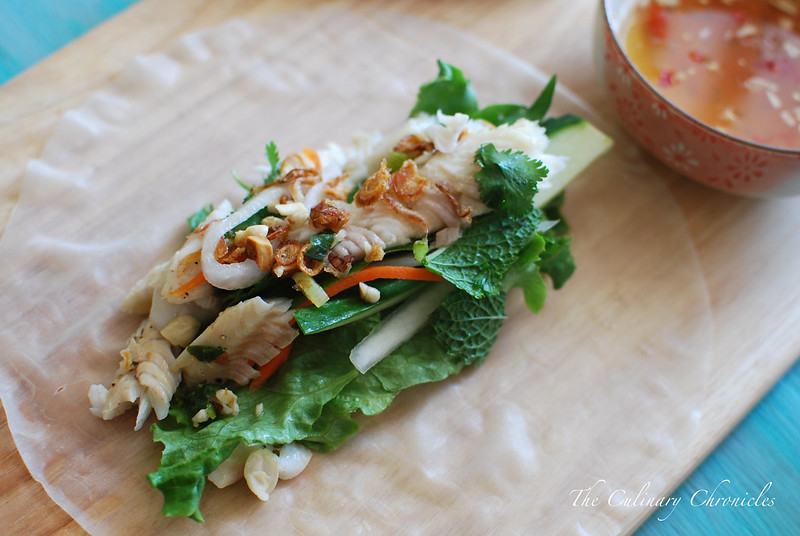
Cá Nướng can be served over rice, with vermicelli noodles, inside a bánh mì (sandwich) or how we typically like it —cuốn bánh tráng (wrapped in rice paper).

The rolls are filled with tons of fresh herbs and veggies that when combined with the roasted fish, is absolutely amazing. They have tons of different textures, knock-out flavor and are deliciously light on the tummy.

Cá Nướng {Vietnamese Roasted Fish}

Serving your Cá Nướng as spring rolls is also a fantastic way to entertain family-style and would be a prefect al fresco dining option during the upcoming warm months. Your guests will love making their own rolls and adding their favorite items inside.

And don’t let the ingredients list and recipe fool you. It may seem like a lot of different components but it’s not difficult at all. You can also prepare many of the components in advance to cut down on prep time.

Easy and delish……Total Nguyen-Win!


______________________________________________

Cá Nướng {Vietnamese Roasted Fish}

Ingredients:

¼ cup vegetable oil
¼ cup chopped scallions
1 whole catfish (2-3 pounds), cleaned/scaled with head removed
1 teaspoon garlic powder
¼ teaspoon black pepper
½ teaspoon kosher salt
2 scallions stalks
½ cup fried shallots
¼ cup roughly chopped peanuts
1 cup roughly chopped fresh cilantro leaves

For Nước Chấm dipping sauce:
¼ cup nước mắm (fish sauce)
¼ cup sugar
¼ cup  fresh lime juice,
2 tablespoons warm  water,
1 finely minced garlic clove
1 teaspoon chili paste, more to taste

Serve with:
1 package bánh tráng (dried rice paper sheets)
lettuce leaves
1 small cucumber, thinly sliced
1 cup đồ chua (pickled carrots and daikon slices)
fresh mint leaves
fresh Vietnamese cilantro leaves
fresh Thai basil leaves
whole Thai chiles
lime wedges

Prepare scallion oil (hành mơ):  In a sauté pan, slowly heat the vegetable oil over low. Add the chopped scallions. Cook the scallions until they are wilted but still bright green–approximately 2-3 minutes. Pull from heat and allow the scallion oil to cool until room temperature.

Rinse the fish with cool water and pat dry with paper towels. Coat the fish with the scallion oil and season the exterior and interior with the garlic powder, black pepper and kosher salt. Stuff the fish cavity with the scallion stalks and prop it upwards on a baking tray. Allow the fish to marinate for 20 minutes.

While the fish marinates, prepare the nước chấm.  Whisk all the items together in a small bowl. Add chili paste to taste. Set aside.

Roast the fish in an oven heated to 400 degrees F for approximately 25-30 minutes or until the flesh is opaque and cooked through. Turn on the broiler of your oven and broil the fish for about 60-90 seconds to slightly crisp & brown the skin. Remove the fish from the oven and transfer to a platter. Top the fish with the fried shallots, chopped peanuts and cilantro leaves.

To serve the fish as a spring roll (bánh tráng cuốn), dip one rice paper sheet in warm water and place on a plate/flat surface. The rice paper will slowly become pliable. Lay one piece of lettuce in the middle of the sheet and top with some of the fresh herbs, đồ chua, cucumber slices and pieces of the fish. Spoon some of the peanuts and fried shallots on top. Tightly roll the bottom of the rice paper over the mound and then fold the sides in. Continue rolling the rice paper up until you’ve created a secured roll.

Serve the rolls and fish with the nước chấm. Ăn ngon!


Appetizers/Small Plates · Condiments/Sauces · Vegetables/Vegetarian

Cilantro & Jalapeño Hummus

Cilantro & Jalapeño Hummus

A few years ago, he and I had a terrible fight….

Trader Joe and I–that is.

What can I say?

He broke my heart — the day he stopped carrying their Cilantro & Jalapeño Hummus. Herby, a bit spicy, rich and creamy. I L-O-V-E-D it and would slather it over just about everything.

Cilantro & Jalapeño Hummus

Then one day when I came in to grab a tub, it was gone. Sure, T.J. offered a three layered hummus that claimed it had my beloved Cilantro & Jalapeño Hummus inside. But once you opened the container, it barely had a dollop of the green goodness in it.

What’s a girl to do?

Cilantro & Jalapeño Hummus

It was then time to take matters into my own hands and make my own version so that I could have my fill of whenever I wanted.

I threw a little bit of this and A LOT of that into the food processor and within a couple of minutes, I had something amazing that I dare say, love even more than the original.

True story.

Cilantro & Jalapeño Hummus

Just like the original, it’s delicious over breads, to dip all kinds of goodies in, and to use as a sauce.

So T.J., I forgive you for cutting off my hummus supply and still love you for everything else you fill my kitchen with. And let’s face it, who cannot adore that you have your staff wearing Aloha gear? 🙂

Side note: T.J. is now carrying a version of Cilantro & Jalapeño Hummus but trust me when I say this–it’s not the same. I don’t know how they altered the recipe but it’s missing some of the old KA-POW the old hummus did.

_____________________________________

Cilantro & Jalapeño Hummus

Ingredients:

1- 2 bunches fresh cilantro, approximately 4-5 loosely packed cups (more to garnish)
1-2 jalapeño peppers, roughly chopped (depending on your heat preference)
4 tablespoons lemon juice
3 tablespoons extra virgin olive oil (more to garnish)
1/3 cup tahini
4 garlic cloves
1 can garbanzo beans (15 ounces), drained with juices reserved
2-4 tablespoons juices from the garbanzo beans
1 teaspoon kosher salt
¼ teaspoon black pepper
¼ teaspoon paprika (more to garnish)

Add the cilantro, jalapeñopeppers, lemon juice, olive oil and tahini into the bowl of a food processor. Pulse until the items have broken down.


Add in the garlic cloves, garbanzo beans, 2 tablespoons of the reserved garbanzo beans juices, kosher salt, black pepper, and paprika. Blend until the hummus is smooth but still thick. If needed, add in the remaining garbanzo bean juices until you reach the desired consistency. Taste and add additional kosher salt if needed.


Plate the hummus and garnish with a drizzle of additional olive oil, sprinkle of paprika, and chopped cilantro. Serve as a spread or as a dip.

Seafood

Tuna Tataki

Tuna Tataki

There are some words out there that are just so fun to say…..

plethora

conundrum

goober

and tataki.

Tuna Tataki


The last one is a double-winner because it’s also darn delicious and easy to make.

When it comes to tataki, I either go with a beef preparation or fish —or BOTH for a little surf and turf action! Either protein lends itself well for the quick sear and rare center.

Though I do love me some ahi tuna….

Tuna Tataki

Simply pick up some beautifully fresh ahi tuna from your local fishmonger, let it marinade in lovely things like ponzu & fresh ginger— and then quickly sear it in a hot skillet.

Boom – POW!

Tuna Tataki

You end up with a gorgeous plate that is packed with flavor and yet still light at the same time. It’s the perfect dish for the upcoming hot summer months and can be served as an appetizer or over mixed greens for a main entree.

And with that — Happy ALOHA FRIDAY!!!

_____________________________________________________

Tuna Tataki
Serves 2

Ingredients:
½ cup ponzu sauce
1 tablespoon water
1 tablespoon low sodium soy sauce
1 tablespoon Mirin
½ teaspoon sesame oil
1 teaspoon freshly grated ginger
¼ teaspoon red chili flakes
2-3 pinches black pepper
2 scallions, chopped
½ pound sashimi grade ahi tuna – preferably in the shape of a long square or rectangular block
2 tablespoons peanut oil

garnish:
thin lemon slices
thin jalapeno or serrano pepper slices
pea shoots
1 tablespoon chopped scallions
toasted sesame seeds

In a shallow dish, whisk together the first 9 ingredients. Reserve 1½ tablespoon of the marinade and set aside. Immerse the tuna in the dish of marinade. Cover the dish with plastic wrap and refrigerate for an hour. (You may want to flip the tuna after 30 minutes have passed if the marinade does not cover the whole piece)


Once marinated, remove the tuna from the liquid and use paper towels to blot the fish dry. Heat the peanut oil in a large skillet over medium high heat. Once the skillet begins to slightly smoke, add the tuna and sear for 30-60 seconds on each side. Remove the fish and allow to rest for 5 minutes.


Using a very sharp knife, cut the tuna into ¼ inch wide slices. Plate the tuna on top of the thin lemon slices. Place the jalapeno/serrano peppers and pea shoots on top and sprinkle the scallions and toasted sesame seeds over the fish. Finally, take the reserved marinade (not the liquids the fish was in) and drizzle over the entire plate.


Enjoy!

Sunday Family Dinner

Sunday Family Dinner goes back to Japan!

April 2014 Family Dinner

Well gang…. last year’s Japanese Sunday Family Dinner was so oishii – we had to go back again.

This time, per our brother-in-law’s request since we were also celebrating his birthday!

April 2014 Family Dinner

As always, we had to start with a few cocktails. I kept it pretty simple (but refreshingly delish) by infusing sake with fresh fruit. I filled a few mason jars with sweet canteloupe and pineapples, topped them off with sake, and them let them hang out in the fridge for a week.

When it was time to get the party started, I threw the contents of each jar in the blender, pureed it and then strained the liquids. It was fabulous!

April 2014 Family Dinner

As for the food, we had to do a little different spin on last year’s dinner. In honor of the robatayaki-yakiniku Japanese grilling style, we snagged a few of my cousin’s grills (that our uncle finagled) and got down to business!

We grilled fresh oysters, clams, prawns, calamari, trumpet mushrooms and yakitori (grilled chicken skewers). The seafood were either dipped in a chili ponzu sauce or a ginger-fish sauce that the B.I.L. (bro-in-law) is a whiz at making.

April 2014 Family Dinner

And of course we had to have some beautiful, fresh sashimi.

Tuna, salmon, hamachi and …………..GEODUCK!

April 2014 Family Dinner

Have you ever seen fresh geoduck? CRAZY!!! They’re a gi-normous shellfish with a trunk-like thing sticking out of it.

We made big sis take care of the prep work for it…. obligatory big sister duties, of course. 🙂

It’s best to first blanch the geoduck for a minute to help skin it – a tip learned by a random stranger when we were buying the geoduck at the market. After a quick clean, she sliced it really thin and we inhaled it with soy and wasabi.

Verdict? Awesome. I liken the flavor and texture to escargot –but not as chewy.

Definitely a Foodventure.

April 2014 Family Dinner

To brush over the yakitori and mushrooms, I made a quick teriyaki sauce. Easy-peasy!

My other seester also made Japanese Hamburger Steak served over rice. Totally comforting and hearty.

April 2014 Family Dinner

And there’s always room for dessert in my family!

This time around, our big sis outdid herself with this layered Matcha Green Tea Cake filled with Green Tea Mousse and smothered with a rich ganache.

It was AH-MAY-ZING! Super-duper Green Tea Flavor!

April 2014 Family Dinner

She did a mash-up of a few different recipes. The cake comes from here and the green tea mousse is from here. As for the ganache, it was a quick version I made with heavy cream and dark chocolate. Can’t get any easier than that! But one piece of advice, double the amounts of matcha powder or else you won’t get that full flavor.

April 2014 Family Dinner

Pre-historic looking mollusks, outdoor grilling (including us accidentally melting the plastic table –eek!) and sparklers for the munchkins.

Needless to say it was a tummy-pleasing and FUN Sunday Family Dinner!

April 2014 Family Dinner

This Month’s Family Dinner Menu

Cocktails: Pineapple and Cantaloupe infused Sake
Appetizers: Tuna, Salmon, Hamachi and Geoduck Sashimis
Entrees: Hibachi Grilled Seafood & Vegetables, Demi-Glace Japanese Hamburger with Rice
Dessert: Matcha Green Tea Cake with Green Tea Mousse and Chocolate Ganache

Poultry

Tequila Chili-Lime Chicken

Tequila Chili-Lime Chicken

So here’s the thing.

I’ve never claimed to have a blog about figure-friendly, low-calorie recipes. I mean, c’mon now. I believe in BUTTER….BACON…and BOOZE!

My kitchen’s Holy Trinity.

Tequila Chili-Lime Chicken

But even this gal has to be a bit health-conscious sometimes. Eating (or drinking) lots of fresh veggies, getting in some regular workouts and finagling lean proteins into the menu as often as possible.

Now I’ll be the first to admit, I don’t naturally gravitate towards chicken breasts–especially boneless/skinless chicken breast. And don’t even get my brother started on his feelings on chicken. But the proof is in the puddin‘ — chicken breast is one of the leanest proteins you can put in your tummy.

Tequila Chili-Lime Chicken

And since we all know that it can so easily dry out and taste like sandpaper, here are my two no-brainer tips to combating the chicken blues.

First, you’ve got to pump the chicken with as much flavor as possible. We’re talking a boom-pow marinade and let the chicken soak in it as long as possible. And if you want to get crazy– brine it!

Second, smother it with goodness! Yup, it’s condiments time – and you know how much I love condiments! Things like pico de gallos, salsas, marinaras, and chimichurris are fantastic over grilled chicken.

My Tequila Chili-Lime Chicken is a standard way I like to marinate my chicken breasts overnight before throwing them on the grill. The tequila and limes help to break down the chicken and as long as you’re not going rogue on the grill, it stays nice and juicy. It’s also a great method for chicken wings—just put a bit of the marinade aside and when you start cooking, baste the wings with it.

Over a salad, inside quesadillas/burritos, in sammies or as a stand alone, my Tequila Chili-Lime Chicken has helped me {in a delicious way} with my skinless-chicken breast aversion.

______________________________________

Tequila Chili-Lime Chicken
Serves 6

Ingredients:
1 large bunch fresh cilantro
1 small white onion
4 large garlic cloves
1-2 jalapeno peppers (depending on heat preference)
zest of 1 lime
½ cup fresh lime juice
½ cup tequila
1 tablespoon honey or agave
1 teaspoon cumin
½ teaspoon dried oregano
½ teaspoon chili powder
¼ teaspoon red pepper flakes
¾ tablespoon kosher salt
1 teaspoon black pepper
½ cup olive oil
6 boneless skinless chicken breasts*
vegetable oil
lime wedges

In a food processor or blender, add the first 15 ingredients. Pulse several times until the fresh aromatics have broken down. Place the chicken breasts into a gallon size resealable bag. Pour the marinade over the chicken and massage it through. Be sure to get most of the air out of the bag before sealing it. Put the chicken in the refrigerator and marinate overnight.

An hour before you start cooking the chicken, pull it from the refrigerator to take the chill off of it. Heat your grill to medium-high. Brush the grates of your grill with the vegetable oil. Place the chicken breast on the grill and cook for about 5-6 minutes on the first side before flipping. Cook for an additional 4-5 minutes on the 2nd side until cooked through and the internal temperature reaches approximately 165 degrees F. Remove the chicken from the grill and loosely tent with aluminum foil. Allow it to rest for about 5 minutes.

Serve warm with fresh lime wedges and your choice of condiments.

*Bone-in chicken breast can also be used but adjust the cooking times as needed.

Beef

Grilled Ribeye Steak with Chimichurri Sauce — Happy Birthday Mom!

Mom

I kind of love this picture of Mom. It was taken on her wedding day about 48 years ago in Việt Nam.

Isn’t she stunning?

And today is her birthday.

photo-64

For the past few years, I’ve sort have done a little ritual each year on May 10th to celebrate her birthday. In the morning, I swing by Panera to grab an Egg Souffle (her fav) for brekkie and then at some point in the day, I make a steak.

Because Mom L-O-V-E-D her some steaks.

Mom3

She adored a Filet Mignon or a straight up Ribeye Steak – kind of a trait she’s passed on to my seester T and my niece Nina.


Mom2

This year to honor Mom’s birthday, I grilled up a tender and meat-a-licious Grilled Ribeye Steak with Chimichurri Sauce.


Grilled Ribeye Steak with Chimichurri Sauce


Truthfully, I can’t recall Mom ever having chimichurri over her steak but I can be certain that she would have loved it. Flavorful grilled steaks topped with an herbaceous & spicy chimichurri –she would have been ALL about it.


Grilled Ribeye Steak with Chimichurri Sauce

So here’s to Mom—our loyal, strong, steak lovin’, foodie, fashionista who we love and miss every day.

Happy Birthday Mama!

__________________________________________

Grilled Ribeye Steak with Chimichurri Sauce
Serves 2

Ingredients:

1/2 tablespoon vegetable oil, more for the grill
1 16-18 ounce ribeye steak
kosher salt
black pepper
1/4 cup (or more) chimichurri sauce, to taste

Rub the oil over the the steak. Heavily season with kosher salt and black pepper.

Heat a grill (gas or charcoal) to medium-high heat. Brush the grates of the grill with additional oil.

Grill the first side of the steak directly over the heat for 4-5 minutes. Flip to the other side and continue to grill for about 3-4 minutes–or until desired doneness.  Once grilled and golden, remove the steak and allow to rest for 10 minutes.

Slice the steak against the grain and plate. Top with spoonfuls of the chimichurri sauce and serve.


Condiments/Sauces

Ch-ch-ch–Chimichurri Sauce!

Chimichurri Sauce

Happy CHIMICHURRI FRIDAY!

Ok…it’s not really Chimichurri Friday-–it’s Aloha Friday. But as far as I’m concerned, every day should have chimichurri in it.

Chimichurri Sauce

The sauce originates from Argentina and is FULL of fresh herbs, citrus and spices. It’s incredibly aromatic and bright and is perfect over grilled meats, seafood, in sammiches and as a dip.

And. I. LOVE. IT.

I’ve posted the recipe alongside other dishes before but I thought this showstopper deserved a post on its own.

Chimichurri Sauce

Chimichurri has similar flavor profiles to pesto as both contain fresh herbs and spicy garlic. But since chimichurri does not contain nuts or cheeses, it can be considered a slimmer substitute for pestos. Both as a spread or even in pastas like my Chimichurri Orzo.

Chimichurri Sauce

So this weekend, break out the grill and throw a few steaks (or chicken…or lamb chops…) and some seafood on the fire. Slather the grilled goodness with Chimichurri Sauce and show all the MOM(s) in your life how much you love them.

Have a fabulous Mother’s Day Weekend!

________________________________

Chimichurri Sauce
Makes approximately 2 cups

Ingredients:

1 large bunch fresh cilantro
1 large bunch fresh Italian parsley
6-8 sprigs fresh oregano
4 large garlic cloves
1 large serrano chili pepper*
zest of 1 lime
¼ cup fresh lime juice
1 teaspoon red wine vinegar
½ teaspoon red chili flakes*
1 teaspoon honey or agave
¾ – 1 cup olive oil, more if needed
kosher salt
black pepper

In a food processor or blender, add all of the ingredients except the olive oil, kosher salt and pepper. Pulse several times until the herbs have broken down.

Stream in the olive oil and blend until the items have fully incorporated. Sprinkle in ½ teaspoon salt and ½ teaspoon black pepper. Pulse to combine. More olive oil can be added if a smoother, loose texture is desired. Check for seasonings and add additional salt and pepper as needed. Refrigerate until ready to be used.

*Chili amounts can be adjusted based on heat level preference.

Poultry

Turkey & Peppers Tacos – Happy Cinco de Mayo!

Turkey & Peppers Tacos

Well gang…y’all made it — HAPPY CINCO DE MAYO!!!!

And as promised, I have one more little goodie to share with you that will definitely make some tummies quite happy today.

Turkey & Peppers Tacos

Turkey & Peppers Tacos!

Like my Portabello Mushroom Tacos, these little beauties are super quick to make and are darn right tasty. And if you’re not a fan of ground turkey, you can swap out the protein with ground chicken, pork, beef– or even ground tofurkey!

Turkey & Peppers Tacos

And just don’t stop with tacos. The filling works fantastic over nachos, tostadas, inside burritos or even inside lettuce wraps.

Because this gal likes versatility.

Turkey & Peppers Tacos

Here’s to a fantastically festive Cinco de Mayo — have a margarita (or 2 for me)!

Salud!

__________________________________________

Turkey & Peppers Tacos
Makes 8-10 Tacos

Ingredients:


2 tablespoons olive oil
1 cup chopped red onions
2 small serrano peppers, seeds removed, finely minced
1 tablespoon minced garlic
1 pound ground turkey meat
¾ teaspoon cumin powder
½ teaspoon chili powder
¼ teaspoon paprika
1/8 teaspoon turmeric powder
½ teaspoon onion powder
½ teaspoon garlic powder
½ teaspoon dried oregano
¼ teaspoon garlic salt
¼ teaspoon kosher salt, more to taste
¼ teaspoon black pepper
2 scallions, chopped
2 cups diced bell peppers (I prefer red and orange peppers)
1 cup chopped cilantro leaves, more to garnish
8-10 small tortillas
1 cup crumbled Cotija cheese, or whatever cheeses you prefer
oven-roasted tomato salsa
lime wedges


In a large cast iron pan or large skillet, heat the oil over medium heat. Add the onions and cook for 3-4 minutes until they become translucent but not browned. Add in the minced serrano, garlic and sauté for an additional minute.


Add the turkey and use a wooden spoon to stir it around the pan while breaking it apart to a crumbled consistency. Cook the turkey until it is no long pink & begins to brown– approximately 5 minutes.


Stir in the cumin, chili powder, paprika, turmeric, onion powder, garlic powder, oregano, garlic salt, kosher salt, black pepper and scallions. Cook for 1 minute and then add the diced bell peppers. Cook for an additional few minutes to allow the peppers to begin soften and the turkey to cook through.


Take the pan off the heat and fold in the cilantro leaves. Taste and adjust with additional kosher salt and black pepper as needed.


Warm the tortillas (in a skillet, over a open flame, or even in the microwave). Begin assembling the tacos by placing a few spoonfuls of the filling mixture in the center of each tortilla. Top each taco with some Cotija cheeses and chopped cilantro. Serve with salsa and lime wedges.