Reviews

Hilo Farmers Market–a Treat for the Senses

I’ve said it before and I’ll say it again—I LOVE Farmers Markets…just LOVE them! And the charming Hilo Farmers Market is no exception.

Primarily open on Wednesdays and Saturdays, the Hilo Farmers Market is broken up into two main areas. The first section predominantly offers crafts, clothing, and other gift items. The second area features beautiful produce, florals, and ‘Ono Grindz. As with other markets, I love to stroll up and down the stalls while chatting with the vendors about their products.

Truth be told, I could go on to describe all the wonderful delights that the Hilo Farmers Market offers but as they say, pictures speak a thousand words.

Snapshot of side entrance

Produce

Veggies and Fruits

Beautiful Long Beans, Cucumbers, Eggplants, Tomatoes, Bananas

Avocados–These were HUGE! Easily the size of an average Pomelo.

Hydroponically Grown Lettuce

Sweet Yellow Corn

Kale, Mint, Dark Greens

Strawberry Papayas

Rainbow Papayas

Ulu (Breadfruit)

Golden Pineapples

Cigar Mangoes

Soursop

Flowers

Orchids

Mixed Tropical Flowers

Anthuriums

Heliconias

Red Ginger Flowers

Tuberose

Cymbidiums

Gardenias

Mixed Arrangements

Uncle Randy with his stunning handmade leis. Many of the flowers used are grown in his own yard. This lei uses nearly 900 flowers!

Snacks and Treats

Rolls, Musubis, Babingka, and more….

Macadamia Nuts

Sweet Rolls and Breads

Cascarones and SPAM Musubis

Fresh Coconut

The Hilo Farmers Market—a definite MUST when visiting this side of the island!

Hilo Farmers Market
Mamo Street & Kamehameha Avenue
Wednesdays and Saturdays, 7:30am-5:00pm


Reviews

Malasadas: Mmmm…Donuts

Where can you find a “bakery” attached to an auto repair store? The Big Island of Hawai’i, of course. 🙂

But better yet, where can one find a “Malasada” while getting your car’s oil changed? Only one place really…at Baker Tom’s in Papaikou.

Never had the opportunity to try these delectable delights? Malasadas are no-frills, no thrills just darn good local eats. How could you possibly go wrong with fried dough rolled in sugar?! Traditionally a Portuguese style donut, I do my hardest to go on a malasada binge whenever I visit the islands.

Fried Dough? Goooood. Filled with Tropical Flavors? Goood. Seriously-it’s a WIN-WIN situation!

During our visit Isaiah’s cousin, Dave, raved about Baker Tom’s malasadas–and as he’s quite the donut aficionado with his own blog (http://www.donutblog.com) I knew we had to give it a try! So on one gorgeous morning on the Big Island we ventured down to Baker Tom’s to grab a box of malasadas to bring back to the house.

True to form, the open store front was attached to an auto repair shop. Why not, right? 🙂

Unfortunately we didn’t get a chance to chat with Baker Tom though his Mom and Dad were staffing the front of the house. And due to a large bread order that morning, they didn’t have any of their infamous Peanut Butter & Jelly malasadas on hand. However we did grab a mixed box of the following malasadas: Canadian Bacon, Lilikoi, Strawberry, Cherry, Apple…and even grabbed a cinnamon roll. As they handed over the heavy box over to us, I instantly caught the luscious aromas of freshly fried dough. Heaven. And yes, the box was still warm. 🙂

Mmm…Malasadas.

Tasty Loaves of Bread

Once back at the house, we cut the malasadas in half so we could try multiple flavors. The dough was absolutely wonderful—light, crispy, yeast-y, and not the least bit greasy. Perfect. With the exception of the Canadian Bacon malasada, each were lightly dusted with sugar–great flavor and texture addition. Of the fruit options, the Lilikoi was my favorite. As for the Canadian Bacon, it was akin to a Ham and Cheese croissant with Canadian Bacon and Cheese wrapped inside. All of them perfect to enjoy with a hot steaming cup of Kona Coffee.

Cherry Malasada (left), Canadian Bacon and Cheese Malasada (Right)


Next time we visit, I’ve got to try the PB&J and the Jalapeno Malasada–and so should you! 🙂

Baker Tom’s
27-2111 Mamalahoa Hwy
Papaikou, HI 96781
(808) 964-8444


Miscellaneous

‘Opihi….Hawaiian Limpets

I had many culinary firsts on my trip back to the Big Island but perhaps none were so memorable as when I first tried the ‘Opihi.

In simplest terms, ‘Opihi are Hawaiian Limpets—or little conical mollusks found clinging to sea rocks and shorelines. Often times found at celebrations or standard lu’au fare, ‘Opihi are prized local delicacies that can cost you a pretty penny when purchased at a store. Unless that is..…you go ‘Opihi picking 🙂

While enjoying some time at the Warm Ponds in Kapoho, Isaiah’s parents went on a little adventure to pry the coveted ‘Opihi from the nearby rocks. To my surprise, they were quite plentiful though one needs to be very careful when ‘Opihi picking. Particularly when large waves pound the rocks while you’re busy concentrating on the little gems!

Many folks have an aversion to ‘Opihi, especially if they’re raw. But when the BF asked if I wanted to try one, I eagerly agreed.  I figured there was no fresher place to try this local delicacy and since I love Oysters and Sea Snails, I assumed it would be similar.

After a quick rinse in the ocean water, Isaiah loosened the flesh from the shell, handed it over to me, and I quickly popped it in my mouth. To my delight—I loved it! Sure, the texture is a bit chewy and slimey at the same time but what mollusks aren’t? I really enjoyed the salty-sea taste mixed with hints of a crab roe flavor. But I think what truly heightened the experience was that I was sampling it in a gorgeous place–fresh from the sea. So cool.

I’m told that ‘Opihi are often times enjoyed with just a little bit of Hawaiian Sea Salt or a bit of Hawaiian Chili Water. In fact, later that week at the BF’s family gathering, I tried them “poke style”, mixed with some local fish.

Another interesting tidbit of information I learned is that Native Hawaiians believe that ‘Opihi can be aumakua and protect you from heavy surf or sharks. Now that’s a Win-Win Situation!

Moral of the story? Every day has the potential of containing a new culinary adventure—so take a chance!

“I’ve long believed that good food, good eating, is all about risk. Whether we’re talking about unpasteurized Stilton, raw oysters or working for organized crime ‘associates,’ food, for me, has always been an adventure.”
Anthony Bourdain

Miscellaneous

Aloha ‘Aina…Love of the Land

I have long admired the Hawaiian mantra of “living off the land”. These ideals of living a sustainable lifestyle without overconsumption and mutual respect for life is something I wish I could practice more regularly. And although I realize the lush islands of Hawai’i lends itself to being more accessible to harvesting the fruits of the land and sea, I think the ideals can be incorporated into anywhere one resides.

While on the Big Island, we spent some time at Isaiah’s grandparents’ home. Nestled on 5 acres of verdant land, their “backyard” is home to beautiful tropical flowers, fruits, and plants. On one particular day, we were able to take a hike around the grounds to explore what the land had to offer and I was thrilled to discover natural jewels around every bend.

Years ago, Isaiah’s grandfather planted a beautiful grove of Macadamia Nut Trees. The nuts from those trees were collected and combined with other co-op growers and sold to local factories (yes, the famed Mauna Loa, included). And although the nuts are no longer harvested, the trees are still abundant and grow stronger with each season.

On our “nature hike” we caught glimpses of delicious fruits, heard the calls of billy goats, and noshed on some fresh sugar cane. Below are a few snap shots of the Matsumura’s land:

Ginger Flowers, Ti Plants, and other lush greens

Taro Plant

Lychee Tree

Lychee Fruit

Wild Berries

Pineapples

Macadamia Nut Trees (The little greens on the ground are all saplings)

Mac Nuts

Avocadoes

Guavee–not to be confused with “Guava”

Sugar Cane

Lilikoi (Passion Fruit)

Lilikoi Flower

Lilikoi

Papaya

And even MORE Papaya

Collard Greens

Needless to say, we thoroughly enjoyed our exploration of the grounds. With such wonderful ingredients within reach–I would never need to go to the Farmers markets! Perhaps Grandma Matsumura would let me stay with her for awhile and create recipes galore using the fruits of the land. Well…a girl could dream, right? 🙂

With that dear friends, I hope that you can find ways to practice the Hawaiian lifestyle in your lives. Start a vegetable garden….grow fresh herbs….buy locally. No effort is too small. 🙂

Much Mahalos to the Matsumura ‘Ohana for showing me “Aloha ‘Aina“. 🙂

Munching on some fresh Sugar Cane

Reviews

Shimmy, Shimmy Coco Puff…..Hawaiian Style

Liliha Bakery Coco Puffs

When you hear the two words “Coco Puff”, what comes to mind? If you’re like many, the first images that arise are of the chocolate, crispy morning cereal. And indeed, I thought the same—that is, until I was introduced to the “Hawaiian Coco Puff”.

Coco Puffs are a choux based cream puff that are most often filled with a chocolate “pudding-like” mixture and topped with a heavy dollop of Hawaiian Chantilly. And where does one find the best Coco Puffs in the Islands? Without a doubt, Liliha Bakery in Honolulu.

Now to be fair, Liliha Bakery not only offers delectable pastries but also has a 24 hour Coffee Shop that serves all kinds of local grindz. But when we stop on in, we only have our hearts (and tummies) set on those magic puffs.

The Coco Puff has three basic components that when combined, are just divine. First, the choux dough. Light….perfectly baked….not too sweet….and is the perfect vessel for the filling. Which brings us to the the filling. The “chocolate pudding” is creamy….rich….dreamy chocolate flavor…..and wonderfully silky. And lastly, the Chantilly. Not to be confused with the Classic French Chantilly, this local creation is like a sugary butter cream. And when you combine the three—HOT FIRE!

And for those who are looking for a different spin, Liliha Bakery also offers a Green Tea Coco Puff—ooooh.

Green Tea Coco Puffs

Looking for other types of sweet delights? Don’t worry, Liliha Bakery has a little something for everyone.

Lilikoi and Guava Chiffon Cakes


Scones, Rolls, Cookies, Jams, and Coffee


Hello Kitty inspired Sugar Cookies


Banana Cupcakes topped with a swirl of Chantilly

So next time you’re in O’ahu, do yourself a favor and swing by Liliha Bakery to pick up a dozen or so Coco Puffs. And while you’re at it, pick me up some, too!

Did I mention that they also sell frozen Coco Puffs so that you can take these little bundles of joy home with you? Trust me, when you’re back at home, you’ll wish you had some.

Frozen packaged Coco Puffs ready for a plane ride home with you.


Liliha Bakery
515 N. Kuakini Street
Honolulu, HI  96817
(808) 531-1651
24 hours a day from Tuesday 6 a.m. to Sunday 8 p.m. Closed Mondays.

Miscellaneous

Hawai’i, Aloha!

Aloha, Friends!

My confession to you all is that I am terribly behind on my posts. Earlier last month I accompanied my BF and his family back to their home of Hawai’i. We spent 10 amazing days on O’ahu and their home island of Hawai’i  (known as the “Big Island”). I proudly say that we indulged ourselves in the beautiful Hawaiian sun, played in the ocean, visited with friends & family…..and of course, partook in the amazing ‘Ono Grindz that one can only find in Hawai’i.

I think many who have visited the islands will agree with me when I profess that it’s a wonderfully Kindred place that holds such immense spirit and community. And since my first visit years ago, I have fallen in love with Hawai’i and have finagled my way back at least once a year. 🙂

Thus the next few posts will chronicle some of our favorite local food haunts and highlight the fruits of the land. Hopefully through it all, you will get to catch a glimpse of our Hawai’i and peek into the Aloha Spirit!

A hui hou kakou! (Until we meet again!)


Desserts/Pastries

Guava and Lilikoi Jam Thumbprint Cookies

Guava (Reddish-Pink) and Lilikoi (Yellow) Jam Thumbprint Cookies

Since being back from our wonderful vacation in Hawai’i, I’ve really missed the flavors and regional cuisine from the islands. To try and relive some of those “ono grindz”, I wanted to bake something with the Guava and Lilikoi (Passion Fruit) jams I picked up. After some inspiration from a friend’s post on Facebook (Thanks, DQ!), I decided to take the tropical flavors from the jams and make Thumbprint Cookies. After a few searches, I settled on Martha Stewart’s “Aunt Maggie’s Jam Thumbprint Cookies” for its simplicity and overall positive reviews.

How did it go? Well, I’ve been baking/cooking long enough to know that I should really trust my gut feelings when something seems odd in a recipe. But no, like a faithful puppy, I followed Martha’s recipe trusting that she would veer me in the right place. Yeah…I should have listened to myself.

Now in all fairness, the cookies weren’t “bad”. They just weren’t great….more like an “ok” response. What was the issue? First of all, the directions listed to make 1 inch balls using about 2 Tablespoons of dough. Sound off? Yup, it was. My cookies were way too big and thus I had to increase the baking time by about 3-4 minutes a batch. Second, two major ingredients were missing that you find in most cookie doughs…..Salt and Vanilla. And perhaps because there was no salt, the final cookie lacked some flavor.

But there was a glimmer of hope. The next day when I got home from work, the BF said that the cookies tasted better. Strange, right? But he was spot on…they DID taste better! Who knew that aging them would increase the flavor?! After all, it’s not a cheesecake!

Next time, I’m not taking the chance and will modify the recipe. I suggest adding about 1 Teaspoon of good quality Vanilla Extract, increase the granulated sugar amount from 1 cup to 1¼ cups, and add about ¼Teaspoon of Salt. Also, when forming the dough balls, only use about 1 tablespoon. I think if you try the modifications, you’ll be happy with your results.

Alohas!

Lilikoi Jam Thumbprint Cookies

Appetizers/Small Plates · Salads · Vegetables/Vegetarian

Warm Lentil Salad with Roasted Beets and Chevre

I love cooking with my sister. Times with her in the kitchen are always so fun and innovative—daring and challenging. Therefore, when she invited us over one day to experiment with new dishes, I was ALL IN!

As a San Francisco resident, my sister has access to a wealth of beautiful products at her disposal and she definitely takes advantage of it. SF is a Foodie Paradise filled with delicious produce, sumptuous bakeries, savory proteins, and of course, amazing wines. So it was no surprise that one of the dishes she wanted to give a spin at was a French Lentil and Beet salad.

Beets. I know– I had made the same face at first. To that day, I hadn’t had good experiences with them as I mostly sampled them from a can or a salad bar. BLEH! But the sister assured me that by roasting the gorgeous golden and red beets it would bring out a decadent sugary component.

As for the French Lentils—wow. Picked up at a local grocery cooperation (Rainbow Grocery in San Francisco), they were absolutely beautiful. Nutty in flavor and deeply earthy. Sorry, I know my description didn’t do it nearly the justice it deserves.

My sister decided to take a spin on Martha Stewart’s Lentil Salad and Beets with many variations to the recipe. I don’t know how she did it, but every alteration she did boosted the flavor immensely. I guess big sisters do know some things 🙂

The end product was absolutely amazing—a perfect dish for the upcoming summer months. The sugary beets complimented the rich textures of the lentils while the goat cheese (Chevre from Cowgirl Creamery) added phenomenal creaminess. The vinaigrette was light but had a great amount of acidity while the baby arugula rounded out the dish with a peppery punch.

Would I suggest it? DEFINITELY! Use Martha’s version as a starting point and add or take away any items you’d like.

ENJOY!

Lovely beets prior to roasting


Leftovers are just as yummy, too!

Breads · Pizzas · Pork

Margherita Pizza with Crispy Bacon

Margherita Pizza with Crispy Bacon

One afternoon while having lunch, we caught an episode of America’s Test Kitchen where they made a Pizza Bianco. It looked so easy and delicious that I stopped mid bite of my sandwich and feverishly began jotting down the recipe for the pizza dough. I was drawn to it as it almost had a focaccia-like consistency.

A few weeks later, with some more time on my hands and ambition at my side, I decided to give A.T.K.’s pizza dough a spin. True to form, like many of their recipes, it was easy. However, it was VERY time consuming. Mix this, wait 5 minutes….spin that, wait 2 minutes, flip 101 times….you get the point. But I must admit that the end result was well worth the wait.

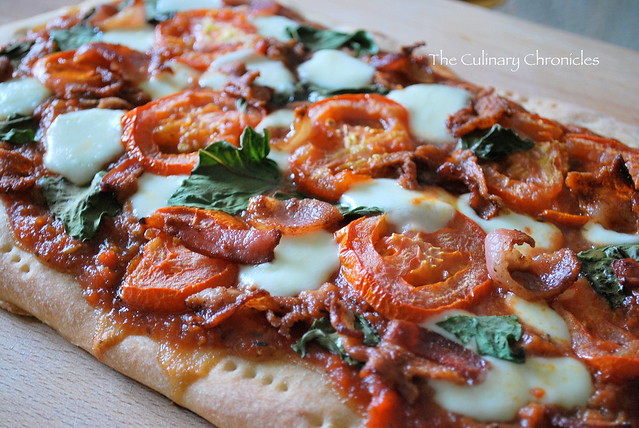
I also opted out of their “bianco” style pizza in lieu of a tomato based sauce I created myself. To honor the Margherita Pizza, I used homegrown basil, creamy Bocconcini Mozzarella, and quickly roasted sliced tomatoes. And for that added extra punch, I topped it all off with crumbled crispy bacon. Why? Because I LOVE bacon.

WE LOVED IT! It was so savory, gooey from the cheese, bright from the basil and 95% homemade so you know where everything comes from. Incidentally, I didn’t make the cheese though I have ALWAYS wanted to try! There’s always next time. We also drizzled some of the baked pizza with some deliciously high quality finishing olive oil….very Italiano!

Word to the wise, start this recipe when you aren’t the least bit hungry. Having to wait for the dough to rise is quite time consuming and could be a monster if you’re hungry! 🙂

Adding the fixings

Enjoy!

Margherita Pizza with Crispy Bacon
Serves Approximately 4

Pizza Dough (From America’s Test Kitchen)
3 Cups All Purpose Flour
1 ¼ Teaspoon Salt
1 ⅔ Cups Water
1 ½ Teaspoon Yeast
1¼ Teaspoon Sugar
2 Tablespoon Olive Oil (extra for greasing)
2 Tablespoons Corn Meal (finely ground)

Tomato Sauce
1 32 Ounce Can of Plum Tomatoes
1 Tablespoon of Extra Virgin Olive Oil
1 Clove Finely Dice Garlic
1 Teaspoon Red Chili Flakes
1 Teaspoon Dried Oregano
¼ Teaspoon Dried Fennel
Salt and Pepper to taste

Toppings
12 Fresh Bocconcini Mozzarella (cut in half)
1 Plum Tomato, sliced, and slightly roasted at 400 degrees for 10 minutes
4 Slices Bacon, cooked, and crumbled into large pieces
5-6 Fresh Basil Leaves

Preheat Oven to 450 degrees for one hour before you are ready to bake the pizza (preferably with a Pizza Stone).

In Mixer using a Dough Hook, combine flour, salt, and water just to combine. Approximately 3-4 minutes. Let rest for an additional 20 minutes.  Add yeast and sugar. Mix for 2 minutes. Turn on Mixer on High Speed and mix for an additional 6-10 minute until dough is glossy & smooth. Dough should begin pulling away from bowl. In another large bowl, oil the surface with 1 Tablespoon of Olive Oil Bowl. Transfer dough to bowl, add another 1 Tablespoon to the top. Cover with plastic wrap and let triple in volume – approximately 2-2 ½ hours.

While dough is resting, prepare tomato sauce. In a sauce pot, heat olive oil for 1 minute. Add garlic and cook until fragrant. Add chili flakes and heat for an additional minute. Add the entire can of tomatoes with liquids to the pot. Let simmer for 2-3 minutes. With the back of a wooden spoon (or potato masher), break down and crush the tomatoes. Add oregano and fennel and simmer on low for an additional 5 minutes. Remove from heat. In a food processor or blender, carefully puree the tomato mixture. Leave thick so that it spreads well over the dough. Salt and pepper to taste.

Cover a baking pan with 2 Tablespoons of Olive Oil. Sprinkle corn meal evenly across the pan and turn dough into pan. Lightly and gently spread dough across pan. If the dough does not hold shape and snaps back, let rest for an additional 5 minutes. Once the dough has been spread onto the pan, let it sit on countertop for another 5-10 minutes until it gets good and bubbly.

Dock the dough 30-40 times and parbake for about 15 minutes. It should be lightly brown on the top. Pull from oven and spread the Tomato sauce to cover.  Add roasted sliced tomatoes, cheese, and bacon. Put back into the oven for about 5-10 minutes until cheese is lightly brown. Add fresh basil and continue cooking for an additional 5 minutes.

Remove from oven and let cool in pan for a few minutes before transferring to a cutting board. Cut with a Pizza Slicer (or bread knife) and Enjoy!

Desserts/Pastries

White Chocolate-Macadamia Nut Cookies

Somewhere along the way I became known as a Cupcake Baker. Now don’t get me wrong…it’s not a bad title to have–especially since cupcakes are just so darn tasty and make people smile. But it made me realize that I have been sorely neglecting my other sweet treats—cookies, brownies, tarts, pies, etc.

In an effort to share the love amongst other baked goods, I decided to whip up a batch of cookies. After thumbing through some recipes, I found a post by Brown Eyed Baker for a White Chocolate-Macademia Nut Cookie. I have always LOVED White Chocolate Mac-Nut cookies and was intrigued with her rendition as she described it as “slightly crisp on the outside with a soft and chewy interior”–my favorite cookie profile. She also said that it was packed with chips and nuts–sounded like a winner to me!

After the first batch came out, I broke one in half and took a bite. Yup, she was right. Crispy outside and extremely chewy and chunky inside. In fact, while I was scooping out the dough onto the baking sheets, I was a bit worried that there were going to be too many chunks and not enough cookie dough. But fear not friends, as somehow things just worked itself out in the oven. What can I say? Magic happens in ovens 🙂


______________________________________________

White Chocolate Macadamia Nut Cookies
Yield: About 2 dozen cookies (depending on size)
From Brown Eyed Baker

Ingredients:
2 Cups All-Purpose Flour
½ Teaspoon Baking Soda
½ Teaspoon Salt
¾ Cup Butter (melted)
1 Cup Light Brown Sugar
½ Cup White Sugar
1 Egg
1 Egg Yolk
1 Tablespoon Vanilla Extract
1½ Cups Chopped Macadamia Nuts
2 Cups White Chocolate Chips
½ Cup Shredded Coconut (Optional)

Preheat the oven to 325 degrees F. Grease baking sheets or line with parchment paper or a silicone baking mat.

In a medium bowl, whisk together the flour, baking soda and salt and set aside. Beat together the melted butter, brown sugar, and white sugar. Beat in the egg, then beat in the egg yolk, then beat in the vanilla. Gradually add the flour mixture to the sugar mixture until just moistened. Stir in the macadamia nuts, coconut and white chocolate chips by hand with a rubber spatula. Roll into balls or drop by heaping tablespoons onto baking sheets, and press down on the cookies with your palm a bit to flatten.

Bake for 12-15 minutes or until the edges look golden brown and the middles don’t look quite set. Allow to finish cooling on the baking sheet.