Desserts/Pastries

Nutella Chocolate Chip Cookies


Not too long ago, I had stumbled upon a post by Sugar Cooking for Nutella Chocolate Chip Cookies. Oh yes, you read correctly….Nutella and Chocolate Chips in a Cookie!

Now I was intrigued. Sure, at first I was a little skeptical of the cookie’s flavor. Would it be true to the Nutella flavor or would it taste like a regular chocolate cookie??? Oh dear friends, I am happy to report that it does do justice to the luscious hazelnut-chocolate spread. Had I added additional hazelnuts to the dough,  it may have tasted even more like Nutella. However, I am a sans-nut kind of gal for my cookies and brownies. My exception is of course, White Chocolate Mac Nut Cookies—delish!

I made very little adjustments to Sugar Cooking’s interpretation of the cookie. I also chose to make the cookie a little smaller than my usual preferred cookie size–about a 1 tablespoon round versus a 2 tablespoon. I wanted to go for a smaller cookie that would only require a bite or two so that you could pop one in your mouth whenever your sweet tooth was calling.

I do have to caution you though, these chewy-chocolatey-nutella honoring cookies are darn addictive. You simply can’t just have one. 🙂

___________________________________________________

Nutella Chocolate Chip Cookies
Slightly Adapted from Sugar Cooking
Makes Approximately 30 Cookies

Ingredients:

1â…“ Cups All Purpose Flour
1 Tablespoon Unsweetened Cocoa
ÂĽ Teaspoon Baking Powder
ÂĽ Teaspoon Baking Soda
½ Teaspoon Salt
8 Tablespoon Unsalted Butter, room temperature
â…” Cup Granulated Sugar
â…“
Cup Light Brown Sugar
â…” Cup Nutella
½ Teaspoon Vanilla Extract
1 Large Egg
½ Cup Chocolate Chips

Mix together flour, cocoa, baking powder, baking soda and salt. Set aside dry ingredients.

Cream together butter, granulated sugar and brown sugar until light and fluffy. Mix in Nutella and vanilla extract. Mix in egg. Add flour mixture and mix until just incorporated. Add chocolate chips. Refrigerate dough for approximately an hour.

Drop approximately one tablespoon of dough 2 inches apart onto parchment lined baking sheets. Bake at 350 for about 11 minutes until the edges look set. Cool on baking sheet for 5 minutes then carefully remove to cooling racks.

Desserts/Pastries

Put the “Lime in the Coconut” Cookies

It’s a well known fact that I love Citrus and Coconut. So when you put them together…WOWZAH!!!

I stumbled upon this recipe on one of my many “research” nights and was instantly drawn in because of its two main ingredients. Sounds like a winner to me! And the icing on the cake? Simple, easy steps. Combine those factors and this gal was a HAPPY CAMPER!

And friends, it really was delish! Imagine a fabulous sugar cookie….light, chewy, slightly crisp from the rolled sugar. And then add the rich flavors of coconut with the bright flavors of lime. Sound amazing? Well it sure was!

Shame on me as I only made a half batch of these goodies–which I often do when testing out recipes. After all, butter isn’t cheap! But after one bite, I totally regretted it. <Sigh>….I guess I’ll have to make it again.

Feel like the Islands are calling you? Why not try these cookies? They are simply delightful….all that’s missing is a pina colada  🙂

_______________________________________________

Coconut Lime Chewy Sugar Cookies
From Rock Recipe

Ingredients:

2Âľ Cups All Purpose Flour
1 Teaspoon Baking Soda
½ Teaspoon Baking Powder
½ Teaspoon Salt
1 Cup Unsalted Butter, room temperature
1½ Cups Granulated Sugar
1 Large Egg
½ Teaspoon Vanilla Extract
Zest of one Large Lime
3 Tablespoons Fresh Lime Juice
½ Cup Unsweetened Toasted Coconut
½ Cup Sugar for Rolling Cookies

Preheat oven to 350 degrees. Line cookie sheets with parchment paper.

In a small bowl, stir together flour, baking soda, baking powder and salt. Set aside.

Using a mixer, beat together the butter and sugar until smooth and very fluffy. Beat in egg, vanilla extract, lime juice and lime zest. Gradually blend in the dry ingredients and toasted coconut.

Roll rounded teaspoonfuls of dough into balls, and roll in sugar. Place on lined cookie sheets about 1 1/2 inches apart.

Bake 8 to 10 minutes in the preheated oven, or until lightly browned.

Let stand on cookie sheet two minutes before removing to cool on wire racks.


Desserts/Pastries

French Macarons…..The Holy Grail of Pastries


Chocolate Macaron with Chocolate Espresso Ganache


I finally did it. Or more accurately, WE finally did it.

I, along with thousands of other aspiring bakers, have been meaning to try my hand at the elusive French Macarons. But for some reason or another, I always found myself pushing it off. “Why?”– you ask. Well, as the song goes….

“At first I was afraid, I was petrified……….”

It’s true. These finicky “Cookie Sandwiches” had me extremely intimidated. Simple in the number of ingredients—yet so much room for possible error. The amount of precision required to create them was simply daunting. But ever since I had my first bite of a Macaron from the famed Bouchon Bakery, I’ve been dreaming about them….Macarons—The Holy Grail of Pastries.

I cannot recount how many posts and articles I have read about Macarons to prepare myself for the day that I could muster up the courage to make them. But reading can only do so much—as I highly doubt I could fly a plane by just reading instructions alone! If I wanted to make Macarons, I’d just have to do it! Time to put on my big girl panties (or apron, in this case) and face my fears!

I entered this daunting experiment with my friend Carol and her sister Christine. Both ladies are quite the bakers and I figured it may be better to attack in numbers. In fact, the few days leading before our big baking day were filled with emails back and forth with various recipes and grocery lists. Heck, we were prepared!

I will not bore you all with the nitty gritty details of all 4+ hours we had in the kitchen but I will simply fast forward to the results (and some pointers). After all the stress and the worry, we were pretty darn successful!! We ended up making two types of Macarons that day. The first, a Chocolate Macaron with Chocolate Espresso Ganache (care of Annie Eat’s) and the second, a Lemon Macaron with Lemon Buttercream (care of Tartlette). Our Chocolate Macarons were the highlight of our day, warranting in my opinion a B+. Unfortunately, our Lemon Macarons were not so successful—-actually kind of a hot mess! The shells (or cookie) were suprisingly quite flavorful but just looked terrible….C- . Strangely enough, we did better with our first Macaron (chocolate) then our second batch (lemon)! We’re hoping it’s not beginners luck!

Here are some notes from our Chocolate Macaron with Chocolate Espresso Ganache:

  • We used Almond Meal that was ground with their skins intact (figured it was going to be chocolate so the speckles should be ok). Next time, I’ll try the Almond Meal without skins as the shells were a tad bumpy;
  • We had VERY good success using silpat mats but did not try parchment paper. Hey, why mess with a good thing?;
  • Getting a stiff peak with the egg whites is quite important before incorporating dry ingredients;
  • We tried both piping methods—piping “straight with a point” and as “commas”. The straight point yielded better tops – don’t worry about the points as they flattened anyhow;
  • We piped our shells on the slightly larger side–almost 2.5 inches. I’d recommend a little bit smaller…perhaps 1.5 inches;
  • Cookies were left for about 30-40 minutes to get the “hard shell” before baking
  • We baked each sheet for 9 minutes but it could have gone another 1-2 minutes (unfortunately there is no way to tell if they’re done than taking a bite into it). Also, the Macarons appeared to taste better the next day. “Aging” may possibly assist in texture/consistency;
  • If filling with Ganache, a thicker consistency is much easier to handle;
  • Using a scale to weigh things (as opposed to measuring) makes a difference.

Allowing the batter to rest after piping is imperative to achieve the macaron “crust”

Hallelujah!!! We have FEET!

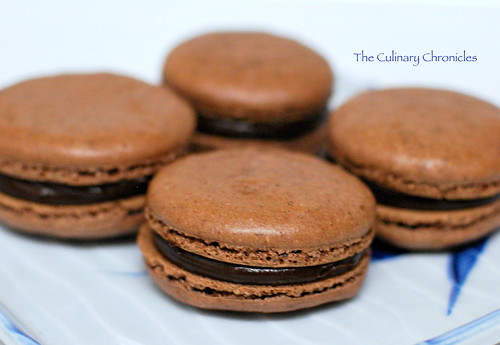
Chocolate Macaron with Chocolate Espresso Ganache…..these little guys make me smile.


Here are some notes about our Lemon Macaron with Lemon Buttercream:

  • We didn’t weigh out everything but measured with cups, spoons, etc. to see if it made a difference. Turns out, it does.;
  • Egg Whites may not have been the precise measurement (see above);
  • We ground Almond Slivers instead of using Almond Meal and could not get a fine enough grind that resulted in grainy batter;
  • By using Almond Slivers, there potentially could have been more natural oils in the mixture thus causing inconsistency in the batter;
  • The meringue we added was very stiff….perhaps too stiff;
  • We could have used more confectioner sugar in the buttercream.

At this point, they still looked like they had potential…..

AGGGHH!! These aren’t French Macarons—they look like shiny cookies!

Ladies and Gentlemen…..this is what you call a HOT MESS! EEEeekk! (Photo by Carol Le)

I do have to reiterate that although our Lemon Macarons looked a bit crazy, it tasted REALLY yummy! The freshly ground almonds gave a wonderful, “true” almond flavor to the shells. We even considered just calling them a cookie versus a macaron. That way, we’d feel better about it 🙂

Our Little Babies (Photo by Carol Le)

Now, with the first attempt out of the way, I’m happy to report that it wasn’t as ridiculous as I had expected. Tedious, yes…but not impossible. It did help TREMENDOUSLY to have two great gals to work with (a little sparkling wine didn’t hurt either!) to whom we could each bounce back ideas and suggestions to. Thanks Carol and Christine–I’d bake with you two anytime!

The Moral of the Story? I’ll have to quote Julia Child on this one:

“The only real stumbling block is fear of failure. In cooking you’ve got to have a what-the-hell attitude.”

I’m am sure that other attempts are in my near future 🙂


Desserts/Pastries

Big, Super-Nutty Peanut Butter Cookies

Growing up in Minnesota, I spent a lot of time with my paternal grandparents. Not only would they would watch over me while my folks were at work but they were my playmates since my elder siblings were way too cool to hang out with their baby sister 🙂

Sure, I admit it now; I was somewhat the quintessential baby sister feigning hurt feelings and tears when I was left out from my older siblings’ adventures. And what were the results? Comfort in the form of kind words from my grandparents followed by secret consolation treats like Fig Newtons and Andes Mint Candies—which I happily accepted. In fact, many foods have childhood memories directly associated to them.

One, for example, are Peanut Butter Cookies. They were my grandpa’s (who we called “Ôn”) favorite sweet treat that my sisters often baked for him. Sometimes they even let me make the traditional tracked prints on the top with a fork—a HUGE honor and joy for a 6 year old. To this day, I can’t eat a Peanut Butter Cookie without thinking about Ă”n. And this particular recipe from Cooks Illustrated would have pleased him greatly. First discovered by my sister, this recipe has made its way as one of my favorite cookies to make. A tad laborious (like all Cooks Illustrated recipes!) but the end results are second to none and pack HUGE peanut butter flavors. Super buttery, great texture from the chopped nuts and crunchy peanut butter, slightly crisp on the outside, chewy on inside….yummy.

Delicious on its own and also as a vessel for ice cream sandwiches, I know any Peanut Butter fanatic will just L-O-V-E these.

This one’s dedicated to my gentle hearted, WWF wrestling-watching grandpa. We miss and love you, Ôn!

______________________________________________________________

Super-Nutty Peanut Butter Cookies
From Cooks Illustrated
Makes approximately 30 Large Cookies

Ingredients:

2½ Cups All-Purpose Flour
½ Teaspoon Baking Soda
½ Teaspoon Baking Powder
½ Teaspoon Salt
½ lb. Butter, salted
1 Cup Packed Dark Brown Sugar
1 Cup Ganulated Sugar
1 Cup Extra-Crunchy Peanut Butter
2 Large Eggs
2 Teaspoons Vanilla Extract
1 Cup Roasted Salted Peanuts (ground in food processor to resemble bread crumbs)

Adjust oven rack to low center position; heat oven to 350 degrees. Sift flour, baking soda, baking powder, and salt in medium bowl.

In bowl of electric mixer or by hand, beat butter until creamy. Add sugars; beat until fluffy, about 3 minutes with electric mixer, stopping to scrape down bowl as necessary. Beat in peanut butter until fully incorporated, then eggs, one at a time, then vanilla. Gently stir dry ingredients into peanut butter mixture. Add ground peanuts; stir gently until just incorporated.

Working with 2 tablespoons dough at a time, roll into large balls, placing them 2 inches apart on a parchment-covered cookie sheet. Press each dough ball with back of dinner fork dipped in cold water to make crisscross design. Bake until cookies are puffed and slightly brown along edges, but not top, 10 to 12 minutes (they will not look fully baked). Cool cookies on cookie sheet until set, about 4 minutes, then transfer to wire rack to cool completely. Cookies will keep, refrigerated in an airtight container, up to 7 days.

Desserts/Pastries

Chocolate Toffee Cookies

Cookies = Good!

Brownies = Good!

So what can be better? Easy—-Cookies that have the rich decadent flavor and chewiness of a Brownie. Which is why this Chocolate Toffee Cookie was destined for greatness.

When I came across the original recipe in Bon Appetit, I knew that the low amount of flour and high amount of melted chocolate would yield a great brownie-like flavor. And it did! The toffee chips also intrigued me though next time, I would leave the toffee bits even more coarse as I think it got somewhat lost in the cookie. No worries because there will definitely be a next time 🙂

So for all you Chocoholics—what are you waiting for? This Cookies is just what the Dr. Cacao ordered!

Until next time friends…..Cheers!

_______________________________________________

Chocolate Toffee Cookies
Adapted from Bon Appetit
Makes 20 Large Cookies

Ingredients:

½ Cup All Purpose Flour
1 Teaspoon Baking Powder
ÂĽ Teaspoon Salt
16 Ounces Semi-Sweet Chocolate Chips
ÂĽ Cup Unsalted Butter, room temperature
1Âľ Cups Light Brown Sugar
4 Large Eggs, room temperature
1 Tablespoon Vanilla Extract
8 Ounces Coarsely Chopped Toffee Bars

Preheat oven to 350° degrees. Line large baking sheets with parchment paper or silpats.

Sift together flour, baking powder and salt in a small bowl. Combine chocolate and butter in a heatproof bowl. Melt the chocolate and butter in the microwave using 20-second intervals, stirring in between each period. Continue until the mixture is melted and smooth—about 100 seconds, depending on the oven. Do this slowly and carefully as to not scorch the chocolate. Cool mixture to lukewarm.

With a stand mixer, beat sugar and eggs in bowl until thick, about 5 minutes. Beat in chocolate mixture and vanilla. Stir in flour mixture and then toffee. Chill batter until firm but not hard, about 30 minutes.

Using a #10 ice cream scooper (or spoon approximately ¼ cup), place dough onto prepared baking sheets, spacing the cookies 2½ inches apart. With the bottom of a flat drinking glass, press slightly down on each cookie to lightly flatten the tops. Bake just until tops are dry and cracked but cookies are still soft to touch, about 15 minutes.

Cool on sheets. ENJOY!

Desserts/Pastries

Guava and Lilikoi Jam Thumbprint Cookies

Guava (Reddish-Pink) and Lilikoi (Yellow) Jam Thumbprint Cookies

Since being back from our wonderful vacation in Hawai’i, I’ve really missed the flavors and regional cuisine from the islands. To try and relive some of those “ono grindz”, I wanted to bake something with the Guava and Lilikoi (Passion Fruit) jams I picked up. After some inspiration from a friend’s post on Facebook (Thanks, DQ!), I decided to take the tropical flavors from the jams and make Thumbprint Cookies. After a few searches, I settled on Martha Stewart’s “Aunt Maggie’s Jam Thumbprint Cookies” for its simplicity and overall positive reviews.

How did it go? Well, I’ve been baking/cooking long enough to know that I should really trust my gut feelings when something seems odd in a recipe. But no, like a faithful puppy, I followed Martha’s recipe trusting that she would veer me in the right place. Yeah…I should have listened to myself.

Now in all fairness, the cookies weren’t “bad”. They just weren’t great….more like an “ok” response. What was the issue? First of all, the directions listed to make 1 inch balls using about 2 Tablespoons of dough. Sound off? Yup, it was. My cookies were way too big and thus I had to increase the baking time by about 3-4 minutes a batch. Second, two major ingredients were missing that you find in most cookie doughs…..Salt and Vanilla. And perhaps because there was no salt, the final cookie lacked some flavor.

But there was a glimmer of hope. The next day when I got home from work, the BF said that the cookies tasted better. Strange, right? But he was spot on…they DID taste better! Who knew that aging them would increase the flavor?! After all, it’s not a cheesecake!

Next time, I’m not taking the chance and will modify the recipe. I suggest adding about 1 Teaspoon of good quality Vanilla Extract, increase the granulated sugar amount from 1 cup to 1¼ cups, and add about ¼Teaspoon of Salt. Also, when forming the dough balls, only use about 1 tablespoon. I think if you try the modifications, you’ll be happy with your results.

Alohas!

Lilikoi Jam Thumbprint Cookies

Desserts/Pastries

White Chocolate-Macadamia Nut Cookies

Somewhere along the way I became known as a Cupcake Baker. Now don’t get me wrong…it’s not a bad title to have–especially since cupcakes are just so darn tasty and make people smile. But it made me realize that I have been sorely neglecting my other sweet treats—cookies, brownies, tarts, pies, etc.

In an effort to share the love amongst other baked goods, I decided to whip up a batch of cookies. After thumbing through some recipes, I found a post by Brown Eyed Baker for a White Chocolate-Macademia Nut Cookie. I have always LOVED White Chocolate Mac-Nut cookies and was intrigued with her rendition as she described it as “slightly crisp on the outside with a soft and chewy interior”–my favorite cookie profile. She also said that it was packed with chips and nuts–sounded like a winner to me!

After the first batch came out, I broke one in half and took a bite. Yup, she was right. Crispy outside and extremely chewy and chunky inside. In fact, while I was scooping out the dough onto the baking sheets, I was a bit worried that there were going to be too many chunks and not enough cookie dough. But fear not friends, as somehow things just worked itself out in the oven. What can I say? Magic happens in ovens 🙂


______________________________________________

White Chocolate Macadamia Nut Cookies
Yield: About 2 dozen cookies (depending on size)
From Brown Eyed Baker

Ingredients:
2 Cups All-Purpose Flour
½ Teaspoon Baking Soda
½ Teaspoon Salt
Âľ Cup Butter (melted)
1 Cup Light Brown Sugar
½ Cup White Sugar
1 Egg
1 Egg Yolk
1 Tablespoon Vanilla Extract
1½ Cups Chopped Macadamia Nuts
2 Cups White Chocolate Chips
½ Cup Shredded Coconut (Optional)

Preheat the oven to 325 degrees F. Grease baking sheets or line with parchment paper or a silicone baking mat.

In a medium bowl, whisk together the flour, baking soda and salt and set aside. Beat together the melted butter, brown sugar, and white sugar. Beat in the egg, then beat in the egg yolk, then beat in the vanilla. Gradually add the flour mixture to the sugar mixture until just moistened. Stir in the macadamia nuts, coconut and white chocolate chips by hand with a rubber spatula. Roll into balls or drop by heaping tablespoons onto baking sheets, and press down on the cookies with your palm a bit to flatten.

Bake for 12-15 minutes or until the edges look golden brown and the middles don’t look quite set. Allow to finish cooling on the baking sheet.

Desserts/Pastries

A.B.’s Chewy Chocolate Chip Cookies

Some things just don’t get old…..

For me, that list includes my Jack Johnson albums, watching “The Breakfast Club”,  Foster Farm Chicken Commercials, and perusing through the Sunday morning Target ads. Oh, and of course, Chocolate Chip Cookies.

Very few things beat the beautiful aromas of freshly baked chocolate chip cookies 🙂

So, when one of my Besties was driving through town on a road trip with her family, I thought I would pack them a little basket of snacks that would include a few cookies. If anything, I thought it would occupy her beautiful little daughter on the car ride down to the aquariums, too.

Now, everyone has their texture preference of a chocolate chip cookie. I prefer the slightly crunchy outside and chewy interior—with of course, TONS of ooey-gooey chips! I initially wanted to give the NY Times Best Chocolate Chip Cookie recipe a go but quite frankly, didn’t have the extra 24 hours to age the dough. Eh, there’s always next time.

I decided to give our boy, Alton Brown’s, recipe a try. With over 600+ reviews and a title of “chewy”, I figured it couldn’t be bad.

And it wasn’t.

That Alton. He always gets me. 🙂

True to form, crispy on the outside—chewy on the inside. With two…count them, TWO cups of chocolate chips. Mmmm….

A few things to note:

  • I didn’t have Bread Flour on hand, so per Joy of Baking, I substituted with All Purpose Flour. Not exact but the ratios are pretty close.
  • I had wanted to add a little Fleur de Sel over the cookies before they baked but had run out. So, I used a bit of course Kosher Salt but since it’s flaked—it melted into the cookie too much. Meh, now I know better 🙂
  • Although the recipe said you can get 2½ dozen cookies, I only got 20. Pretty typical results for me actually—I never get the amount recipes quote.

And of course, while you enjoy them, don’t forget an extra large and icy glass of milk. 🙂

Cheers!

A shower of chocolate chips

I like to use an ice cream scooper for nice, round cookies

6 will fit on one Silpat covered baking sheet

These cookies took about 12 minutes–turning the sheet once half way through the baking time

Mmmm….Cookies….

Chewy Chocolate Chip Cookies
From Alton Brown
Makes 20 Cookies

Ingredients
2 Sticks Unsalted Butter
2ÂĽ Cups Bread Flour
1 Teaspoon Kosher Salt
1 Teaspoon Baking Soda
ÂĽ Cup Sugar
1ÂĽ Cups Brown Sugar
1 Egg
1 Egg Yolk
2 Tablespoons Milk
1½ Teaspoons Vanilla Extract
2 Cups Semisweet Chocolate Chips

Heat oven to 375 degrees F.

Melt the butter in a heavy-bottom medium saucepan over low heat. Sift together the flour, salt, and baking soda and set aside.

Pour the melted butter in the mixer’s work bowl. Add the sugar and brown sugar. Cream the butter and sugars on medium speed. Add the egg, yolk, 2 tablespoons milk and vanilla extract and mix until well combined. Slowly incorporate the flour mixture until thoroughly combined. Stir in the chocolate chips.

Chill the dough, then scoop onto parchment-lined baking sheets, 6 cookies per sheet. Bake for 14 minutes or until golden brown, checking the cookies after 5 minutes. Rotate the baking sheet for even browning. Cool completely and store in an airtight container.

And to make them EXTRA special, package them in clear bags with a pretty little ribbon

Desserts/Pastries

Molasses Cookies—Mmm…so good!

One of my favorite childhood memories of the holidays was going to visit my mom at Donaldson’s—the department store that she worked at in Minnesota. My siblings and I would head over to the mall with our dad and meander about. Too young at that age to be interested in Christmas shopping, I would look forward to all of the holiday decorations and hoopla of the season. But my ultimate memories surround the moments when the elevator doors would open in the department store and the amazing aromas of gingerbread would fill the air. It was so magically intoxicating and to me, it was heaven.

I truly believe that’s what started my love for the flavor and smell of gingerbread. There’s just something about that spicy scent that will instantly transport me back to my youth—and as I believe, nostalgia can be that hidden “taste” bud. :) Gingerbread cookies, gingerbread loaves, gingerbread lattes—you name it, I love them all!

So when the holidays come around, I go into full gingerbread baking mode. Of my favorites to make are my Molasses Cookies. They carry the same spicy punch that a great gingerbread cookie should have but are slightly chewy in the inside and crisp on the outside–which is this gal’s favorite cookie profile. :) Through trial and error, I’ve tweaked the below recipe from an online post I found years ago. I am sorry to say that I cannot remember where I first snagged it—so my apologies that I can’t give due credit to the original.

They are SUPER yummy and very easy to pull together. If you’re looking to transport your home into the holiday spirit—try whipping up a batch of these Molasses Cookies. It will make your house smell AMAZING  (almost as good as the gingerbread aromas of my childhood). :)

Molasses Cookies © Photo rights reserved.

Molasses Cookies
Ingredients:

3/4 Cup Unsalted Butter, melted
1 Cup Light Brown Sugar
1 Egg at room temperature
1/4 Cup Molasses
2 Cups All-Purpose Flour
1 Teaspoons Baking Soda
1/2 Teaspoon Salt
2 Teaspoon Ground Cinnamon
1 Teaspoon Ground Cloves
1 Teaspoon Ground Ginger
1 Cup Granulated Sugar (to roll dough in)
2 Tablespoons Confectioner Sugar (for dusting)

In a medium bowl, mix together the melted butter, light brown sugar, and egg until smooth. Stir in the molasses. In another bowl, combine the flour, baking soda, salt, cinnamon, cloves, and ginger. Mix dry ingredients into the molasses mixture. Cover and chill dough for 1 hour.

Preheat oven to 375 degrees. Roll dough into walnut sized balls and roll them in the remaining 1 cup granulated sugar. Place cookies 2 inches apart onto parchment lined baking sheets. Using the bottom of a flat glass, gently press down on the cookies to lightly flatten.

Bake for 7-8 minutes until tops are cracked. Remove from baking sheets and cool on wire racks. Once cookies have completely cooled, lightly dust them with confectioner sugar.

Note: Dried spices as well as baking soda & baking powder lose potency over time. For best results, I suggest keeping them in your cupboard for no longer than 6 months before discarding.

Desserts/Pastries

Snickerdoodles 2.0

When the bf told me a few years ago that his FAVORITE cookie was the Snickerdoodle, I was a bit surprised. In all honesty, I hadn’t had many Snickerdoodles in my life, recalling that they were pretty much a sugar cookie with an extra application of ground cinnamon prior to baking. They were okay for me but not a cookie that I would first reach for.

But, when my better half has specific treats that he likes, I’ve got to do my best to make it happen! :) I had made several attempts in the past of his beloved cookie with mediocre results—yielding more of a “butter cookie flavor” than what I envision as a Snickerdoodle. I struggled with how I could kick up the flavor a bit without losing the integrity of the simple dough.

After many variations, I finally stumbled upon a great end product—and it was simple too! I’ve added extra cinnamon in the dough and substituted a portion of the granulated sugar to light brown sugar. Lastly, right when the cookies come out of the oven, I suggest sprinkling some of the remaining coating mixture of cinnamon/sugar on the warm cookies for an added “oompf” of texture and flavor. What a difference a few steps make! I was clearly making it too complicated in my first few attempts. 🙂  Ooops!

The bf has proclaimed that it’s my best cookie yet—lightly crispy on the outside and chewy in the inside. This kicked up version of a classic has definitely changed my opinion on the Snickerdoodle.

Special Note: I’ve used SaiGon Cinnamon in my cookies—a gift from my cousin who had visited the Motherland :) SaiGon Cinnamon direct from Viet Nam is often not ground as fine like the cinnamon you’ll find in supermarkets or your average grocery store in the States. Hence, you’ll notice the larger flecks of it in my photos of the cookies.


Snickerdoodles 2.0 © Photo rights reserved.
Snickerdoodles 2.0 Cooling on Racks © Photo rights reserved.


______________________________________________

Snickerdoodle Cookies 2.0
Makes approximately 24 cookies

Ingredients:

½ Cup Butter (1 stick) at room temperature
Âľ Cup Granulated Sugar
ÂĽ Cup Light Brown Sugar
1 Teaspoon Ground Cinnamon
ÂĽ Teaspoon Baking Soda
ÂĽ Teaspoon Cream of Tartar
1 Large Egg at room temperature
½ Teaspoon Vanilla
1 ½ Cups All Purpose Flour

For Coating:
3 Tablespoons Granulated Sugar
1 ½ Teaspoons Cinnamon

Preheat oven to 375 degrees and prepare two baking sheets lined with parchment paper.

Using your stand mixer (or large bowl with handheld mixer) beat butter, Âľ cup of sugar, and ÂĽ cup brown sugar until very smooth (approximately 2 minutes until smooth). Stop periodically to scrape down sides of the bowl. Add egg and vanilla until well blended.

In another bowl, mix flour, 1 teaspoon of cinnamon, baking soda, and cream of tartar. Carefully add dry ingredients into the wet mixture. Combine until smooth. Roll dough into 1 inch balls. Dough may be refrigerated if it is too soft to handle.

In a small dish, mix remaining sugar and the cinnamon. Roll each ball in cinnamon sugar mixture and place on parchment-lined baking sheets. Using the bottom of a glass, gently flatten each cookie to about ½ inch thick.

Bake the cookies for about 10-12 minutes or until they are light golden brown around the edges. Remove from oven and immediately sprinkle each cookie with the remaining cinnamon sugar mixture. Place on a wire rack to cool.