Side Dish

Zesty Cilantro-Lime Rice

Cilantro-Lime Rice

Usually when I make a side dish for tacos or fajitas, I whip up a version of my Spanish Rice. It’s a straight forward method with tomato sauce, chiles and a few other aromatic and spices.

But when I want a bit of a lighter flavor, I make a pot of Zesty Cilantro-Lime Rice.

Cilantro-Lime Rice

It also starts off with onions, garlic, and chicken stock for a rich flavor. But then it’s all finished off with bright citrus-y notes with lots of lime juice, zest of fresh cilantro.

Oh, and there may be a tab of butter or so for added richness.

Definitely a good thing.

Cilantro-Lime Rice

If you’re a bit shy about making rice on the stove top and prefer a rice cooker, just follow the initial steps below. Before adding in the stock, put the rice, cooked onions/garlic into the pot of your rice cooker. Pour in the stock, salt and then follow your machine’s directions. Once done, just follow the rest of the directions to finish it off.

Easy Peasy.

Happy Taco Tuesday!

________________________________________

Zesty Cilantro-Lime Rice
Serves 2-3

Ingredients:

1 tablespoon olive oil
2 tablespoons unsalted butter, divided
½ cup diced white onion
½ tablespoon minced garlic
1/8 teaspoon red pepper flakes
1 cup white rice (long grained preferred)
2 cups low sodium chicken stock or vegetable stock
¼ teaspoon kosher salt
½ cup chopped cilantro
2 tablespoons fresh lime juice
zest of 1 lime

In a small pot that has a lid, heat the olive oil and one tablespoon of butter over medium heat. Once melted add the white onions and cook for 2-3 minutes until softened. Add the garlic, pepper flakes and cook for an additional minute. Stir in the rice and cook for one more minute.

Add the chicken stock, kosher salt and bring to a boil. Cover the pot and reduce the heat to low. Simmer until all the liquids have evaporated and the rice is tender—about 18-20 minutes. Once done, remove the pot from the stove and let sit, covered for 5 minutes.

Remove the lid and add the remaining butter, cilantro, lime juice and zest. Use a fork to fluff the rice grains.

Enjoy!

Drinks

Blended Mango Margaritas

Blended Mango Margaritas

Let’s get one thing straight.

In my book, it’s not a Cinco de Mayo celebration if there aren’t margaritas on hand –whether there’s booze in them or not. A chilled beverage filled with tons of citrus that is the perfect sidekick to spicy salsas, tacos, ceviche, barbacoa….let’s face it–pretty much anything!


Blended Mango Margaritas

As we continue on with the Cinco de Mayo plans, it’s only fit to think about what type of margaritas to serve. I usually lean towards my standard classic margarita on the rocks with a heavy salt rim. But if you’re interested in something different, here are a few options:


Blood Orange Margaritas

Blood Orange Margaritas

Mint Margaritas

Mint Margaritas


Pomegranate Margaritas

Pomegranate Margaritas


Palomas
(not technically a margarita but a fantastic close cousin)

Palomas


I managed to get my hands on some deliciously sweet ataulfo mangoes and thought they would be fantastic in a blended margarita. I tossed them into the blender with some booze, fresh citrus, ice and voila— a fiesta in a glass!

Blended Mango Margaritas

If you don’t have fresh mangoes on hand, frozen mangoes could also be used. However, you may want to reduce the amount of ice and add a bit more simple syrup to taste. I also chose to rim the glass with sugar but if you happen to have some chili-lime salt (ie. Tajin) then that would be another fab flavor layer.

Salud!

_________________________________

Blended Mango Margaritas
Serves 2

Ingredients:

1 lime wedge
sugar
2½ cups ripe mangoes
4 ounces premium tequila
2 ounces Cointreau or triple sec
2 ounces fresh lime juice
2 ounces fresh orange juice
1 ounce simple syrup (more if you prefer a sweeter cocktail)
1 cup crushed ice
limes slices to garnish

Use the lime wedge and rim the edge of two glasses. Dip/roll the rim into the sugar and coat the edge of each glass.

Place all the remaining items into a blender and puree until smooth. Pour the contents into the rimmed glass and garnish with a lime slice. Cheers!

Drinks

Blood Orange Margaritas

Blood Orange Margaritas

TEE…GEE…EYE…EFF!!!!!

And what better way to ring in Aloha Friday than with a delish and refreshing cocktail?

Blood Orange Margaritas

Lately, blood oranges have been incredibly abundant in my neck of the woods. These little guys look quite unassuming from the outside but when you cut into them, they reveal an extraordinarily beautiful hue. As for the flavor, I find them to be slightly reminiscent of tangerines which goes so well with a kick of tequila.

And with that—have a wonderful weekend, Friends! Salud!

_____________________________________________

Blood Orange Margaritas
Serves 1

Ingredients:

lime wedge
coarse salt
ice
4 ounces blood orange juice
2 ounces premium tequila
1 ounce Cointreau or triple sec
1 1/2 ounces fresh lime juice
2 ounces simple syrup
additional blood orange and lime slices for garnish

Use the lime wedge and rim the edge of a margarita glass. Dip the rim into salt and coat the edge of the glass.

Fill a cocktail shaker with ice and add the blood orange juice, tequila, Cointreau, lime juice, and simple syrup. Cap the shaker and vigorously shake for 15-20 seconds. Pour the contents into the glass and garnish with additional orange and lime slices

Drinks

Toasting the Oscars with a “Sparkling Tangerine Tiger”

Sparkling Tangerine Tiger

I adore Oscars Season. The movies, the glitz, the fashion, the glamor, the festivities….

And like the Superbowl, I usually do a spread of my picks for the awards.

Sparkling Tangerine Tiger

At this point, I’ve watched 7 out of the 9 nominees for Best Picture. Not too shabby right?

And since I’m having a little shindig at mi casa to watch the event, my pals and I attempted to create a menu as an homage to some of the films:

Sparkling Tangerine Tiger

To pair with our Oscars bites, I wanted to serve my guests with a cocktail…..or two, or three.

As my nod to Life of Pi, I’ll be shakin’ up a refreshing cocktail using Bombay Sapphire Gin, fresh tangerines, limes, raw sugar, mint and a good dose of sparkling wine. Peppery, bright, refreshing, and just plain lovely. After much consultation from my cocktail lovin’ peeps, I’ve dubbed this concoction, the Sparkling Tangerine Tiger.

Rawwwrrr……

However you choose to cerebrate, hope y’all enjoy the Oscars tomorrow—I know we will!

____________________________________________

Sparkling Tangerine Tiger Cocktail
Serves 2

Ingredients:

1/2 tangerine, cut into small wedges
1/2 lime, cut into small wedges
10 fresh mint leaves
1 tablespoon raw sugar
2 1/2 ounces Bombay Sapphire
ice
6 ounces sparkling wine
*garnish with additional mint leaves, lime wedges and tangerine wedges

In a shaker, muddle the tangerine, lime, mint and sugar. Add the gin and shake well.

Fill two glasses with ice. Strain and divide the liquids amongst the two glasses. Top each glass with 1/2 of the sparkling wine. Garnish with citrus wedges and mint leaves.

Desserts/Pastries

Mojito Cookies……Havana is Calling.

Mojito Cookies


I know I should be a little more humble about this but…….

I make amazing Mojitos.

As in so freaking good, you would think you were being whisked away to the streets of Havana.


Mojito Cookies


So when I saw that my beloved neighborhood Cuban patisserie, Azúcar offered mojito cookies, I felt compelled to try my hand at making some!

Using a sugar cookie base from Baking Illustrated , I incorporated a “mint sugar” I made and fresh lime zest to give that bright kick that mojitos are so known for.


Mint Sugar


Chewy, crispy, slightly sweet, and minty.


Mojito Cookies

Now if there was only some subtle way I could sneak the rum into them…….. 🙂

_____________________________________

Mojito Cookies
Makes approximately 2 dozen
Adapted from Baking Illustrated Soft and Chewy Sugar Cookies

Ingredients:

2 Cups All Purpose Flour
½ Teaspoon Baking Powder
½ Teaspoon salt
1 Cup Unsalted Butter, softened but still cool
1 Cup Granulated Sugar, plus ½ cup for rolling dough
1 Tablespoon Light Brown Sugar
1 Large Egg
1½ Cups Loosely Packed Mint Leaves, washed and thoroughly dried
1 Tablespoon Lime Zest
1½ Teaspoons Vanilla Extract

Adjust the oven racks to the upper- and lower-middle positions and heat the oven to 375 degrees F. Line 2 large baking sheets with parchment paper or spray them with nonstick cooking spray.

In a food processor, pulse one cup of granulated sugar and mint leaves until the leaves have been ground down and combined with the sugar (see photo).

Whisk the flour, baking powder, and salt together in a medium bowl; set aside.

Cream the butter, the mint sugar, and the brown sugar at medium speed until light and fluffy, about 3 minutes, scraping down the sides of the bowl with a rubber spatula as needed. Add the egg, lime zest and vanilla; beat at medium speed until combined, about 30 seconds. Add the dry ingredients and beat at low speed until just combined, about 30 seconds, scraping down the bowl as needed.

Place the ½ cup sugar for rolling in a shallow bowl. Fill a medium bowl halfway with cold tap water. Dip your hands in the water and shake off any excess (this will prevent the dough from sticking to your hands and ensure that the sugar sticks to the dough). Roll a heaping tablespoon of dough into a 1½-inch ball between moistened palms, roll the ball in the sugar, and then place it on the prepared baking sheet. Repeat with the remaining dough, moistening your hands as necessary and spacing the balls about 2 inches apart (you should be able to fit 12 cookies on each sheet). Butter the bottom of a drinking glass and then dip the bottom of the glass in the remaining sugar. Flatten the dough balls with the bottom of the glass until they are about ¾ inch thick, dipping the glass in sugar as necessary to prevent sticking (after every 2 or 3 cookies).

Bake until the cookies are golden brown around the edges and their center are just set and very lightly colored, 15 to 18 minutes, rotating the baking sheets front to back and top to bottom halfway through the baking time. Cool the cookies on the baking sheets about 3 minutes; using a wide metal spatula, transfer the cookies to a wire rack and cool to room temperature. Store in an airtight container at room temperature.


Desserts/Pastries

Fluffy Lime Cupcakes with Lime Whipped Cream

Fluffy Lime Cupcakes with Lime Whipped Cream


Ever since I picked up these super cute lime green-polka dot cupcake liners, I’ve been wanting to make some lime cupcakes. Something light, fluffy, and fragrant. From the combination of cake flour and egg whites, these cuppies fit the bill perfectly.

I also went back and forth for awhile between a few different possible frostings for the cakes—-lime cream cheese, lime buttercream, lime swiss meringue buttercream….so many options. And then the lime whipped cream I had made for the Key Lime Cheesecake popped in my mind. I just loved it with the cheesecake and felt like it would be great with the cupcakes. After a quick survey of some peeps, it was settled—Lime Whipped Cream it was.


Fluffy Lime Cupcakes with Lime Whipped Cream


And it was P-E-R-F-E-C-T! Since the cakes were so light and fluffy, the whipped cream was a perfect pairing! I had never had a cupcake topped with whipped cream before and the end result was actually quite refreshing.

Flavored whipped cream….my new FAV cupcake topping. If you’ve never tried the combo before, immediately pick up some heavy cream and go directly to your kitchen and try it out!

Mmmmm…..

Thanks for reading and have a lovely weekend!

_______________________________________________

Fluffy Lime Cupcakes with Lime Whipped Cream
Makes 24 Cupcakes

Ingredients:

Cupcake Batter (Adapted from My Baking Addiction):
2 ¼ Cups Cake Flour
1 Tablespoon Baking Powder
½ Teaspoon Salt
1 ¼ Cups Buttermilk
4 Large Egg Whites, at room temperature
1½ Cups Sugar
1½ Tablespoons Fresh Lime Zest
½ Cup Unsalted Butter, at room temperature
1 Tablespoon Fresh Lime Juice
1 Teaspoon Key Lime Extract

Lime Whipped Cream:
1 Cup Heavy Cream, chilled
2 Tablespoons Sugar
1 TablespoonsFresh Lime Zest

Garnish:
Fresh Lime Zest
Fresh Lime Slices

Preheat oven to 350˚ F.  Line cupcake pans with paper liners.

In a medium bowl, sift together the cake flour, baking powder and salt. Whisk together the milk and egg whites in another bowl. Put the sugar and lime zest in a mixer bowl and rub them together with your fingers until the sugar is moist and fragrant. Add the butter and with the paddle attachment beat at medium speed with a stand mixer until ingredients are light and fluffy. Beat in the extract and lime juice, then add one third of the flour mixture, still beating on medium speed. Mix in half of the milk-egg mixture, then beat in half of the remaining dry ingredients until incorporated. Add the rest of the milk and eggs, mixing until the batter is well mixed, then add the last of the dry ingredients. Continue beating the mixture for another few minutes to ensure that the batter is thoroughly mixed and well aerated. Divide the batter evenly between the prepared liners, filling each about ¾ full. Bake for 18-22 minutes, or until the cupcakes are well risen and springy to the touch and a toothpick inserted in the center comes out clean.  Allow to cool in the pans for a few minutes, and then transfer the cupcakes to a wire rack to cool completely.

While cupcakes are cooling, prepare the whipped cream. Using a standing mixer fitted with the balloon whisk attachment, whip the chilled heavy cream on high until it just holds stiff peaks. Slowly sprinkle in the sugar until you reach a thick consistency. Add in the zest and whip until combined.

Fill a piping bag with a fitted tip. Pipe on the whipped cream on top of cooled cupcakes. Garnish with additional lime zest and lime slices.

Desserts/Pastries

Key Lime Cheesecake

Key Lime Cheesecake

I know I always harp on about it.

But I freaking love citrus.

In the foods I cook/eat, beverages I like to drink, fragrances for my hand soaps and lotions, and even for decor.

I’m a Citrus-a-holic.

Key Lime Cheesecake

I know. I’ve got issues 🙂

Key Lime Cheesecake

Since Key Lime Pie ranks among one of my top favorite desserts, I wanted to take it’s bright flavors and marry it with one of my other favorite sweet treats—Cheesecake!

If you love citrus and limey things, this dessert is perfect for you! The tartness is fully pronounced but not overwhelming and the citrus-whipped cream is the ideal pairing.

As I mentioned in my post about Key Lime Pie with a Macadamia-Graham Cracker Crust, it’s tough work to squeeze the juice out of those little buggers! But Key Limes have such a distinct flavor that I didn’t want to substitute them with Persian Limes. Lucky for me, my sis had just picked up a bottle of pure Key Lime juice from Williams Sonoma. And since I was intent on packing in as much citrus flavor into this cheesecake as I could, I also used Key Lime Extract. (My sis had given me a bottle as a gift since she knows what a key lime freak I am!)

Key Lime Cheesecake

Sure, if you just “kinda” like the flavors of citrus, you could decrease the amounts of juice, zest, or extract. But what fun would that be?

I myself, just might even try to add more zest next time. 🙂

And with that my friends, thanks for reading and have a WONDERFUL MOTHER’S DAY WEEKEND!

__________________________________________

Key Lime Cheesecake
Makes one 9-inch Cheesecake

Ingredients:

Crust:
2 Cups Graham Cracker Crumbs
3 Tablespoons Sugar
6 Tablespoons Unsalted Butter, melted

Filling:
24 Ounces Cream Cheese, at room temperature
¼ Cup Sour Cream, at room temperature
1 Cup Sugar
3 Large Eggs, at room temperature
3 Tablespoons Key Lime Juice
2 Tablespoons Lime Zest
1½ Teaspoon Key Lime Extract

Whipped Cream:
1 Cup Heavy Cream, chilled
2 Tablespoons Sugar
1 Tablespoons Lime Zest
Preheat oven to 325 ˚F.

Combine the graham cracker crumbs, sugar and butter until moistened and resembles the texture of wet sand. Pour into a 9-inch springform pan and press crumbs into the bottom of the pan and about one inch up the sides. Bake for 8-10 minutes until golden and cool to room temperature.

Using a standing mixer fitted with the paddle attachment, whip the cream cheese and sour cream until its light and fluffy. Gradually mix in the sugar.  Mix in the eggs one at a time, beating well after each addition.  Add the lime juice, lime extract and zest until well combined.  Pour the filling over the cooled crust.

Place the pan on the middle rack of the oven with a pan half full of hot water on the bottom rack of the oven. Bake for 50-60 minutes or until the center is set. Turn off the oven and allow the cake to sit in the oven with the door propped open for about 30 minutes. (To prop the oven door, I use a wooden handled spoon to keep it ajar a few inches). Remove from the oven and transfer to a wire rack.  Allow the cake to cool for an additional 30 minutes.  Wrap well with plastic film and foil. Refrigerate for at least 8 hours. Carefully remove the sides of the pan by running a hot knife around the outside of the cake.

When you are ready to serve, prepare the whipped cream. Using a standing mixer fitted with the whisk attachment, whip the chilled heavy cream on high until it just holds stiff peaks. Slowly sprinkle in the sugar until you reach a thick consistency. Add in the zest and whip until combined.

Pipe the whipped cream on top of the cheesecake and garnish with additional lime slices and zest.

Enjoy!

Drinks · Pork · Sponsored

Fat Tire® Braised Carnitas Tacos with Fat Tire® Chavelas

Fat Tire® Braised Carnitas Tacos and Chavelas

I don’t indulge in beers too much these days. Let’s face it—without my college metabolism, it just doesn’t sit that well with me (or my hips!) anymore. But I do make exceptions for an occasional New Castle® or Fat Tire® from time to time.

So you can imagine my delight when, as part of the Foodbuzz Tastemaker Program, I was challenged to create a dish that featured and paired with a New Belgium Brewing Company beer. Which includes Fat Tire®! 🙂

Fat Tire® Braised Carnitas

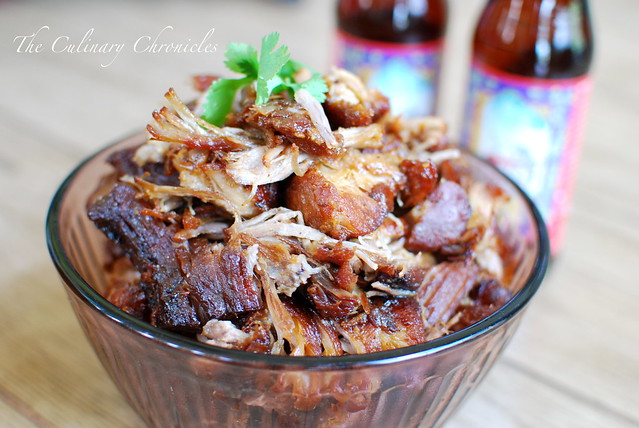
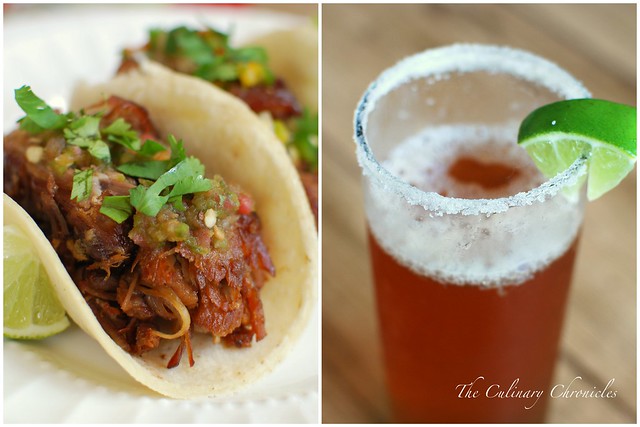
I immediately knew that I wanted to incorporate the “hoppy” amber ale into a slow braise pork—ultimately to create Carnitas. By adapting David Lebovitz’ recipe, I was able to achieve tender, flavorful pork that was beautifully crispy on the outside. O…M…G.

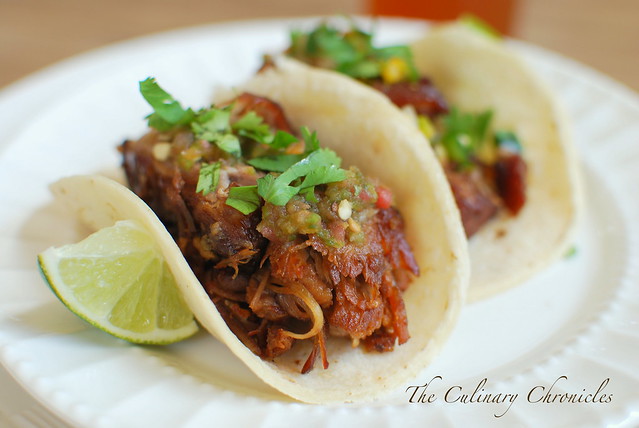
Wrapped in warm tortillas and topped with a few spoonfuls of pico de gallo, salsa negra and a squeeze of lime—the Carnitas were Delicioso!!!

Fat Tire® Braised Carnitas Tacos

I confess, I turned to the local mercado for the fresh tortillas and salsas. I had every intention of making them myself but when I went to the mercado for some ingredients, I encountered these fabulous women making it all from scratch for a fraction of the cost it would take me to make.

Yep. I opted for the shortcut this time. But for the record……this gal can fix up some yummy salsas. 🙂

To wash it all down, I whipped up an homage to Taqueria Tlaquepaque’s Chavelas. Tlaquepaque was one of my beloved taquerias in San Jose that served up AMAZINGLY fresh and delish food. But the food was only 1/2 of the reason why my dear gal friends and I would congregate there. The other half was for the Chavelas —Mexican beer mixed with fresh lime juice and salt. Very few things in life are more refreshing than a frosty goblet of Chavela. True Story.

Fat Tire® Chavelas

Turns out that Fat Tire® in a Chavela is PDA.  (Translation: Pretty. Darn. Amazing.)

Fat Tire® Braised Carnitas Tacos & Chavelas

Incorporating Fat Tire® in a dish? Not as difficult as one would think  🙂

And as luck would have it—just in time for Cinco de Mayo!!!

___________________________________________________________

Fat Tire® Braised Carnitas
Adapted from David Lebovitz

Ingredients:

5 Pounds Boneless Pork Shoulder, cut into 5-inch chunks, trimmed of excess fat
2-3 Tablespoon Sea Salt
2 Tablespoons Vegetable oil
2 Bottles Fat Tire® Ale (24 ounces)
1 Cup White Onion, diced
1 Tablespoon Fresh Garlic, finely diced
1 Teaspoon Chile Powder
¼ Teaspoon Paprika
¼ Teaspoon Cayenne Powder
¼ Teaspoon Ground Cumin
2 Bay Leaves

Using paper towels, dry off the pork and generously season with salt.

Heat the oil in a large dutch oven over medium-high heat. Cook the pieces of pork in a single layer until very well-browned, turning them as little as possible so they get nice and dark before flipping them around. If your cooking vessel is too small to cook them in a single-layer, cook them in two batches. Be sure to take your time to get a deep brown color as it enhances the flavor. This usually takes me about 30 minutes to properly brown all the meat.

Once all the pork is browned, remove them from the pot and blot away any excess fat with a paper towel. Discard all but one tablespoon of the grease that remains in the pot. Lower the heat to medium. Add the onions to the pot and cook until translucent. Add the garlic and cook for an additional one to two minutes.  Then pour in the beer, scraping the bottom of the pot with a wooden spoon to release all the brown bits.

Heat the oven to 350F degrees.

Add the pork back to the pot and add the remaining of the seasonings and spices. Braise in the oven uncovered for 3-3½ hours, turning the pork a few times during cooking, until much of the liquid is evaporated and the pork is falling apart. Remove the pan from the oven and lift the pork pieces out of the liquid and set them on a platter.

Once the pork pieces are cool enough to handle, shred them into bite-sized pieces discarding any big chunks of fat. Return the pork pieces back to the roasting pan and cook in the oven, turning occasionally, until the liquid has evaporated and the pork is crispy and caramelized.

Serve with corn tortillas and your choice of salsas and toppings.

___________________________________________________________

Fat Tire® Chavelas
Serves One

Ingredients:

1 Bottle Fat Tire® Ale (12 ounces)
2 Tablespoons Fresh Lime Juice
Sea Salt
Lime Wedges

Chill glass in the freezer for 15 minutes. Rim the glass using a lime wedge and dip into sea salt. Pour the lime juice in the bottom of the glass and pour well chilled Fat Tire® Ale  over it. Serve and garnish with lime wedges. Enjoy!

Desserts/Pastries

Put the “Lime in the Coconut” Cookies

It’s a well known fact that I love Citrus and Coconut. So when you put them together…WOWZAH!!!

I stumbled upon this recipe on one of my many “research” nights and was instantly drawn in because of its two main ingredients. Sounds like a winner to me! And the icing on the cake? Simple, easy steps. Combine those factors and this gal was a HAPPY CAMPER!

And friends, it really was delish! Imagine a fabulous sugar cookie….light, chewy, slightly crisp from the rolled sugar. And then add the rich flavors of coconut with the bright flavors of lime. Sound amazing? Well it sure was!

Shame on me as I only made a half batch of these goodies–which I often do when testing out recipes. After all, butter isn’t cheap! But after one bite, I totally regretted it. <Sigh>….I guess I’ll have to make it again.

Feel like the Islands are calling you? Why not try these cookies? They are simply delightful….all that’s missing is a pina colada  🙂

_______________________________________________

Coconut Lime Chewy Sugar Cookies
From Rock Recipe

Ingredients:

2¾ Cups All Purpose Flour
1 Teaspoon Baking Soda
½ Teaspoon Baking Powder
½ Teaspoon Salt
1 Cup Unsalted Butter, room temperature
1½ Cups Granulated Sugar
1 Large Egg
½ Teaspoon Vanilla Extract
Zest of one Large Lime
3 Tablespoons Fresh Lime Juice
½ Cup Unsweetened Toasted Coconut
½ Cup Sugar for Rolling Cookies

Preheat oven to 350 degrees. Line cookie sheets with parchment paper.

In a small bowl, stir together flour, baking soda, baking powder and salt. Set aside.

Using a mixer, beat together the butter and sugar until smooth and very fluffy. Beat in egg, vanilla extract, lime juice and lime zest. Gradually blend in the dry ingredients and toasted coconut.

Roll rounded teaspoonfuls of dough into balls, and roll in sugar. Place on lined cookie sheets about 1 1/2 inches apart.

Bake 8 to 10 minutes in the preheated oven, or until lightly browned.

Let stand on cookie sheet two minutes before removing to cool on wire racks.