Appetizers/Small Plates · Seafood

Steamed Crab Dumplings – Happy Lunar New Year!

Steamed Crab Dumplings
Hello Peeps!

I’m taking a quick break from the Fam Din recaps (told ya’ I would be making up for lost time!) to say Chúc Mừng Năm Mới!!

Steamed Crab Dumplings
Yes, it’s that time again…. Tết – the Vietnamese Lunar New Year!

Steamed Crab Dumplings
All of the my Tết prep has been dutifully followed.

The house is sparkly clean, the altar is up and I popped into the bank to get “new money” to fill the red lì xì envelopes for the munchkins.

Steamed Crab Dumplings
And OF COURSE, there has to be lots of “lucky” food!

There will be tons of noodles (longevity), fruit (auspicious) and Bánh Tét – steamed rice cakes (prosperity).

Steamed Crab Dumplings

And it wouldn’t be the new year if I wasn’t making lots and lots of dumplings that symbolize wealth. I’m fairly certain that I’ve made a couple hundred dumplings this month alone!

Steamed Crab Dumplings
Since the Year of the Pig rings in tomorrow, I thought I would take a moment to share with you these scrumptiously decadent dumplings I made for family dinner the other week.

Steamed Crab Dumplings
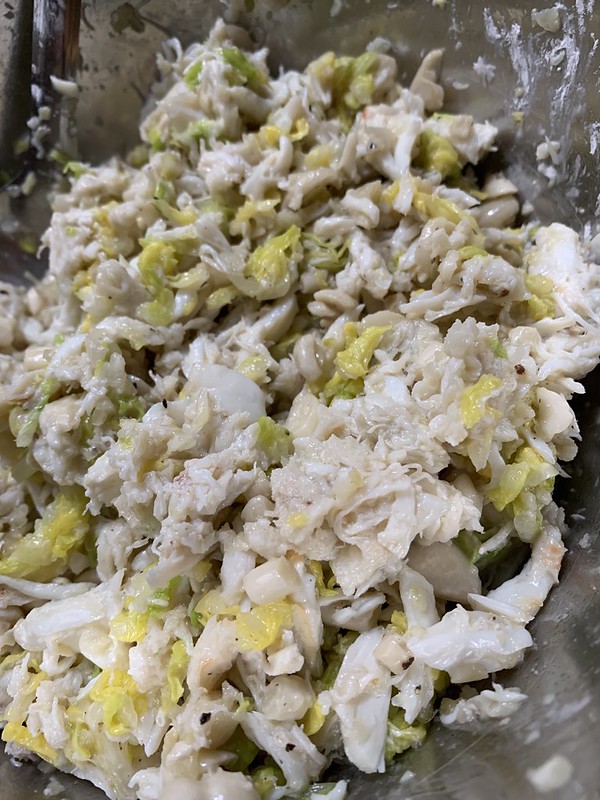
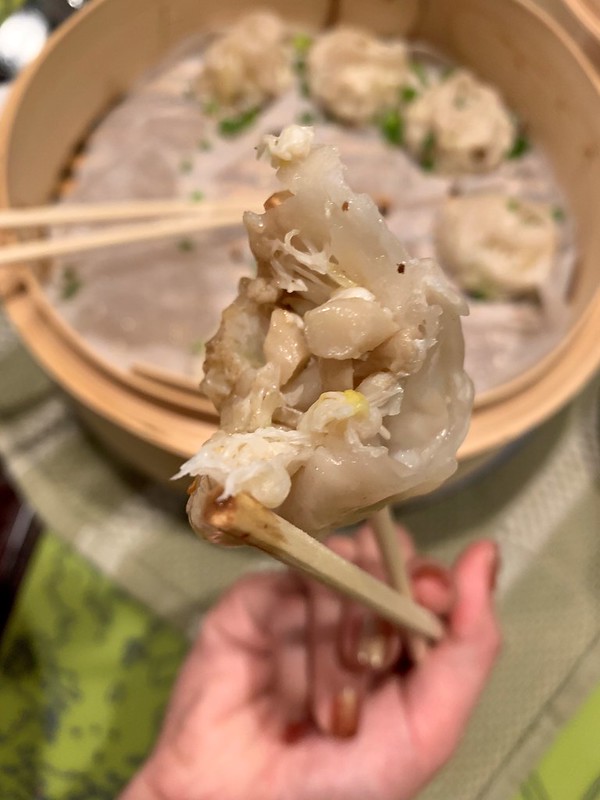
Seester T had requested some type of crab dumplings for her Fam Din menu (more on that soon) so I got to work creating a filling that was truly indulgent and delish.

Steamed Crab Dumplings
Since I wanted the crab to shine, I kept the filling quite simple and only supplemented the shellfish with beech mushrooms and cabbage. I did toy around with the idea of adding water chestnuts because I thought the added texture would be nice. But a quick convo with seestrah N had me doubting it.

Good thing too because I did a quick straw poll at dinner where I found out that most of my fam do not like water chestnuts. Who knew?

Steamed Crab Dumplings
I will also say that this is definitely one of the times that I skipped the dirty work and bought pre-shelled lump crab meat. Who the heck wants to be picking through shells to get a pound of pure, luscious crab meat?!?

I definitely didn’t!

Steamed Crab Dumplings

But it you’re up for it, more power to ya!

ps. I got mine at Costco. The quality is reliable and the price is reasonable.

Steamed Crab Dumplings
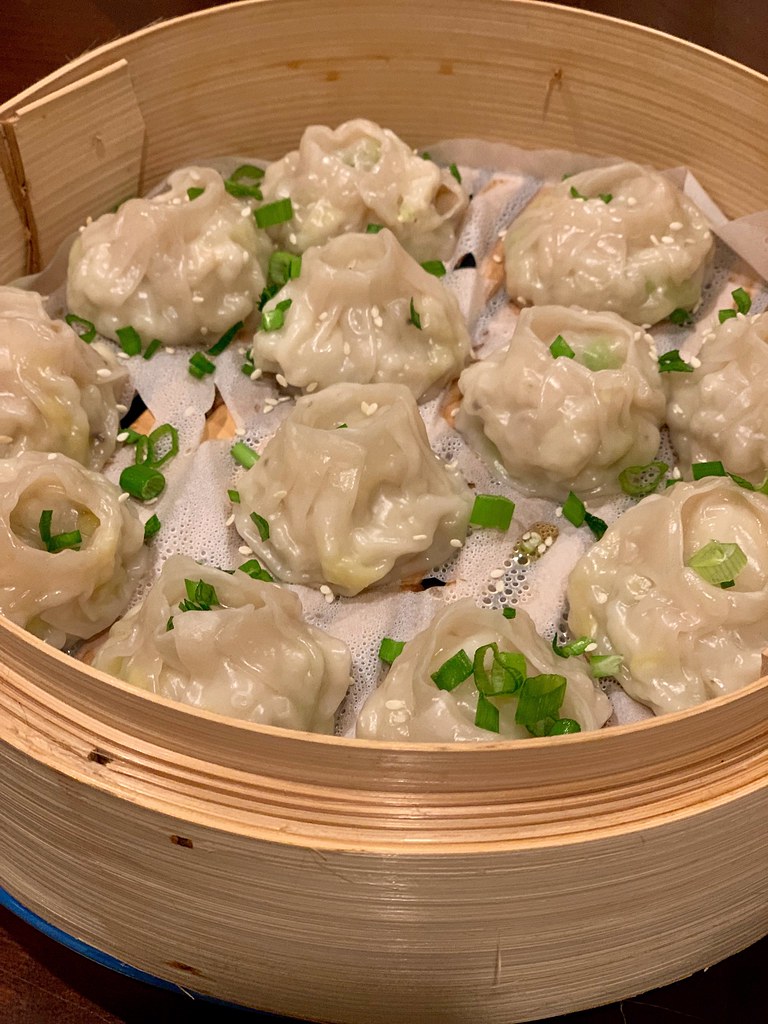
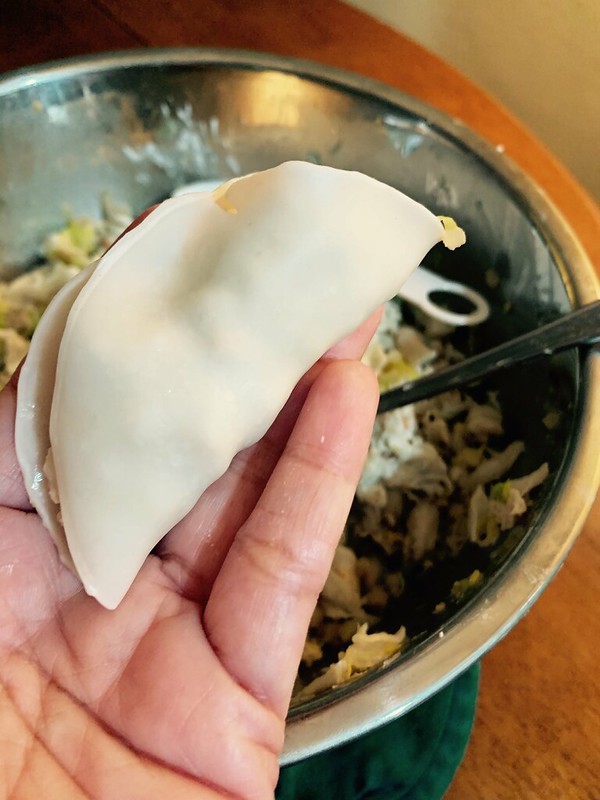
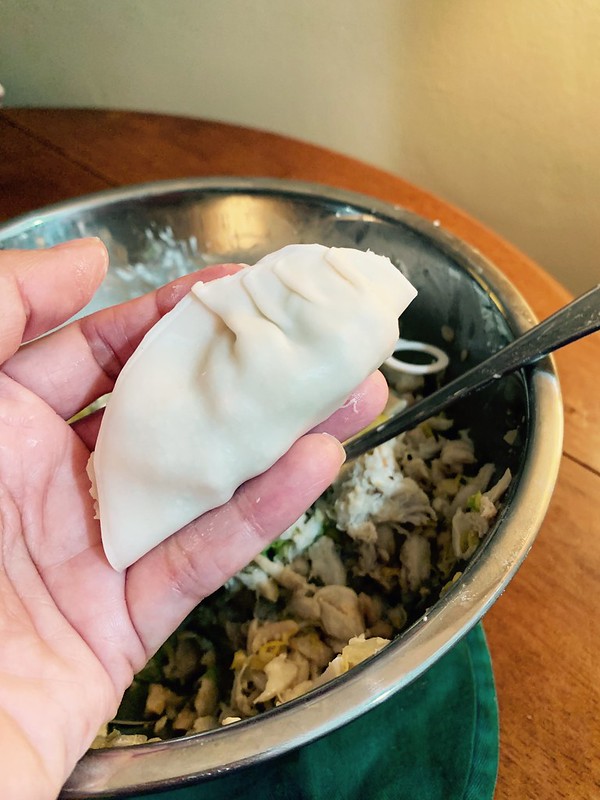
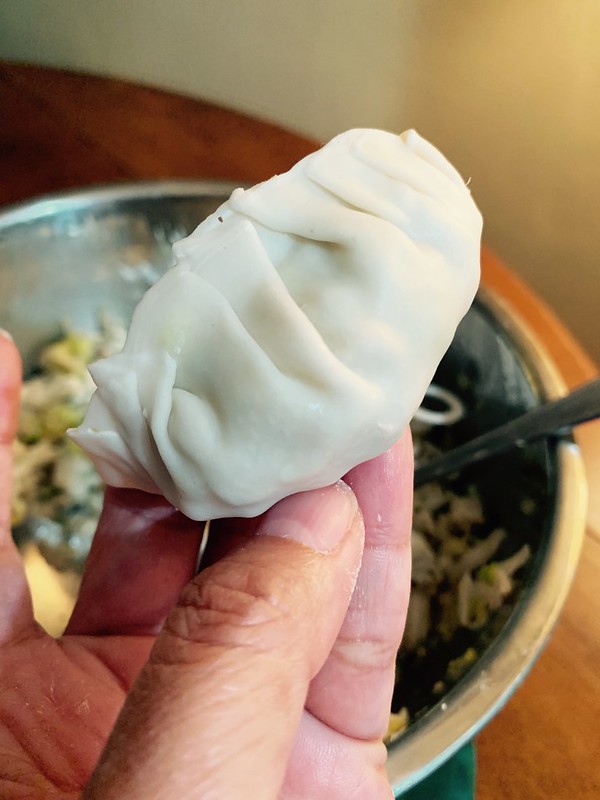
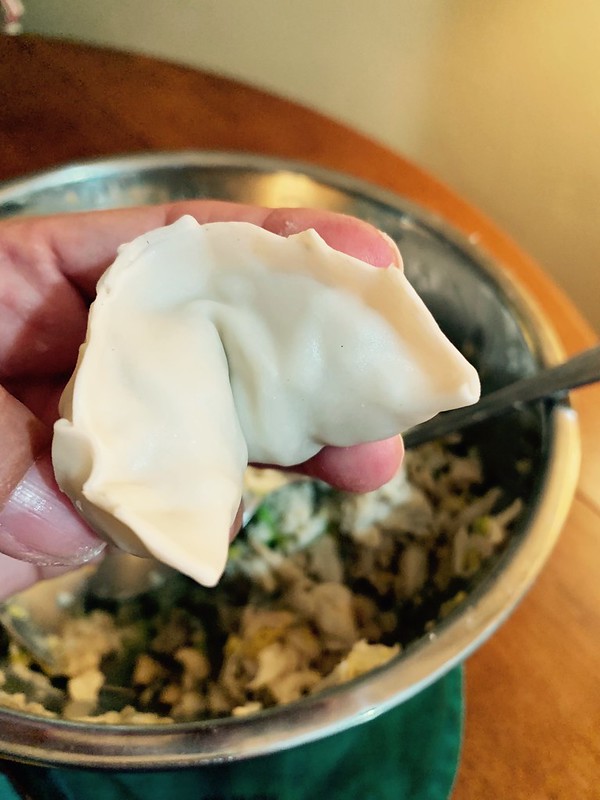
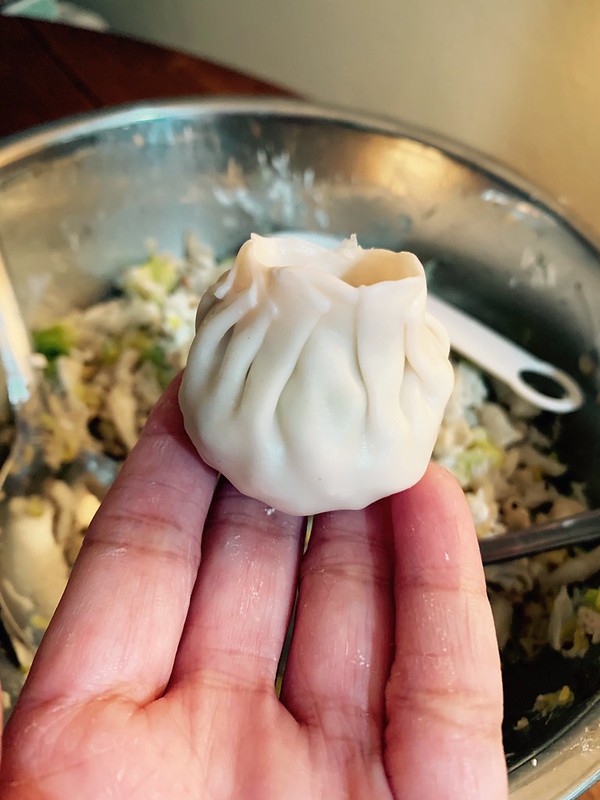
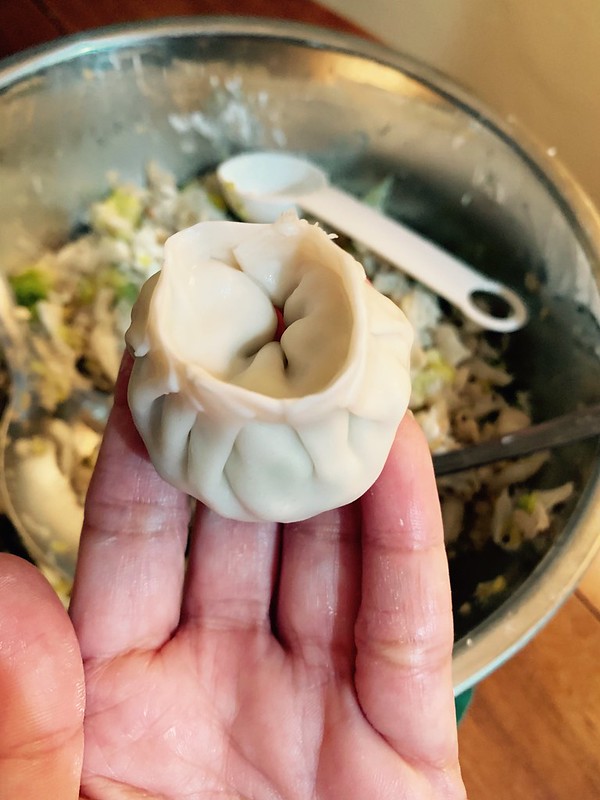
Once the filling was made, it was time to assemble. I did a little different fold on these dumplings that made them look like cute little pouches.

Steamed Crab Dumplings
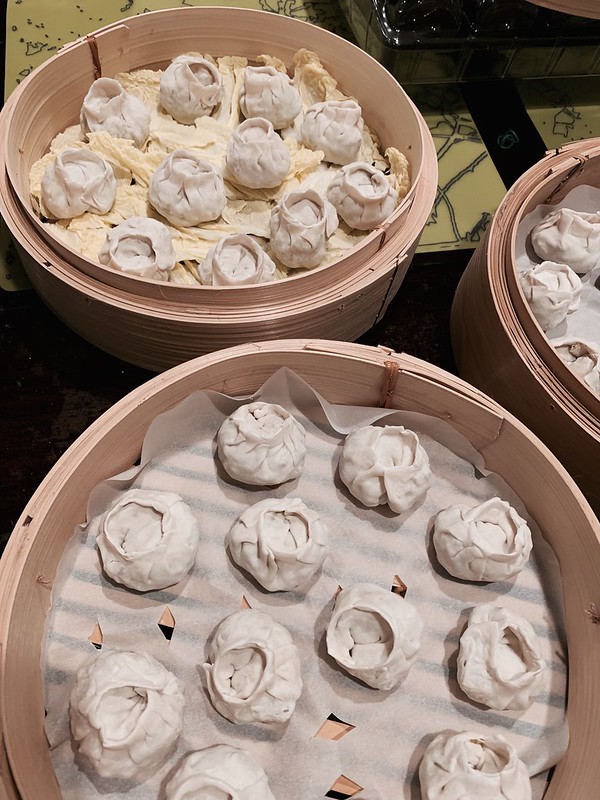
I started off with my tried and true pleated method but then coiled the edges around to seal them up.

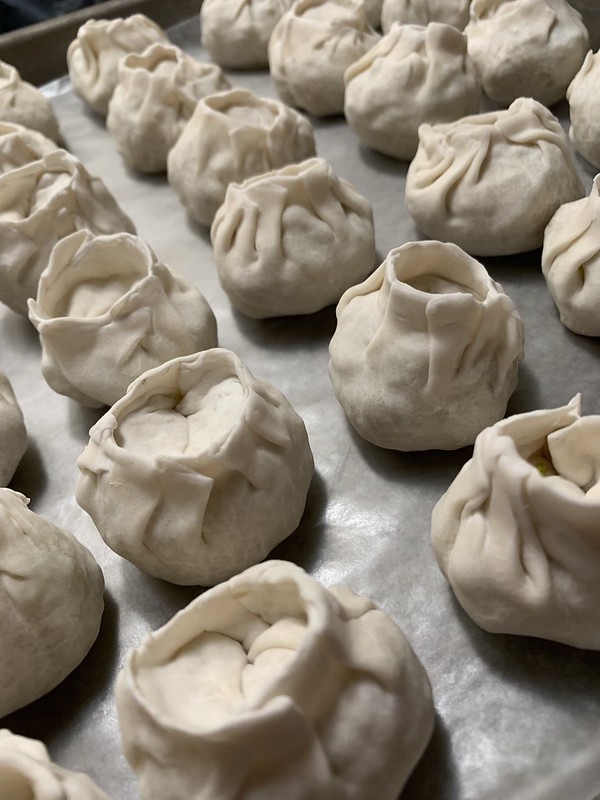
I was quite happy with how they looked after they steamed up. ❤

Steamed Crab Dumplings
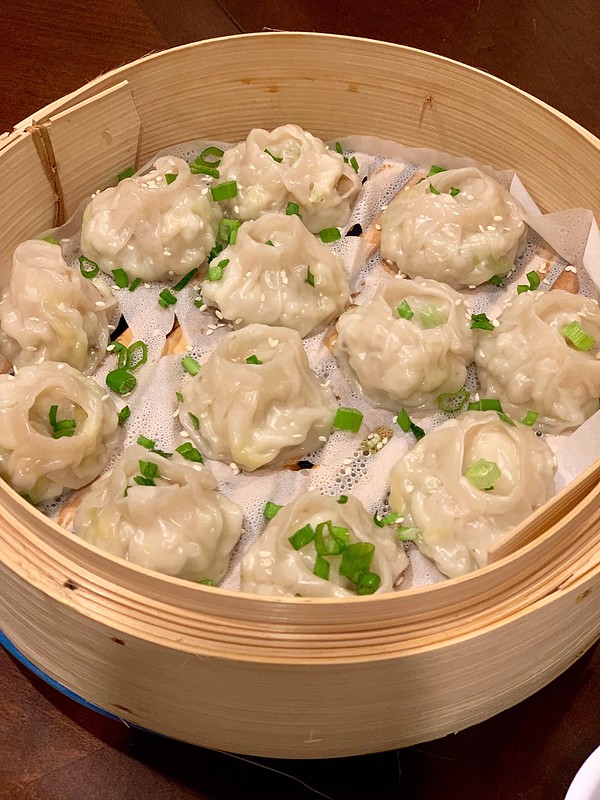
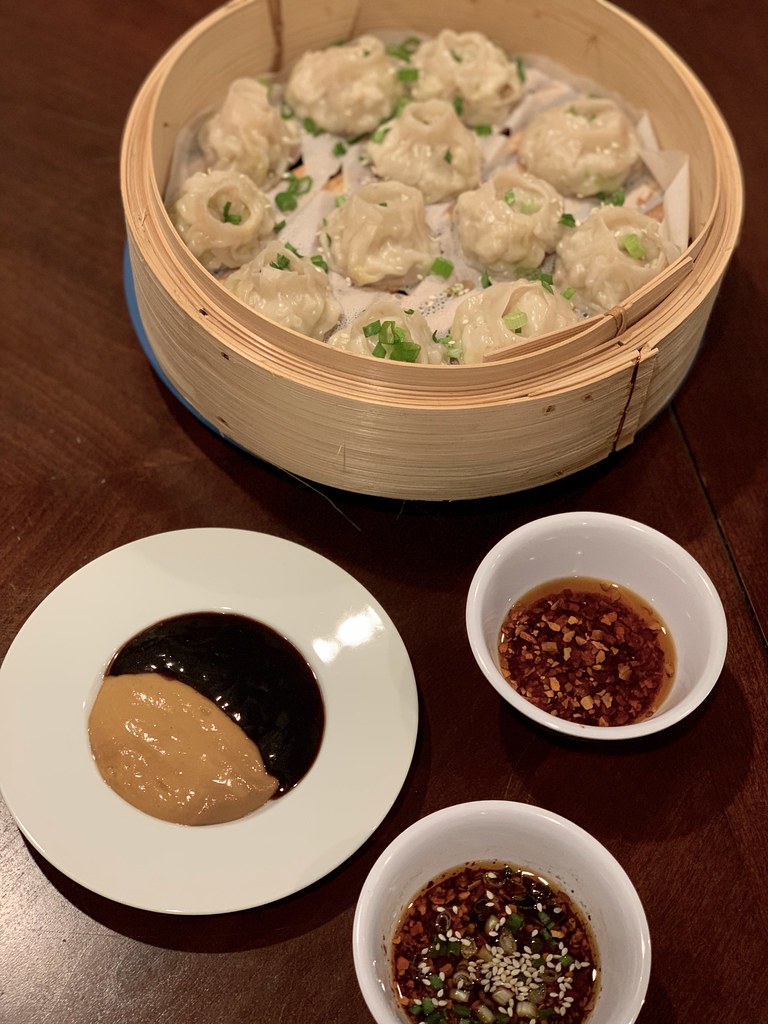
I suggest serving them with a generous drizzle of my homemade Sichuan oil but even a quick dunk in my soy-black vinegar sauce was delish too!

Steamed Crab Dumplings
I got some solid feedback from the Fam on these so they’ll definitely be making appearances in the future. Added bonus – since the filling is so simple, they were actually quite easy and quick to make.

Though, I’ve got to give Costco some credit there for knocking out a few hours of manual labor. Thanks Costco!

Steamed Crab Dumplings
So with that, dear Friends– Here’s to a wonderful New Year! May yours be filled with health, prosperity, joy and endless Foodventures!

_________________________________________________

Steamed Crab Dumplings
Makes approximately 45-50 dumplings

Ingredients:

2 cups finely chopped Napa cabbage
kosher salt
16 ounces cooked lump crab meat
4 ounces white beech mushrooms, chopped
½ tablespoon finely minced garlic
½ tablespoon finely minced ginger
1 tablespoon Shaoxing wine
2 teaspoons toasted sesame oil
1 tablespoons fish sauce sauce (more, if needed)
½ teaspoon black pepper
50 thin dumpling wrappers
serve with: chopped scallions, sesame seeds, Sichuan oil

Place the cabbage in a colander; sprinkle it with about ½ teaspoon salt and let sit over a bowl for 20 minutes. Wrap the cabbage in a cheesecloth or clean kitchen towel. Squeeze out and discard the excess liquid and place the drained cabbage in a clean bowl.

Add in the crab, mushrooms, garlic, ginger, Shaoxing wine, sesame oil, ½ teaspoon salt, fish sauce and pepper. Taste and add more fish sauce if needed.

Begin assembly of the dumplings. Lay one dumpling wrapper on a flat surface. Dip your finger in water and moisten the edge of the wrapper. Place about 1 tablespoon of the filling in the center of the dumpling skin. Pick up the dumpling, fold it in half and pinch the center together. Starting from the center, make about 4-5 pleats on the right side of the dumpling. Repeat with the left side of the dumpling so that all the pleats point towards the center. Wet one corner of the dumpling and wrap/coil the other end together. Pinch and seal so that it creates an enclosed pouch. Place the dumpling on a baking sheet and continue until all the filling/wrappers have been used.*

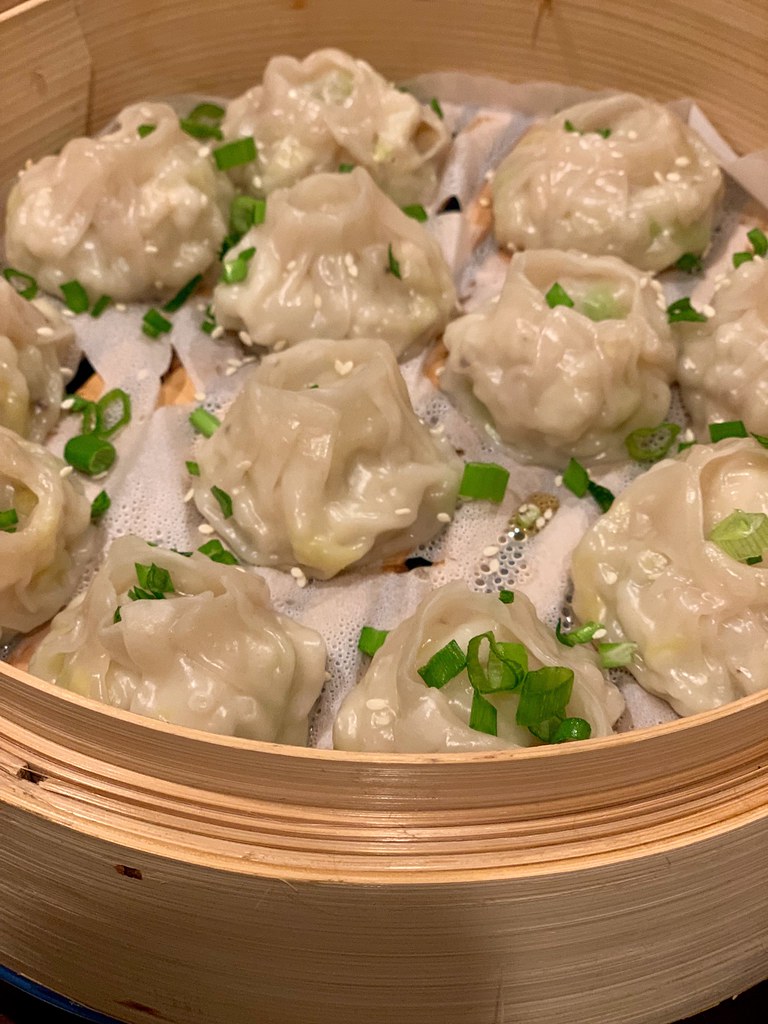
To cook, arrange the dumplings in a steamer (lined with cabbage leaves or parchment paper) and steam for 7-8 minutes. Transfer the dumplings to a platter and sprinkle the tops with scallions and toasted sesame seeds. Serve immediately with Sichuan oil or your choice of sauce.

*If you would like to freeze the uncooked dumplings, place the baking sheet directly into freezer for 2-3 hours after you have assembled them. Be sure that the dumplings are in a single layer and are not touching each other. Once the dumplings are frozen, you may transfer them to a sealed container. They can be kept in the freezer for a few months and should be cooked frozen. Add 1-2 additional minutes to the cooking time when steaming.


Poultry · Vietnamese

Xôi Gà Chiên Nước Mắm for Tết – {Vietnamese Style Fried Chicken with Sticky Rice}

Xôi Gà Chiên Nước Mắm {Vietnamese-Style Fried Chicken with Sticky Rice}

Well gang…in true Nam form, I’ve waited to the last minute to finish scrubbing down my house. And I need to get my act together because tomorrow is the beginning of Tết – the Lunar New Year!

Will I ever learn??

Doubt it.….

Xôi Gà Chiên Nước Mắm {Vietnamese-Style Fried Chicken with Sticky Rice}
But hey — I get points for having the majority of mi casa scrubbed down, lì xì (lucky money in red envelopes) all ready, ancestral altar is up and Bella got a bath. It’ll be a mad rush over the next few hours but it’s Tết and it needs to be done to optimize my luck for the year. I don’t like to gamble with bad ju-ju…especially since the Year of the Sheep (or Ram) is predicted to be a good one for me.

THANK BUDDHA!

Xôi Gà Chiên Nước Mắm {Vietnamese-Style Fried Chicken with Sticky Rice}
It’s going to be a crazy time with the family and I’ll be headed up to Orange County in a day to begin the shenanigans with them. Lots of food, lots of booze, loud talking (we’re not arguing–we just speak HELLA loud), lots of kids, lots of games and if all goes well, a lot of luck and prosperity for my o’hana.

Xôi Gà Chiên Nước Mắm {Vietnamese-Style Fried Chicken with Sticky Rice}
To celebrate Tết, I wanted to share my Xôi Gà Chiên Nước Mắm which is sticky rice served with Vietnamese style fried chicken (aka…marinaded in fish sauce). It’s not a traditional Tết dish but it’s so darn good! Fried chicken swathed in a sticky, sweet, salty and spicy sauce –everything that speaks to the Vietnamese palette. Couple it with sticky glutinous rice and it’s HEAVEN!

So to you my dear friends, Chúc Mừng Năm Mới!! Wishing you all an extremely fulfilling, prosperous, joy filled, healthy and delicious Year of the Sheep!!!

______________________________________________________________

Xôi Gà Chiên Nước Mắm {Vietnamese-Style Fried Chicken with Sticky Rice}
Serves 5-6

Ingredients:

½ cup fish sauce (I use Việt Hương Three Crabs or Red Boat)
½ cup granulated sugar
¼ cup warm water
2 tablespoons minced shallots
1 heaping tablespoon minced garlic
½ tablespoon minced ginger
3 – 4 Thai chilies, minced (more if you prefer)
¼ cup chopped fresh cilantro
½ teaspoon black pepper
2½ – 3 pounds chicken, bone-in and skin-on (I prefer drumsticks and thighs)
2 cups sweet glutinous rice
1 teaspoon kosher salt
peanut oil (you can substitute with vegetable oil if need be)
1 cup rice flour
½ cup all purpose flour
garnish: toasted sesame seeds, minced chilies, chopped scallions and chopped cilantro

In a bowl, whisk together the fish sauce, sugar, water, shallots, garlic, ginger, chilies and black pepper. Pour the marinade into large gallon Ziploc bags- you may need more than one depending on the size of the chicken. Rinse the chicken under cool water and pat dry with paper towels. Place the chicken inside the Ziploc bags. Massage the chicken in the marinade and try to get most of the air out of the bag before sealing it. Put the bag(s) of chicken in a large bowl in case it leaks and refrigerate for 3-4 hours.

While the chicken marinates, prepare the sticky rice. Rinse the rice until the water runs clear. Fill a large bowl with cool water, add the rice and soak it for about 2-3 hours. Drain the water and place the soaked rice in a rice cooker. Fill the cook with about 2/3 inch of water. Stir in the salt and cook according to the settings of your rice cooker. Alternatively, you can use a bamboo steamer and follow my directions posted here

An hour before you start cooking the chicken, pull it from the refrigerator to take the chill off of it. Pour the marinade into a small sauce pan and set aside. Fill a large, heavy bottom pot with about 2-3 inches of the oil. Heat the oil to 350 degrees F.

Take the chicken and use paper towels to blot off the excess moisture. In a large bowl, whisk together the rice flour and all-purpose flour.

After the oil comes to temperature take a few pieces of chicken at a time and roll it into the flour mixture. Shake off any excess flour and carefully place the pieces into the oil –being careful to not overcrowd the pot. Depending on the size of the chicken, allow the pieces to fry for 10-20 minutes or until the internal temperature reaches 160 degrees F. Once done, allow the chicken to drain on a wire rack. Continue dredging and frying until all the chicken has been cooked.

While the chicken is frying, cook the marinade over medium-low heat until it reduces by half. Toss the fried chicken into the reduced marinade. Plate with a portion of sticky rice and sprinkle with toasted sesame seeds, minced chilies, chopped scallions and chopped cilantro. Serve warm.


Appetizers/Small Plates

Pan-Fried Ginger Chicken Dumplings – Happy Lunar New Year!

Pan-Fried Ginger Chicken Dumplings

Today marks the first day of Tết {Vietnamese Lunar New Year} – so allow me to say Chúc Mừng Năm Mới!!

Like the good Vietnamese gal I am, I’ve spent the past several days cleaning up the house, running to the bank to get “new money” to stuff in the red envelopes for lì xi (lucky money), paying off my bills and finishing everything else Mom used to tell us to do in preparation for Tết. Hey- I do what I can to deflect any bad ju-ju!

I expect that our clan’s Tết celebration on Sunday will be filled with a lot of shenanigans, new year’s wishes, a bit of gambling and a whole lot of eating! Braised bamboo, crab, sticky rice, roast pork, stuffed rice cakes and a ton more. I CAN’T WAIT!

Pan-Fried Ginger Chicken Dumplings

To get in the new year’s spirit, I decided to make some dumplings. Truthfully, this style of dumpling isn’t traditional for Tết but they’re quite common for Chinese New Year celebrations. Dumplings are eaten because they symbolize wealth & richness as their shape resembles Chinese gold ingots.

This time around I decided to fill the dumplings primarily with ground chicken, shiitake mushrooms, cabbage, some aromatics and a TON of fresh ginger. I often use a pork & shrimp filling as well but you could use almost anything that tickles your fancy. Just one thing, you’ll want to cook a bit of the filling before you start assembling the dumplings so that you can adjust the seasonings. Trust me, you don’t want to stuff 100 dumplings before you discover that your filling is bland.

Pan-Fried Ginger Chicken Dumplings

As for the dumpling skins/wrappers, let me be the first to admit that I never make my own and I’m happy to just grab a package of the pre-made ones. I’m sure there’s a lot of pros of going 100% homemade but the thought of rolling out all of those super thin rounds is just too daunting. But one day I’ll give it a try— ya know….bragging rights and all.

If you opt to buy the packaged skins, I’d recommend the egg-less Shanghai style wrappers. But if you’re in a bind or live in an area where it’s difficult to procure Shanghai style wrappers, you could use wonton skins. The texture and flavor will be a bit different though as those are typically are made with eggs.

Pan-Fried Ginger Chicken Dumplings

Once you’ve mixed up the filling, you’re ready to assemble the little dumplings.

  • Wet the edges to help seal the edges,
  • Add a heaping teaspoon of filling,
  • Fold in half and pinch the center,
  • Fold 3-4 pleats to the right and then pinch and crease the end to seal,
  • Fold 3-4 pleats to the left and then pinch and crease the end to seal.

And that’s it! The filled dumplings should form a slight crescent shape and be able to sit upright. Alternatively you can fold the dumplings so that they lay flat. Instructions on how to fold a flat dumpling can be found here.

Man…I have the most wrinkly fingers and desperately need a manicure— but I digress.

Pan-Fried Ginger Chicken Dumplings

Keep on filling, folding, and pleating…..don’t worry, it gets faster once you get the rhythm down.

At this point, you can either pan-fry the dumpling right away or freeze them so that you can have them whenever you have a dumpling hankering. If you do choose to freeze them, be sure to freeze them in a single layer on a baking sheet for a few hours before stacking them in a container. If you don’t, they’ll clump up together while they freeze.

Pan-Fried Ginger Chicken Dumplings

Once you’re ready to cook up these little buggers, grab a skillet that has a fitted lid and fry them in a single layer for a minute or two. You’ll then want to add a bit of water and slap on the lid to allow the dumplings to steam and finish cooking.

Pan-Fried Ginger Chicken Dumplings

And that’s it! Deliciously juicy and flavorful dumplings that are ready to be dunked into a quickly made sauce of soy, rice wine vinegar and a few other goodies.

Pan-Fried Ginger Chicken Dumplings

Well Friends, let me again say – Chúc Mừng Năm Mới!! I wish you all an incredible Year of the Horse filled with health, prosperity, wisdom, and joy!!

____________________________________________

Pan-Fried Ginger Chicken Dumplings
Makes approximately 50 dumplings

Ingredients:

Dumplings:
2 cups finely chopped Napa cabbage
1/2 teaspoon salt
1 pound ground chicken
1 cup minced shiitake mushrooms
1/2 cup chopped scallions, plus more for garnish
2 tablespoons finely minced shallots
1 tablespoon finely minced garlic
2 tablespoons finely minced ginger
2 tablespoons soy sauce (more, if needed)
1 tablespoon rice wine
2 teaspoons toasted sesame seed oil
1/2 teaspoon black pepper
1 package Shanghai-style dumpling skins (50 count)
water
vegetable oil
1/4 teaspoon toasted sesame seeds, plus more for garnish

Dipping Sauce:
1/2 cup soy sauce
1/4 cup rice wine vinegar
1/2 tablespoons toasted sesame seed oil
1/2 teaspoon sugar
1 scallion, chopped
1 garlic clove, finely minced
1/2 teaspoon finely minced ginger
1/4 teaspoon chili powder
1/4 teaspoon toasted sesame seeds

Place the cabbage in a large bowl, sprinkle it with salt and let sit for about 20 minutes. Wrap the cabbage in a cheesecloth or clean kitchen towel. Squeeze out and discard the excess liquid and place the drained cabbage back in the bowl.

Add the ground chicken, mushrooms, scallions, shallots, ginger, garlic, soy sauce, rice wine, sesame seed oil, and black pepper to the bowl. Using cleans hands, mix the filling until thoroughly combined. To test for seasoning, take a small spoonful of the mixture and pan fry in a non stick skillet for 1-2 minutes on each side. Taste and if needed, add more soy sauce to the uncooked filling.

Begin assembly of the dumplings. Lay one dumpling wrapper on a flat surface. Dip your finger in water and moisten the edge of the wrapper. Place about 1 heaping teaspoon of the filling in the center of the dumpling skin. Pick up the dumpling, fold it in half and pinch the center together. Starting from the center, make about 3-4 pleats on the right side of the dumpling. Repeat with the left side of the dumpling so that all the pleats point towards the center. This will also create a flat bottom to allow the dumpling to sit upright and form a slight crescent shape. Place the dumpling on a baking sheet and continue until all the filling/wrappers have been used.

Prepare the dipping sauce by whisking together all the sauce ingredients. Set aside.

To cook the dumplings, heat a large frying pan to medium-high heat with 1 tablespoon of oil. Place a single layer of the dumplings in the pan. Fry the dumplings for 1-2 minutes until the bottoms are golden. Carefully pour in about 1/4 cup of water and immediately place a tight fitting lid on the pan. Lower the heat to medium-low and allow the dumplings  to steam for 4-5 minutes. Remove the lid and cook until all the water has evaporated. Transfer the dumplings to a platter and sprinkle the tops with scallions and toasted sesame seeds. If you need to fry the dumplings in batches, use a paper towel to wipe the frying pan clean before repeating the above process. Serve warm with the dipping sauce.

*If you would like to freeze the dumplings, place the baking sheet directly into freezer for 4-5 hours after you have assembled them. Be sure that the dumplings are in a single layer and are not touching each other. Once the dumplings have froze, you may transfer them to a sealed container. They can be kept in the freezer for a few months and should be cooked frozen. Add 1-2 additional minutes to the cooking time when pan-frying frozen dumplings.*

Appetizers/Small Plates · Seafood

Ringing in Tết with Crispy Crab & Avocado Wontons

Crispy Crab & Avocado Wontons


Chúc Mừng Năm Mới!!

That’s right, dear friends! It’s Tết – the Lunar New Year!

I have to admit, I just barely finished scrubbing down my home yesterday. As I’ve shared before, one of the rituals leading up to Tết involves some serious housekeeping. And heck–I do whatever I can to ensure that my loved ones and I will have a lucky and prosperous new year. No bad ju-ju here!

Crispy Crab & Avocado Wontons

My clan won’t be gathering until next week but my mouth is already watering just thinking about all of the delicious traditional eats that are in my near future. Rice cakes, roasted pig, sticky rice…..yummers.

Since I’ll be getting my fill of all of the traditional Tết fixins’ next week, I thought I would whip up some quick, yet satisfying bites to pay homage to the Lunar New Year. These Crispy Crab & Avocado Wontons fit that bill! I figure that since dumplings are traditionally served during Chinese New Year to symbolize money, the same may go for these lovely wontons. After all, they are gold and look like little purses 🙂

The fried wontons are filled with lump crab and pairs beautifully with the creaminess from the avocados. The sriracha adds a slight kick and when dipped into the tamarind chili sauce–perfection!

Crispy Crab & Avocado Wontons

And with that dear friends, please allow me to wish you a very Happy, Healthy, Meaningful, Joyful, and Adventurous Year of the Snake!

_____________________________________

Crispy Crab & Avocado Wontons
Serves 4

Ingredients:

Wontons:
6 ounces cooked lump crab meat
½ tablespoon sriracha hot sauce
½ cup diced avocados
1 tablespoon minced chives
1 teaspoon fresh lime juice
kosher salt and pepper to taste
12 wonton skins
vegetable oil for frying

Tamarind Chili Sauce:

3 tablespoons tamarind juice concentrate
1½ tablespoons fish sauce
1 tablespoon warm water
½ tablespoon lime juice
1 tablespoon palm sugar
1 teaspoon minced garlic
1 red chili, minced finely

In a bowl, gently combine the crab, sriracha, avocados, chives and limejuice. Season with salt and pepper.

Take one wonton skin and brush the edge of each side with water. Place about 1 heaping tablespoon of the mixture in the center of the skin. Fold the ends of the wrapper together, pinching to seal. Fold the other ends together to make a little parcel. Use your fingers and pinch together all the seams to thoroughly seal. Repeat with the remaining wonton skins.

Heat the oil in a heavy bottom pot to 375 degrees F.

While the oil comes to temperature, prepare the Tamarind Chili Sauce. In a bowl, whisk together all the items and refrigerate for 10 minutes. Sauce can be stored in the refrigerator for up to one week.

Once the oil is ready, fry the wontons in batches for about 2 minutes until golden brown. Remove to a plate lined with paper towels to drain. Repeat until all wontons have been fried and serve with immediately with the Tamarind Chili Sauce.

Side Dish · Vietnamese

Xôi Gấc for Tết (Baby Jackfruit Flavored Sticky Rice)

Xôi Gấc (Baby Jackfruit Flavored Sticky Rice)

It’s hard to believe that Tết, Vietnamese Lunar New Year, is just a few days away.

Growing up, our parents used to have us scrub down the entire house the days leading up to Tết. It was one of the many important traditions we used to follow to ensure a prosperous and lucky new year. Then, the entire clan would come together, cook up a feast of goodies, offer ancestral prayers at the alter, hand out lì xì (lucky money in red envelopes) to the kids, eat, drink, laugh, and well—gamble and play cards! Needless to say, it was always a fun time.

One of the traditional dishes often found around Tết is Xôi Gấc which is essentially, glutinous rice (sticky rice) that has been steamed with coconut milk and Gấc.

Xôi Gấc (Baby Jackfruit Flavored Sticky Rice)

This is one of those Vietnamese dishes whose name just doesn’t translate well into English. The first challenge is “Gấc”.  It has several English names such as Baby Jackfruit, Cochinchin Gourd, Sweet Gourd, Momordica Charantia Fruit, and my least favorite–Spiny Bitter Gourd. I mean, c’mon now…… How unappetizing does Spiny Bitter Gourd sound? You might as well throw in some other funky words like gelatinous and congealed and call it a day.

But I digress…..

Since I’ve seen Gấc more often called “Baby Jackfruit“—–I’m going with it. But for the record, it does not taste like regular jackfruit or even “young jackfruit”. Could I BE more confusing???

Xôi Gấc (Baby Jackfruit Flavored Sticky Rice)

The flesh of the Gấc fruit is deep red and is well suited to not only flavor Xôi (sticky rice) but also naturally dyes the grains of rice to an intense orange-reddish hue. It’s because of this that you’ll find Xôi Gấc served at celebrations such as Tết and weddings since the color red is considered to be very lucky.

Although fresh Gấc can now be found in many large Vietnamese grocery stores this time of year, I couldn’t convince myself to make the trek to Orange County to pick some up. I resorted to using frozen Gấc puree that my local Vietnamese grocery store has stocked year round. If you can get it, I would HIGHLY recommend using the fresh fruit over frozen as you won’t be able to get the same rich and vibrant hue if you use the latter. Truthfully, my finished Xôi Gấc looked a tad anemic because I used the frozen puree—but it was DARN TASTY all the same.

Oh—and if being healthier is one of your New Year’s resolutions….the Gấc fruit has a supposed astronomic amount of beta-carotene and lycopene.

Xôi Gấc (Baby Jackfruit Flavored Sticky Rice)

Since Xôi Gấc has a slightly sweet profile to it, it’s best served alongside something savory like roast pork or Chả lụa (pork sausage). But it can also be enjoyed as a breakfast item as well.

And with that Dear Friends, I better get back to cleaning my house before Tết is here. But before I sign off, let me wish you and your loved ones a joyous, adventure-filled, and delicious Year of the Dragon!

Chúc Mừng Năm Mới!!

_________________________________________

Xôi Gấc (Baby Jackfruit Flavored Sticky Rice)
Serves 4-6

Ingredients:

2 Cups Sweet Glutinous Rice
12 Ounces Gấc Fruit, either fresh or frozen puree
1 Teaspoon Kosher Salt
6-8 Fresh Pandan Leaves
1 Tablespoon Mirin
1/2 Cup Coconut Milk

Rinse the rice until the water runs clear. Fill a large bowl with cool water, add the rice and soak it overnight.

Once the rice has been properly soaked, drain the rice and shake off any excess water. With a kitchen towel, gently pat the rice dry and then transfer to a mixing bowl.

While wearing gloves, massage and rub the Gấc into the rice, allowing the grains to be thoroughly covered in the fruit. Sprinkle in the salt and mix until combined.

Line the bottom of your steamer with a sheet of cheesecloth. Place a layer of pandan leaves on top of the cheesecloth and then spread the rice mixture evenly on top the leaves. Cover the rice mixture with additional pandan leaves and place the steamer lid on. Steam for about 15 minutes and then remove the lid and top layer of pandan leaves. Using chopsticks, stir in the coconut milk and mirin while fluffing the rice. Place the leaves and steamer lid back on and continue cooking for an additional 5 minutes or until rice is fully cooked. Enjoy!

Desserts/Pastries · Vietnamese

Celebrating Tết with Mứt Gừng (Vietnamese Candied Ginger)

Mứt Gừng (Vietnamese Candied Ginger)


Chúc Mừng Năm Mới!!

That’s right, it’s Tết–the Vietnamese Lunar New Year! For Vietnamese folks, we are welcoming in the Year of the Cat. For our Chinese neighbors, it’s the Year of the Rabbit. 🙂

There are so many customs and traditions that go along with Tết–from making sure your house/home is clean, offering ancestral prayers and thanks, eating delicious food, playing games like bầu cua cá cọp, going to festivals and my personal favorite—getting lì xì (red envelopes of money to bring luck and good fortune).

Tết is a multiple day celebration—which means food galore! Bánh chưng (sticky rice cakes filled with meats, mung beans, etc.), Xôi (savory or sweet glutinous rice), Măng khô (braised bamboo shoots), and all sorts of Mứt (preserved/candied vegetables and fruits).

And although the trays of Mứt always had a wide variety of fruits, veggies, & nuts to choose from (coconut, lotus seeds, persimmons, mandarins, etc.), my favorite was Mứt Gừng —candied or crystallized ginger which my grandmother made all of the time.


Mứt Gừng (Vietnamese Candied Ginger)


The thin slices of candied ginger are not only yummy but they can be used for health ailments too. Nausea or motion sickness can often be curtailed by chewing/sucking on Mứt Gừng and next time you have a cough, forgo the drops and grab a bag of Mứt Gừng instead. You can also filter the boiling water used to cook the ginger into a calming ginger tea. All natural! And as for baking, I’ve also used this Candied Ginger in my Scones and to top Spiced Cupcakes. So many options!

I want to give a big THANKS to my cousin An for giving me a tutorial on Mứt Gừng—the woman even took step by step pics on her phone for me. Now that’s a trooper—-although I’m not sure how she’ll feel about me adding the lemon zest. 🙂

So allow me to wish you all an extremely happy, prosperous, and healthy New Year!

Chúc Mừng Năm Mới!!

————————————————————–

Mứt Gừng (Vietnamese Candied Ginger)
Makes approximately one pound

Ingredients:

1 Pound Fresh Ginger
2 Cups Granulated Sugar
1/2 Cup Fresh Lemon Juice, divided
1 Teaspoon Fresh Lemon Zest
1 Teaspoon Vanilla Extract

Fill a large bowl with cold water and add 1/4 cup of lemon juice. Peel the ginger, removing any blemishes from the root and then place in the bowl of water until all pieces have been peeled. Using a mandoline with its thinnest plate, slice the ginger roots. Place the ginger slices in the bowl of water until all have been cut.

Fill a large pot with water and the rest of the lemon juice. Transfer the ginger slices to the pot and bring to a boil. While the ginger is boiling, spray two cooling racks with nonstick spray and place them on cookie sheets that have been lined with foil. Cook the ginger for 25 minutes, skimming off any impurities that may build up. Drain the slices in a colander and flush with cool tap water. Rinse the ginger 2 or 3 times and shake off excess water. Use paper towels to dry the ginger slices off well.

In a large pan over medium-low heat, add the ginger slices with sugar. Use chopsticks to coat the slices with sugar. Continue to stir as the sugar begins to melt and bubble. Stir in the vanilla extract and lemon zest. Continue cooking and stirring the ginger until the liquid has evaporated and the sugar has crystallized onto the slices. This process takes about 15-20 minutes.

Remove from heat and transfer the slices to the cooling racks. Be sure to spread the slices into one even layer—flatten out any slices that may have folded over or curled up. Allow an hour for the slices to completely dry. Store in Ziploc bags or other airtight containers.