Pork

Pan Seared Pork Chops with Tomatoes & White Wine-Garlic Sauce

Pan Seared Pork Chops in White Wine-Garlic Sauce
I’m not sure if I’ve told you but I have had a crazy bout of insomnia….of some serious epic proportions. And before you ask — YES, I’ve tried everything. (But THANK YOU!)

And my poor co-workers and loved ones have been subjected to my deliriousness. Trust me, I’ve been the hottest mess in all of the land. It’s not pretty.

In conversations I vacillate between speed talking (think of Six from Blossom), slow-motion speech and then just blank stares when I forget my train of thought mid-sentence.

I repeat, it’s not pretty. Ugh.

Pan Seared Pork Chops in White Wine-Garlic Sauce

How have I been filling my time?

Through a questionable amount of binge watching shows (how have I never watched Into the Badlands before?!?!), Podcasts (I’m crushin’ on Pod Save America) and reading everything I can get my hands on (any recommendations?).

There’s also been a good amount of QT in the kitchen. If you’ve been following me on Instagram, you know that I’m obsessed with using my Anova Precision Cooker. Yup, I pretty much want to sous vide everything I can get my hands on.

But I still love my quick meals….ones like this little number.

Pan Seared Pork Chops in White Wine-Garlic Sauce
One of my go-to proteins for weeknights are pork chops–particularly these really thin cuts sometimes sold as “breakfast pork chops”. They generally are about ½ – ¾ inch thick and are bone-in. Not only do they have great flavor but they’re super quick to cook up in a skillet.

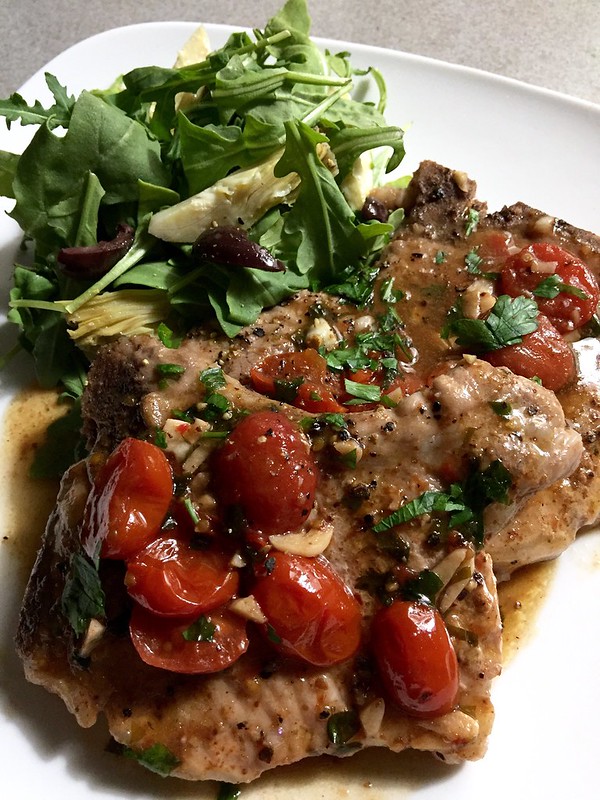
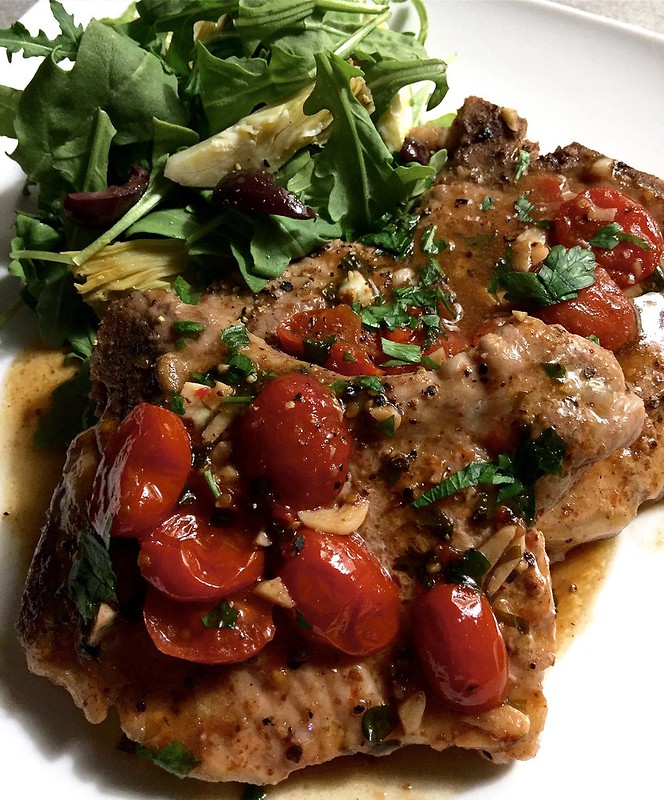
These Pan Seared Pork Chops with Tomatoes & White Wine-Garlic Sauce can be whipped up in under 20 minutes. After a light seasoning, they’re browned up in a skillet before white wine and stock are added to deglaze the pan. Finally, lots of garlic, herbs, tomatoes and butter join the party to make a light sauce that the chops are simmered in for an additional few minutes. The chops are wonderfully savory and there’s great acidity from the wine and tomatoes along with brightness from the fresh herbs.

Total winner.

And I’m not just saying that because I’m half asleep as I type this. 😴

_____________________________________________________________________
Pan Seared Pork Chops with Tomatoes & White Wine-Garlic Sauce
Serves 4

Ingredients:

4 thin bone-in pork chops, ½ – ¾ inch thick
black pepper
kosher salt
1 teaspoon garlic powder
1 teaspoon onion powder
2 tablespoons olive oil
3 tablespoons unsalted butter, divided
1 tablespoon minced fresh garlic
1 cup dry white wine
½ cup chicken stock
½ teaspoon red pepper flakes
3-4 sprigs fresh thyme
1½ cups grape tomatoes, halved
1 heaping tablespoon chopped fresh parsley, more for garnish

Make 4-5 notches around the edges of each chop with a sharp pairing knife about ⅓ inch deep. This will help prevent the edges of the pork chops from curling up. Season each side of the chops with pepper, salt, garlic powder and onion powder.

Bring a large, heavy bottom skillet up to medium-high heat. Melt 1 tablespoon butter into the olive oil and swirl it around the skillet. Sear the chops for about 2 minutes on each side and remove them from the skillet—this can be done in batches if they do not fit all it once in the skillet.

Lower the heat to medium and add the minced garlic to the skillet. Stir around for 45 seconds to a minute –be careful not to burn the garlic or let it get too dark. Pour in the white wine, chicken stock and use a wooden spoon to scrape off the browned bits off the bottom of the skillet. Once the liquids come to a boil, add the red pepper flakes, fresh thyme, tomatoes and allow the liquids to reduce by about a third. Stir in and melt the remaining butter and add all the pork chops back into the skillet. Allow the pork to cook in the sauce for an additional 3-5 minutes, spooning the sauce over the chops every so often so that they are well coated.

Fold in the chopped parsley. Taste the sauce and add additional salt and pepper as needed. Plate the pork chops and spoon the sauce with tomatoes generously over each serving. Garnish with additional parsley and serve with your choice of salad, roasted veggies, rice, potatoes, etc.

Poultry

Grilled Honey-Sesame Chicken Skewers

Honey Sesame Chicken Skewers

Easy, Delish and Versatile.

Now that’s the name of a cookbook I’d totally buy as I’d hope it would have satisfyingly scrumptious goodies like these Grilled Honey-Sesame Chicken Skewers.

Honey Sesame Chicken Skewers

These chicken skewers are super quick to prep, takes only a few minutes to cook and I like to serve them in anything from noodle bowls (bún), Vietnamese sandwiches (bánh mì), with rice or even as appetizers.

Oh the possibilities!!

Honey Sesame Chicken Skewers
And if you’re feeling a bit lazy to heat up the grill, you can even throw them in the oven. Just place the skewers on a tray and bake at 425 degrees for about 20 minutes.

Easy peasy.

Note: I prefer the flavor of chicken thighs and find that it tends to dry out less than breast meat. However, feel free to swap out whichever cut is your preference.

___________________________________
Grilled Honey-Sesame Chicken Skewers
Makes 10-12 skewers

Ingredients:

2 tablespoons oyster sauce
1 tablespoon low sodium soy sauce
1 tablespoon honey
1 tablespoon sesame oil
1 tablespoon rice wine vinegar
1 tablespoon mirin
1 tablespoon sambal chili paste
1 tablespoon Sriracha sauce
1 tablespoon fresh lime juice
zest of 1 lime
1 tablespoon minced garlic
1 tablespoon minced ginger
¼ teaspoon black pepper
2 pounds boneless, skinless chicken thighs – cut into 1½ inch pieces
10-12 bamboo skewers soaked in water for 30 minutes
vegetable oil
¼ cup chopped scallions
2 tablespoons chopped fresh cilantro
½ teaspoon toasted sesame seeds

In a large bowl, whisk together the first 13 ingredients. Add the chicken, mix to coat well. Cover the bowl and refrigerate for 30 minutes.

Heat the grill (gas or charcoal) to medium-high heat. Brush the grates of the grill with the vegetable oil. While the grill heats, thread the chicken pieces through the soaked skewers.

Grill the chicken skewers, turning every few minutes, for 6-8 minutes until the chicken has cooked through. Remove the skewers to plate and sprinkle with scallions, cilantro and sesame seeds.

Poultry · Sponsored

Basil Chicken and Egg Lettuce Wraps

Lettuce Wraps2

I’m all about easy to make meals these days…..

Ok, let’s be honest. I’ve always been enamored with low fuss meals–particularly during the weekdays when I’m always short on time. And when those dishes are savory, fulfilling AND on the health conscious then it’s a NGUYEN-WIN!!!

I’ll tell ya, these Basil Chicken and Egg Lettuce Wraps fit that bill perfectly!

And guess what?

It’s PALEO!!! Yup, you read correctly!

Lettuce Wraps3

Partnering again with our friends at Safest Choice® Eggs, I took quality ground chicken and stir fried it with classic South East Asian aromatics.  After a few splashes of fish sauce (there are tons of fantastic paleo fish sauces out there), I topped the chicken with ribbons of Safe Eggs. Tons of lean protein, packed with flavor and yet still light on the tummy.

Click here to read my post on Paleo Basil Chicken and Egg Lettuce Wraps and here for the recipe.

Have a fantastic week!

Davidsons-Dozen-Blogger-Badge

Poultry

20-ish Minute Chicken Parmigiana

Chicken Parmigiana

A couple of days ago I was playing around with a variation of my tried and true marinara recipe. I didn’t really have any particular purpose for the marinara but just felt a tugging compulsion to make some.

So what does one do when one finds themselves with a pot full of wonderful sauce?

Make some Chicken Parmigiana, of course!

It also may have helped that I was scrolling through IG while the sauce was simmering and saw a rich plate of Chicken Parmigiana that someone had posted. And since I hadn’t made some in a very long time, I decided to put my newly made marinara sauce to some delicious use.

Chicken Parmigiana
Chicken Parmigiana
is typically breaded and pan fried. And although it’s delicious, that step does take some extra time and if you don’t serve it soon after it’s made, the crust can get soggy. Let’s face it–what’s the point of taking the extra effort to have a crispy crust/breading only to have it get all soggy?

So I usually just skip it!

I like to make a very simple and quick version of this Italian-American dish which makes it a perfect weeknight meal. After a quick browning in the skillet (since I nix the breading/frying), I smother the chicken in marinara (homemade or store bought) and cheese before it bakes for several minutes.

Chicken Parmigiana
Super easy, super quick!

The sauce seeps into the chicken while it finishes cooking in the oven so it’s wonderfully juicy and flavorful. Serve it alongside some pasta, potatoes, veggies or even in a sandwich and you’ll be all set!

You can also make a very large dish/tray of it to serve during the holidays. Since there’s no crust, you won’t need to worry about it getting soggy.

That’s totally NGUYEN-ing!

__________________________________

20-ish Minute Chicken Parmigiana
Serves 4

Ingredients:

4 skinless boneless chicken breast
1 teaspoon dried onion powder
½ teaspoon dried basil
½ teaspoon dried fennel seeds, crushed
½ teaspoon red pepper flakes
¼ teaspoon paprika
2 garlic cloves, minced
2 tablespoon lemon juice
zest of 1 lemon
kosher salt
black pepper
olive oil
2 cups marinara sauce (homemade or store-bought)
8 ounces fresh mozzarella, thinly sliced
¼ grated Parmesan
2 tablespoons chopped parsley


Preheat oven to 400 degrees F.

Using a kitchen mallet or bottom of a heavy pan, pound each of the chicken breasts to an even thickness. Place the chicken in a dish and add the onion powder, basil, fennel seeds, red pepper flakes, paprika, garlic, lemon juice and zest, ½ teaspoon kosher salt, ¼ teaspoon black pepper and 3 tablespoons olive oil. Flip the chicken around a few times to coat evenly.

Heat a large heavy bottom skillet with 2 tablespoons olive oil. Cook the chicken breasts over medium-high heat until golden—about 2 minutes each side.

Spread ½ cup marinara sauce on the bottom of a baking dish. Place the browned chicken breasts in the dish and top each breast with the remaining marinara sauce. Top each breast with sliced mozzarella and parmesan. Bake for 7-8 minutes until the chicken has cooked through and the cheeses have melted and browned. If needed, turn on the broiler briefly to brown the cheese.

Remove the dish from the oven and sprinkle the tops with chopped parsley. Serve warm.

Pastas/Noodles

Browned Butter Linguine with Mizithra {Myzithra}

Browned Butter Linguine with Mizithra

Okay.

Y’all are in trouble.

Why have you been hiding Mizithra from me my whole life??

Browned Butter Linguine with Mizithra

Mizithra…the wonderful Greek sheep’s milk cheese. Dry, salty, with a very distinct floral and nutty flavor.

And do you know where I finally discovered Mizithra? The Old Spaghetti Factory of all places!

I know, what the heck was I doing at The Old Spaghetti Factory?! But that’s an entirely different story for another time.

Browned Butter Linguine with Mizithra

They toss Mizithra with pasta and browned butter which is so perfect and simple. I mean, c’mon now, throw some nutty flavored browned butter in anything and I’ll gobble it up. So when Mizithra joins the party, I’m totally there.

Browned Butter Linguine with Mizithra

I found a little wedge of the cheese at my neighborhood market and swooped it right up. I, too, browned up some butter to coat linguine noodles in but added lots of fresh parsley and lemon zest. The combination of the browned butter and Mizithra can be a bit rich so the fresh herbs and citrus really helped to brighten it all.

A rad little dish that takes less than 10 minutes to make with only a handful of ingredients.

And yes, I forgive you now ❤

_________________________________________

Browned Butter Linguine with Mizithra
Serves 2

Ingredients:

kosher salt
4 ounces dried linguine noodles
¼ cup salted butter
¼ teaspoon dried red pepper flakes
¼ cup grated Mizithra (Myzithra) cheese, more to plate
¼ teaspoon fresh lemon zest
1 tablespoon minced parsley

Bring a pot of salted water to boil. Add linguine noodles and boil for 6-7 minutes or until al dente.

While the pasta boils, prepare the browned butter. Place the butter in a saucepan and melt over medium-low heat. Swirl the pan and allow the butter to bubble and foam slightly. Continue browning the butter until it begins to smell nutty and it turns a dark golden brown. Remove from heat.

Once the pasta becomes al dente, drain well and add it back to the pot. Toss the noodles with the browned butter, red pepper flakes and cheese. Plate the pasta between two dishes. Sprinkle each serving with lemon zest, parsley and grate additional Mizithra over each plate. Enjoy!

Pastas/Noodles

Bucatini with Anchovies and Kale

Bucatini with Anchovies and Kale

Earlier this morning, I ran around town knocking out some errands. Nothing out of the usual….stopping by at the dry cleaners, making my bi-daily homage to Target and picking up some groceries.

I came a cross a beautiful bunch of organic Lacinato Kale for only a $1! Smoking Deal!

This particular variety originates from Italy–Tuscany to be specific. Since I couldn’t pass up the bargain, I grabbed a few bunches for the week.

Fresh Kale

As I was finishing my last errand, I had that moment. That brink when you know things may take a quick turn for the worst.

Yeah…I was about to get h’angry.

Hide yo’ kids! Hide yo’ wives!

It’s not a pretty picture ….and I needing something quick to make to save the world from the Namzilla.

IMG_2947

As soon as I got into the kitchen, I quickly got a pot of water boiling and threw in some bucatini. At first glance, bucatini looks like a thick spaghetti noodle. But it actually is hollow inside and has a great texture and “toothiness” because of it.

Bucatini with Anchovies and Kale

While the noodles boiled, I minced up a pile of garlic and chopped up the kale into thin, long strips–a chiffonade. After quickly sauteing the garlic in olive oil, I added a generous amount of red pepper flakes and a huge dollop of anchovy paste.

Bucatini with Anchovies and Kale

Don’t freak out. The anchovy paste does not taste “fishy” at all but adds a rich, salty depth of flavor that you just can’t replicate. And if you don’t have anchovy paste, feel free to use 2-3 anchovy fillets.

Once the oil is infused with the garlic and anchovies, I added the kale and cooked them until they were tender but still had a bite to them.

Bucatini with Anchovies and Kale

Toss in the cooked bucatini, chopped tomatoes, parmesan–and that’s it!!! Super quick, super savory, and totally satisfying. The whole thing took about 15 minutes to whip up and is perfect for a fast weekday meal.

Phew…Crisis Averted.

_____________________________________

Bucatini with Anchovies and Kale
Serves 3

Ingredients:

kosher salt
½ pound dried bucatini pasta (or other long strand pasta of your choice)
3 tablespoons extra virgin olive oil
1 heaping tablespoon minced garlic
½ teaspoon red pepper flakes (more to finish)
1 heaping tablespoon anchovy paste or 2-3 anchovy fillets
½ bunch kale, chiffonade
1 cup diced tomatoes
¼ cup grated parmesan cheese (more to finish)
black pepper

Boil the pasta for approximately 7-8 minutes in heavily salted water until al dente. Drain the pasta and reserve ¼ cup of the starchy water that the pasta was cooked in.

While the pasta cooks, heat the olive oil over medium heat in a large skillet. Add the garlic, red pepper flakes and cook for 1-2 minutes to infuse the oil. Add in the anchovies and stir until it melts into the oil. Toss in the kale and cook for 2 minutes until the leaves have wilted.

Toss in the cooked bucatini, tomatoes and cheese — coating the pasta well. If you want a looser based “sauce”, add a tablespoon at a time of the starchy pasta water until you reach your desired consistency. Season with additional kosher salt and black pepper as needed. Plate the pasta and cover each dish with additional parmesan and red pepper flakes.

Breakfast/Brunch

Down and Dirty Breakfast Fries

Down & Dirty Breakfast Fries

Sometimes a gal has got to throw frou-frou out the door and just get down and dirty….. for breakfast that is.

I’m talking about turning to premade pantry items that can be thrown together in about 15 minutes to create a gritty, gut bomb breakfast. Something so darn good that you should actually feel a tinge bad about inhaling.

But don’t…. in fact, I’ll like you more for it.

Down & Dirty Breakfast Fries

C’mon now... we’re talking fries with a runny egg. It’s a no brainer.

If you’re aiming for extra credit, you could go the extra mile to fry up your own potatoes and pull together homemade salsa. Heck, I usually would but this dish is all about channeling your old 3am college days. And y’all know I’m not a morning person so the AM is my perfect “out” for taking shortcuts. No guilt here 🙂

Happy Sunday FUN-Day everyone!

___________________________________________

Down and Dirty Breakfast Fries
Serves 1

Ingredients:

2 cups uncooked frozen french fries (or homemade if you want a gold start)
cooking spray
3-4 ounces breakfast sausage
1 egg
2-3 heaping tablespoons salsa
black pepper and kosher salt
chopped cilantro

Place a large piece of aluminum foil over a baking sheet. Spread the french fries in a single layer over the foil and lightly cover with cooking spray. Bake until crispy according to package decorations.

In a skillet, add the breakfast sausage and cook over medium heat. Use a wooden spoon to crumble the sausage and break into small pieces. Cook the sausage until browned and transfer to a plate. Take a paper towel to wipe out the majority of the grease left from the sausage. Return the skillet to the stove over medium low heat.

Crack the egg into the skillet and fry it until the yolk has just set. Plate the baked fries onto a dish and top with the browned sausage, salsa and then fried egg. Add a pinch or two of both pepper and salt over the egg. Sprinkle the plate with the chopped cilantro and enjoy warm.


Seafood

Clams with Ginger and Lemongrass

Clams with Ginger and Lemongrass

Does anyone else pretend like they’re on a cooking show when you’re in the kitchen?

You know, talk out loud as if you’re narrating your own show….

Or try to race against the clock to cook/bake something in 5 minutes….

Just me???

Oh…..ok.

Well, if you did ever time yourself, these Clams with Ginger and Lemongrass would be the perfect dish because they’re done in flash! You can easily be in and out of the kitchen in less than 15 minutes—even faster if you have your fishmonger clean your clams for you.

And for the record, I not only time myself when making this dish but also talk to my puggle as if she was the audience in my live cooking show. She thinks I’m hilarious.

_________________________________________

Clams with Ginger and Lemongrass
Serves 2

Ingredients:

2 tablespoons peanut oil or vegetable oil
1 tablespoon finely minced garlic
2 tablespoons minced shallots
2 fresh lemongrass stalks, tender inner white bulbs only, minced
1 tablespoon ginger, minced
2 Thai Bird chilies, sliced
½ cup dry white wine
½ tablespoon fish sauce
2 scallions, cut into 1″ pieces (more for garnish)
1½ pounds little-neck or Manila clams, scrubbed and cleaned
cilantro

Heat a wok or large skillet over medium heat and add the oil. Once the oil is hot, add the garlic, shallots, lemongrass, ginger, and chilies–stir-fry for 30 seconds. Carefully stir in the wine, fish sauce, and scallions.

Add in the clams, stir the contents, and cover with a lid. Allow the clams to cook for 4-5 minutes or until the shells have opened. Plate the clams and garnish with scallions and cilantro. .


Pastas/Noodles · Pork

20-Minute Spicy Sausage & Mushroom Pasta

20-Minute Spicy Sausage & Mushroom Pasta

I love pasta…yeah, yeah, yeah!

Pasta is so great….yeah, yeah, yeah!


That’s my new pasta song. Do you like it? Well obvi you can’t appreciate the full artistry of the song by just reading it.

But trust me.

It’s going to be a Grammy hit one of these days.

20-Minute Spicy Sausage & Mushroom Pasta

This 20-minute beauty truly tops the cake! Or pasta cake…or whatever. Y’all get where I’m going with this………………

Using two of my most favorite items– spicy Italian sausage and ‘shrooms, this number comes together so quick and is so delish that it’ll be a regular staple in your weeknight dinner rotation. You can also throw in other cast members that you may have lingering in your fridge like bell peppers, carrots, zucchinis, etc.

This time around, I ended using whole wheat pasta but feel free to use whichever that tickles your fancy.

TGIF Folks!

______________________________________________

20-Minute Spicy Sausage & Mushroom Pasta
Serves 3-4

Ingredients:

kosher salt
½ pound dried linguine, or pasta of your choice
2 tablespoons olive oil
¾ pound hot Italian sausage, casings removed
½ cup diced shallots
1 tablespoon finely minced garlic
½ teaspoon red pepper flakes
¼ teaspoon dried fennel, crushed
¼ teaspoon dried oregano
2 cups sliced crimini or button mushrooms, roughly chopped
1 28-ounce can crushed Roma tomatoes
2-3 pinches sugar
2-3 sprigs fresh thyme
fresh grated parmesan cheese

Boil the pasta for approximately 8-10 minutes in heavily salted water until al dente. Drain the pasta and reserve ¼ cup of the starchy water that the pasta was cooked in.

While the pasta boils, heat a large skillet with the olive oil over medium-high heat. Add in the sausage and use a wooden spoon to crumble up the meat while it’s browning. Cook until the sausage is no longer pink (about 1-2 minutes) and add the shallots, garlic, pepper flakes, fennel, oregano, and mushrooms. Sauté the items together for another 1-2 minutes.

Add tomatoes with its juices and bring to a boil. Add the sugar, thyme and lower the heat to medium-low. Use the wooden spoon to crush and break apart any large pieces of tomatoes. Allow the items to simmer for 8-10 minutes. Remove the thyme sprigs.

Toss in the cooked/drained linguine, coating the pasta well. If you want a looser based sauce, add a tablespoon at a time of the starchy pasta water until you reach your desired consistency. Season with additional kosher salt and black pepper as needed. Plate the pasta and cover each dish with freshly shaved parmesan.

Enjoy!


Seafood

Pan Seared Black Cod with Anchovy-Herb Vinaigrette

Pan Seared Black Cod with Anchovy-Herb Vinaigrette

It’s been non-stop for me over the past few weeks and although I’ve had a fantastic time, this gal was starting to feel a bit run down.

I needed sleep.

I needed to give my party pants a break.

And I needed to get back in my own {tiny} kitchen.

Pan Seared Black Cod with Anchovy-Herb Vinaigrette

And that’s where I was all weekend long.

Well, it was where I was after I went to the store to stock up on fresh produce because I think the only green thing I consumed over our 4-day Vegas trip was the lime in my grey goose tonic.

Gluttony is my name.

Pan Seared Black Cod with Anchovy-Herb Vinaigrette

To fuel up for the weekend of cooking, I wanted something light but fulfilling–definitely some fish. Now my default is usually sushi or fish tacos when I get a hankering for fish but I then remembered a nearby fishmonger that I’ve been wanting to try – Catalina Offshore Products. They get their product every day directly off the boat from the fishermen — cannot get any fresher than that!

So I popped on in….drooled over all of their premium grade uni, oysters, sushi grade fish and chopped it up with some of their staff. AMAZING!!! For all of you folks in the San Diego area who may be wary about seafood—come here! They’ll put to rest any fears that you may have.

I somehow practiced some self restraint and only picked up a few fillets of their gorgeous black cod for lunch. Black cod is a tender fish that is a bit on the fattier side –think of sea bass– and incredibly delish.

I chose to pan sear the fillets because it’s quick and gives the fish a lovely crunchy crust without overcooking the meat. And the secret to pan searing fish? You’ve got to get the skillet/pan screaming hot before adding the oil and do not —let me repeat…DO NOT mess around with trying to flip the fish around a gazillion times. You’ve got to let it crisp up on the first side and then when it’s ready, meaning when you can slide a spatula underneath it without any resistance, then flip it!

Pan Seared Black Cod with Anchovy-Herb Vinaigrette

Because I’m obsessed with anchovy paste lately, I decided to make a quick herby vinaigrette with anchovy paste for that much needed acidity to cut the natural fattiness of the fish. And for all of you anchovy haters — get over it! The paste adds a subtle, salty, sea flavor that I’m sure you wouldn’t guess it was anchovy if I hadn’t told you.

For reals…..

Since I was aiming for a lighter dish, I served my fish with these gorgeous heirloom tomatoes that I also tossed in some of the vinaigrette. They were beautiful and sweet. But if you’re looking for a little starch — a sunchoke puree or even garlic noodles would be the bomb-diggity.

Yeah….I just went there.

The finished dish is a show stopper if I dare say so myself. Crisp and tender fish with bright acidity from the vinaigrette. And guess what? If you get your act together, this beauty can be done in 20 minutes…..25 minutes if you want to take a leisurely approach.

Fantastic if you’re having folks over or just when you want to make yourself something delish. Because let’s face it, I don’t care if you’re just learning how to cook, an intermediate cook or chef extraordinaire —the food you create should make you want to smile and do a little happy dance.

And this little number made me do both….times 100.

________________________________________________

Pan Seared Black Cod with Anchovy-Herb Vinaigrette
Serves 2

Ingredients:

1 tablespoon anchovy paste
2 tablespoons minced shallots
1 garlic clove, roughly chopped
1 cup roughly chopped fresh basil
1 tablespoon roughly chopped Italian parsley
1 teaspoon fresh thyme leaves
1 teaspoon lemon juice
1/4 cup champagne vinegar
1/2 cup extra virgin olive oil
kosher salt
black pepper
2 black cod fillets, skin-on, de-boned (5-6 ounces each)
2 tablespoons vegetable oil
3-4 fresh thyme sprigs
2 cups heirloom cherry tomatoes, quartered

Combine the anchovy paste, shallots, garlic, herbs, lemon juice and vinegar in a blender and blend at medium speed for about 20 seconds. With the blender running on low, slowly drizzle in the olive oil until the vinaigrette has become emulsified. Season with salt and pepper. Set aside.

Score the skin side of each of the fish fillets and use paper towels to pat them dry. Season the fillets with kosher salt and pepper.

Choose a skillet that can handle a high level of heat (ie. cast iron, stainless steel, etc.) Heat the skillet over high heat so that it becomes screaming hot. Once it reaches the desired temperature, add the oil and swirl it around the skillet. Carefully place each fillet, skin side down into the oil. Using a spatula, gently press down on the fillets so that they don’t curl up on the sides. Toss the thyme sprigs into the oil on the side of the fish –this will help flavor the oil.

Cook the first side of the fish for about 3 minutes — depending on the thickness of the fillets. Be careful not to flip the fish before the skin has crisped up and formed a crust. Once the first side has cooked, about 2/3 way through, flip and cook for an additional 2 minutes. Remove the fillets from the skillet.

Toss the tomatoes in a few spoonfuls of vinaigrette. Plate 1/2 of the dressed tomatoes on each plate. Top each mound of tomatoes with a cod fillet. Drizzle the fish with additional vinaigrette. Serve immediately.