Sunday Family Dinner

A Belated Sunday Family Dinner

Feb 2016 Fam Din
The other weekend we celebrated February in March.

Or more accurately, we had February’s Sunday Family Dinner in March. February was totally hectic with the Lunar New Year, the family being up in San Francisco for our cousin’s wedding and just a bunch of random events that caused the delay for dinner.

But the thing is, we couldn’t actually “skip” a month—because once you start doing that, those “monthly dinners” can continue to get pushed back and eventually become “every few months family dinners”.

And that’s No bueno.

Plus, February was Maya’s birthday and we couldn’t skimp out on birthday celebrations for this cutie! So per her request, we made a menu around some of the favorite things she loves — steak and cake!

A girl after my own heart….

Feb 2016 Fam Din

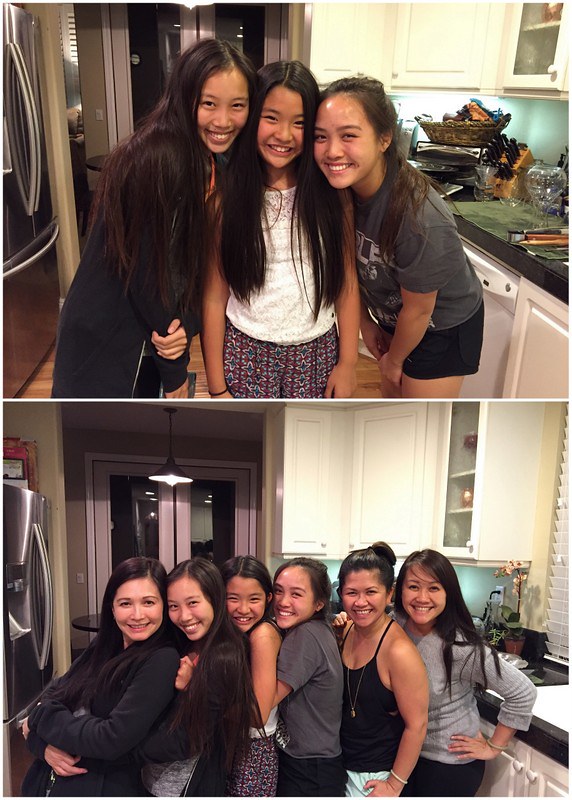
That day we decided to enact a new rule — unless you’re taking pictures of each other or food (which is more likely), everyone has to stay off their iPads and iPhones. Which, if you have teenagers and wee ones, can be torture!

But if the point of us having monthly family dinners was to spend quality time with each other, being glued to phones and tablets (darn you Snapchat and Minecraft!) kind of defeated the purpose. So I went around and collected all their devices and didn’t return them until dessert – which is pretty darn good if you know our munchkins!

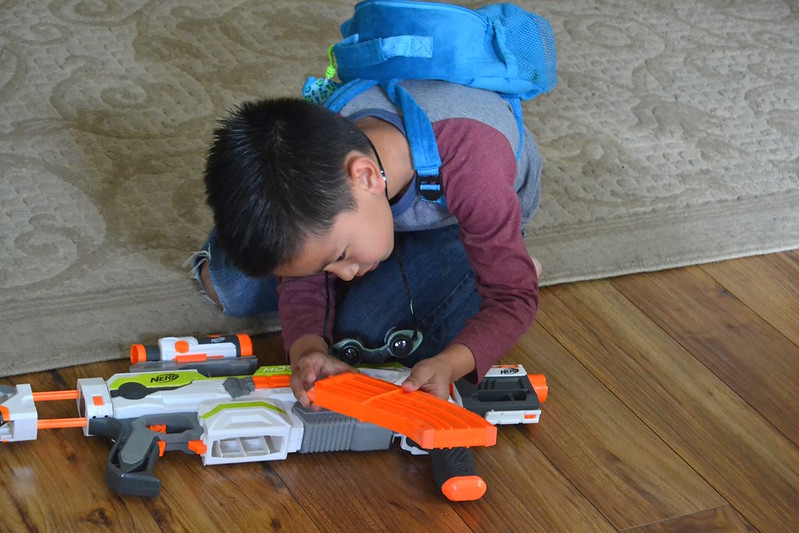
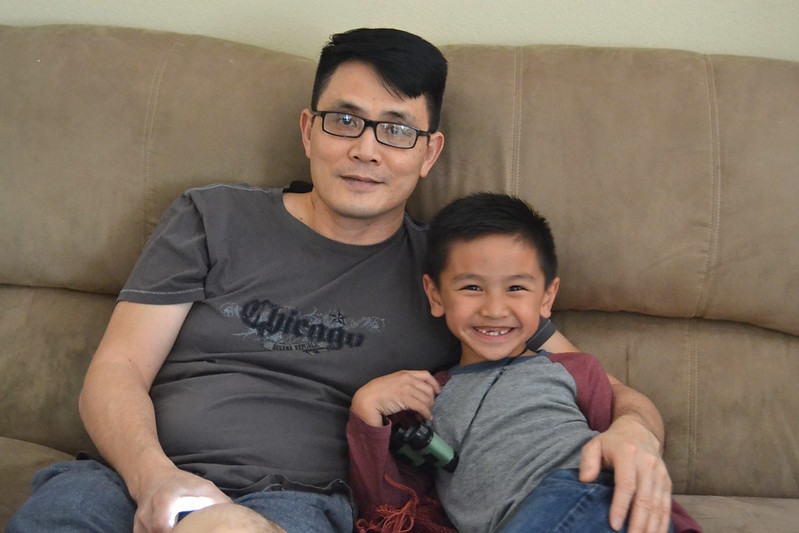
Without his iPad, Lucas had to resort to one of his other favorite obsessions — Nerf guns. Here he is intensely loading up on ammo. Afterwards, he spent a good hour running around the house, hiding behind columns and banisters as he went on full assault mode with his uncle.

Feb 2016 Fam Din
Those two have always been thick as thieves–ever since Lucas was a wee-bitty-baby. I used to think it was because he and my sister had two daughters and no sons—but I really think it’s because my brother-in-law definitely has a “kid at heart” gene.

Feb 2016 Fam Din

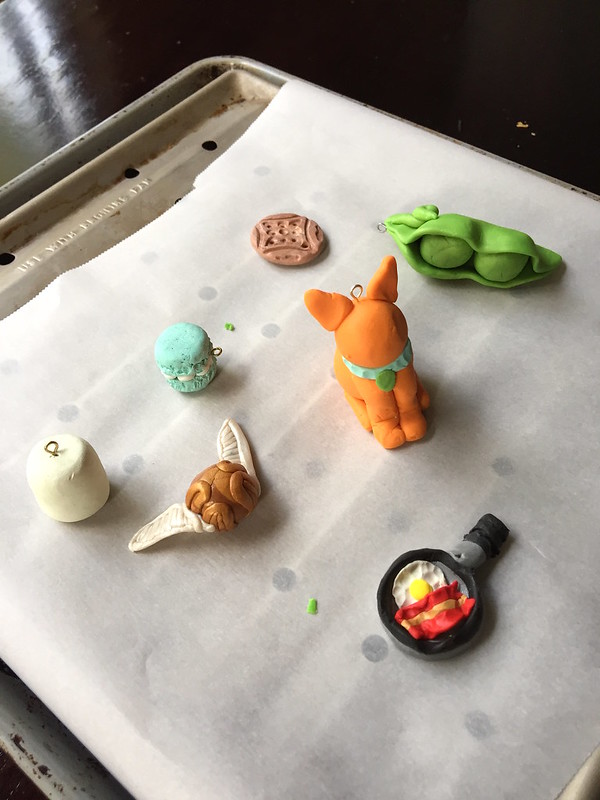
The girls decided to spend a considerable amount of time with Maya’s latest obsession – FIMO clay. The clay can be molded into whatever your imagination conjures up–then you bake it to harden your design.

She has a TON of them in all different colors filling tackle boxes, tupperwares, and wherever else she can store them.

Feb 2016 Fam Din
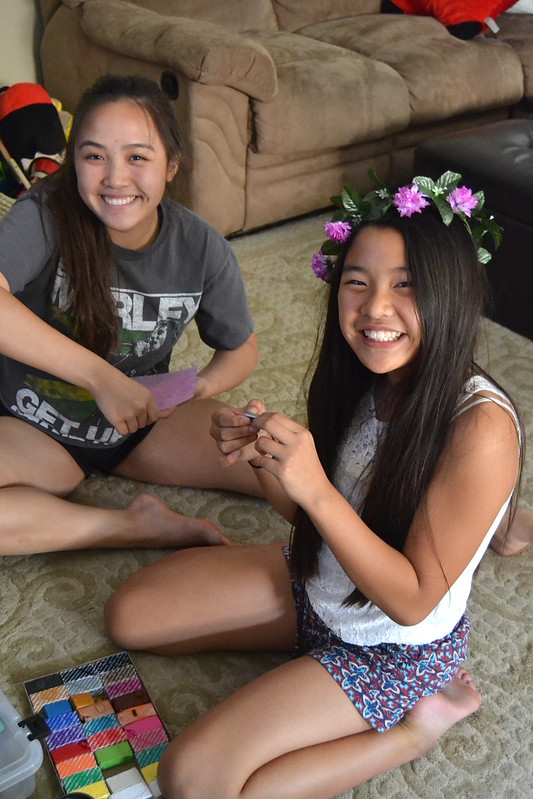
They’re quite talented with it too!

They made a golden snitch, macaron, marshmallow, a cat(?) and my favorite–a cast iron skillet with an egg and bacon!

Feb 2016 Fam Din
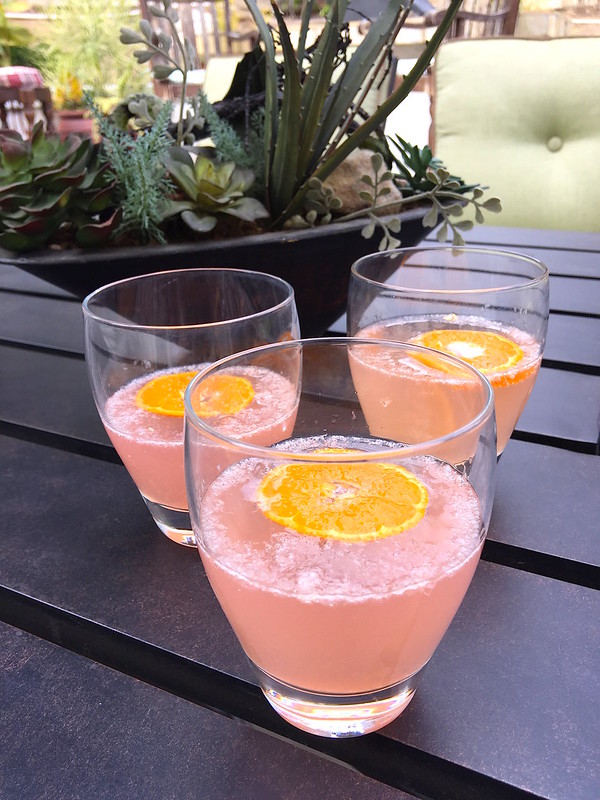
Then it was cocktail time!

The adults sipped on Raspberry-Lemonade Sparklers….and by “sparklers”, I mean prosecco.

Feb 2016 Fam Din

We always need to nosh on a few things before dinner is served or else my “cute” family turn into a tribe of gremlins.

And that’s not a pretty sight.

Trust me….I’ve seen it.

Feb 2016 Fam Din
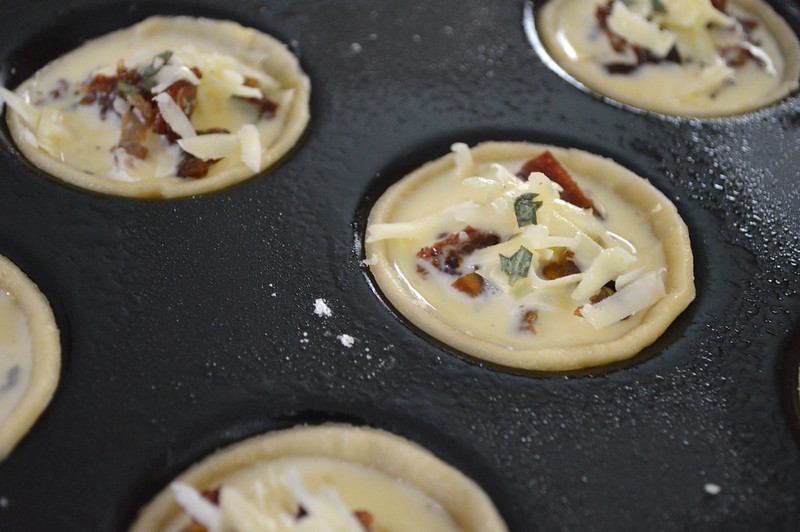
Big seester made these adorable little Tartlets that were like mini-quiches filled with bacon, gruyere, and custard all in a savory crust.

Perfect bite sized snacks!

I had about 30 or so……

Feb 2016 Fam Din
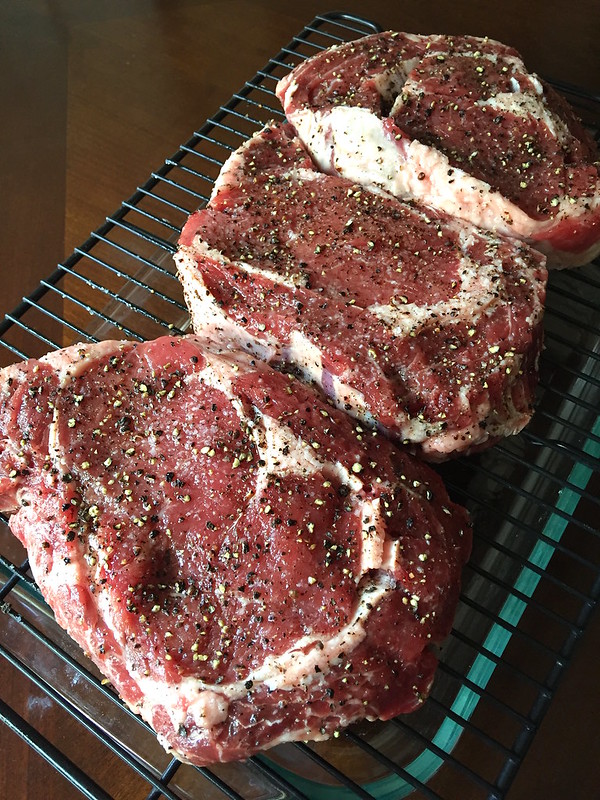
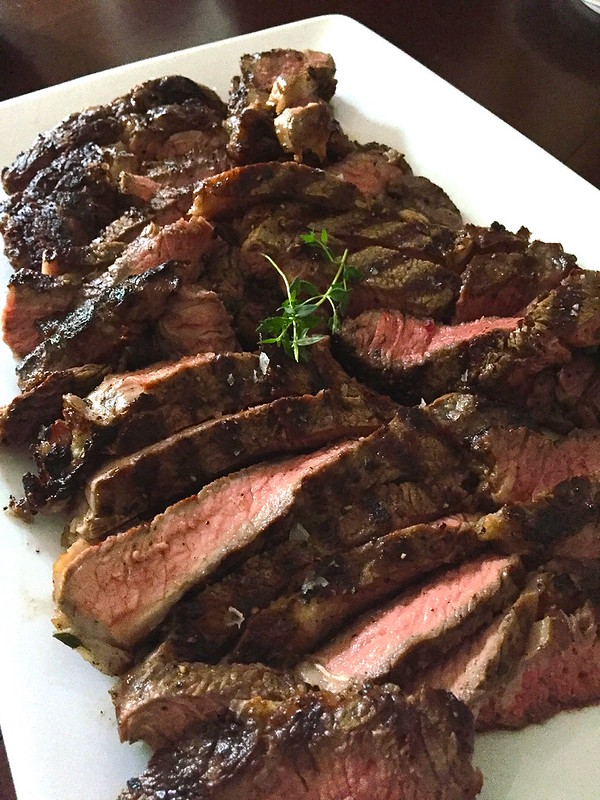
Since birthday girl wanted steaks, she got STEAKS!

These were the beautiful boneless Ribeyes seestrah picked up. She simply seasoned them with lots of kosher salt and fresh cracked pepper. And oh that lovely marbling!

Feb 2016 Fam Din
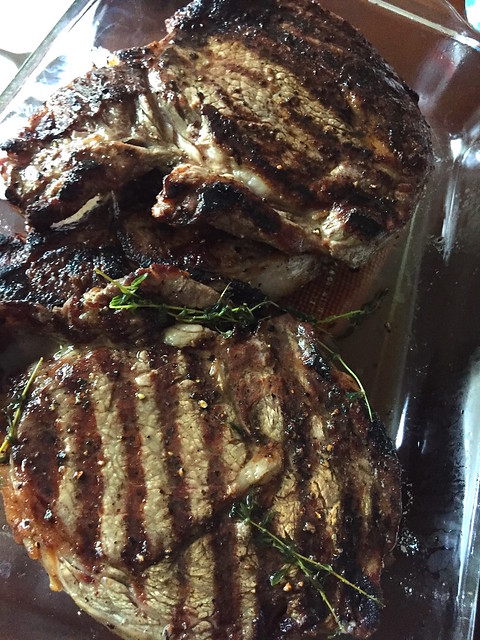
They were then handed over to the boys to grill.

I must have a gajillion pics of R and C posing like this by the grill over past few years…. But hey–they like to grill so we put them to work!

Feb 2016 Fam Din
Sizzle, sizzle!

And no, I didn’t mean The Sizzler.…..but oh that cheese bread!

Feb 2016 Fam Din
The grilled steaks were brushed with some herb butter while they rested which now gives me a great opportunity to talk about the sides!

Feb 2016 Fam Din
Maya loves salad–usually odd for small kids but she does have a mature palate. We put together a tray of colorful Wedge Salads because nothing makes veggies more healthy than dousing it with a creamy dressing and tons of crispy bacon bits.

MMMMmmmm….bacon……

Feb 2016 Fam Din
And since Nina helped with making it, I made her pose with the tray.

Think the kids will be traumatized by all the pics I make them take holding food?

Nah…they make good profile pics, right?

Feb 2016 Fam Din
Next up, colorful Roasted Potatoes that were marinated in tons of garlic, rosemary, chili flakes and Dijon mustard before being blasted in a high heat oven.

Feb 2016 Fam Din
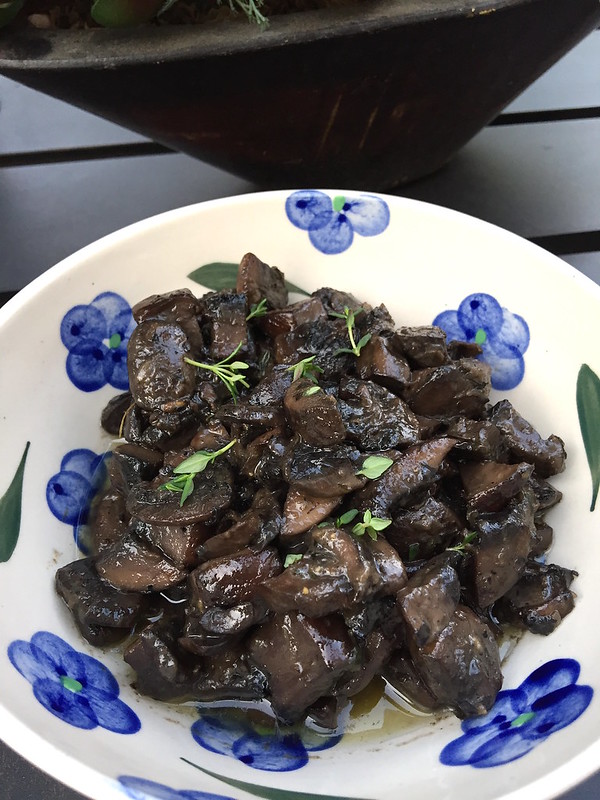
We also had a side of slowly Sauteed Crimini Mushrooms that were drizzled with truffle oil and fresh thyme.

Total mushroom goodness.

Feb 2016 Fam Din
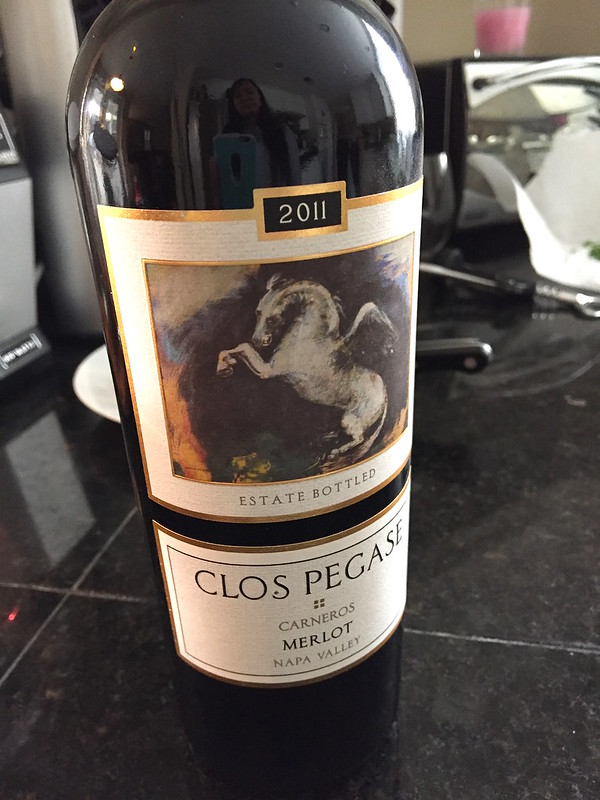
There may have been a few bottles of vino too…..

And yes, that’s me in the bottle’s reflection…

Hiiiiii!!!

Feb 2016 Fam Din
Beef-a-licious!

Feb 2016 Fam Din
Here’s my plate with a little bit of everything…. OH! And I forgot about the Dirty Rice seester made as well! It’s cooked with onions, lots of butter, beef consomme, and a few other secret stuff.

What’s the secret?

No idea…I never pay attention when she makes it but I am more than pleased to shovel it down by the large spoonfuls.

Feb 2016 Fam Din

After dinner, we tend to try and clean up a bit before dessert.

And by “clean up”, I mean “take pictures”.
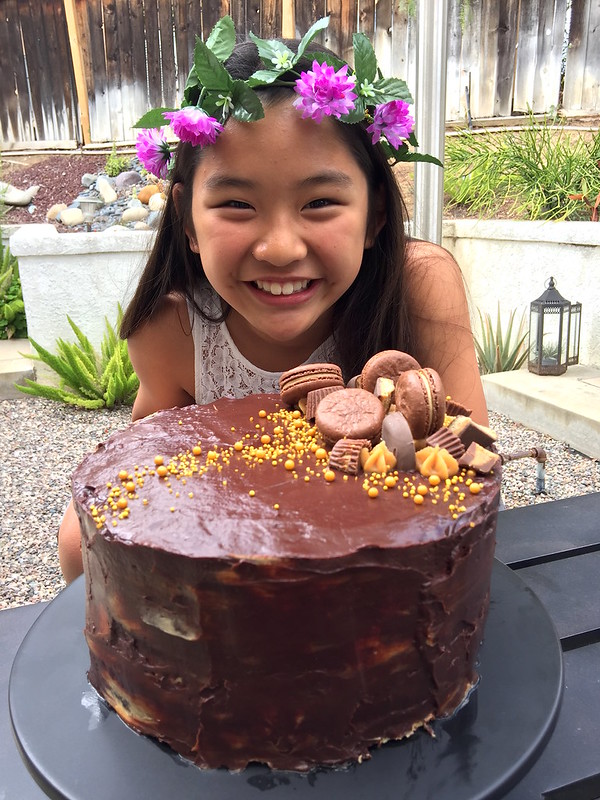
Fam Din
Cake time!

When I asked Maya what kind of cake she wanted, all she said was a chocolate and peanut butter combo.

Told you the girl had good taste!

Feb 2016 Fam Din
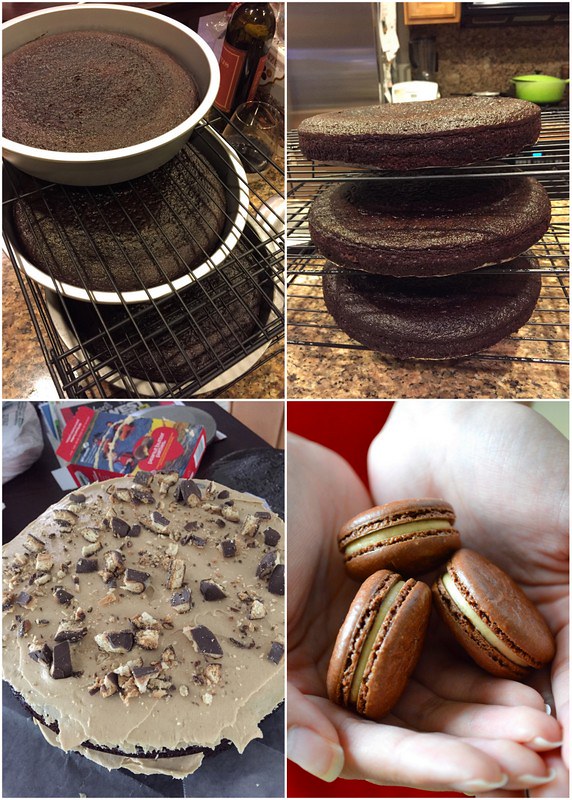
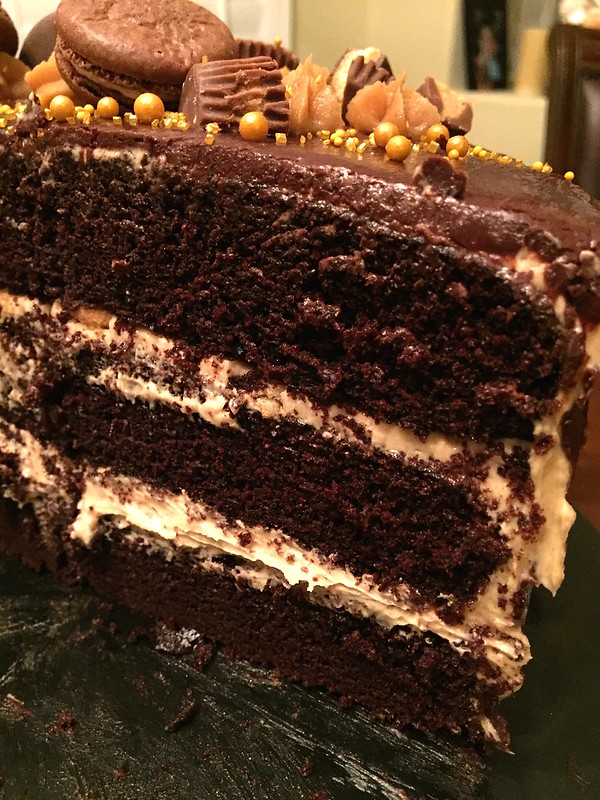
I started off with a wonderful chocolate cake by Brown Eyed Baker.

I have to tell y’all, that crumb was oh-so-lovely! Super dense, moist and oober chocolaty! And there were three layers of it! I also used her version of peanut butter buttercream that was so lip smacking good!

Chocolate & Peanut Butter Cake
But this was for Maya and things had to be OVER THE TOP! Although the chocolaty cake was frosted in the peanut butter buttercream, I added chopped mini-peanut butter cups in one layer and Girl Scouts Peanut Butter Patties in the next!

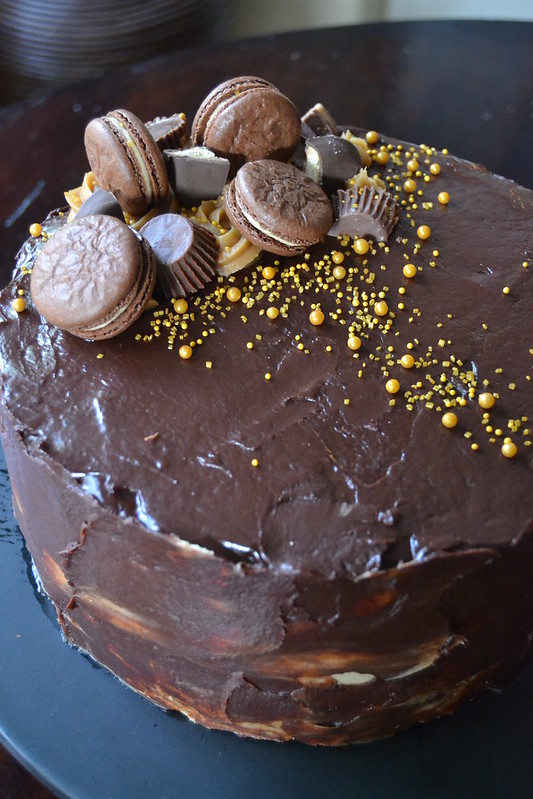
Now, I had intended to frost the entire cake with that luscious buttercream and then do a drippy, drizzle layer of chocolate ganache like Brown Eyed Baker did for her Chocolate-Peanut Butter Cup Overload Cake.

But I totally biffed it by making the ganache too thick and instead of making that whimsical-purposely drippy look, it turned into a gloopy mess. AGH! So I took seester’s advice and decided to frost the ganache out into a thin layer—and I actually kind of loved the marbling effect it had.

PHEW!

Chocolate & Peanut Butter Cake
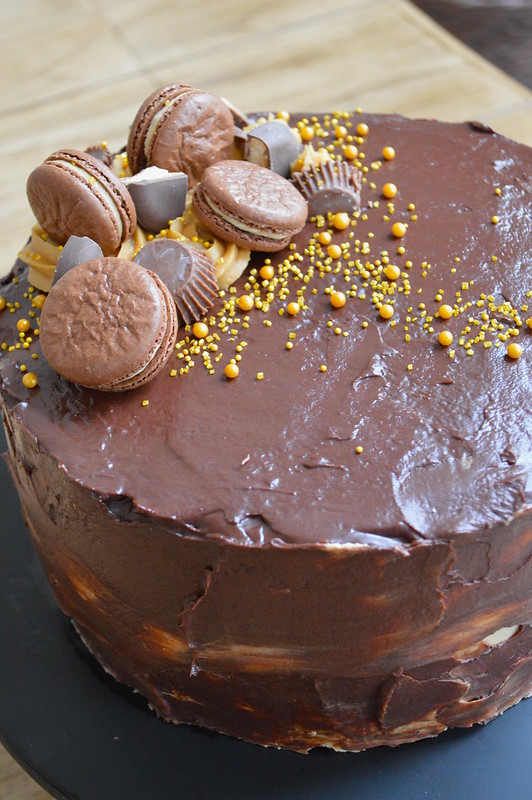
To top the cake I added more Peanut Butter Patties, mini-peanut butter cups, 3 different types of gold sprinkles and wait for it–freshly made Chocolate and Peanut Butter Macarons.

Wait–did I say I baked macarons just to top the cake? I SURE DID!!! Because Miss Maya LOVES macarons and I promised her an OVER THE TOP cake.

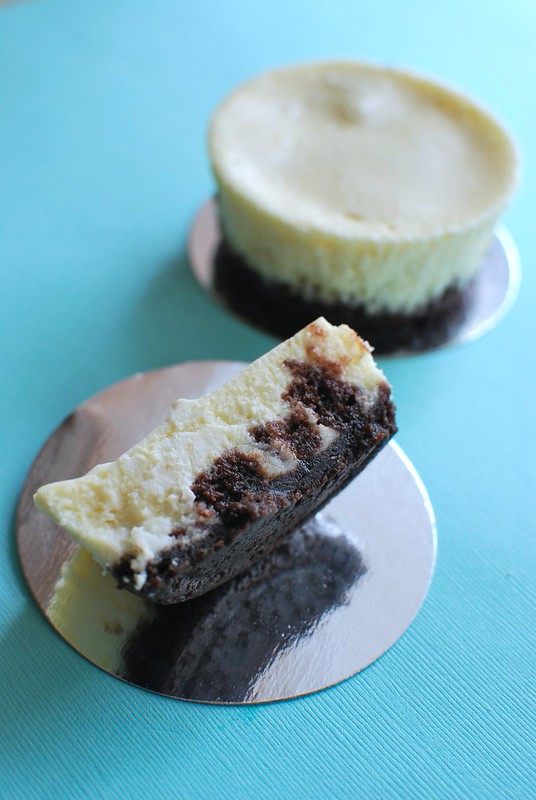
Here’s a quick peek inside of the cake…..and let me just tell you, a tall and icy glass of milk would go perfect with it!

Except I can’t drink milk…..TMI?

So I had it with red vino instead.

Chocolate & Peanut Butter Cake
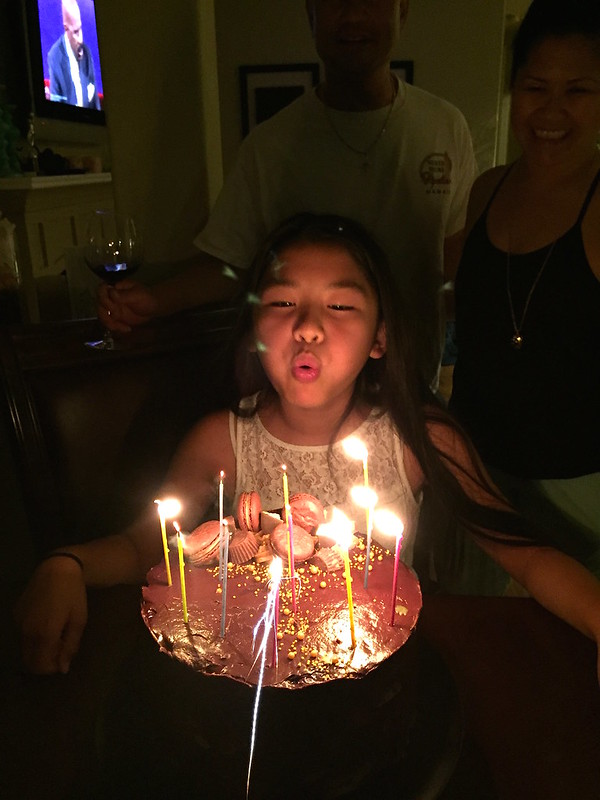
All in all, I think birthday girl forgave us for having her dinner so late—though, she’s such a sweet tempered kid that I don’t think she really minded at all.

HAPPY BELATED BIRTHDAY MAYA LOVE! ❤

Feb 2016 Fam Din

This Month’s Family Dinner Menu

Cocktails: Raspberry-Lemonade Sparklers
Appetizers: Bacon Gruyere Tartlets
Entrees: Grilled Ribeye Steaks
Sides: Wedge Salads, Rosemary-Garlic Roasted Fingerling Potatoes, Sauteed Mushrooms, Dirty Rice
Dessert: “Over the Top” Chocolate and Peanut Butter Cake

Desserts/Pastries

Raspberry Cupcakes with Raspberry Whipped Cream

Raspberry Cupcakes

Man, old, man…..There’s a Baby Epidemic going around!

Yep. In less than 8 weeks, I’ve attended 5 baby showers. Now that’s a lot of baby games!

Raspberry Cupcakes

And not to brag, but I’m kind of a pro now when it comes to guessing how many jelly beans there are in a baby bottle…..or gauging the diameter of momma’s tummy using a roll of toilet paper….or everyone’s favorite–identifying the type of candy bar that has been melted/schmeared into a little diaper. Yep, y’all don’t stand a chance!

For the most recent shower I attended, I decided to bring some cuppies to the party. My friend, who is the momma-to-be, doesn’t really enjoy overly sweet desserts so I wanted to make something light but that would still satisfy everyone’s sweet tooth.

Raspberry Cupcakes

I ended up making these fluffy Raspberry Cupcakes that were flavored with fresh raspberry puree. And instead of your standard buttercreams, I topped them with rosette swirls of raspberry flavored whipped cream.

_______________________________________________________

Raspberry Cupcakes with Raspberry Whipped Cream
Makes approximately 2 dozen cupcakes

Ingredients:

Cupcake Batter:
2¼ cups cake flour
1 tablespoon baking powder
½ teaspoon salt
1¼ cups buttermilk
4 large egg whites, at room temperature
½ cup unsalted butter, at room temperature
1½ cups sugar
½ tablespoon almond extract
½ cup raspberry puree*

Raspberry Whipped Cream:
1½ cups heavy cream, chilled
2 tablespoons sugar
¼ cup raspberry puree*

Garnish:
fresh raspberries

Preheat oven to 350˚ F.  Line cupcake pans with paper liners.

In a medium bowl, sift together the cake flour, baking powder and salt. Whisk together the buttermilk and egg whites in another bowl.

Place the butter and sugar in the bowl of a stand mixer fitted with the paddle attachment. Beat at medium speed until ingredients are light and fluffy. Beat in the almond extract and then add one third of the flour mixture, still beating on medium speed. Mix in half of the milk-egg mixture, then beat in half of the remaining dry ingredients until incorporated. Add the rest of the milk and eggs, mixing until the batter is well mixed, then add the last of the dry ingredients. Continue beating the mixture for another few minutes to ensure that the batter is thoroughly mixed and well aerated. Gently fold in the raspberry puree until just combined.

Divide the batter evenly between the prepared liners, filling each about ¾ full. Bake for 18-22 minutes, or until the cupcakes are well risen and springy to the touch and a toothpick inserted in the center comes out clean.  Allow to cool in the pans for a few minutes, and then transfer the cupcakes to a wire rack to cool completely.

While cupcakes are cooling, prepare the whipped cream. Using a standing mixer fitted with the balloon whisk attachment, whip the chilled heavy cream on high until it just holds stiff peaks. Slowly sprinkle in the sugar until you reach a thick consistency. Slowly add in the raspberry puree and whip until combined.

Fit a piping bag with a fitted tip. Fill the bag with the Raspberry Whipped Cream and pipe decorative swirls on top of cooled cupcakes. Garnish with fresh berries.

**To make Raspberry Puree, add 2 pints of fresh raspberries with 2 tablespoons of water in a blender. Puree the berries until smooth. Pour the raspberry mixture through a fine mesh strainer to remove the seeds. Depending on how sweet the raspberries are, you can also add a few teaspoons of sugar while you puree them.

Desserts/Pastries

Sweet Treats from 2012 and Happy New Year!!

Alice in Wonderland Chocolate Cupcakes

With just a few hours left in 2012, I wanted to wish you and your loved ones Happiness, Joy, Endless Laughter and epic Foodventures! May 2013 be everything you wish it to be and more.

I also wanted to show some sweet treats that I pulled together in 2012 but didn’t get a chance to share with you before.

Alice in Wonderland Chocolate Cupcakes

Alice in Wonderland  themed cupcakes for my niece’s Birthday Tea Party. Chocolate Cupcakes frosted with Vanilla Buttercream with toppers that were molded from fondant and edible markers

Mini White Chocolate-Brownie Chunk Cheesecake

Mini White Chocolate-Brownie Chunk Cheesecakes

Chiffon Cupcakes w/ Strawberry Swiss Meringue Buttercream

Chiffon Cupcakes with Strawberry Swiss Meringue Buttercream

Chocolate Malt Cupcakes

Chocolate Malt Cupcakes

Chocolate Soccer Cupcakes

Soccer Themed Chocolate Cupcakes for my nephew’s 3rd birthday

Chocolate Soccer Cupcakes

Toppers made with fondant and painted with gel food colors, royal icing and edible markers

Chiffon Cupcakes w/ Swiss Meringue Buttercream

Vanilla Bean Chiffon Cupcakes with Swiss Meringue Buttercream topped with handmade White Chocolate Shell Candies for a Beach Themed Bridal Shower

Chiffon Cupcakes w/ Lemon Curd & Swiss Meringue Buttercream

4 layer Vanilla Bean Wedding Cake filled with Lemon Curd and frosted with Swiss Meringue Buttercream in a “ribbon” pattern

Vanilla Cake Pops

Vanilla Cake Pops for a Bridal Shower

Chocolate Raspberry Petal Cake

3 layer rich Chocolate Cake filled with Raspberry Coulis and frosted with Chocolate Buttercream in a “petal” pattern for my niece’s birthday party

Chocolate Raspberry Petal Cake

Creating a “petal” pattern with Chocolate Buttercream

And with that, I’m off to the countdown with friends and bubbly. Here’s to a delicious 2012 and Cheers to all of the wonderful things to come in 2013! HAPPY NEW YEAR!!!

Desserts/Pastries

White Chocolate Raspberry Cheesecake

White Chocolate Raspberry Cheesecake

Forgive me. This is a HORRIBLE photo.

But the fact of the matter is, you wouldn’t forgive me if I didn’t share this with you. So after weighing out the lesser of two evils, I said— “LET THEM EAT (cheese)CAKE!”

I made this for our family Christmas party and amidst all of the cooking/baking, catching up with the fam, and partaking in holiday cocktails—I totally missed photographing this little number and only caught a quick pic on my phone. I know, I know. The same woman who makes her loved ones eat cold food because I have to take a hundred photos first, totally blew it. DOH!

But I think you’ll forgive me once you try this beauty. Creamy, dense cheesecake studded with white chocolate and swirls of raspberry puree. DEE-LISH. I chose to use ginger snaps for the crust as an homage to the holidays but you can definitely swap them out for graham crackers or even better–chocolate cookies!

Guess I’ll just have to make this again so I can snap some better photos.

Yup–It’s a difficult task but someone has got to do it.

_____________________________________________

White Chocolate Raspberry Cheesecake
One 9-inch cake

Ingredients:

Crust:
2½ Cups Ginger Snap Crumbs (or Graham Cracker Crumbs if you prefer)
3 Tablespoons Sugar
6 Tablespoons Unsalted Butter, melted

Filling:
24 Ounces Cream Cheese, at room temperature
¼ Cup Sour Cream, at room temperature
1 Cup Sugar
3 Large Eggs, at room temperature
¼ Teaspoon Cornstarch
2 Teaspoons Pure Vanilla Extract
6 Ounces White Chocolate, chopped

Raspberry Puree:
10 Ounces Frozen Raspberries
¼ Cup Granulated Sugar
¼ Cup Red Wine
Zest of 1 Lemon
Preheat oven to 325 ˚F.

Prepare the raspberry puree by placing all the ingredients in a small sized, heavy saucepan. Simmer on medium-low until berries have broken down and the wine has cooked off. Approximately 10-15 minutes. Transfer contents to a blender and puree until smooth. Strain through a sieve, using a rubber spatula to help press the puree through. Cover and set puree aside.

Prepare a 9-inch spring form pan by wrapping the outside with 2-3 sheets of heavy-duty aluminum foil. Spray the inside of the pan with cooking spray. Combine the ginger snap crumbs, sugar and butter until moistened and resembles the texture of wet sand. Pour into the pan and evenly press the crumbs into the bottom of the pan and about one inch up the sides. Bake for 8-10 minutes until golden and cool to room temperature.

Using a standing mixer fitted with the paddle attachment, whip the cream cheese and sour cream until its light and fluffy. Gradually mix in the sugar.  Mix in the eggs one at a time, beating well after each addition.  Add the vanilla extract and cornstarch until well combined.  Sprinkle the white chocolate over the cooled crust and pour the filling on top. Spoon dollops of the raspberry puree over the cheesecake. Run the tip of a pairing knife or a toothpick through the raspberry puree to create a marble effect.

Place the springform pan in a large roasting pan on the middle rack of the oven. Fill the roasting pan with hot water to come halfway up the sides of springform pan. Bake for 50-60 minutes or until the center is set. Allow the cake to sit in the oven (heat turned off) with the door propped open for about 30 minutes. Remove from the oven and transfer to a wire rack.  Allow the cake to cool for an additional 30 minutes.  Wrap well with plastic film and foil. Refrigerate for at least 8 hours. Carefully remove the sides of the pan by running a hot knife around the outside of the cake.

Serve with whipped cream and a drizzle of the remaining raspberry puree. Enjoy!

Desserts/Pastries

Fresh Fruit Tart with Pastry Cream

Fresh Fruit Tart with Pastry Cream

My cousin, T, recently graduated from optometry school.

And to be honest, it kind of trips me out. I still remember him following me and his sister around when he was a kid and now he’s all grown up and taking care of people’s eyeballs.

Yup, I said “eyeballs“. 🙂

Fresh Fruit Tart with Pastry Cream

For T’s graduation party, I gave him a few options of desserts to choose from for me to make. He chose a fruit tart which worked out great for me since I had been wanting to try out this pastry cream recipe for some time now. It came together beautifully—silky, rich, and delicious. And since it’s so easy to pull together, I turned to Alice Medrich’s  recipe for a shortbread-like tart crust. Buttery goodness!

Fresh Fruit Tart with Pastry Cream

And not only was this tart delicious but it’s quite a looker, too! 🙂

Have a great week, Friends!

______________________________________________
Fresh Fruit Tart with Pastry Cream
Makes one 10-inch tart

Ingredients:

Pastry Cream (America’s Test Kitchen):
2 Cups Half-and-Half
½ Cup Sugar
Pinch Salt
5 Large Egg Yolks
3 Tablespoon Cornstarch
4 Tablespoon Cold Unsalted Butter, cut into 4 pieces
1½ Teaspoon Vanilla Extract

Crust (From Alice Medrich):
8 Tablespoons Unsalted Butter, melted
¼ Cup Sugar
1/8 Teaspoon Salt
¾ Teaspoon Pure Vanilla Extract
1 Cup All Purpose Flour

Topping:
Fresh Blueberries
Fresh Raspberries
Fresh Blackberries
Kiwis, peeled and sliced
½ Cup Apple Jelly

Prepare the pastry cream. Bring the half-and-half, 6 tablespoons of the sugar, and the salt to a simmer in a medium saucepan over medium high heat, stirring occasionally. As the half-and-half mixture begins to simmer, whisk the egg yolks, cornstarch, and remaining 2 tablespoons of sugar together in a medium bowl until smooth. Slowly whisk about 1 cup of the simmering half-and-half mixture into the yolks to temper, then slowly whisk the tempered yolks back into the simmering saucepan. Reduce the heat to medium and cook, whisking vigorously, until the mixture is thickened and a few bubbles burst on the surface, about 30 seconds. Off the heat, stir in the butter and vanilla. Transfer the mixture to a medium bowl, lay a sheet of plastic wrap directly on the surface, and refrigerate the pastry cream until chilled and firm, about 3 hours.

While the pastry cream chills, repare the crust. Position a rack in the lower third of the oven and preheat the oven to 350°F. Mix the butter, sugar, salt, and vanilla in a medium bowl with a fork. Add the flour and mix just until well blended with a pastry blender or a large fork. Don’t worry if the dough seems too soft. Press all of the dough very thinly and evenly into the sides and bottom of an 10-inch tart pan. If it seems like the butter is getting too oily and it’s becoming difficult to manipulate the dough, simply put it in the fridge for a few minutes, it’ll become easier to handle. Using a fork, prick the dough all over the bottom and sides. Place a large piece of parchment paper on top of dough and fill with pie weights or dry beans. Press weights to the edges of dough and bake in the oven for 15 minutes. Remove parchment and weights and continue baking until deeply golden in color, approximately 10 minutes longer. Remove from oven and place on cooling rack.

To assemble, spread the chilled pastry cream evenly over the bottom of the cooled tart shell. Shingle the kiwis around the edge, then a row of blackberries, then raspberries, and finally pile the blueberries in the center. Melt the jelly in a small saucepan over medium-high heat, stirring occasionally to smooth out any lumps. Using a pastry brush, dab the melted jelly over the fruit. Enjoy!

Desserts/Pastries

Pavlovas: A Guest Post at The Ravenous Couple

Pavlova with Fresh Berries


One of the best things that has occurred by writing this blog has been connecting with some of the most talented food writers from around the world. Thanks to the internet, I have made friends around the globe who are so incredibly creative that one just can’t help but be inspired.

One of my regular sources of inspiration comes from The Ravenous Couple. You simply must head over there if you haven’t seen their delicious creations yet. Through mouthwatering dishes and beautiful photography, Kim and Hong highlight all of the wonderful flavors of Vietnamese cuisine.

I am honored to be among a group of guest bloggers who will be posting over at The Ravenous Couple while the lovely pair takes some time off to get hitched 🙂

Just in time for the Fourth of July holiday, I offer individual Pavlovas with Fresh Berries. Not only are these pavlovas delicious but they are sure to impress your guests at any Independence Day shindig! For the recipe and information about my pavlovas, click  here to their site.

Thanks for reading!

Desserts/Pastries

Fresh Strawberry Tart

Fresh Strawberry Tart

We managed to bring home 6 pounds of gorgeous strawberries that we picked fresh from our day at Tanaka Farms. Because they were perfectly ripe, the berries were a lovely shade of red and utterly sweet and juicy.

I knew we’d polish off a good amount of them just as they were. But since each of us ate our bellies full of the berries at the farm, I wanted to make a few desserts to utilize the rest before they spoiled. It didn’t take too long for us to decide that a fresh strawberry pie would fit the bill perfectly!

Fresh Strawberry Tart

I had initially wanted to make a pie just like the ones we used to order from Marie Callendar’s that were piled high with whole strawberries and glistened with a bright red glaze. But my sis, P, suggested I try out Alice Medrich’s shortbread tart crust. It’s one of her “go to” recipes because the flavor is stellar and it’s super quick and easy to pull together. I followed her advice and our fresh strawberry pie turned into a fabulous fresh strawberry tart with a buttery shortbread crust.

If you’ve never tried Alice Medrich’s tart crust before, you simply MUST! It comes together so quick due to the fact that it uses melted butter and you don’t need to roll out the dough.

Fresh Strawberry Tart

If you read the recipe below, you’ll notice that I also used some fresh raspberries in the tart. Normally I wouldn’t have but I somehow used up so many of the berries in our other strawberry dessert that I needed something extra to fill in the spaces. However, it’s completely up to you if you’d like to add them or not.

I took the extra step of individually dipping each strawberry into the glaze before placing them into the crust. Most recipes will toss the strawberries in the glaze and then pour all the contents into the crust. This can often result in way too much glaze and the end result can be overly sweet and goopy. It definitely was unnecessary for our tart since our strawberries were so naturally sweet. So although the extra step may seem a bit much, it’s really worth it.

The finished tart is quite the show stopper and tastes even better than it looks. And with the delicious strawberries that we picked ourselves from Tanaka Farms, I can honestly say, it doesn’t get any fresher than this 🙂

Thanks for reading and have a wonderful weekend!

__________________________________

Fresh Strawberry Tart
Makes one 8-inch tart

Ingredients:
Crust: (From Alice Medrich)
8 Tablespoons Unsalted Butter, melted
¼ Cup Sugar
1/8 Teaspoon Salt
¾ Teaspoon Pure Vanilla Extract
1 Cup All Purpose Flour


Filling
:
1 Quart Strawberries
½ Cup Raspberries (optional)
3/4 Cup Water
2 Tablespoons Strawberry Gelatin
1 Tablespoon Cornstarch
¼ Cup Sugar (more if berries aren’t sweet enough)

Prepare the crust. Position a rack in the lower third of the oven and preheat the oven to 350°F. Mix the butter, sugar, salt, and vanilla in a medium bowl with a fork. Add the flour and mix just until well blended with a pastry blender or a large fork. Don’t worry if the dough seems too soft. Press all of the dough very thinly and evenly into the sides and bottom of an 8-inch tart pan. If it seems like the butter is getting too oily and it’s becoming difficult to manipulate the dough, simply put it in the fridge for a few minutes, it’ll become easier to handle. Using a fork, prick the dough all over the bottom and sides. Place a large piece of parchment paper on top of dough and fill with pie weights or dry beans. Press weights to the edges of dough and bake in the oven for 15 minutes. Remove parchment and weights and continue baking until deeply golden in color, approximately 10 minutes longer. Remove from oven and place on cooling rack.

While the crust is cooling, prepare the filling. Mix together the sugar, gelatin, and cornstarch. Bring water to a boil in a saucepan. Whisk in the dry ingredients and cook until the mixture thickens. Remove from heat and cool to room temperature. Dip each strawberry into the glaze and arrange them in the crust. Dip each raspberry and arrange them in between the strawberries. Chill  the tart for at least 2 hours before serving.

Desserts/Pastries

Chocolate Raspberry Cupcakes

Chocolate Raspberry Cupcakes


It’s been a minute since I’ve baked Cupcakes. In fact, I gave up baking for the entire month of January. The holidays just wiped me out and I needed some reprieve.

But lately when I open up my cabinets, I see my little muffin/cupcake pans looking at me sadly. You know what I’m talking about. It’s the “why have you abandoned us” kind of look.

These little pans have been good and loyal….. and they were in need of some TLC.

So when I made plans to reconnect with some old friends the other day, I thought it was high time to whip them out, blow off the dust, and get Cupcakin‘!


Chocolate Raspberry Cupcakes

I managed to pull together a rich chocolate cupcake, filled them with a raspberry sauce, and topped them off with a whipped chocolate ganache and fresh raspberries.

Easy, simple, and pretty.

Perfect to get my Cupcake Baking Love going again. 🙂

Note: I used a Wilton 4B Tip to pipe the ganache.


________________________________________

Chocolate Raspberry Cupcakes
Makes approximately 24 Cupcakes (depending on size)

Ingredients:

Chocolate Cake:

½ Cup Unsweetened Cocoa Powder
2 Cups All Purpose Flour
1½ Teaspoons Baking Soda
¾ Teaspoon Baking Powder
1 Teaspoon Salt
2 Cups Granulated Sugar
5 Ounces Dark Chocolate, finely chopped
1 Cup Buttermilk
1 Cup Strong Brewed Hot Coffee
½ Cup Vegetable Oil
2 Large Eggs
2 Teaspoons Raspberry Extract

Chocolate Ganache:
12 Ounces Quality Dark Chocolate, finely chopped
1 Cup Heavy Cream
1 Tablespoon Framboise Liqueur

Raspberry Filling:
2 Cups Frozen Raspberries
1 Cup Granulated Sugar
1 Tablespoon Framboise Liqueur
1 Teaspoon Fresh Lemon Zest

Prepare Cakes: Preheat oven to 350 degrees. Place paper cup liners in cupcake pans. Place finely chopped chocolate in a bowl and pour hot coffee over it. Cover bowl with plastic wrap and allow to sit for a few minutes. Remove plastic and stir until smooth. Sift together cocoa powder, flour, baking soda, baking powder, sugar, and salt into a large bowl. In a mixing stand, beat eggs for a few minutes until they become a pale yellow. Beat in oil, buttermilk, and raspberry extract .  Scrape down the sides of the bowl and slowly add the chocolate. Slowly add dry ingredients and mix until just incorporated. Pour batter into the lined cups–about 3/4 way. Bake for 20 minutes or until a toothpick inserted in the center comes out clean. Allow cupcakes to cool in the pans for 10 minutes before removing to cooling racks.

Prepare Raspberry Filling: Place all raspberry sauce ingredients in a medium sized, heavy saucepan. Simmer on medium-low until berries have broken down and the sauce has thickened. Approximately 10-15 minutes. Let cool to room temperature. *If you don’t want seeds in your filling, puree the raspberries in a blender and strain before cooking.

Prepare Chocolate Ganache: Place chocolate pieces in a large bowl. Heat heavy cream on medium high until it comes to a boil.  Remove from heat and immediately pour cream over chocolate. Cover bowl with plastic wrap and allow to sit for a few minutes. Remove plastic and add framboisestir until smooth and glossy. Allow ganache to cool completely before frosting. *If you wish a fluffier “whipped” frosting, allow ganache to cool completely before transferring to a stand mixer. On medium-high speed, whip until you reach the desired consistency.

Assemble Cupcakes: Once all items have been prepared, fill a piping bag with a small round tip with the raspberry filling. Fill another piping bag with the ganache. Taking one cupcake, place the tip of the raspberry filled bag into the cake and squeeze in a few teaspoons of the filling. Be careful not to “inject” too much or your cupcakes will implode 🙂 Finally with the piping bag filled with ganache, pipe/decorate swirls on top of the cupcake. Garnish with fresh raspberries.

Desserts/Pastries

Raspberry Almond Linzer Cookies

Raspberry Almond Linzer Cookies


I have a very specific picture in my head when I think of a Holiday Cookie Platter. Gingerbreads, a smattering of butter cookies, an array of sugar cookies, perhaps a few “American” macaroons…..and of course, Linzer Cookies.

These buttery cookies first originated in Austria and were derived from the Linzertorte—which is essentially a tart filled with preserves. How did these buttery delights converge as a holiday cookie staple? The world may never know. But I was inspired by the recent wave of Linzer Cookies postings in the blogosphere and decided to try my hand at the wonderful Dorie Greenspan’s take on these delectable bites.

The ending results yielded a rich and buttery cookie that had a lovely “nutty” flavor profile due to the almond meal I used. The richness from the cookies were “cut” by the tart raspberry jam I used to sandwich these goodies. A rad balance indeed.

What could have I done better? Well, I won’t lie. The recipe called for me to roll the dough to a ¼ inch thickness and I may have gone a smidge thicker.

Just a “smidge” mind you. 🙂

But still, the cookie sammy was too thick once all was said and done. My suggestion, if you’re going to deviate from the recipe—-go a smidge thinner and reduce the baking time.

Did I care much? Nah…when a cookie is this tasty, very little matters.

And as I wipe the cookie crumbs away from my mouth, I wonder….How many other Holiday treats can this gal cram in before the holidays end????


______________________________________________

Raspberry Almond Linzer Cookies
From Dorie Greenspan

Ingredients:

1½  Cups Finely Ground Almonds
1½  Cups Flour
1½  Teaspoon Ground Cinnamon
¼  Teaspoon Salt
¼  Teaspoon Ground Cloves
1 Large Egg
2 Teaspoon Water
½  Cup Unsalted Butter, room temperature
½  Cup Sugar
½  Cup Raspberry Jam plus 1 Teaspoon Water
Confectioner’s Sugar, for dusting

In a medium bowl, whisk together the ground nuts, flour, cinnamon, salt, and cloves. In a small bowl, lightly beat together the egg and water.

In an electric mixer, beat together the butter and sugar until light and fluffy. Add the egg mixture and beat until combined. On low speed, add the nut and flour mixture and beat only until just combined.

Divide the dough into two halves, and shape each half into a disk. Place each disk between two sheets of wax paper or plastic wrap, and with a rolling pin roll out until the dough is 1/4 inch thick. Place both pieces of wrapped dough on a cookie sheet and refrigerate for about 2 hours, or freeze for about 45 minutes, or until firm. If you don’t want to bake right away, you can keep the dough refrigerated for up to 3 days, or frozen for up to 2 months.

After dough is firm, preheat oven to 375ºF and place rack in center of oven. Line two cookie sheets with parchment paper or silpats. Using a 2-inch round (or scalloped) cookie cutter, cut out, cut out as many cookies as possible. If you want a hole in the top cookie so you can see the jam inside, use a small cookie cutter to cut a small shape out of the center of half of the cookies.
Set the scraps aside, you can combine them with the scraps from the second sheet of dough.

Place cutout cookies on the cookie sheet, leaving space in between cookies. Bake for 11-13 minutes or until lightly golden. Cool cookies on a wire rack.

Repeat with the second sheet of dough, and also roll the scraps out between two sheets of wax paper and repeat.

While cookies are cooling, combine the jam and teaspoon of water in a small saucepan and bring to a boil over low heat. Remove from heat and let cool.

Spread half of the cookies with about 1/2 tsp of jam and sandwich together with another cookie. Sprinkle with confectioner’s sugar before serving.

Makes about 25 sandwich cookies.

Desserts/Pastries

Chocolate Raspberry Tart inspired by “World AIDS Day”

Chocolate Raspberry Tart inspired by "World AIDS Day"


December 1st is World AIDS Day—an international day that aims to “raise awareness, commemorate those who have passed on, and celebrate victories such as increased access to treatment and prevention services”.

I don’t pretend to be an expert on HIV and AIDS but I am proud to have siblings who are and work tirelessly towards the treatment, research, education, and yes—-even the development of vaccinations. So on this day, I ask that you join me and take a minute to learn more and share that knowledge. Don’t know where to start? Here’s a brief list of resources you can peruse:

The theme for World AIDS Day 2010 is “Universal Access and Human Rights”. Beautiful, poignant, and to the point….don’t you think? So to honor World AIDS Day 2010, I made individual Chocolate Raspberry Tarts –equipped with raspberry red ribbons! And although I am almost positive these delicious tarts will be finished by the end of the day, advocacy and awareness of HIV and AIDS should not.

Together, We can Educate, Advocate, and Act.


Chocolate Raspberry Tart inspired by "World AIDS Day"

_________________________________

Chocolate Raspberry Tart

Ingredients:

Shortbread Crust
1 Cup Unsalted Butter, room temperature
½ Cup Confectioner Sugar
1 Teaspoon Pure Vanilla Extract
1½ Cups All Purpose Flour
1 Tablespoons Cornstarch
¼ Teaspoon Salt

Chocolate Filling
10 Ounces Good Quality Dark Chocolate, chopped
1 1/3 Cup Heavy Cream
1 Tablespoon Framboise or Raspberry Extract
*Fresh Raspberries for garnish

Preheat oven to 325 degrees. Using a brush, grease a 9 inch tart pan with melted butter. (Or four individual sized tart pans like I did.)

In a large bowl, sift together flour, cornstarch, and salt. In a standing mixer, cream butter and sugar until light and fluffy. Add vanilla extract. Slowly begin incorporating in flour mixture a few spoonfuls at a time. When the dough begins to come together, transfer to the prepared tart pan and press dough into it. Prick the bottom of the dough all over with a fork and place in freezer for at least 10 minutes to let rest. Once chilled, line the tart with parchment paper and fill with pie weights or beans. Bake in oven for 10-15 minutes, until edges are lightly golden brown and set. Carefully remove the parchment paper from the pie and place back in the oven for 5-10 minutes until center of tart is golden brown. Remove from oven and place on cooling rack.

Using a double boiler, heat the cream until it’s very hot but not boiling. Remove from stove and add the chocolate. Gently stir the mixture until all the chocolate is melted and combined. Add Framboise (or raspberry extract) and stir until combined. You should have a beautiful glossy mixture when finished.  Pour chocolate filling into the thoroughly cooled baked crusts.  Carefully tap the side of the pan to even out the filling. Leave tart on the counter to cool (about 30 minutes) and then move to the refrigerator to chill for an additional 2 or 3 hours. The filling should be firm when done.

Remove the tart from refrigerator and carefully slide out the outer pan ring. Transfer tart to serving platter and garnish with raspberries. ENJOY!