Pastas/Noodles · Vegetables/Vegetarian

Burrata Caprese Bucatini

Burrata Caprese Bucatini
Pasta makes this gal very, very, VERY happy.

Because, you know–carbs make the world go round.

Or does it make your belly go round?

Eh….it’s a gleeful thing either way.

Burrata Caprese Bucatini
As promised, here’s a scrumptious pasta dish that gives a big ol’ nod to my summer crush– Burrata Caprese.

It’s surprisingly light since it’s not laden with a heavy sauce and quite fresh from the heirloom tomatoes and basil. And can we talk about the burrata?

So dreamy….

Burrata Caprese Bucatini
Added bonus?

This beauty can be ready in under 15 minutes. A complete hero for weeknight meals.

Burrata Caprese Bucatini
Next up – Burrata Caprese & Prosciutto Skillet Pizza!

_____________________________________

Burrata Caprese Bucatini 
Serves 2

Ingredients:

kosher salt
1/3 pound dried bucatini pasta (or other long strand pasta of your choice)
3 tablespoons quality extra virgin olive oil, more to finish
1 heaping tablespoon minced garlic
½ teaspoon red pepper flakes–more to finish
1 heaping tablespoon anchovy paste or 2-3 anchovy fillets
¼ cup grated parmesan cheese–more to finish
black pepper
1½ heaping cup diced tomatoes*
10 large fresh basil leaves, julienned
3 ounces fresh burrata cheese

Boil the pasta for approximately 7-8 minutes in heavily salted water until al dente. Drain the pasta and reserve ¼ cup of the starchy water that the pasta was cooked in.

While the pasta cooks, heat the olive oil over medium heat in a large skillet. Add the garlic, red pepper flakes and cook for 1-2 minutes to infuse the oil. Add in the anchovies and stir until it melts into the oil.

Toss in the cooked bucatini and cheese — coating the pasta well. If you want a looser based “sauce”, add a tablespoon at a time of the starchy pasta water until you reach your desired consistency. Season with additional kosher salt and black pepper as needed. Toss in the tomatoes and basil. Plate the pasta and top with burrata. Sprinkle each dish with additional parmesan, red pepper flakes and a drizzle of olive oil.

Enjoy!

*If I can find them, I like using small heirloom tomatoes as they are often times sweeter but Romas or other ripe tomatoes are just as delish. 

Breakfast/Brunch · Sponsored · Vegetables/Vegetarian

Crispy Polenta Cakes with Poached Eggs & Asparagus

Polenta3
Spring has most definitely sprung!

The sun is shining, the days are getting longer, the flowers are in bloom (Aaaa-CHOO! My pollen allergies are terrible!) and everyone seems to be in a festive mood for celebrations and leisure meals. And why not? So many delicious items are coming back into season!

Polenta2
Asparagus is one of those beautiful produces that are coming back and are popping up all over at our Farmers Markets and grocery stores. And in my opinion, nothing pairs more lovely with asparagus than eggs. Eggs and Asparagus….what could be more “Spring-like” than that winning combo?!

Safe Eggs
To celebrate the comeback of my favorite season, Spring, I’m partnering with the makers of Safest Choice™ pasteurized eggs to create a quick and easy dish that would be perfect to make for breakfast or even a last minute brunch gathering and featured that winning pairing.

Polenta4

Veggies? Check!

Bright and sunny egg/protein? Check!

But what about a starch?

I’m not a gal to shy away from bread or potatoes — I’m unabashedly carbo-holic like that. Though for this dish, I thought I’d bring a little Italian slant to it by pan frying up some crispy polenta cakes by using a pre-made polenta roll.

Now before you yell at me for using a pre-made polenta, let me justify it by the following:

  1. One of my favorite stores carries a wonderful organic polenta roll that is extremely tasty and affordable.
  2. If I made the polenta myself, I would have to wait for it to cool before frying them up into crispy cakes.
  3. It’s QUICK! And who doesn’t need some short cuts every now and then?

But hey-if you prefer to make your own, I’m all over it! In fact, it would be a great opportunity to use up any leftover polenta you may have lingering in your fridge.

Polenta5
After roasting the fresh asparagus with simple S&P and lemon zest, I topped them with the crispy polenta cakes and a sprinkle of Parmesan cheese. And the pièce de résistance – a beautifully poached Safest Choice™ pasteurized egg. In my humble opinion, there are few other culinary beauties than seeing an unctuous egg yolk over a dish.

Perfection!

Poletna6
And not only is a beautiful but it’s functional. The yolk becomes a rich sauce for both the crisp polenta cakes and asparagus. I know some folks are wary of under cooked eggs but rest assured. Davidson’s Safest Choice® uses an all-natural egg pasteurization process to eliminate the risk of salmonella–all without changing that farm fresh flavor or nutrition. Plus their wonderful chicks are Hormone free, Antibiotic free, and Vegetarian-fed. You can learn more over at SafeEggs.com

Polenta

As for the next few months, I’m looking forward to all that Spring has to offer as well as fixing up more dishes fitting of the season. But in the meanwhile, you can find this quick and delectable recipe for Crispy Polenta Cakes with Poached Eggs and Asparagus here.

Davidsons-Dozen-Blogger-Badge

*DISCLOSURE: This recipe and post was created in partnership with Safest Choice™ pasteurized eggs. However, as always, all opinions are my own.*

Pastas/Noodles

Browned Butter Linguine with Mizithra {Myzithra}

Browned Butter Linguine with Mizithra

Okay.

Y’all are in trouble.

Why have you been hiding Mizithra from me my whole life??

Browned Butter Linguine with Mizithra

Mizithra…the wonderful Greek sheep’s milk cheese. Dry, salty, with a very distinct floral and nutty flavor.

And do you know where I finally discovered Mizithra? The Old Spaghetti Factory of all places!

I know, what the heck was I doing at The Old Spaghetti Factory?! But that’s an entirely different story for another time.

Browned Butter Linguine with Mizithra

They toss Mizithra with pasta and browned butter which is so perfect and simple. I mean, c’mon now, throw some nutty flavored browned butter in anything and I’ll gobble it up. So when Mizithra joins the party, I’m totally there.

Browned Butter Linguine with Mizithra

I found a little wedge of the cheese at my neighborhood market and swooped it right up. I, too, browned up some butter to coat linguine noodles in but added lots of fresh parsley and lemon zest. The combination of the browned butter and Mizithra can be a bit rich so the fresh herbs and citrus really helped to brighten it all.

A rad little dish that takes less than 10 minutes to make with only a handful of ingredients.

And yes, I forgive you now ❤

_________________________________________

Browned Butter Linguine with Mizithra
Serves 2

Ingredients:

kosher salt
4 ounces dried linguine noodles
¼ cup salted butter
¼ teaspoon dried red pepper flakes
¼ cup grated Mizithra (Myzithra) cheese, more to plate
¼ teaspoon fresh lemon zest
1 tablespoon minced parsley

Bring a pot of salted water to boil. Add linguine noodles and boil for 6-7 minutes or until al dente.

While the pasta boils, prepare the browned butter. Place the butter in a saucepan and melt over medium-low heat. Swirl the pan and allow the butter to bubble and foam slightly. Continue browning the butter until it begins to smell nutty and it turns a dark golden brown. Remove from heat.

Once the pasta becomes al dente, drain well and add it back to the pot. Toss the noodles with the browned butter, red pepper flakes and cheese. Plate the pasta between two dishes. Sprinkle each serving with lemon zest, parsley and grate additional Mizithra over each plate. Enjoy!

Breakfast/Brunch · Sponsored · Vegetables/Vegetarian

Coddled Eggs with Pesto and Potato-Parsnip Purée

Coddled Eggs with Pesto and Potato-Parsnip Puree

We’ve officially entered “shower” season. And by that, I don’t mean April Showers but Wedding Showers and Baby Showers!

My next two months will be weekends filled with shower games, presents galore, tea sandwiches, little bite sized desserts, and sparkling cocktails (I hope!).

Coddled Eggs with Pesto and Potato-Parsnip Puree

What can I say? Love is in the air and my dear friends and loved ones have a lot to be celebrating over these next few months.

So for my latest contribution to Safest Choice™ Darling Dozen, I thought I would make something that would go well on a menu for both bridal and baby showers.

Coddled Eggs with Pesto and Potato-Parsnip Puree

I’ve always been a huge fan of choosing brunch to host parties and celebrations. It’s the perfect time of day where you can serve a variety of foods to please all palates. A few desserts, sandwiches. croissants, scones, preserves, charcuterie boards, and of course–there has to be eggs!

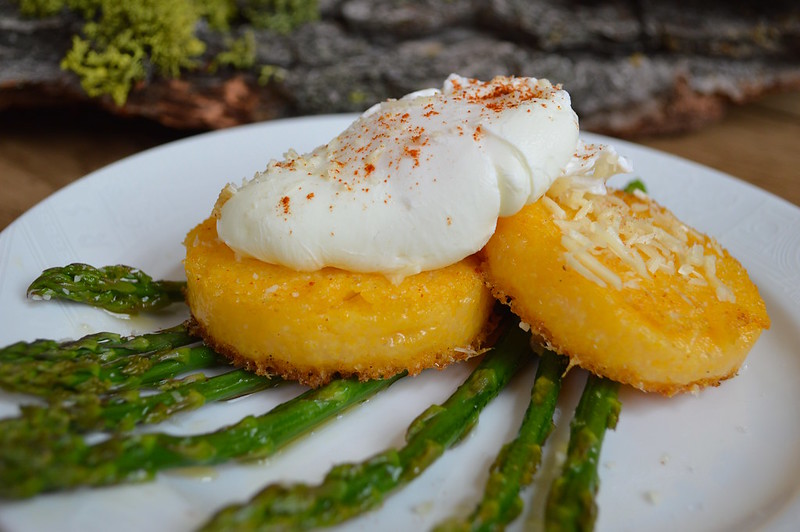
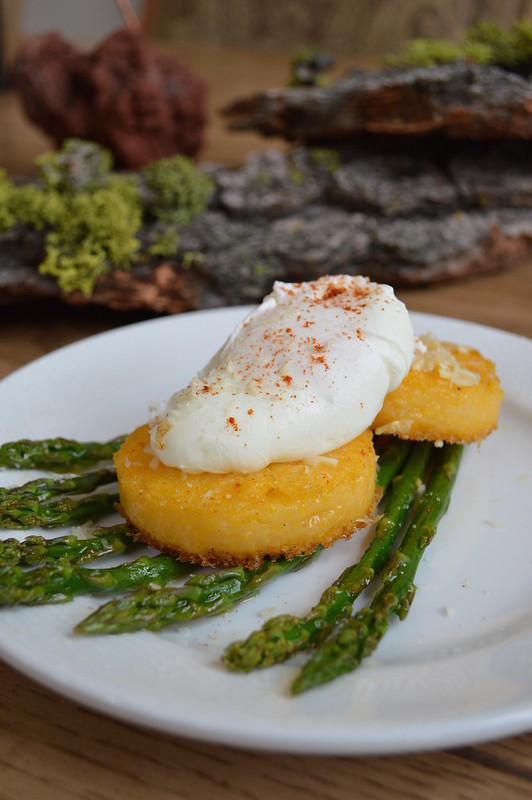
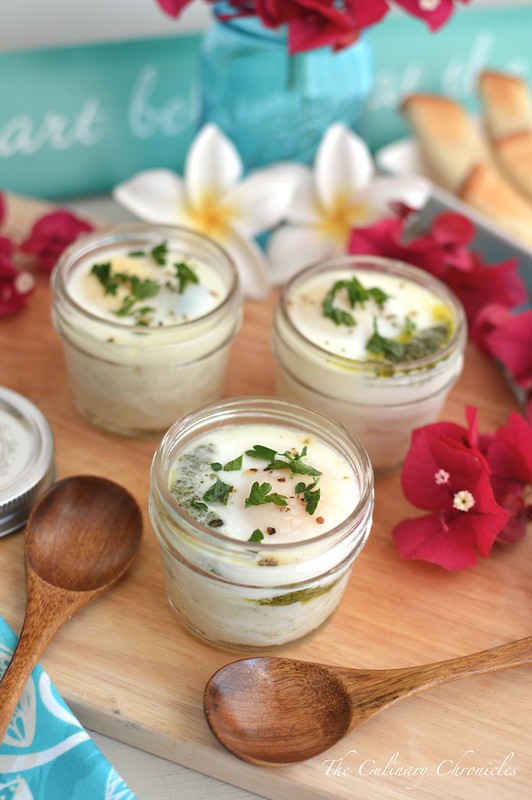
And these adorable coddled eggs served in mason jars will be an absolute hit at your showers.

Coddled Eggs with Pesto and Potato-Parsnip Puree

They start with a luscious, smooth layer of a potato-parsnip purée….which truthfully, are one of my faves these days. They’re a bit lighter than traditional mashed potatoes but are just as delectable.

Next, comes a layer of savory, herbaceous pesto. And c’mon now–who doesn’t love pesto? But for this particular dish, it really does add some much needed brightness to offset the rich, coddled egg and purée. You can also add some sauteed greens as well.

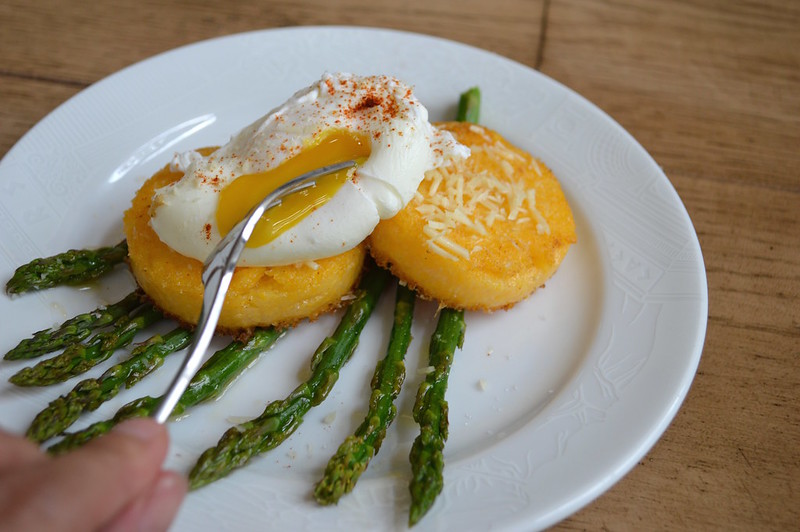
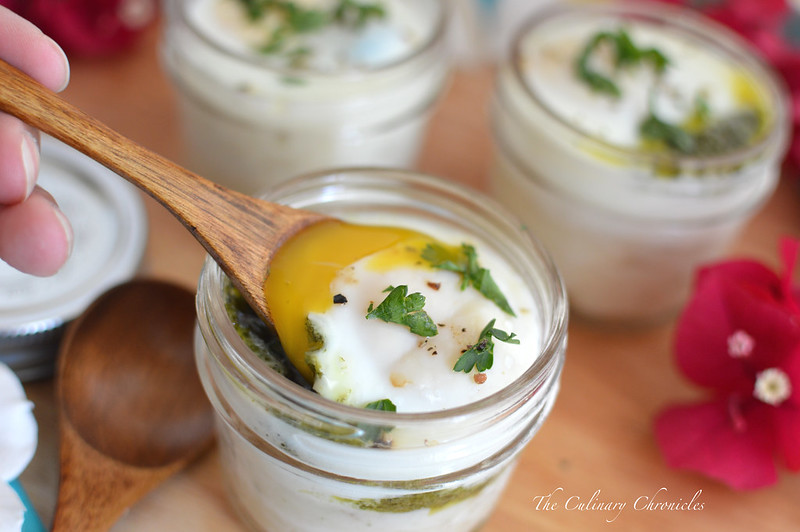
Finally, the whole thing is topped off with a beautiful egg. Heaven.

Coddled Eggs with Pesto and Potato-Parsnip Puree

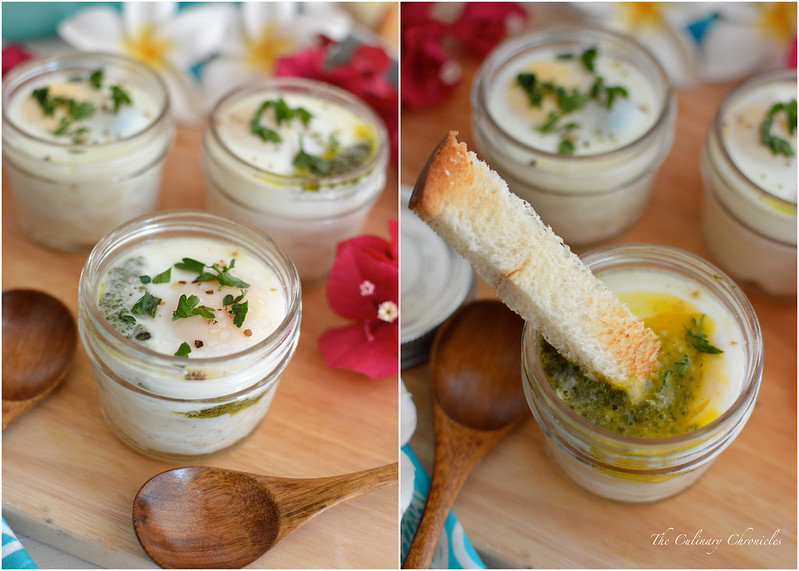
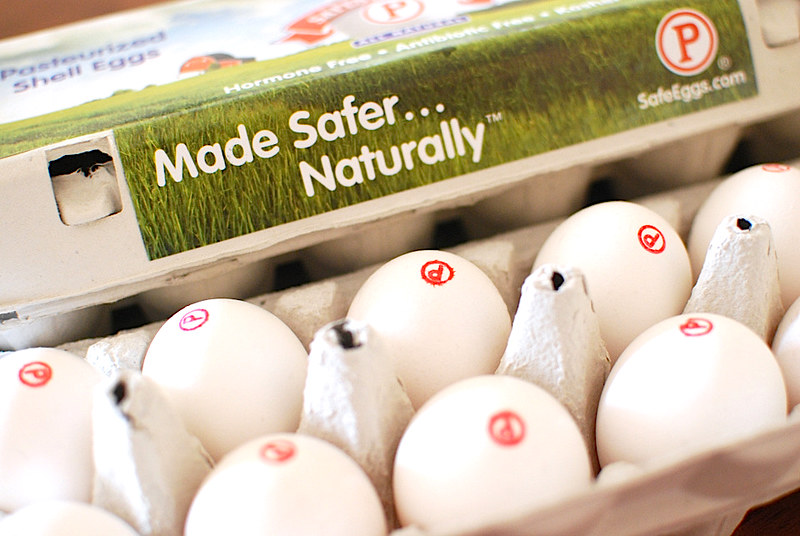
Your guests will just love these little jars when served. The yolks are unctuous and runny — perfect to dunk toasted little soldiers into. And since Safest Choice™ uses an all-natural egg pasteurization process to eliminate the risk of salmonella, feel at ease when serving them to mamas-to-be.

Want to find out more about their pasteurization process? Click here

Coddled Eggs with Pesto and Potato-Parsnip Puree

These little cuties can be assembled hours before your parties (even the night before!) to give you even more time to spend with your guests.

Adorable? Check! Easy to assemble? Check! Delicious? Check!

Sounds like a slam dunk dish to me. Happy Shower Season, Friends! ❤

______________________________________________________________

Coddled Eggs with Pesto and Potato-Parsnip Purée
Serves 4

Ingredients:

kosher salt
½ pound russet potatoes, peeled and cut into 1 inch chunks
1 medium sized parsnip, peeled and cut into 1 inch chunks
¼ cup heated heavy cream
2 tablespoons unsalted butter, room temperature, divided
1 teaspoon garlic powder
black pepper
4 tablespoons pesto
4 large Safest Choice™ pasteurized eggs
sea salt flakes
chopped parsley
serve with soldiers or other bread of your choice

Prepare the potato-parsnip purée by bringing a medium sized pot of water to a boil. Add ½ tablespoon salt, potatoes and parsnips. Boil until they are tender—about 20 minutes. Drain the root vegetables and either run them through a food mill or ricer. Stir the hot heavy cream, 1 tablespoon butter, and garlic powder into the potato-parsnip mixture. Season with additional salt and black pepper as needed. Set aside.

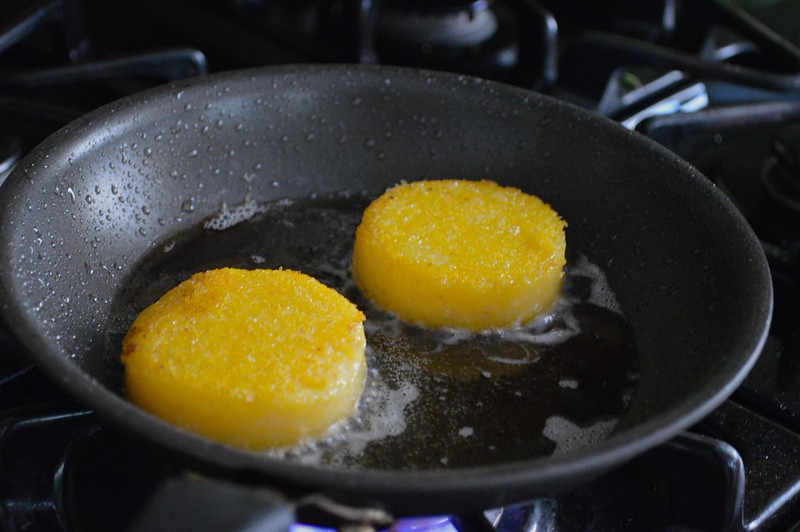
Take 4 small mason jars or ramekins and use the remaining butter to grease the inside of each jar. Divide and spoon the potato-parsnip purée into the bottom of each of the jars. You can also use a small piping bag to do this. Spread one tablespoon pesto on top of each potato-parsnip purée and then carefully top each with an egg.

Fill a large pot with about 2-3 inches of water and bring to a simmer. Place a steam rack inside of the pot of water and carefully place the filled jars/ramekins on top. Cover the pot and steam the eggs for 8-10 minutes until the whites are set but the yolks are still soft. Alternatively, if using mason jars, screw on the lids of each jar and place directly into the pot to simmer for about 10-12 minutes. If the jars/ramekins that I’m using aren’t very high, I prefer to place them on top of a steam rack.

Once done, top each coddled egg with sea salt flakes and chopped parsley. Serve with soldiers or other bread of your choice.

NPE_DarlingDozenBadges

*DISCLOSURE: As a brand ambassador for the Safest Choice™ Darling Dozen, I was compensated for the creation of this recipe and post. However, as always, all opinions are my own.*

Pizzas · Vegetables/Vegetarian

Spring Skillet Pizza Pie for π (PI) Day!

Spring Skillet Pizza Pie

Happy 3.14159 Day…..

otherwise known as π (Pi) DAY!

Spring Skillet Pizza Pie

This morning, my Twitter and IG feed have been filled with gorgeous berry, apple, and chocolate pies as my foodie friends around the world celebrate π Day. And it’s makin’ me HUNGRY!

But this year, I decided to lean towards the savory route again for π Day and this time, we went the Pizza Pie route!

Spring Skillet Pizza Pie

Since spring is just a few days away, I opted for colorful and light veggies for toppings. We started off with a base of EVOO, garlic, thyme, fresh mozzarella and then went to town on all the beautiful produce in reach. Mixed color peppers, artichokes, grape tomatoes, thin asparagus tips and arugula jumped out to me but really, use anything that tickles your fancy. The whole pi(e) was then drizzled with a sweet, tart balsamic reduction.

HOLY PI(E), BATMAN!

Did I ever mention that beautiful food geeks me out?

It also makes me dance around the kitchen….but that’s a story for another time.

Spring Skillet Pizza Pie

As you know, I’m obsessed with making pizza pi(es) in a cast iron skillet. But if you don’t own a cast iron or want to make a larger pizza pi(e), just bake the whole thing on a hot baking sheet (or pizza stone) for 15-20 minutes in a 450 degree F oven.

There’s still plenty of time to get your π Day on and here are some ideas for ya:

And with that folks— have a gorgeous weekend and HAPPY π DAY!

________________________________________________

Spring Skillet Pizza
Serves 2

Ingredients:

5 ounces fresh pizza dough, rested and at room temperature
flour
½ tablespoon corn meal
1 tablespoon extra-virgin olive oil
1 teaspoon minced garlic
½ teaspoon fresh thyme leaves, divided
¼ cup thinly sliced red onions
¼ cup thinly sliced bell peppers
¼ pound thinly sliced fresh mozzarella cheese
½ cup blanched asparagus
4-6 grape or cherry tomatoes, halved
¼ cup artichoke hearts, quartered
½ tablespoon grated parmesan cheese
sea salt
½ teaspoon fresh lemon zest
fresh black pepper
2-3 pinches red chili flakes
1-2 tablespoons balsamic vinegar reduction*
1 small handful fresh arugula leaves

Turn on the oven broiler and adjust one of the racks to the top of the oven to rest directly under the broiler. Place a seasoned cast iron skillet (10-12 inches in diameter) directly under the broiler for 8-10 minutes. It may begin to smoke but you need the skillet to be screaming hot.

While the skillet is heating, roll out the pizza dough onto a floured surface–you’ll want it a tad smaller than the width of your skillet. If you have a pizza peal, sprinkle it with cornmeal and transfer the pizza dough onto it. If not, you can also use a wooden cutting board.

Brush the olive oil over the dough and sprinkle the garlic and ½ the thyme leaves over it. Quickly top with the red onions, bell peppers, mozzarella cheese, asparagus, tomatoes and artichoke. Once the skillet has heated for the appropriate length of time, quickly and CAREFULLY slide the pizza into the skillet. Replace the skillet so it sits directly underneath the broiler.

Close the oven door and allow the pizza to cook for about 45-60 seconds. Open the oven door and rotate the skillet 180 degrees. Close the door and allow another 60-90 seconds underneath the broiler. Once the crust is slightly charred and cheese has melted, CAREFULLY remove the skillet from the oven and place it on a rack for 2-3 minutes. Sprinkle the top with parmesan cheese, remaining thyme leaves, sea salt, lemon zest, black pepper, and chili flakes. Drizzle the balsamic reduction and top with the arugula leaves. Transfer the pizza to a cutting board, slice up and enjoy!

*To make the balsamic reduction, combine 1 cup balsamic vinegar, ½ tablespoon sugar and 2 pinches of red chili flakes to a small sauce main. On medium-high heat, bring to a boil, stirring often. Reduce the heat to low. Continue stirring and cooking until the liquids have reduced by half and take on a thick, syrup consistency—about 10 minutes. Be sure to watch the reduction closely as it can burn quickly. Transfer to a container and allow to cool completely.

Pastas/Noodles · Salads · Vegetables/Vegetarian

Vegetarian Soba Noodle Salad

Vegetarian Soba Noodle Salad

Guys… I moved to Việt Nam.

Okay, not really. But I swear, San Diego these past few weeks have been as hot and humid as South East Asia in the dead of Summer!

I’m MELTING!!!

And turning on the oven or kitchen burners has been the last thing I’ve wanted to do. But a girl has got to eat and the lighter and easier the dish–the better!

Vegetarian Soba Noodle Salad

Quick and light bites like this Vegetarian Soba Noodle Salad is the perfect remedy to combat the heat. Soba (buckwheat) noodles tossed with fresh veggies in a bright and acidic ponzu sauce is easy to make and doesn’t leave you feeling like gazillion pounds.

I opted for a vegetarian take but if you miss the meat, throw in such grilled chicken or shrimp and you’ll be a happy camper.

Now excuse me as I pass out in front of the air conditioner.

__________________________________________

Vegetarian Soba Noodle Salad
Serves 2

Vinaigrette:
2 tablespoons prepared ponzu sauce
1 tablespoon low sodium soy sauce
1 tablespoon toasted sesame oil
3 tablespoons canola oil (or other light flavored oil)
2 tablespoons honey
½ tablespoon sambal paste
1 large garlic clove, finely minced
2 teaspoons finely minced fresh garlic
kosher salt
black pepper

6 ounces dried soba noodles
1 heaping cup sweet peppers, thinly sliced
1 cup blanched edamame beans
1 cup blanched asparagus tips
1 cup sweet grape tomatoes, halved
½ cup thinly sliced Japanese cucumbers (or other small cucumbers of your preference)
¼ cup sliced scallions
1/8 teaspoon toasted sesame seeds

Prepare the vinaigrette by whisking all the ingredients in a small bowl. Season with additional kosher salt and black pepper as needed.

Bring a large pot of water to a boil and cook soba noodles for 3-4 minutes or accordingly to package instructions. Drain the soba in a colander and rinse well with cool water. Shake off excess water and transfer to a bowl. Add all the vegetables to the noodles, except the scallions. Add several spoons of the vinaigrette over the noodles and vegetables and toss well. Add additional vinaigrette as needed for everything to be lightly coated.  Divide the contents between two serving dishes. Top each plate with scallions, sesame seeds and enjoy!

Vegetables/Vegetarian

Portabello Mushroom Tacos

Portabello Mushroom Tacos

Ok…so let’s recap.

For our Cinco de Mayo fiesta planning, we’ve covered dips, pickled onions, and margaritas. And now it’s time for tacos.

Tacos, oh tacos…..how glorious you are. Savory goodness topped with fresh veggies and citrus–all wrapped up in a tortilla. Frankly, I haven’t met a taco I didn’t like.

So handy….so delicious….so perfect.

With so many variations, you really can’t go wrong. And might I suggest a few options?

Fish Tacos with Avocado-Cabbage Slaw

Fish Tacos with Avocado-Cabbage Slaw

Fat Tire® Braised Carnitas

Fat Tire® Braised Carnitas Tacos & Chavelas

Grilled Shrimp Tacos with Spicy Avocado Crema

Grilled Shrimp Tacos

And in case you’re looking for a vegetarian option, these Portabello Mushroom Tacos are the perfect thing for you. They’re hearty, flavorful and best of all–super quick to whip up. So instead of slaving in the kitchen during your Cinco de Mayo celebrations, you can make better use of your time such as sipping on margaritas with your loved ones.

But don’t fret folks, I’ve got one last fab dish for you that I’ll be sharing on Monday. Equally as delicious and fast to make….you’ll love it.

Happy Friday Folks!!!

___________________________________________
Portabello Mushroom Tacos
Makes 8-10 tacos

Ingredients:
2 tablespoons olive oil
1 cup chopped white onions
1 jalapeno pepper, seeds removed, finely minced
1 tablespoon minced garlic
1½ pounds portabello mushrooms, roughly chopped
¾ teaspoon cumin powder
½ teaspoon chili powder
¼ teaspoon paprika
1/8 teaspoon turmeric powder
¼ teaspoon red pepper flakes
½ teaspoon onion powder
½ teaspoon garlic powder
½ teaspoon dried oregano
¼ teaspoon garlic salt
¼ teaspoon kosher salt, more to taste
¼ teaspoon black pepper
2 scallions, chopped
1½ cups chopped cilantro leaves, more to garnish
8-10 small tortillas
1 cup shredded cheese (pepper jack, Monterey, cheddar- whatever you fancy)
pickled red onions
oven-roasted tomato salsa
lime wedges

In a large cast iron pan or large skillet, heat the oil over medium heat. Add the onions and cook for 4-5 minutes until they become translucent but not browned. Add in the minced jalapeno and garlic and sauté for an additional minute.

Add the chopped mushrooms to the pan and sauté over the medium heat until they are softened and begin to brown. Stir in the cumin, chili powder, paprika, turmeric, red pepper flakes, onion powder, garlic powder, oregano, garlic salt, kosher salt, black pepper and scallions. Cook for 1 minute and take the pan off the heat. Fold in the cilantro leaves. Taste and adjust with additional kosher salt and black pepper as needed.

Warm the tortillas (in a skillet, over a open flame, or even in the microwave). Begin assembling the tacos by placing a layer of the cheese on a tortilla and top with a few spoonfuls of the mushroom mixture. Top each taco with some picked red onions and cilantro. Serve with salsa and lime wedges.

*The dried spices in this recipe essentially make up the taco seasoning blend I keep on hand at home. However, if you want to make the dish even easier, substitute the dried spices for your preferred taco seasoning blend.

Giveaways · Sponsored · Vegetables/Vegetarian

Poached Eggs over Lentils and Arugula + a RAD GIVEAWAY!

Poached Eggs over Lentils and Arugula

It’s true.

This carnivorous, bacon loving gal can enjoy a “sans-meat” meal from time to time. Which is why I was happy to join our friends over at Safest Choice® Eggs this month with their fun {and downright awesome} March Meatless Meals Party!

Poached Eggs over Lentils and Arugula

I went back and forth for some time as to what I would make and finally decided upon this hearty and heartwarming dish – tender, savory lentils with fresh arugula leaves topped with an unctuous poached egg.

Uh……YES, PLEASE!!!!

Poached Eggs over Lentils and Arugula

It all starts by sauteing various aromatics and then cooking the lentils of your choice {I opted for green lentils} until they become tender. Perch a perfectly poached egg on top and you’re ready to dig in!

Poached Eggs over Lentils and Arugula

Great for weekend brunch entertaining or an easy weeknight meal, this lentils dish can also easily be adapted for the meat-lovers out there. Rendering bacon or pancetta with the aromatics would be utterly spectacular or perfectly cooked prawns would be the raddest sidekick to the poached egg.

But as delish as these lentils are, I’ve got to let you in on this FABULOUS giveaway sponsored Safest Choice® Eggs.

Poached Eggs over Lentils and Arugula

Enter now until Monday, March 31st for a chance to win one of two Safest Choice™ prize packs. Each prize pack will include (1) $200 Amex gift card, one (1) Lodge Round Fry Pan 10”, one (1) Sur La Table® Red Mixing Bowls, one (1) Flexible Nylon Spatula, one (1) Eggs cookbook, and 52 coupons for a free dozen of Davidson’s Safest Choice® Eggs; Approximate Retail Value is $467.00

HAVE MERCY– that’s awesome!!!

Want to know how to enter? Easy peasy! Click HERE where you’ll be redirected to Safest Choice giveaway powered by Rafflecopter.

Poached Eggs over Lentils and Arugula

Best of Luck, Friends!

And remember, enter by March 31st so you can get in on all that goodness!!!!

_________________________________________

Poached Eggs over Lentils and Arugula
Serves 4

Ingredients:

2 tablespoons unsalted butter
1 tablespoon vegetable oil
1 cup diced celery
1 cup diced carrots
2 cups chopped leeks, thoroughly washed and dried
1 tablespoon minced garlic
¼ teaspoon red chili flakes
4-5 sprigs fresh thyme
1 cup lentils
½ cup white wine
3 cups unsalted vegetable stock
1 dried bay leaf
1 tablespoon white vinegar
4 Safest Choice™ pasteurized eggs
kosher salt
black pepper
2 cups fresh arugula leaves
4 ounces parmesan cheese shavings
quality extra virgin olive oil
In a heavy bottom pot, melt the butter with the olive oil over medium heat. Add the celery, carrots, leeks and garlic. Sauté until softened but not browned—about 5-7 minutes. Add the red chili flakes, thyme sprigs, and cook for 1-2 minutes, stirring frequently.
Stir in the lentils and then pour in the wine . Continue simmering until the wine has reduced and nearly evaporated. Add the vegetable stock, bay leave and bring the liquids to a boil. Partially cover the pot and reduce to a simmer. Cook the lentils for about 25-30 minutes or until tender.
While the lentils cook, begin poaching the eggs. Fill a separate pot 3/4 full of water and bring to a rolling boil. Pour in the vinegar and slightly lower the heat. Crack one egg into a small bowl. Take a spoon and swirl it around quickly in the pot to make a whirlpool in the water. Slowly pour the egg into the center of the whirlpool. The movement of the whirlpool will help the egg form but you can also use a spoon to help it along. After about 2 minutes, use a slotted spoon to remove the egg and set aside into a warm bowl of water. Cook the eggs just under of how you’d normally like your eggs. Repeat with the remaining eggs. Once done, cover the pot and turn the heat down to low to keep the water hot.

After the lentils have cooked until tender, pull out the stems of the thyme sprigs and bay leaf. Drain any excess stock that may remain. Season with kosher salt and black pepper as needed. Toss the lentils with the arugula leaves and use a slotted spoon to plate into 4 dishes.

Using the slotted spoon and dip each poached egg into the pot of hot water to rewarm it. Gently blot it dry with a paper towel and place on top of each lentil mound. Place parmesan cheese shards over plate and drizzle the tops with a bit of the olive oil. Garnish with additional thyme sprigs and serve immediately.

Meatless-Meals

Appetizers/Small Plates · Giveaways · Vegetables/Vegetarian

Sriracha Deviled Eggs + The Pioneer Woman Holiday Cookbook GIVEAWAY!

Sriracha Deviled Eggs

As my nephew, Lucasaurus, would say…..

Oh Yea! Oh Yea! Oh Yea!

The other week I came home to a package on my doorstep from the fabulous Ree Drummond (The Pioneer Woman). Within seconds I ripped it open to find a lovingly signed copy of her new cookbook – The Pioneer Woman Cooks: A Year of Holidays

Sriracha Deviled Eggs

Over a 100+ lip-smackingly delicious recipes that are just darn gorgeous. And perfect for any holiday from Valentine’s Day to Cinco de Mayo to Turkey Day and heck–even game day!

I was already drooling from the ravishing photos when I came across the page for Sriracha Deviled Eggs. Sriracha? Deviled Eggs? Football Finger Foods? YES, PLEASE!

And let me tell ya……they are darn good and so quick and easy to make! Ree describes them as “with a Spicy Asian kick“—just like me 🙂

Sriracha Deviled Eggs

In celebration of Ree’s new cookbook, I’m giving away (3) signed copies of it! Yup–you read correctly… THREE COPIES!

There are six (6) different ways to enter (increase those odds, Baby!) To Enter, please be sure to leave a separate comment for each indicating which of the below you did This Giveaway has ended- THANKS!

  1. Leave a comment sharing what is your favorite holiday dish to make;
  2. Subscribe to The Culinary Chronicles & get automatic emails when new posts are published (If you already Subscribe, leave a comment indicating so);
  3. Like our Facebook Fan Page (If you already “Like” us, leave a comment indicating so);
  4. Follow @CulinaryChron on Twitter (If you already Follow us, leave a comment indicating so);
  5. Follow our boards on Pinterest (If you already Follow us, leave a comment indicating so);
  6. Follow us on Instagram (If you already Follow us, leave a comment indicating so

The deadline to enter is Thursday, November 7th at 5pm (PST) This Giveaway has ended – THANKS! and the winners will be notified the next day. Good Luck!

Thanks so much to The Pioneer Woman for sponsoring this giveaway! And don’t worry Bella, I won’t give away our copy.

Bella

___________________________

Sriracha Deviled Eggs
Makes 24

Ingredients:

1 dozen hard-boiled eggs (peeled, sliced open, and yolks removed)
1/4 cup mayonnaise
3 tablespoons Sriracha
1 teaspoon rice vinegar
Salt and pepper to taste
Black sesame seeds, for garnish

Mix the yolks with the mayonnaise and Sriracha. Then add the rice vinegar, salt, and pepper. Mash it and mix it together until the mixture is smooth. It will be a little on the thin side. Spoon the filling into the egg halves. Then sprinkle a few black sesame seeds on top.

Note: I opted to use a piping bag with a decorative tip to fill the eggs and topped them with a sprinkle of paprika and some chives—but the eggs are just as delish as is.

Recipe from The Pioneer Woman Cooks: A Year of Holidays

Vegetables/Vegetarian

Quick & Easy Vegetable Quinoa Wraps

Vegetable Quinoa Wraps

These past few weeks have been B-A-N-A-N-A-S!

I’ve barely had the chance to catch my breath, let alone spend any quality time cooking. So when I do find a few moments when I can whip something together, I rely on quick dishes that are still yummy but don’t require a lot of effort–and especially those that don’t make too many dirty dishes!

These Vegetable Quinoa Wraps totally fit that bill!

Vegetable Quinoa Wraps

What’s great about a dish like this is that anything goes! You can throw whatever you have on hand in these wraps–veggies, proteins, starches, herbs…whatever tickles your fancy. I like to use quinoa as a base because it is high in protein and packed with fiber. It’s fluffy and pairs well with the crunchy raw veggies.

And you know what? All of this goodness can be done in about 25 minutes! You can maximize your time by chopping the veggies while the quinoa cooks so when it’s done, it’s just a matter of assembly. Plus, the wraps are great in sack lunches or picnics since they are served at room temperature.

Delish? CHECK!

Quick? CHECK!

Minimal mess? ABSOLUTELY!

I’m totally into it.

__________________________________________

Vegetable Quinoa Wraps
Makes 8 wraps

Ingredients:

1 cup dry quinoa
2 tablespoons olive oil
½ cup diced shallots
½ tablespoon minced garlic
½ jalapeno pepper, seeded and finely diced
¼ teaspoon dried thyme
¼ teaspoon red chili flakes
2 cups vegetable stock
½ cup roasted corn
1 small red bell pepper, diced
½ cup edamame beans
¼ cup finely diced red onion
½ cup diced and seeded tomatoes
½ chopped fresh cilantro leaves
kosher salt and black pepper
8 large tortillas
salsa
1 cup shredded pepper jack cheese (optional)

Using a fine mesh strainer, thoroughly rinse the quinoa under cool water. Gently shake the strainer so that the quinoa is drained.

In a medium size pot, heat the olive oil and cook the shallots until softened and translucent. Add in the garlic, jalapeno, thyme, red chili flakes and quinoa. Stir and cook for 1 minute before pouring in the vegetable stock. Turn up the heat and bring the liquid to a boil. Cover and reduce the heat to medium-low. Allow the contents to simmer for about 15-20 minutes until the liquids have all absorbed. Remove the pot from the stove and let sit for an additional 5 minutes. Remove the cover and use a fork to fluff the quinoa.

Add the corn, edamame, bell pepper, red onion, tomatoes and cilantro to the pot. Gently fold the ingredients together and season with kosher salt and pepper as needed.

Begin assembling the wraps. Lay one tortilla on a flat surface. Spoon 1/8 of the quinoa mixture in an even line in the middle of the tortilla. Top with a few spoonfuls of salsa and cheese. Fold in the sides of the tortilla and firmly roll up the wrap. Repeat with the remainder of the tortillas and filling. Enjoy!