Desserts/Pastries

Almond-Whiskey Chocolate Bites

Almond Whiskey Chocolates
Want to know the best way to win people over?

Almond Whiskey Chocolates

With Chocolates…..

And Booze……

But better yet– with Chocolate AND Booze!!!

Almond Whiskey Chocolates
When I saw Sprinkle Bakes’ post about 5-Minute Bourbon Balls, I knew they were in my future.

Almond Whiskey Chocolates
Heather’s
recipe contains just a few ingredients and can be whipped up in minutes. Melted chocolate, honey, vanilla wafers, walnuts, and bourbon…. YES PLEASE!

Almond Whiskey Chocolates

I followed her recipe fairly close but used almonds instead of walnuts (I’m not that much of a walnut fan) though I’m sure they would be SPLENDIFEROUS with hazelnuts or pistachios as well. I also added a few splashes of vanilla extract and used whiskey since I was out of bourbon.

Though…aren’t all bourbons whiskey? But not all whiskeys are bourbon?

I won’t mind if you use either….or both!

Almond Whiskey Chocolates

Since you do not add heavy cream or milk, these bites wouldn’t technically be a “truffle” but heck–they’re lovely nonetheless and require no baking at all. Which during the craziness of the season can be a much needed break.

Added bonus? They can be made well in advance!

Almond Whiskey Chocolates

I’ll be making a few more dozen of these little bites for my family’s Christmas shindig and think they’d be a great addition to your holiday celebrations!

For the original recipe, please click here.

Desserts/Pastries

Matcha Chocolate Pocky Cake

August 2015 Family Dinner

It’s Friday gang….so let’s get down with some CAKE!!!

Cake! Cake! Cake! Cake!

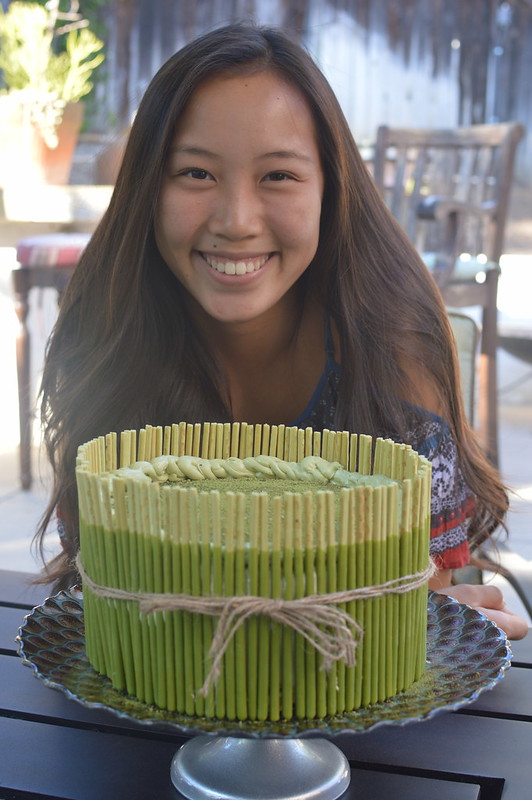
Since I posted a pic of this beauty I made for my beauty of a niece, I’ve been getting lots of love (THANK YOU!) and questions about what went into the cake.

So let me break it down for you…

August 2015 Family Dinner

There was a TON of matcha powder….

LOTS of chocolate….

A gleeful amount of butter and sugar……

And three pinches of fairy dust.

Because if you’re not baking with fairy dust, then you’re doing something wrong.

August 2015 Family Dinner

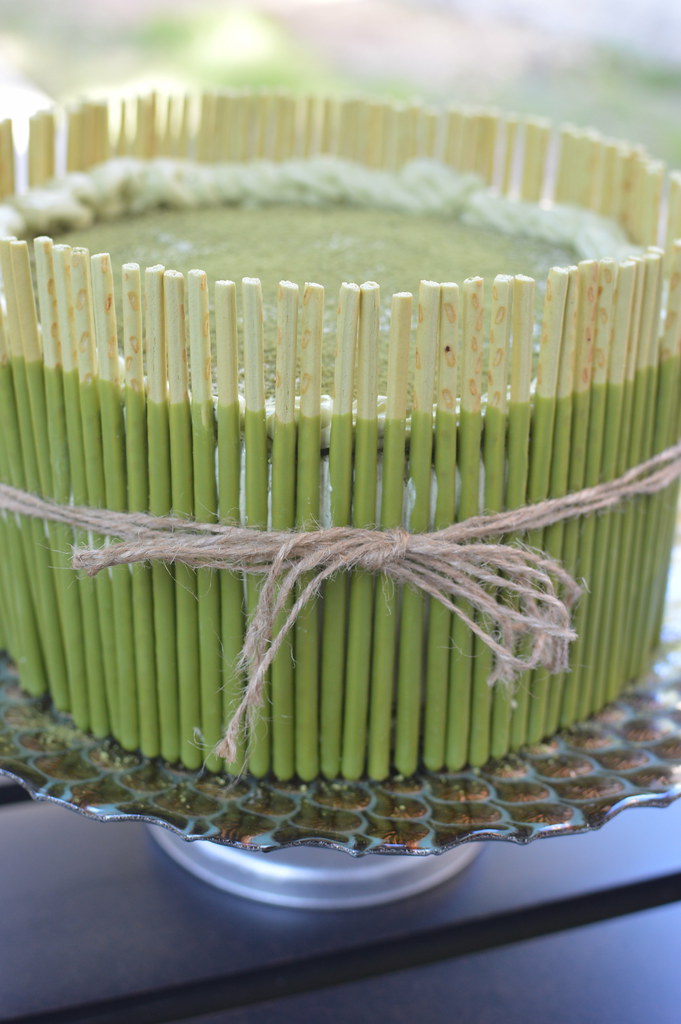
Our Nina loves chocolate and matcha so when it came time to think of a birthday cake for her, I remembered a picture I saw on Pinterest a while back that had a cake adorned with Matcha Pocky Sticks. It was so flipping cute and had her name all over it.

I got down to business. It’s rather impressive in its presentation and surprisingly, not too hard to make. But there are a lot of stages involved—totally worth it in my opinion.

August 2015 Family Dinner

To begin, I turned to my girl Ina Garten and her incredible chocolate cake recipe. Actually she gives credit to “Beatty“…. who is Beatty again? She’s a saint as far as I’m concerned….a Cake Saint {insert sounds of angels singing}.

Seriously, this is THE chocolate cake recipe. We make this all of the time and not only is it near foolproof but it is always a hit whenever we serve it. It’s rich in chocolate flavor (because the hot coffee intensifies the cocoa powder) and wonderfully moist (because of the buttermilk and it’s an oil based batter). Layered cakes, cupcakes, sheet cake—look no further for a base chocolate cake….I’m not exaggerating this time guys.

Pinky swear.

If you’ve never made this cake before (drop EVERYTHING and bake it now!), don’t be concerned if the batter looks really runny before baking. It will come together.

Trust Ina. And Beatty.

August 2015 Family Dinner

I initially had planned to just use buttercream in between the cake layers. But then I thought, why stop there? Let’s add MORE matcha flavor to party!

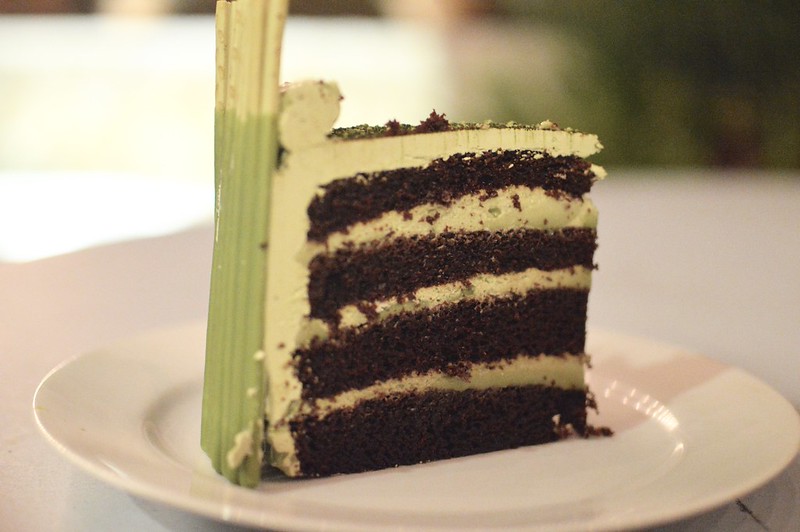
I ended up making an airy matcha mousse to fill the layers with. The mousse was inspired by the Matcha Cake my seester N made for her hubby’s birthday last year. He, too, loves green tea. Yep, my niece Nina (and her seester Nini) get their love of matcha from their Pops.

August 2015 Family Dinner

After I filled the layers of cake with the mousse, I refrigerated it for an hour or so to allow everything to set up.

While everything was chilling out in the fridge, I turned my attention to the frosting.

August 2015 Family Dinner

These days, I tend to make Swiss Meringue Buttercream to frost almost all my cakes and cupcakes with. I find that it tastes less sweet (though, don’t get me wrong, there’s a hefty amount of sugar in it) and it’s a more stable product to decorate with.

Sure, it is more laborious than an American Buttercream but so much tastier.

To flavor the buttercream, I used… you guess it—- matcha powder!

August 2015 Family Dinner

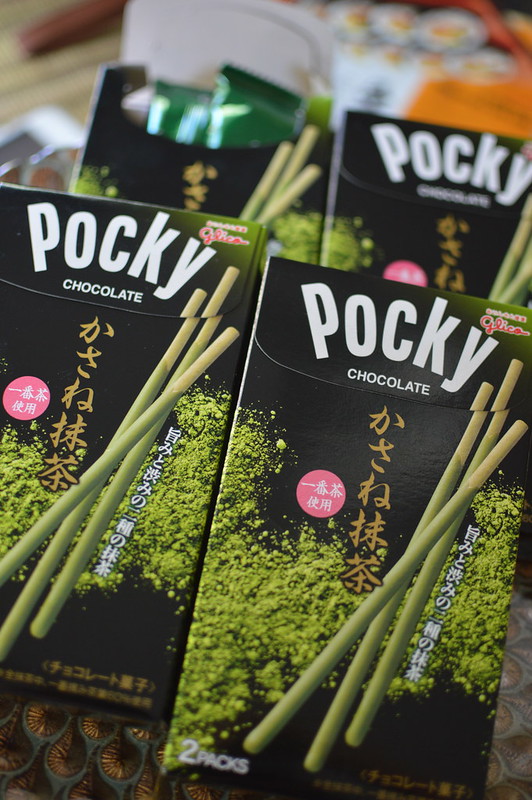
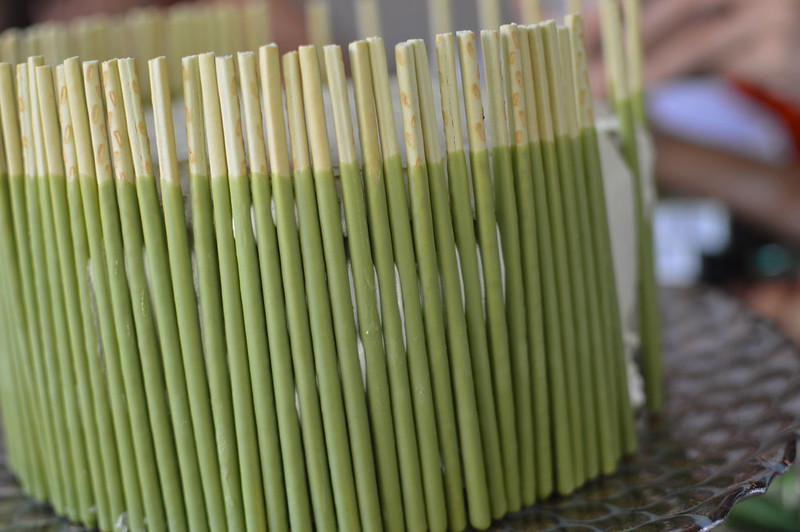
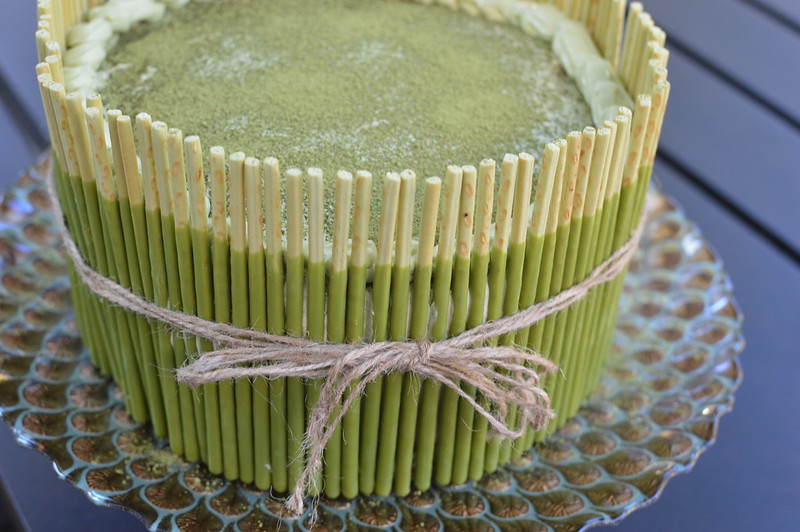
After the cake was frosted, it was time to add the Matcha Pocky Sticks!

I used 4 boxes of Pocky Sticks for this 9-inch round cake and ended up with just a few spare sticks that quickly disappeared –care of the hovering munchkins.

August 2015 Family Dinner

Next time I make this cake, I will definitely take my time to ensure that the layers are evenly cut so I have a nicer presentation once sliced. I also got sloppy with the buttercream because I assumed the Pocky Sticks would cover any imperfections—but unfortunately some of it seeped through the sticks.

Moral of the story = My laziness always gets me in the end

August 2015 Family Dinner

But with that said, the fam – particularly the birthday gal, really enjoyed the cake. Chocolate and green tea pair so well together and when combined with a whimsical presentation –you’ll have a winning cake.

Happy Friday Friends!

________________________________________
Matcha Chocolate Pocky Cake
Makes one 9-inch cake

Ingredients:

Matcha Mousse:
1 cup chilled heavy cream
2 large egg yolks
½ cup sugar
1 tablespoon gelatin powder
7 tablespoons warm water, divided
2 heaping tablespoons matcha green tea powder|
1 cup milk

Cake Batter (From Ina Garten) :
1¾ cups all-purpose flour, plus more for pans
2 cups sugar
¾ cups good cocoa powder
2 teaspoons baking soda
1 teaspoon baking powder
1 teaspoon kosher salt
1 cup buttermilk, shaken
½ cup vegetable oil
2 extra-large eggs, at room temperature
1 teaspoon pure vanilla extract
1 cup freshly brewed hot coffee

Matcha Swiss Meringue Buttercream:
5 large egg whites
1½ cups sugar
1½ pounds unsalted butter, cubed and at room temperature
pinch of salt
1½ heaping tablespoons matcha green tea powder

Garnish:
4 boxes Matcha Pocky Sticks
1 teaspoon matcha powder

Prepare the Matcha Mousse:
Using a stand mixer fitted with the balloon whisk attachment, whip the chilled heavy cream on high until it holds stiff peaks. Cover and place in the refrigerator.

In a medium sized bowl, whisk together the egg yolks, sugar and then set aside. In small bowl, mix the gelatin powder with 4 tablespoons water until dissolved. Dissolve the matcha powder with the remainder of warm water in another small bowl.

Using a small saucepan, heat the milk until it just begins to bubble. While whisking, slowly drizzle the heated milk into the egg mixture until everything has incorporated. Whisk in the liquefied matcha. Place the bowl in a larger bowl that has been filed with ice and water to help chill the contents. Continue stirring the mixture until it cools to room temperature –be careful to not splash any water inside the mixture bowl. Once cooled, take the refrigerated whipped cream and gradually fold it into the matcha custard. Cover the bowl and allow the mousse to refrigerate for a minimum of 6 hours. *This can be done the night before.

Prepare the Cake:
Preheat the oven to 350 degrees. Butter two 9-inch round cake pans. Line with parchment paper, then butter and flour the pans.

Sift the flour, sugar, cocoa, baking soda, baking powder, and salt into the bowl of an electric mixer fitted with a paddle attachment and mix on low speed until combined. In another bowl, combine the buttermilk, oil, eggs, and vanilla. With the mixer on low speed, slowly add the wet ingredients to the dry. With mixer still on low, add the coffee and stir just to combine, scraping the bottom of the bowl with a rubber spatula. Pour the batter into the prepared pans and bake for 35 to 40 minutes, until a cake tester comes out clean. Cool in the pans for 30 minutes, then turn them out onto a cooling rack and cool completely.

Prepare the Buttercream:
Add the egg whites and sugar in a mixer bowl set over a pot of simmering water. The water should not be able to touch the bottom of the bowl. While the bowl sits over the simmering pot, whisk until sugar dissolves and the mixture registers 140 degrees on a candy thermometer. Remove from heat, and attach bowl to a mixer.

Using the whisk attachment, whip on medium speed until the meringue becomes thick and can hold medium peaks. This can take about 8-10 minutes and once done, the sides of the bowl should not feel warm at all. Remove the whisk attachment and replace with the paddle.

With the mixer on low, add a few cubes of butter and beat until it has full incorporated. Add in a few more cubes and continue with the process until all the butter has been added and the frosting has become smooth. If it looks slightly curdled, keep mixing—it will come together! Sprinkle in the salt and on low, slowly add in the matcha powder until it becomes fully incorporated.

Cake Assembly:
Using a serrated knife, slice each of the cake layers in half so that you are left with four thin chocolate cake layers. Place one layer of chocolate cake on a serving platter or cake stand. Spread 1/3 of the matcha mousse, evenly, over the layer. Place another layer of cake on top and evenly spread another 1/3 of the matcha mousse over the layer. Place a third chocolate cake layer on top and spread the remaining amount of matcha mousse evenly over the cake. Top with the final chocolate cake layer. Place the cake in the refrigerator for an hour to set.

Once the cake has set, frost the entire cake with the buttercream—covering the top and sides. Place the Pocky Sticks upright, side by side, all around the side of the cake –pressing them gently into the cake to secure. With the remaining matcha powder, dust the top of the cake. Optional: Tie ribbon around the cake. Refrigerate for one last hour before serving.

Breads · Breakfast/Brunch · Desserts/Pastries

Malasadas – Portuguese Doughnuts

Malasadas

LET’S GET DOUGHNUT WASTED!!!!!!!

And why the heck not? It’s National Doughnut Day!!!

Malasadas

What’s my favorite doughnut or donut?

Easy.

It comes down to either an Old Fashioned with a Chocolate Glaze or Malasadas. Mmmm…malasadas.

Never had one? Let me break it down for you.

Malasadas

Malasadas are Portuguese doughnuts. They’re a yeast based dough with eggs, butter and milk (or half and half). Rolled in sugar, these babies should be light and fluffy…and freaking amazing.

Now of course, the go-to place for malasadas is Leonard’s Bakery in O’ahu and every time I’m on the island, I MUST pop in for a box of them. Traditionally they’re unfilled but when I’m at Leonard’s, I have to get a variety of the filled ones. I love the ones that are stuffed with haupia (a Hawaiian coconut “pudding”), custard or if I’m lucky, they have the lilikoi (passion fruit) filling as their flavor of the month.

Malasadas

Sadly, I’m not on the islands today and had to take matters into my own hands. I used the recipe below from  Leonard’s and it’s pretty easy to follow. After proofing, the dough is just lovely.

And no surprise here… they were ONOLICIOUS!

Malasadas

In full disclosure, they were not nearly as good as Leonard’s…..I may be in San Diego but the beautiful air in Hawai’i combined with the sounds of the trade winds and ocean definitely add to the flavor of island food and takes it over the top.

But hey, they sure did do the trick and I happily inhaled four of them and washed it all down with a chilled class of Pinot Grigio….keeping it classy.

Happy National Doughnut (or Donut) Day!!!

_____________________________________________________
Malasadas – Portuguese Doughnuts from Leonard’s Bakery
Makes about 1 dozen

Ingredients:

1 tablespoon active dry yeast
112 cups sugar
3 eggs
2 tablespoons unsalted butter, melted
12 cup milk
12 cup half & half
14 teaspoon kosher salt
4 cups bread flour (1 lb. 2 oz.), sifted
canola oil, for frying
Combine yeast, 1 teaspoon sugar, and 2 tablespoons water heated to 115° in a bowl; let sit until foamy, about 10 minutes; set aside. Beat eggs in the bowl of a stand mixer fitted with a paddle attachment until fluffy. Add yeast mixture, 12 cup sugar, butter, milk, half & half, and salt; mix until combined. With the motor running, slowly add flour; beat until dough is smooth. Transfer to a lightly greased bowl and cover loosely with plastic wrap; set in a warm place until doubled in size, about 112 hours.

On a lightly floured surface, roll dough into a 12″ square about 12″ thick. Using a knife, cut dough into 3″ squares; gather and reuse scraps. Place on greased parchment paper-lined baking sheets, at least 3″ apart; cover loosely with plastic wrap and set aside in a warm place until doubled in size, about 1 hour.

Place remaining sugar in a large bowl; set aside. Heat 2″ oil in a 6-qt. saucepan until a deep-fry thermometer reads 350°. Using scissors, cut the donuts out of the parchment paper, leaving about 1″ of paper around the sides of each doughnut (the paper makes it easier to transfer them to frying oil). Working in batches, place donuts in oil, paper side up, using tongs to peel off and discard paper. Cook, flipping once until puffed and golden, 2 to 3 minutes. Transfer to a baking sheet with a wire rack; let cool completely, then toss with sugar.

Repost from Saveur

Desserts/Pastries

Ring in the New Year with Earl Grey Macarons

Earl Grey Macarons

Whether you’re at a large gala, intimate gathering or a cozy night at home — your New Year’s Eve countdown absolutely must have bubbly.

#MyFav

Earl Grey Macarons

And you know what is the perfect accompaniment to bubbly?

Parisian Macarons of course! The sweet little gems are a wonderful pairing to the dry sparkling wine. An absolute match made in heaven.


Earl Grey Macarons

Ever since I started baking macarons, my seester T had been trying to convince me to make an Earl Grey version — an homage to her favorite macarons from Bottega Louie in LA.

This past summer, I finally was able to get the proportions down and they even made an appearance at my seester P’s baby shower. The shells have a great floral scent with a bit of spice–stemming from the bergamot of the tea. The little specks of tea with a sprinkle of disco dust add to the charm to the shells as well.

Earl Grey Macarons

I know I have a propensity towards filling almost all of my macarons with chocolate ganache, but I promise, it really is the perfect filling for the Earl Grey flavor. But if you prefer a non-chocolate approach (which is both strange and crazy to me), I’d recommend a myer lemon curd or even an Earl Grey Buttercream.

Earl Grey Macarons

However you choose to fill it, you must have these little beauties for your countdown to 2015. What better way to ring in the year than with the perfect little sweet treat.

And with that dear friends, Happy New Year!!!

_______________________________________________

Earl Grey Macarons filled with Chocolate Ganache

Ingredients:


Macaron Shells:
110 grams almond meal or blanched almonds
15 grams loose Earl Grey tea leaves (about 2 tea bags)
170 grams confectioner’s sugar
100 grams egg whites, aged at room temperature for 24 hours
40 grams granulated sugar
powdered food color (optional)
edible glitter (optional)

If using blanched almonds, pulse the almonds in a food processor until it becomes finely ground. In a spice grinder, grind the tea leaves into a fine powder. In a bowl, sift together the ground almonds (or almond meal), tea powder and the confectioner’s sugar. Set aside.

In a mixing stand fitted with the whisk attachment, whisk egg whites until frothy. Slowly add granulated sugar and continue beating until stiff peaks are formed. Carefully begin incorporating the dry mixture into the meringue, gently folding until all items have been integrated and a smooth batter has been formed. Optional: Halfway through the folding, add in the food color.

Using a pastry bag fitted with a large round tip, pipe small rounds of the mixture onto baking sheets lined with silicon mats. Rounds should be about 1-1½ inches in diameter. Once the baking sheets are filled, carefully tap the sheets on the counter to remove any possible air pockets. Let the macaron shells sit on the counter for 45-60 minutes to harden the outer shell before baking. Humidity will affect how long it takes for the “skin” to form but the shells should not be sticky when you gently touch them. Optional: If you choose to use edible glitter, sprinkle on the shells after it’s dried for 15 minutes.

Bake the shells at 290 degrees F for 18-20 minutes. Transfer the baking sheets to cooling racks and cool completely before removing shells. Macarons shells can be made up to 24 hours in advance before filling and should be stored in airtight containers.

Chocolate Ganache
4 ounces heavy cream
5 ounces bittersweet chocolate, finely chopped

In a small saucepan, bring the heavy cream just to a boil. Remove and pour the scalded cream through a fine-meshed sieve directly into the bowl of the chopped chocolate. Let the mixture sit for 1 to 2 minutes and then gently whisk until the ganache is smooth and glossy. Allow the ganache to sit for 20-30 minutes at room temperature until it becomes thick enough to pipe.

Fill the flat side of a macaron shell with ganache and sandwich with another shell. Filled macarons can be kept up to 2 days in airtight containers.


Desserts/Pastries

Chocolate Crinkles with Dark Chocolate Mint Truffle Kisses

Chocolate Crinkles with Dark Chocolate Mint Truffle Kisses

Okay, okay….someone was a bit behind this year on their holiday baking.

And that “someone” may be a certain 5’2″ Vietnamese gal we all know and love….

Okay- FINE!

Five foot, 1 inch AND three quarters….

Sheesh!

Chocolate Crinkles with Dark Chocolate Mint Truffle Kisses

But let’s not get stuck in the minutia of things because I’ve got cookies.

Some SERIOUS cookies that will rock your jingle-jangle, holiday socks off. When I saw these crinkle cookies from the Recipe Girl, I knew I had to have them!

Chocolate + Mint = THE BEST PAIRING EVER!!!!!!!

I hadn’t even known that Hershey made these magical little confections in the form of Dark Chocolate Mint Truffle Kisses. These little beauties are, to date — my FAVORITE of the Hershey Kisses.

Truth.

Chocolate Crinkles with Dark Chocolate Mint Truffle Kisses

As for the base cookie, Recipe Girl is completely on point. The cookie is moist, chewy, fudgy and somewhat brownie-like. The only change I made was a splash of additional vanilla extract when the mint extract goes in.

Mo’ flava, mo’ betta!

And the kiss, the KISS just sends things over the top and seals the deal. So if you plan on leaving the Big Guy a plate of cookies next Wednesday night, do yourself a solid and whip up a batch of these beauties because I’m pretty darn sure that it’ll flip you to the “nice” list in a jiffy.

Want the original recipe? It can be found here.

ps. Two quick notes on the recipe. First, you really MUST chill the dough before rolling them out or you’ll have a hot mess on your hands. And second, if you want the cute little point of the kiss to stay intact, definitely chill the cookies on the sheet immediately after you take them out of the oven.

pps. HAPPY BAKE COOKIES DAY!!!!!!!

Desserts/Pastries

Peanut Butter Cream Pie

Peanut Butter Cream Pie

Wait, wait, wait – hold up!

Did I really suggest Thanksgiving dessert ideas yesterday and NOT include anything with chocolate?????

Quick! Someone check my temperature!


Peanut Butter Cream Pie

But fear not, dear friends. There’s still PLENTY of time to make this luscious Peanut Butter Cream Pie and your loved ones won’t even know it was a last minute addition.

Because it’s a known fact that Peanut Butter and Chocolate are a match made in heaven.

Foodie Heaven.


Peanut Butter Cream Pie

I had actually made this beauty a few weeks ago when one of my besties and I had gone over to a friend’s for dinner. Because I can never go to someone’s house empty-handed, I offered to bring a dessert and turned to this fabulous pie courtesy of Joy the Baker.

Instead of the graham crackers that the recipe calls for, I opted for Oreo cookies because mo’ chocolate is always mo’ better! As for the filling, you can’t beat the light, fluffy, peanut-buttery center that is then layered with whipped cream. And to go that extra bit over, top it with whatever your heart desires! I kind of went to infinity and beyond by topping the pie with a drizzle off melted chocolate, crushed salted peanuts, itty-bitty mini chocolate peanut butter cups AND chopped up chocolate covered pretzels.

Yea….I have no self control.

Want the recipe? It can found in Joy the Baker’s new book, Homemade Decadence. Or, you can find it HERE at the Candid Appetite’s site.

So once again, HAPPY THANKSGIVING FRIENDS!!! And now, you have no excuse to leave out the chocolate 🙂

Desserts/Pastries · Drinks · Ice Cream

Almond Joy Milkshakes

Almond Joy Milkshakes

It’s been really hot these past few days.

How hot you ask?

HELLA hot.

Darn too hot to cook or even warm up food. So instead, I opted to make milkshakes for dinner the other night.

Almond Joy Milkshakes

I rummaged through the freezer and found some chocolate and coconut ice creams which I threw in the blender with some other goodies. And some how, I inadvertently made the most delicious milkshake with the flavors of Almond Joy. ‘Cause….

Sometimes you feel like a nut…
Sometimes you don’t…..

It was decadently yummy and helped keep me cool during the .5 seconds it took me to inhale the whole thing.

I love it when I make delish things by accidents.

____________________________________

Almond Joy Milkshakes
Serves 1

Ingredients:

1 heaping scoop chocolate ice cream
1 heaping scoop coconut ice cream
½ cup almond milk
½ teaspoon vanilla extract
¼ teaspoon coconut extract
1 ounce creme de cacao (optional)
2 tablespoons toasted coconut flakes
1 teaspoon toasted almond slices
1 teaspoon cacao nibs or chocolate chunks

In a blender, add both ice creams, almond milk, both extracts, creme de cacao (if using) and 1½ tablespoons coconut flakes. Blend until the shake is smooth and frothy. Pour the contents into a glass and sprinkle the top with the remaining coconut flakes, almond slices and cacao nibs (or chocolate).

Enjoy!


Desserts/Pastries

Browned Butter Double Chip Cookies

Browned Butter Double Chip Cookies

If there was ever a day of the week that you deserved a cookie, it would be today…..

Monday.

Because Mondays are just darn rough – they don’t call them Manic Mondays for nothing.

Browned Butter Double Chip Cookies

And because you’re amazing, I think you deserve to make yourself some amazing cookies –these Browned Butter Double Chip Cookies to be exact.

Browned Butter….

Dark Chocolate Chips…..

Toffee Chips….

Sprinkled with Sea Salt.

HAVE MERCY!

Browned Butter Double Chip Cookies

Slightly crispy exterior, uber chewy interior and jammed packed with goodness. And the bonus? The dough freezes perfectly. Just scoop the dough onto a baking sheet and freeze them in a single layer for a few hours before bagging them up.

The frozen dough can keep in your freezer for a few months (if they last that long!). And when you get a hankering for warm cookies, bake them frozen (don’t defrost) and add a couple extract minutes to the baking time.

Browned Butter Double Chip Cookies

Here’s to Mondays – now go bake some cookies! 🙂

_______________________________________

Browned Butter Double Chip Cookies
Makes about 18 large cookies

Ingredients:

¾ cups unsalted butter
2 cups all-purpose flour
½ teaspoon salt
½ teaspoon baking soda
½ teaspoon cornstarch
½ cup granulated sugar
1 cup light brown sugar
1 whole egg
1 egg yolk
1½ tablespoons vanilla extract
1½ cups dark chocolate chunks or chips
1 heaping cup baking toffee bits (I used Heath’s)
sea salt flakes

Place the butter in a saucepan and melt over medium heat. Swirl the pan and allow the butter to bubble and foam slightly. Continue browning the butter until it begins to smell nutty and it turns a dark golden brown. Remove it from the heat and allow the butter to cool to room temperature.

Sift together the flour, salt, baking soda and cornstarch. Set the dried ingredients aside.

Place the browned butter and both sugars into the bowl of a stand mixer. Beat for about 1-2 minutes. Add in the egg, egg yolk and vanilla extract until combined. On low, slowly add in the dry ingredients until just combined. Using a wooden spoon, stir in the chocolate chunks and toffee bits.

Chill the cookie dough for about an hour.

Preheat the oven to 325 degrees F. Line baking sheets with parchment paper or silpat mats.

Once chilled, use a cookie scoop (ice cream scoop) and scoop the dough onto the prepared baking sheets about 2-3 inches apart from each other. Sprinkle the tops of each cookie with sea salt.

Bake for about 15 minutes until the edges of the cookies begin to turn golden brown and have set. Allow the cookies to cool on the baking sheets for 5 minutes before transferring to a wire rack to cool completely.


Desserts/Pastries

Thin Mints Chocolate Cheesecake ….Happy St. Patrick’s Day!

Thin Mints Chocolate Cheesecake

Yeah….I went there.

I just had to do it.

Thin Mints Chocolate Cheesecake

It wouldn’t be a Girl Scouts Cookies season if I didn’t bake something with them. I typically make some type of cupcake with the various cookies like my Thin Mints Cupcakes, Samoa Cupcakes, and Tagalong Cupcakes.

Thin Mints Chocolate Cheesecake

But this year, I wanted to change it up a bit. And since my siblings and I decided to pay tribute to the Emerald Isle for our Sunday Family Dinner yesterday, I knew I had to take the opportunity to use one of my favorites in our dessert– Thin Mints.

This time, in cheesecake form.

Thin Mints Chocolate Cheesecake

It all started with the crust that was made purely from melted butter and ground Thin Mints. Then, I took my standard cheesecake filling recipe and mixed it with melted dark chocolate. I poured a layer of the chocolate cheesecake filling over the crust and then sprinkled in mint & dark chocolate chips (more mint chip flavor, the better!). Another layer of the chocolate cheesecake filling gets poured on top and then a heavy sprinkle of chopped Thin Mints gets topped on that. The remaining chocolate cheesecake filling gets poured in and then it gets baked for about 50 minutes.

photo-61

Once baked, the cheesecake sets and ages overnight. And finally it all gets topped with mint scented whipped cream, even MORE Thin Mints and shamrock sprinkles. It is St. Patrick’s Day, after all!

Thin Mints Chocolate Cheesecake

This beauty was the perfect, decadent end to our Irish inspired Family Dinner. And although it was in honor of St. Patrick’s Day, it would be spectacular for any occasion—birthdays, holidays,…..or just because you’re a Thin Mints monster.

May the luck o’ the Irish be with you today—HAPPY ST.PATRICK’S DAY!!!!!!

____________________________________

Thin Mints Chocolate Cheesecake
Makes one 9-inch Cheesecake

Ingredients:

Crust:
11 ounces Thin Mints Cookies
3 tablespoons unsalted butter, melted
cooking spray

Filling:
8 ounces quality dark chocolate, roughly chopped
24 ounces cream cheese, at room temperature
¼ cup sour cream, at room temperature
1 cup sugar
3 large eggs
½ tablespoon vanilla extract
1 cup dark chocolate and mint chips (or other chocolate mint candies of your choice)
1 cup chopped Thin Mints Cookies

Mint Scented Whipped Cream:
1 cup heavy cream, chilled
2 tablespoons sugar
1 teaspoon mint extract.

Garnish:
Thin Mints Cookies
sprinkles
Preheat oven to 325 ˚F.

Prepare the crust. In a food processor, pulse the Thin Mints Cookies until they are well ground. Pour them into a bowl and mix them with the melted butter until moistened and resembles the texture of wet sand. Cover a 9-inch springform pan with cooking spray and press the crust mixture into the bottom of the pan and about one inch up the sides. Bake for 8-10 minutes until golden and cool to room temperature.

In a heatproof bowl, melt the chocolate in the microwave until smooth. Do this in 20 second intervals, stirring in between to ensure that you do not scorch the chocolate. Cool the chocolate mixture until room temperature.

Using a standing mixer fitted with the paddle attachment, whip the cream cheese and sour cream until its light and fluffy. Gradually mix in the sugar.  Mix in the eggs one at a time, beating well after each addition.  Add  the vanilla extract and melted chocolate. Mix until well combined.

Pour 1/3 of the filling over the cooled crust. Sprinkle the dark chocolate and mint chips over the filling before pouring another 1/3 on top. Sprinkle the chopped Thin Mints Cookies over the top and then cover with the remaining filling. Gentle rap the pan on the counter to release any air bubbles

Place the pan on the middle rack of the oven with a pan half full of hot water on the bottom rack of the oven. Bake for 50-60 minutes or until the center is set. Turn off the oven and allow the cake to sit in the oven with the door propped open for about 30 minutes. (To prop the oven door, I use a wooden handled spoon to keep it ajar a few inches). Remove from the oven and transfer to a wire rack.  Allow the cake to cool for an additional 30 minutes.  Wrap well with plastic film and foil. Refrigerate for at least 8 hours. Carefully remove the sides of the pan by running a hot knife around the outside of the cake.

When you are ready to serve, prepare the whipped cream. Using a standing mixer fitted with the whisk attachment, whip the chilled heavy cream on high until it just holds stiff peaks. Slowly sprinkle in the sugar until you reach a thick consistency. Add in the mint extract and whip until combined.

Pipe the whipped cream on top of the cheesecake and garnish with additional cookies and sprinkles. Enjoy!