Seafood

Clams with Ginger and Lemongrass

Clams with Ginger and Lemongrass

Does anyone else pretend like they’re on a cooking show when you’re in the kitchen?

You know, talk out loud as if you’re narrating your own show….

Or try to race against the clock to cook/bake something in 5 minutes….

Just me???

Oh…..ok.

Well, if you did ever time yourself, these Clams with Ginger and Lemongrass would be the perfect dish because they’re done in flash! You can easily be in and out of the kitchen in less than 15 minutes—even faster if you have your fishmonger clean your clams for you.

And for the record, I not only time myself when making this dish but also talk to my puggle as if she was the audience in my live cooking show. She thinks I’m hilarious.

_________________________________________

Clams with Ginger and Lemongrass
Serves 2

Ingredients:

2 tablespoons peanut oil or vegetable oil
1 tablespoon finely minced garlic
2 tablespoons minced shallots
2 fresh lemongrass stalks, tender inner white bulbs only, minced
1 tablespoon ginger, minced
2 Thai Bird chilies, sliced
½ cup dry white wine
½ tablespoon fish sauce
2 scallions, cut into 1″ pieces (more for garnish)
1½ pounds little-neck or Manila clams, scrubbed and cleaned
cilantro

Heat a wok or large skillet over medium heat and add the oil. Once the oil is hot, add the garlic, shallots, lemongrass, ginger, and chilies–stir-fry for 30 seconds. Carefully stir in the wine, fish sauce, and scallions.

Add in the clams, stir the contents, and cover with a lid. Allow the clams to cook for 4-5 minutes or until the shells have opened. Plate the clams and garnish with scallions and cilantro. .


Appetizers/Small Plates

Poblano-Avocado-Yogurt Dip >> #MadeWithChobani

Roasted Poblano Avocado Yogurt Dip

Have you heard of the #MadeByChobani challenge that’s going around the food blogisphere?

Roasted Poblano Avocado Yogurt Dip

The task is fairly simple really– come up with a healthy recipe using Chobani® yogurt. But if you’ve been to my site before, you’re fully aware that I have never claimed to write “healthy” recipes. Remember the Holy Trinity of my kitchen?

Bacon, Butter, and Booze!

But it’s a new year and even I can try something new. So……….

CHALLENGE ACCEPTED!

Roasted Poblano Avocado Yogurt Dip

With the Super Bowl just around the corner, I thought it would be the perfect opportunity to whip up a healthier appetizer to go along with all of those buffalo wings and pizza that will be consumed. And the recipe is incredibly easy too!

Roasted Poblano Avocado Yogurt Dip

I grabbed a poblano pepper (sometimes sold in the US as “pasilla”) and charred the exterior. Once peeled, I threw it in a food processor along with some avocados that are rich in potassium, fiber, and monounsaturated fat (“good fat”). Non-fat Plain Chobani® Greek Yogurt, cilantro, garlic and a few spices like cumin were also added to the party. The latter has been known to help with building your immunity and digestion.

Roasted Poblano Avocado Yogurt Dip

The end results?

A wonderfully creamy, beautifully rich, totally satisfying dip. Deeply flavored from the charred poblano and cumin & luscious from the yogurt and avocado.

I chose to serve this healthier dip with tortilla chips (all about balance, right?) but it would be great with sliced veggies or as a spread in sandwiches.

DEE-LISH!

But…I’ll get back to creating some kind of bourbon-bacon dip so y’all know it’s still me.

_________________________________

Poblano-Avocado-Yogurt Dip
Serves 6

Ingredients:

1 large poblano pepper
½ cup fresh cilantro leaves, roughly chopped
1 large garlic clove, minced
2 large ripe avocados, roughly diced (about 3 cups)
5 ounces Non-fat Plain Chobani® Greek Yogurt, or other plain Greek yogurt of our choice
½ tablespoon fresh lime juice
1/8 teaspoon cumin powder
¼ teaspoon garlic salt
¼ teaspoon kosher salt, more to taste
¼ teaspoon black pepper
tortilla chips or veggie sticks of your choice

On your stove top range, char the poblano pepper on all sides. This can also be done under your oven broiler. Once charred, place in a bowl and cover with plastic wrap for 10 minutes. This will help the skin loosen from the pepper. Once cooled, peel the skin from the pepper and discard along with the stem and seeds. Roughly chop the roasted pepper and place into the bowl of a food processor.

Pulse the poblano until it becomes fairly smooth. Add the rest of the ingredients and blend until smooth. Taste and add additional kosher salt as needed. Serve with tortilla chips or veggies of your choice.

Enjoy!


Poultry

Pan-Roasted Rosemary Chicken Thighs

Pan-Roasted Rosemary Chicken Thighs

The thing is, I’m kind of obsessed with rosemary.

Nearly every time I pass by a bunch at the market, I always stop to smell them. If I come across a rosemary bush during my walks with Bella, I always brush my hand across the top so that the oils will release and the scent will stay with me.

I’ve got issues, I know.

Pan-Roasted Rosemary Chicken Thighs

At the farmers market last Saturday, I grabbed a huge bunch and decided that my meals for the week would all feature rosemary. I marinated prawns in them to top some pizzas, roasted some pistachios with chopped rosemary and garlic, brined some pork chops with rosemary and lemon, bottled some rosemary infused olive oil, and made a huge batch of pan-roasted rosemary chicken thighs in my cast iron skillet.

This recipe is a nod to all of those delicious spots that make European-style rotisserie chicken. A whole chicken is marinated in fresh herbs (yep-rosemary!) and garlic, which are then slowly spun and roasted. Extra bonus? The establishments that place a tray of new potatoes underneath the spinning chicken so that all of those spectacularly flavored juices fall down and infuse the potatoes.

I’m drooling.

Pan-Roasted Rosemary Chicken Thighs

Since I don’t happen to own a rotisserie (ahem…birthday is in May folks!), I decided to turn to my trusty cast irons to sear and render down some chicken before roasting them in the oven. But before any of that happened, I marinated the chicken (I prefer chicken thighs) in an obscene amount of fresh rosemary, garlic, lemon zest and a few other spices overnight. If you don’t have that kind of time, you could do it for about 6 hours but overnight is best. After the chicken has roasted, the skillet is quickly deglazed with wine and stock for a light sauce.

The end results? Perfectly moist and aromatic chicken.

If you prefer white meat, you could substitute with chicken breast. But do yourself a favor and make sure you use bone-in. You’ll get SO much more flavor and the meat tends to be more moist.

Now excuse me as I go enroll myself in a Rosemary Addiction Group.

____________________________________________________

Pan-Roasted Rosemary Chicken Thighs

Ingredients:
½ cup chopped rosemary
¼ cup minced garlic
zest of 1 lemon
½ teaspoon red chili flakes
1 tablespoon kosher salt
½ teaspoon black pepper
¼ cup olive oil
2 pounds chicken thighs (bone-in, skin on)
2 tablespoons vegetable oil
½ cup low sodium chicken stock
½ cup white wine
1 tablespoon unsalted butter (optional)

In a bowl, mix together the rosemary, garlic, lemon zest, red chili flakes, salt, pepper and olive oil. Place the chicken in a large shallow dish or gallon sized resealable bags. Pour the herb mixture over the chicken and turn to coat well. Cover and refrigerate for 6-8 hours, or preferably overnight.

Remove the chicken from the refrigerator about 30 minutes before cooking. Preheat oven to 450 degrees F.

Heat the vegetable oil in a large cast iron skillet or other oven proof skillet over medium heat. When the oil begins to shimmer, take each chicken thigh and wipe off any excess marinade. Carefully lay each piece into the skillet, skin side down. Allow the skin to crisp and become golden brown, about 5-7 minutes. Once browned, turn each chicken thigh over. Since a good amount of the fat would have rendered out of the chicken, carefully spoon out and discard. Transfer the skillet to the oven.

Roast the chicken for an additional 10-15 minutes depending on the size. If pierced with the tip of a knife, the juices should run clear or use a thermometer and roast until internal temperature reaches 160-165 degrees F.

Pull the skillet from the oven and transfer the chicken to a plate. Cover with foil. Return the skillet to the stove and over medium-high heat, pour in the chicken stock and white wine. Use a wooden spoon and scrape the bottom of the skillet to release all the brown bits. Allow the liquids to come to a boil and reduce for 2-3 minutes. Stir in the butter (optional). Adjust with additional kosher salt or pepper as needed.

Place the chicken back into the skillet and serve. Alternatively, you can spoon the pan sauce over chicken thighs and serve.

Enjoy!


Desserts/Pastries

Ring in the New Year with Earl Grey Macarons

Earl Grey Macarons

Whether you’re at a large gala, intimate gathering or a cozy night at home — your New Year’s Eve countdown absolutely must have bubbly.

#MyFav

Earl Grey Macarons

And you know what is the perfect accompaniment to bubbly?

Parisian Macarons of course! The sweet little gems are a wonderful pairing to the dry sparkling wine. An absolute match made in heaven.


Earl Grey Macarons

Ever since I started baking macarons, my seester T had been trying to convince me to make an Earl Grey version — an homage to her favorite macarons from Bottega Louie in LA.

This past summer, I finally was able to get the proportions down and they even made an appearance at my seester P’s baby shower. The shells have a great floral scent with a bit of spice–stemming from the bergamot of the tea. The little specks of tea with a sprinkle of disco dust add to the charm to the shells as well.

Earl Grey Macarons

I know I have a propensity towards filling almost all of my macarons with chocolate ganache, but I promise, it really is the perfect filling for the Earl Grey flavor. But if you prefer a non-chocolate approach (which is both strange and crazy to me), I’d recommend a myer lemon curd or even an Earl Grey Buttercream.

Earl Grey Macarons

However you choose to fill it, you must have these little beauties for your countdown to 2015. What better way to ring in the year than with the perfect little sweet treat.

And with that dear friends, Happy New Year!!!

_______________________________________________

Earl Grey Macarons filled with Chocolate Ganache

Ingredients:


Macaron Shells:
110 grams almond meal or blanched almonds
15 grams loose Earl Grey tea leaves (about 2 tea bags)
170 grams confectioner’s sugar
100 grams egg whites, aged at room temperature for 24 hours
40 grams granulated sugar
powdered food color (optional)
edible glitter (optional)

If using blanched almonds, pulse the almonds in a food processor until it becomes finely ground. In a spice grinder, grind the tea leaves into a fine powder. In a bowl, sift together the ground almonds (or almond meal), tea powder and the confectioner’s sugar. Set aside.

In a mixing stand fitted with the whisk attachment, whisk egg whites until frothy. Slowly add granulated sugar and continue beating until stiff peaks are formed. Carefully begin incorporating the dry mixture into the meringue, gently folding until all items have been integrated and a smooth batter has been formed. Optional: Halfway through the folding, add in the food color.

Using a pastry bag fitted with a large round tip, pipe small rounds of the mixture onto baking sheets lined with silicon mats. Rounds should be about 1-1½ inches in diameter. Once the baking sheets are filled, carefully tap the sheets on the counter to remove any possible air pockets. Let the macaron shells sit on the counter for 45-60 minutes to harden the outer shell before baking. Humidity will affect how long it takes for the “skin” to form but the shells should not be sticky when you gently touch them. Optional: If you choose to use edible glitter, sprinkle on the shells after it’s dried for 15 minutes.

Bake the shells at 290 degrees F for 18-20 minutes. Transfer the baking sheets to cooling racks and cool completely before removing shells. Macarons shells can be made up to 24 hours in advance before filling and should be stored in airtight containers.

Chocolate Ganache
4 ounces heavy cream
5 ounces bittersweet chocolate, finely chopped

In a small saucepan, bring the heavy cream just to a boil. Remove and pour the scalded cream through a fine-meshed sieve directly into the bowl of the chopped chocolate. Let the mixture sit for 1 to 2 minutes and then gently whisk until the ganache is smooth and glossy. Allow the ganache to sit for 20-30 minutes at room temperature until it becomes thick enough to pipe.

Fill the flat side of a macaron shell with ganache and sandwich with another shell. Filled macarons can be kept up to 2 days in airtight containers.


Poultry

Slow Cooker BBQ Pulled Chicken Sandwiches

Slow Cooker BBQ Pulled Chicken Sandwiches

I know, I know.

It’s kind of silly that I’m even posting this recipe as it’s a near no-brainer.

But if any of you are like me and have been running around like crazy with holiday errands, festivities, tasks, etc —then you know how clutch it is to have a “set it and forget it” kind of meal in your back pocket.


Slow Cooker BBQ Pulled Chicken Sandwiches

And that’s where slow cookers are my saving grace.

I got up pretty darn early this past Saturday with coffee in hand and a heavy to-do list that needed to be tackled. But before I dashed out of the house, I threw some chicken, aromatics and a couple of glugs of BBQ sauce in the slow cooker pot, flipped the switch on and let it do its magic while I battled crazy holiday shoppers.

I’m still sporting the wounds from some ‘bows being thrown at the toy store.

Scawie.


Slow Cooker BBQ Pulled Chicken Sandwiches

But my quick 5 minute prep in the morning was rewarded when I got home to a pot of delicious chicken ready to be piled on to some soft Kings Hawaiian buns.

So tender, so tangy, so delicious and so dang easy.


Slow Cooker BBQ Pulled Chicken Sandwiches

Slow cooker pulled chicken is definitely one of those fab dishes that you can add or omit whatever you may have handy in your pantry or fridge. Crushed tomatoes, canned chili, cream of mushroom soup, bell peppers, root veggies—whatever goes! But if you do opt for the BBQ sauce route, don’t skip the liquid smoke. It adds that wonderful smokey element you can’t get if you don’t use a smoker or outdoor grill.

This time around, I topped the chicken with lightly pickled onions and shredded lettuce. But definitely use whatever toppings you like. Or in my case, whatever I managed to scrounge up from the fridge.

And with that dear friends, let me wish you and your loved ones a very, very….

Happy Hanukkah!
Joyous Kwanzaa!
Merry Christmas!
Cheerful Winter Solstice!

and a Happy Festivus for the Rest of Us!!!

________________________________________

Slow Cooker BBQ Pulled Chicken Sandwiches
Serves approximately 8

Ingredients:

2 pounds boneless, skinless chicken breasts
½ tablespoon kosher salt, more to taste
½ teaspoon black pepper
¼ teaspoon paprika
¼ teaspoon cayenne pepper
½ small white onion, sliced
1 tablespoon minced garlic
2 dried bay leaves
1 4-ounce can diced green chiles
2 cups BBQ sauce, divided (homemade or bottled)
4-5 dashes liquid smoke
8 large hamburger buns/rolls
optional: cole slaw, pickles, cheese, shredded lettuce, pickled onions, avocado, etc.

Season the chicken with kosher salt, pepper, paprika and cayenne. Place in the slow cooker and top with the onions, garlic and bay leaves. Pour in the can of chiles and 1 cup of the BBQ sauce. Cover the pot and cook on low for about 6 hours or on high for 3 hours.

Once done, carefully remove the chicken from the slow cooker and place on a platter or large dish. Use two forks to shred the meat into bite sized pieces. Spoon the onions, garlic and chiles from the slow cooker over the chicken. Pour the remaining BBQ sauce over the meat and stir in the liquid smoke. Taste and season with additional salt as needed.

Assemble each sandwich by placing a large mound of the pulled chicken and sauce on top of each bun/roll. Serve with additional toppings/condiments as desired.


Desserts/Pastries

Chocolate Crinkles with Dark Chocolate Mint Truffle Kisses

Chocolate Crinkles with Dark Chocolate Mint Truffle Kisses

Okay, okay….someone was a bit behind this year on their holiday baking.

And that “someone” may be a certain 5’2″ Vietnamese gal we all know and love….

Okay- FINE!

Five foot, 1 inch AND three quarters….

Sheesh!

Chocolate Crinkles with Dark Chocolate Mint Truffle Kisses

But let’s not get stuck in the minutia of things because I’ve got cookies.

Some SERIOUS cookies that will rock your jingle-jangle, holiday socks off. When I saw these crinkle cookies from the Recipe Girl, I knew I had to have them!

Chocolate + Mint = THE BEST PAIRING EVER!!!!!!!

I hadn’t even known that Hershey made these magical little confections in the form of Dark Chocolate Mint Truffle Kisses. These little beauties are, to date — my FAVORITE of the Hershey Kisses.

Truth.

Chocolate Crinkles with Dark Chocolate Mint Truffle Kisses

As for the base cookie, Recipe Girl is completely on point. The cookie is moist, chewy, fudgy and somewhat brownie-like. The only change I made was a splash of additional vanilla extract when the mint extract goes in.

Mo’ flava, mo’ betta!

And the kiss, the KISS just sends things over the top and seals the deal. So if you plan on leaving the Big Guy a plate of cookies next Wednesday night, do yourself a solid and whip up a batch of these beauties because I’m pretty darn sure that it’ll flip you to the “nice” list in a jiffy.

Want the original recipe? It can be found here.

ps. Two quick notes on the recipe. First, you really MUST chill the dough before rolling them out or you’ll have a hot mess on your hands. And second, if you want the cute little point of the kiss to stay intact, definitely chill the cookies on the sheet immediately after you take them out of the oven.

pps. HAPPY BAKE COOKIES DAY!!!!!!!

Pastas/Noodles · Pork

20-Minute Spicy Sausage & Mushroom Pasta

20-Minute Spicy Sausage & Mushroom Pasta

I love pasta…yeah, yeah, yeah!

Pasta is so great….yeah, yeah, yeah!


That’s my new pasta song. Do you like it? Well obvi you can’t appreciate the full artistry of the song by just reading it.

But trust me.

It’s going to be a Grammy hit one of these days.

20-Minute Spicy Sausage & Mushroom Pasta

This 20-minute beauty truly tops the cake! Or pasta cake…or whatever. Y’all get where I’m going with this………………

Using two of my most favorite items– spicy Italian sausage and ‘shrooms, this number comes together so quick and is so delish that it’ll be a regular staple in your weeknight dinner rotation. You can also throw in other cast members that you may have lingering in your fridge like bell peppers, carrots, zucchinis, etc.

This time around, I ended using whole wheat pasta but feel free to use whichever that tickles your fancy.

TGIF Folks!

______________________________________________

20-Minute Spicy Sausage & Mushroom Pasta
Serves 3-4

Ingredients:

kosher salt
½ pound dried linguine, or pasta of your choice
2 tablespoons olive oil
¾ pound hot Italian sausage, casings removed
½ cup diced shallots
1 tablespoon finely minced garlic
½ teaspoon red pepper flakes
¼ teaspoon dried fennel, crushed
¼ teaspoon dried oregano
2 cups sliced crimini or button mushrooms, roughly chopped
1 28-ounce can crushed Roma tomatoes
2-3 pinches sugar
2-3 sprigs fresh thyme
fresh grated parmesan cheese

Boil the pasta for approximately 8-10 minutes in heavily salted water until al dente. Drain the pasta and reserve ¼ cup of the starchy water that the pasta was cooked in.

While the pasta boils, heat a large skillet with the olive oil over medium-high heat. Add in the sausage and use a wooden spoon to crumble up the meat while it’s browning. Cook until the sausage is no longer pink (about 1-2 minutes) and add the shallots, garlic, pepper flakes, fennel, oregano, and mushrooms. Sauté the items together for another 1-2 minutes.

Add tomatoes with its juices and bring to a boil. Add the sugar, thyme and lower the heat to medium-low. Use the wooden spoon to crush and break apart any large pieces of tomatoes. Allow the items to simmer for 8-10 minutes. Remove the thyme sprigs.

Toss in the cooked/drained linguine, coating the pasta well. If you want a looser based sauce, add a tablespoon at a time of the starchy pasta water until you reach your desired consistency. Season with additional kosher salt and black pepper as needed. Plate the pasta and cover each dish with freshly shaved parmesan.

Enjoy!


Seafood · Sponsored

Pan-Seared Mahi Mahi with Coconut-Cilantro Rice

Pan-Seared Mahi Mahi with Coconut-Cilantro Rice

So here’s the problem I have after EVERY Thanksgiving.

Do I now try to eat lighter the weeks leading up to Christmas to make up for the gazillion calories I inhaled during Thanksgiving weekend?

Or………

Do I not let leftovers go to waste and continue on with the turkey, potatoes, casseroles, mac n’ cheese, and desserts until they’re all gone?

First world problems.

Pan-Seared Mahi Mahi with Coconut-Cilantro Rice

Eh….let’s be honest. I’m going to continue shoveling in the last of the leftovers and THEN jump over to something lighter and easy to whip up.

Which works out fantastic because our friends at The Saucey Sauce Co. had sent me a care package awhile back with a variety of yummy goodness that can be used as ready-to-go sauces or marinades. They’re a family owned group (yay for family!) that base many of their products on their Asian/Vietnamese heritage. You can find them at their online store but they’re also branching out across the country to some great retailers!


photo-1

I love using the sauces to marinade chicken breasts and fish because it’s all ready to go. I’ve also tossed some chicken wings in rice flour, deep fried it and then tossed them in their Sweet Ginger Sauce — so good!


Pan-Seared Mahi Mahi with Coconut-Cilantro Rice

I happened to pick up some gorgeous mahi mahi fillets while at the store because they looked wonderfully fresh and I like the “heartiness” of the fish. When I got home, I grabbed my trusty bottle of Spicy Garlic Sauce and added some lime zest and ginger for a bit more brightness. (On a side note, I always add a bit of additional fresh herbs or other aromatics when using bottled products. I think it greatly enhances the flavor and adds that needed zing.)

After coating the fish with the marinade, I placed it in the fridge for about an hour so that it could work its magic.

Saucey-sauce magic.


Pan-Seared Mahi Mahi with Coconut-Cilantro Rice

Once the fillets have had its fill of magic, I pan-seared the fish on a screaming hot cast iron skillet to get that super crunchy skin. And like I said on the Pan Seared Black Cod post, do not — and I mean DO NOT, try to flip the fish before it’s ready. It’ll let you know when the time is right when you can slide a spatula underneath it.

Trust me.

To serve with the mahi mahi, I made a fragrant coconut-cilantro rice. The recipe below tells you how to make it on the stove but if you have a rice cooker, just throw it all in machine and let it do its thing.

The fish turned out so delicious! The mahi mahi was able to soak up the slightly sweet, slightly spiced marinade but it wasn’t overpowering at all. And you can definitely use any other fish of your choice if mahi mahi isn’t your thing.

The perfect, easy, scrumptious weeknight meal.

And as always, much thanks to our friends at The Saucey Sauce Co.!!

_________________________________________________

Pan-Seared Mahi Mahi with Coconut-Cilantro Rice
Serves 2

Ingredients:

½ cup The Saucey Sauce Company’s Spicy Garlic Sauce
1 teaspoon finely minced fresh ginger
2 teaspoons fresh lime zest, divided
2 mahi mahi fillets, skin-on, de-boned (5-6 ounces each)
1 cup uncooked jasmine rice
½ cup coconut milk
3/4 cup coconut water (or water)
2 tablespoons minced fresh cilantro
pinch kosher salt
2 tablespoons vegetable oil
whole cilantro leaves and lime wedges for garnish

In a shallow dish, whisk the Spicy Garlic Sauce, ginger and 1 teaspoon lime zest together. Place the fish in the dish and coat both sides. Cover the dish with plastic wrap and marinate for 45-60 minutes in the refrigerator. Take out of the refrigerator about 10 minutes before cooking to take the chill off.

While the fish marinates, prepare the rice. Combine the rice, coconut milk, coconut water (or water) and salt in a heavy bottom pot. Bring the liquids to a boil and then lower the heat to a gentle simmer. Cover the pot and allow to cook for 18-20 minutes. Remove the pot from the heat with the cover still on and allow to sit for about 5 minutes. Once the time is up, add the cilantro and remaining lime zest. Using a fork, fluff the rice and set aside.

Choose a skillet that can handle a high level of heat (ie. cast iron, stainless steel, etc.) Heat the skillet over high heat so that it becomes screaming hot. Once it reaches the desired temperature, add the oil and swirl it around the skillet. Carefully place each fillet, skin side down into the oil. Using a spatula, gently press down on the fillets so that they don’t curl up on the sides. Cook the first side of the fish for about 3 minutes — depending on the thickness of the fillets. Be careful not to flip the fish before the skin has crisped up and formed a crust. Once the first side has cooked, about 2/3 way through, flip and cook for an additional 2 minutes.

Remove the fillets from the skillet. Use paper towels to gently blot any excess grease off of the fillets and plate on two separate plates. Add a large scoop of the rice on each plate and top each fillet and rice with the fresh cilantro leaves. Serve each plate with a piece of lime wedge that should be squeezed over the fish before eating. Serve warm.

Enjoy!


 **Disclosure: I did receive products from The Saucey Sauce Co., but as always, my opinions are my own.**

Desserts/Pastries

Peanut Butter Cream Pie

Peanut Butter Cream Pie

Wait, wait, wait – hold up!

Did I really suggest Thanksgiving dessert ideas yesterday and NOT include anything with chocolate?????

Quick! Someone check my temperature!


Peanut Butter Cream Pie

But fear not, dear friends. There’s still PLENTY of time to make this luscious Peanut Butter Cream Pie and your loved ones won’t even know it was a last minute addition.

Because it’s a known fact that Peanut Butter and Chocolate are a match made in heaven.

Foodie Heaven.


Peanut Butter Cream Pie

I had actually made this beauty a few weeks ago when one of my besties and I had gone over to a friend’s for dinner. Because I can never go to someone’s house empty-handed, I offered to bring a dessert and turned to this fabulous pie courtesy of Joy the Baker.

Instead of the graham crackers that the recipe calls for, I opted for Oreo cookies because mo’ chocolate is always mo’ better! As for the filling, you can’t beat the light, fluffy, peanut-buttery center that is then layered with whipped cream. And to go that extra bit over, top it with whatever your heart desires! I kind of went to infinity and beyond by topping the pie with a drizzle off melted chocolate, crushed salted peanuts, itty-bitty mini chocolate peanut butter cups AND chopped up chocolate covered pretzels.

Yea….I have no self control.

Want the recipe? It can found in Joy the Baker’s new book, Homemade Decadence. Or, you can find it HERE at the Candid Appetite’s site.

So once again, HAPPY THANKSGIVING FRIENDS!!! And now, you have no excuse to leave out the chocolate 🙂

Vegetables/Vegetarian

Crispy Oven Roasted Herb Potatoes + Last Minute Thanksgiving Ideas

Crispy Oven Roasted Herb Potatoes


Goodlawd…..do I love me some potatoes. And in fact, my last meal that I request could possibly be a mountain of Mickey D french fries that is then washed down with a lovely bottle of vino.

I’m so classy.


Crispy Oven Roasted Herb Potatoes

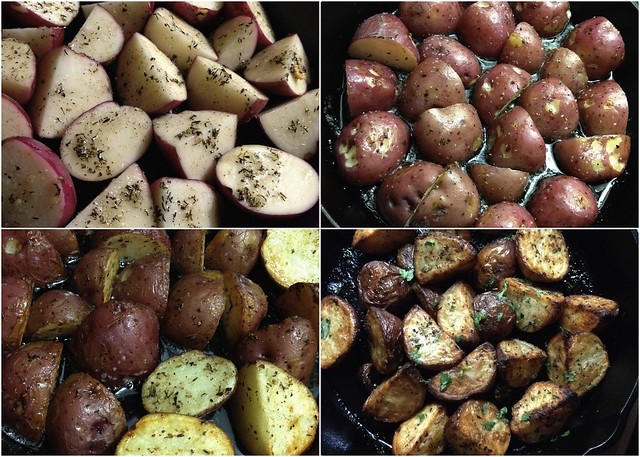
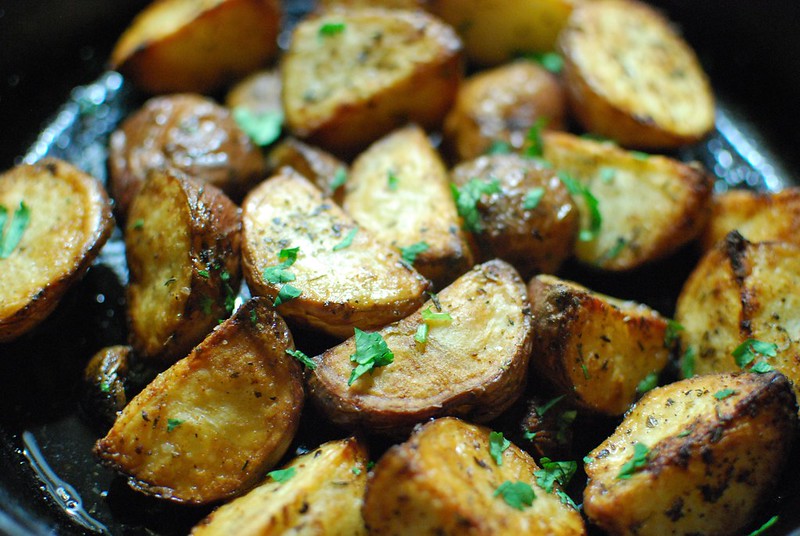
So naturally, I’m obsessed with these easy, crispy, oven-roasted herb potatoes.  They can be prepped in under 5 minutes and since they’re roasted in a hot cast iron skillet, they are wonderfully crispy on the outside and tender on the inside.

These little beauties are quite versatile as well. Perfect side dish for a brunch….low maintenance for a weeknight dinner….and fantastically delish to adorn your table for any special occasion/holiday – like Turkey Day!


Crispy Oven Roasted Herb Potatoes

And if you’re anything like me, you’re still trying to figure out what to make for Thursday. But worry not peeps, here are some great ideas if you’re stumped.

First off… Cocktails of course!

My recommendation to kick off the festivities – The Spiced Apple Pie

It’s made of apple cider, spiced rum, nutmeg and all other types of goodness that screams the holidays.


The Spiced Apple Pie

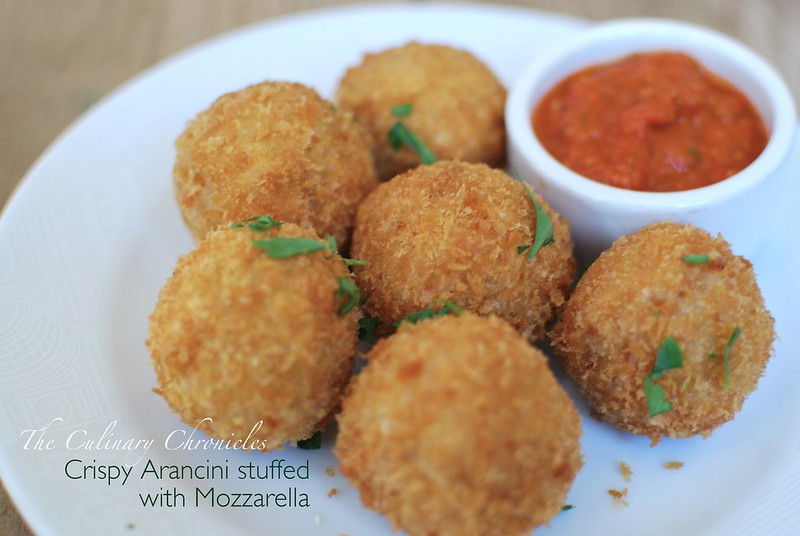
And if your family/loved ones are anything like mine, you’ll need to keep the Appetizers flowing before the masses get h’angry. So for your safety, make a double batch of these fab Crispy Arancini Stuffed with Mozzarella. They can also be made in advance and frozen until you’re ready to fry them up.

So. Dang. Addicting.


Crispy Arancini stuffed with Mozzarella

Next up… Bread time!!! Because in addition to potatoes, bread is my kryptonite.

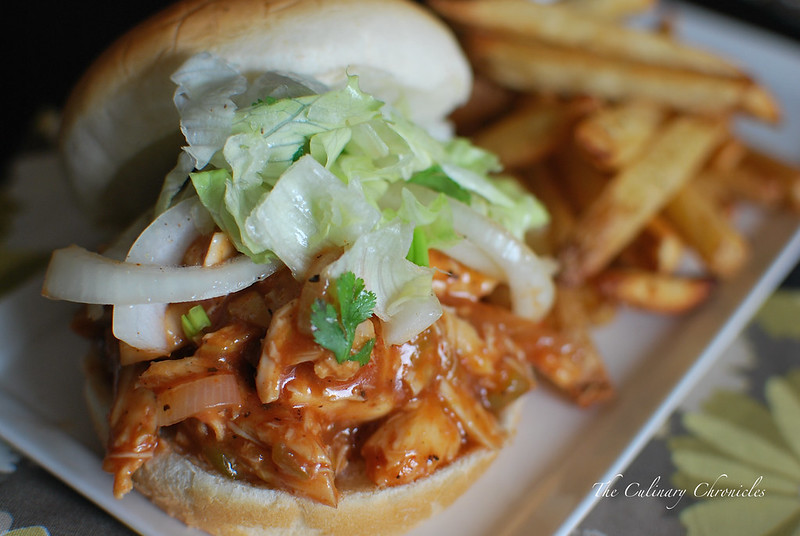
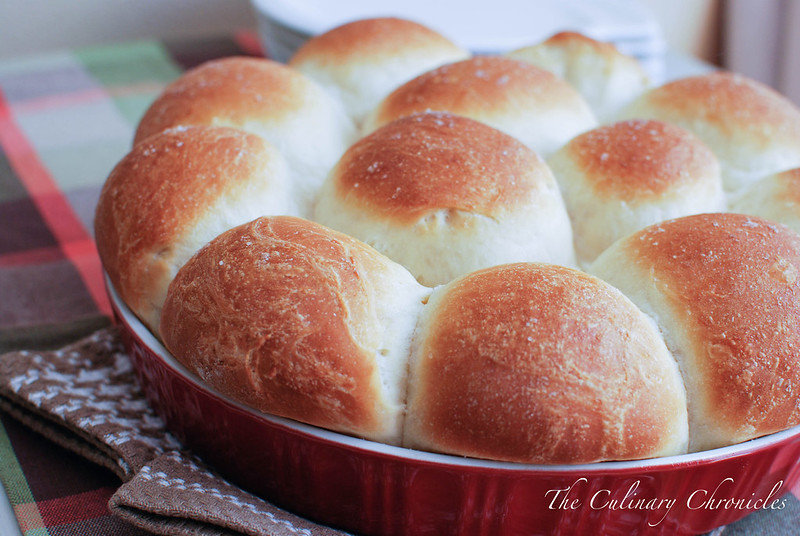
I’d recommend these Honey Yeast Rolls with Sea Salt. They’re fluffy, slightly sweet and if you happen to have a few leftover (which I doubt!), they make the perfect buns for sliders.


Honey Yeast Rolls with Sea Salt

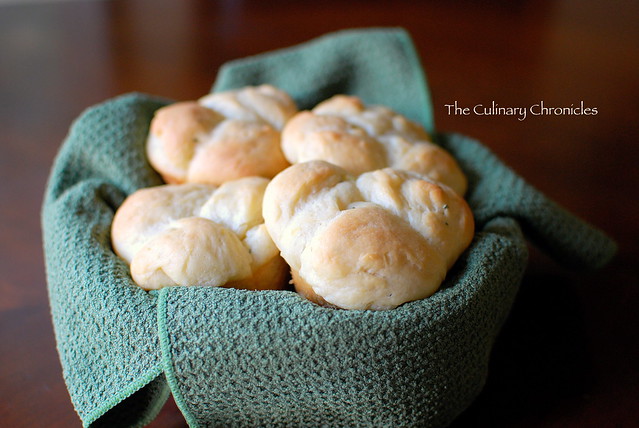
Another bread option would be Potato Rosemary Rolls which are the truth! Potatoes inside of bread?! Total no brainer. And trust me, your casa will smell like HEAVEN while they’re baking.


Potato Rosemary Rolls

How about a few Side Dishes?

Now I realize there are some people who don’t fancy mashed potatoes. Nobody I would trust, mind you. But for those folks (and for those who just like plenty of options), this Roasted Garlic Mashed Cauliflower will be a huge hit.


Roasted Garlic Mashed Cauliflower

And just in case your Thanksgiving table wasn’t decadent enough, this Lobster Macaroni and Cheese  not only kicks up a classic but it’ll have your guests giving thanks to YOU!


Lobster Macaroni and Cheese


At some point, you may want some greens. You know, because greens are good for you. And this Asian Pear and Gorgonzola Salad with Pomegranate Vinaigrette is not only good for you but will be gobbled up in heartbeat.


Asian Pear and Gorgonzola Salad with Pomegranate Vinaigrette

And now on to the Poultry.

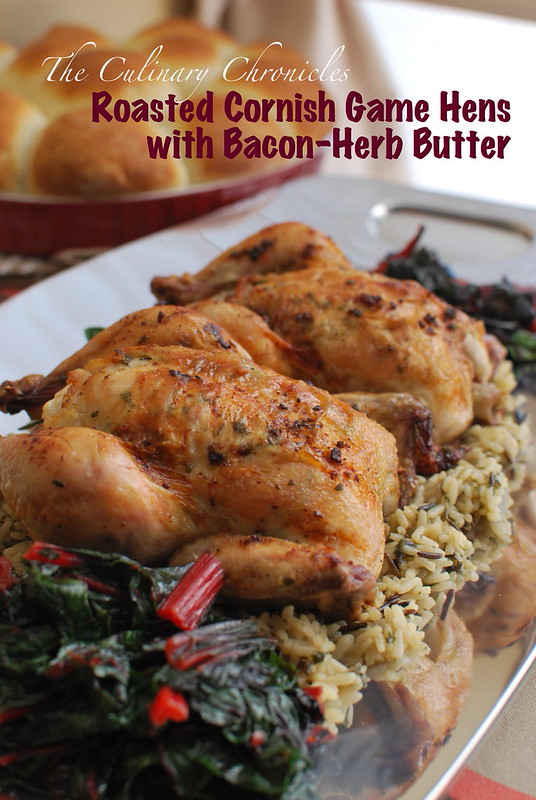
I totally get it. Fixing up an entire turkey can be a bit intimidating. But that’s no reason to totally nix a bird. These little Roasted Cornish Game Hens with Bacon-Herb Butter are a perfect alternative. Game hens cut your roasting time down to about an hour and the meat is wonderfully succulent and juicy.

Did I mention there’s bacon in it?


Roasted Cornish Game Hens with Bacon-Herb Butter

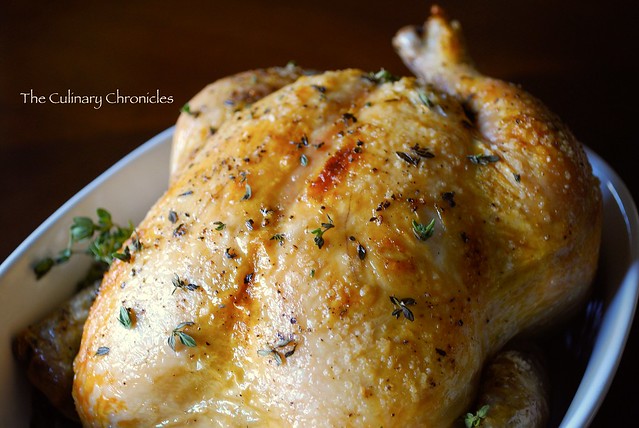
Or you could keep things really simple and opt for a traditional Roast Chicken. Because really, a beautiful roast chicken is bliss.

I almost always default to the grandmaster Thomas Keller’s method. Completely no fuss and I always get perfect results. Crispy skin, juicy meat.


Thomas Keller's Roast Chicken

And finally, Dessert.

Sure there’s apple pie, pumpkin pie (BLEH!) and yadda, yadda, yadda. But how about something a little different?

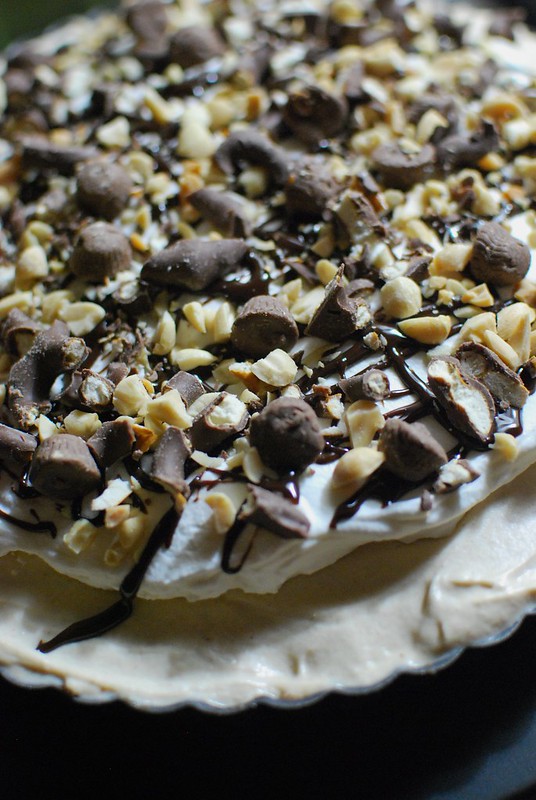
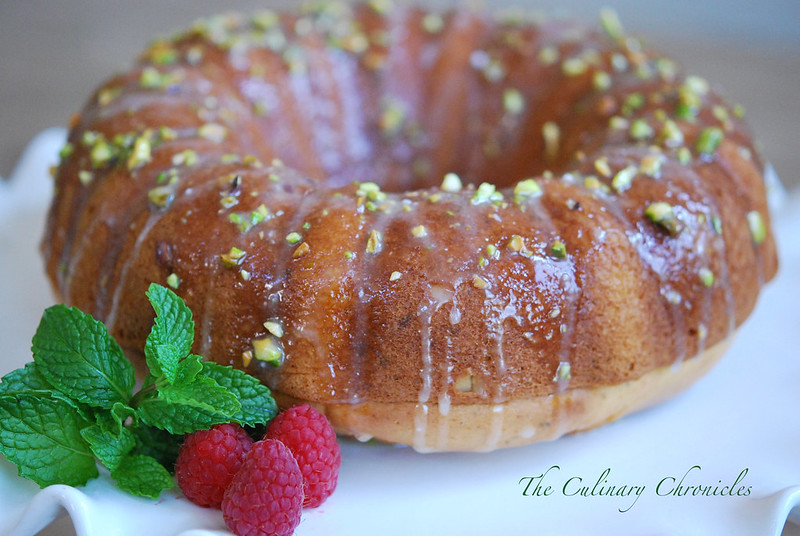
My Pistachio-Orange Blossom Cake would be a great finale to your Thanksgiving feast. The cake is light and gently perfumed with citrus. The crushed pistachio adds to the scent of the cake and it’s all topped with whipped cream and fresh berries.


Pistachio-Orange Blossom Cake

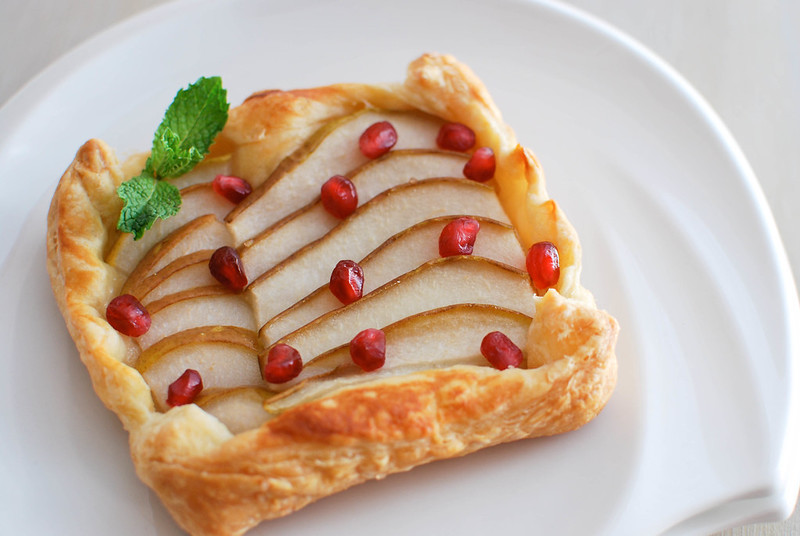
And because my family is never satisfied with just one dessert, these Pomegranate-Peart Tarts are just the ticket for a low fuss addition to the dessert buffet. Especially since you can cut corners by using pre-packaged puff pastry.

YES, PLEASE!


Pomegranate-Pear Tarts

Now, I’m officially starving…. But hopefully this gave you a few ideas to fill your menu for Turkey Day.

And from my tummy to yours – I wish you and your loved ones a wonderfully delicious and comforting Thanksgiving!

____________________________________

Crispy Oven-Roasted Herb Potatoes

Ingredients:


2 pounds small Yukon gold or red potatoes, washed and dried
¼ cup melted butter
2 tablespoons olive oil
½ tablespoon finely minced fresh rosemary
1 teaspoon fresh thyme
1 tablespoon minced garlic
¼ teaspoon red pepper flakes
kosher salt
black pepper
¼ cup chopped parsley
1-2 wedges lemon

Preheat your oven to 425 degrees F. Place a large cast iron skillet in the oven while it preheats. (If you do not have a cast iron skillet, you can use a sheet pan)

Depending on the size of your potatoes, cut them into halves or quarters so that they’re even sized. Place the potatoes in a large bowl and toss them with the melted butter, olive oil, rosemary, thyme, garlic and pepper flakes. Season them well with the kosher salt and black pepper.

Once your oven has reached temperature, carefully take out your cast iron skillet (be careful, it’s hot!). Spread the potatoes into an even layer and place back into the oven. Roast the potatoes for about 30-40 minutes until they’re crisp on the outside and tender on the inside when pierced with a paring knife. Be sure to flip the potatoes a few times during the roasting process to ensure even cooking.

Once done, remove the skillet from the oven. Toss the potatoes with the chopped parsley and squeeze fresh lemon over them. Enjoy!

*For some added zing, whisk in a few tablespoons of Dijon mustard into the melted butter before tossing them into the potatoes for roasting. YUM!*