Desserts/Pastries · Sponsored

Matcha Green Tea Cheesecake

Matcha Green Tea Cheesecake
If you’ve been with me for awhile then you’re probably familiar with my family’s obsession with ALL things matcha green tea flavored. So when it comes to our celebrations, I’m constantly trying to think of different ways to incorporate the finely ground matcha green tea powder in our desserts

Matcha Green Tea Cheesecake
We’ve done…..

You’d think we’d be sick of it all by now—but of course, we can’t seem to get enough of it!

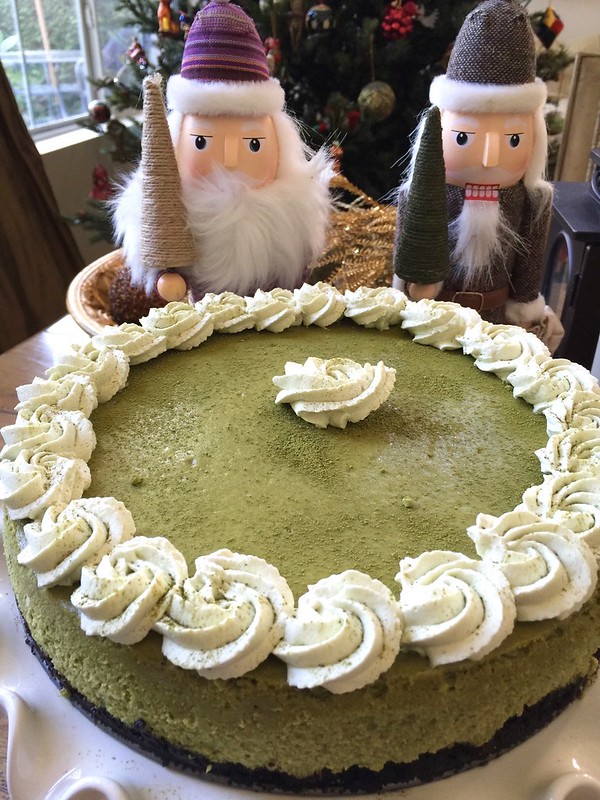
There are even some health benefits to matcha — high in antioxidants, can assist with your concentration and help to detox. And if you use it in baked goods like I do, it finishes into a beautiful green hue –perfectly festive for the  holidays.

Matcha Green Tea Cheesecake
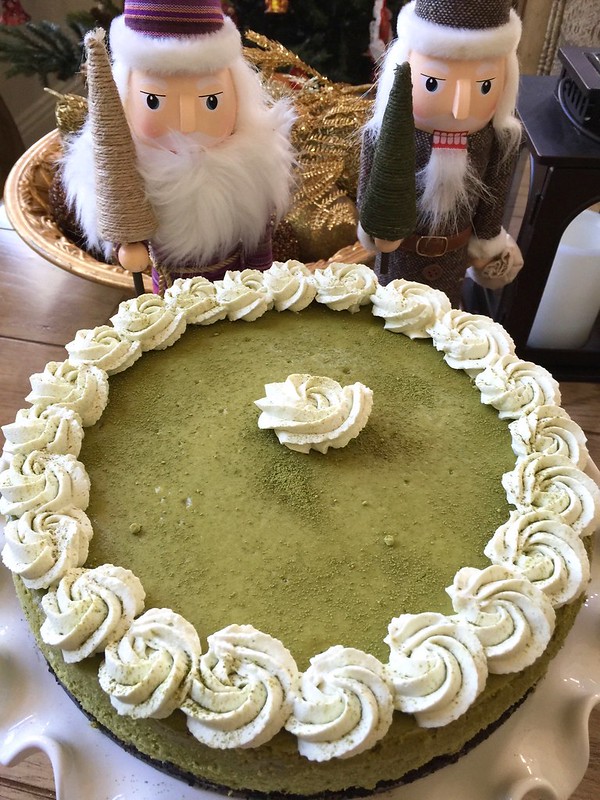
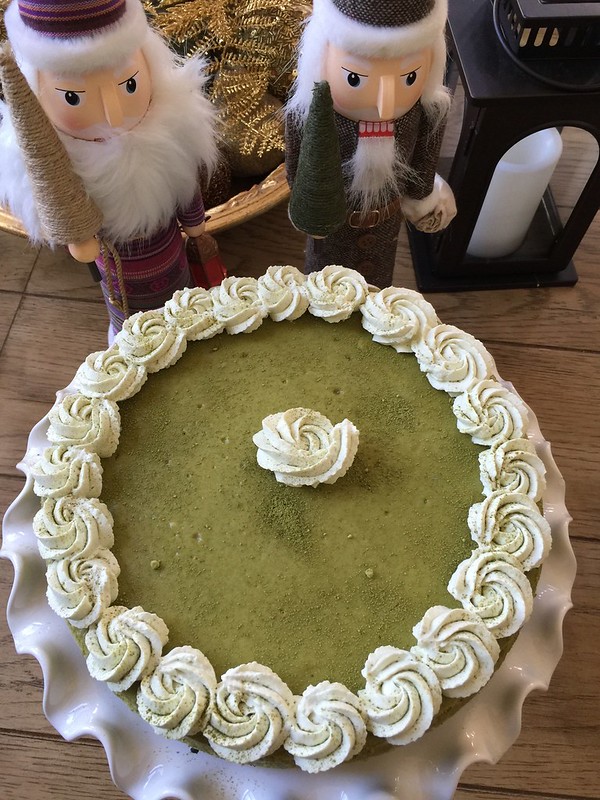
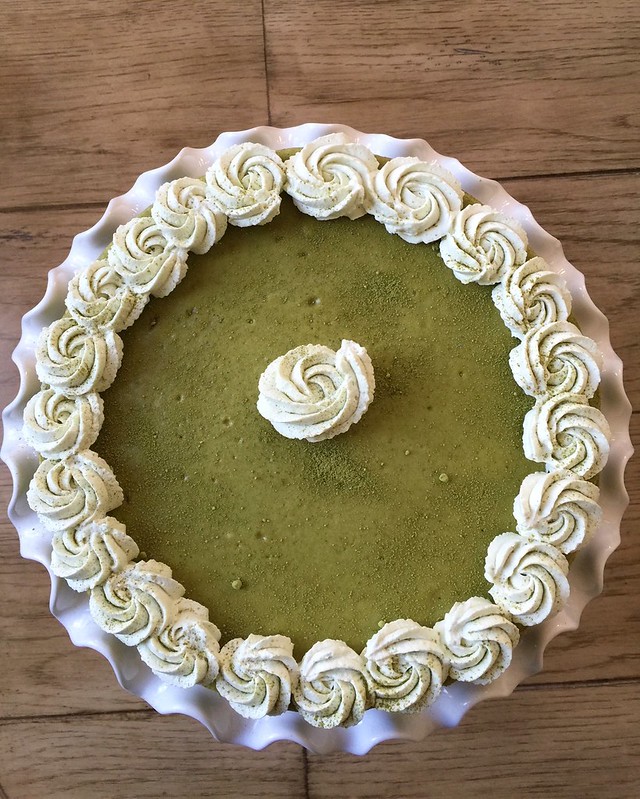
To close out my year as a Davidson’s Dozen, I thought I would take one of our favorite ingredients and combine it with their Safest Choice® pasteurized eggs. The end resulted in a rich and decadent Matcha Green Tea Cheesecake.

There are several different forms cheesecakes. Some are baked and some are unbaked like my Matcha Green Tea Icebox Cheesecake. There are fruit flavored, chocolate based and some are light and airy whereas others are rich and dense.

I generally prefer a denser texture –more along the lines of a New York style cheesecake –which is how this baked Matcha Green Tea Cheesecake was inspired by.

Matcha Green Tea Cheesecake

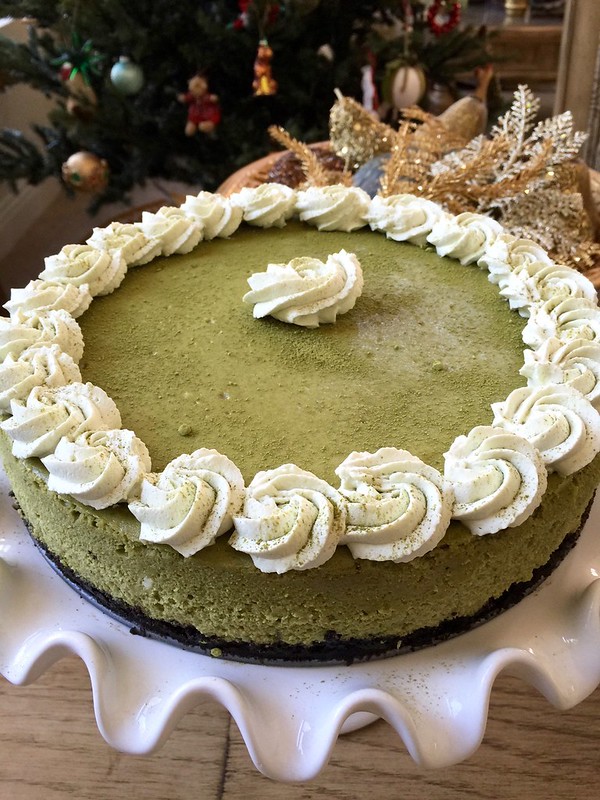
The crust of the cheesecake started off with chocolate sandwich cookies that I threw into the food processor — cream filling and all. Once the cookies were pulsed into the texture of sand, it’s then mixed with some melted butter and baked off in a springform pan for a few minutes to set.

The filling is a combination of cream cheese, sour cream (for that added bit of tang), sugar, Safest Choice®  Eggs, and a hefty dose of ground matcha green tea. Davidson’s Safest Choice® Pasteurized Eggs are all-natural, hormone and antibiotic free which all leads towards a delicious farm-fresh flavor. They give the cheesecake a smooth and creamy consistency that your loved ones will adore for the holidays.

The cheesecake is then baked in a water bath to provide moisture in the oven so that the top doesn’t crack. After chilling in the fridge overnight, it’s then topped with matcha flavored whipped cream. And I’ve got to admit–it tastes fantastic! Chocolate pairs especially well with matcha — the green tea is slightly bitter and balances the sweetness from the cake.

Matcha Green Tea Cheesecake

If you’d like the recipe for my Matcha Green Tea Cheesecake, click here. And if you need other delicious ideas for your holiday events, visit the recipe center at SafeEggs.com for cocktails, appetizers, entrees and desserts!

Happy Holidays!

Davidsons-Dozen-Blogger-Badge*DISCLOSURE: As a brand ambassador for the Safest Choice™ pasteurized eggs, I was compensated for the creation of this recipe and post. However, as always, all opinions are 100% my own.*

Desserts/Pastries

Thin Mints Chocolate Cheesecake ….Happy St. Patrick’s Day!

Thin Mints Chocolate Cheesecake

Yeah….I went there.

I just had to do it.

Thin Mints Chocolate Cheesecake

It wouldn’t be a Girl Scouts Cookies season if I didn’t bake something with them. I typically make some type of cupcake with the various cookies like my Thin Mints Cupcakes, Samoa Cupcakes, and Tagalong Cupcakes.

Thin Mints Chocolate Cheesecake

But this year, I wanted to change it up a bit. And since my siblings and I decided to pay tribute to the Emerald Isle for our Sunday Family Dinner yesterday, I knew I had to take the opportunity to use one of my favorites in our dessert– Thin Mints.

This time, in cheesecake form.

Thin Mints Chocolate Cheesecake

It all started with the crust that was made purely from melted butter and ground Thin Mints. Then, I took my standard cheesecake filling recipe and mixed it with melted dark chocolate. I poured a layer of the chocolate cheesecake filling over the crust and then sprinkled in mint & dark chocolate chips (more mint chip flavor, the better!). Another layer of the chocolate cheesecake filling gets poured on top and then a heavy sprinkle of chopped Thin Mints gets topped on that. The remaining chocolate cheesecake filling gets poured in and then it gets baked for about 50 minutes.

photo-61

Once baked, the cheesecake sets and ages overnight. And finally it all gets topped with mint scented whipped cream, even MORE Thin Mints and shamrock sprinkles. It is St. Patrick’s Day, after all!

Thin Mints Chocolate Cheesecake

This beauty was the perfect, decadent end to our Irish inspired Family Dinner. And although it was in honor of St. Patrick’s Day, it would be spectacular for any occasion—birthdays, holidays,…..or just because you’re a Thin Mints monster.

May the luck o’ the Irish be with you today—HAPPY ST.PATRICK’S DAY!!!!!!

____________________________________

Thin Mints Chocolate Cheesecake
Makes one 9-inch Cheesecake

Ingredients:

Crust:
11 ounces Thin Mints Cookies
3 tablespoons unsalted butter, melted
cooking spray

Filling:
8 ounces quality dark chocolate, roughly chopped
24 ounces cream cheese, at room temperature
¼ cup sour cream, at room temperature
1 cup sugar
3 large eggs
½ tablespoon vanilla extract
1 cup dark chocolate and mint chips (or other chocolate mint candies of your choice)
1 cup chopped Thin Mints Cookies

Mint Scented Whipped Cream:
1 cup heavy cream, chilled
2 tablespoons sugar
1 teaspoon mint extract.

Garnish:
Thin Mints Cookies
sprinkles
Preheat oven to 325 ˚F.

Prepare the crust. In a food processor, pulse the Thin Mints Cookies until they are well ground. Pour them into a bowl and mix them with the melted butter until moistened and resembles the texture of wet sand. Cover a 9-inch springform pan with cooking spray and press the crust mixture into the bottom of the pan and about one inch up the sides. Bake for 8-10 minutes until golden and cool to room temperature.

In a heatproof bowl, melt the chocolate in the microwave until smooth. Do this in 20 second intervals, stirring in between to ensure that you do not scorch the chocolate. Cool the chocolate mixture until room temperature.

Using a standing mixer fitted with the paddle attachment, whip the cream cheese and sour cream until its light and fluffy. Gradually mix in the sugar.  Mix in the eggs one at a time, beating well after each addition.  Add  the vanilla extract and melted chocolate. Mix until well combined.

Pour 1/3 of the filling over the cooled crust. Sprinkle the dark chocolate and mint chips over the filling before pouring another 1/3 on top. Sprinkle the chopped Thin Mints Cookies over the top and then cover with the remaining filling. Gentle rap the pan on the counter to release any air bubbles

Place the pan on the middle rack of the oven with a pan half full of hot water on the bottom rack of the oven. Bake for 50-60 minutes or until the center is set. Turn off the oven and allow the cake to sit in the oven with the door propped open for about 30 minutes. (To prop the oven door, I use a wooden handled spoon to keep it ajar a few inches). Remove from the oven and transfer to a wire rack.  Allow the cake to cool for an additional 30 minutes.  Wrap well with plastic film and foil. Refrigerate for at least 8 hours. Carefully remove the sides of the pan by running a hot knife around the outside of the cake.

When you are ready to serve, prepare the whipped cream. Using a standing mixer fitted with the whisk attachment, whip the chilled heavy cream on high until it just holds stiff peaks. Slowly sprinkle in the sugar until you reach a thick consistency. Add in the mint extract and whip until combined.

Pipe the whipped cream on top of the cheesecake and garnish with additional cookies and sprinkles. Enjoy!

Desserts/Pastries · Sunday Family Dinner

Matcha (Green Tea) Icebox Cheesecake

Green Tea "Icebox" Cheesecake

Have you ever made an icebox cheesecake? They’re actually quite easy and don’t require a finicky water bath. In lieu of eggs, the filling utilizes gelatin to help it set. The end results? Something quite light and fluffy that won’t leave you feeling too heavy at the end of the meal.

Green Tea "Icebox" Cheesecake

This particular icebox cheesecake is flavored with matcha– a finely ground green tea powder. It’s quite floral and has a slightly bitter taste which is why it pairs so well with the chocolate crust. Depending on the quality of the matcha that you use, you may want to add more than the recipe lists to oompf up the flavor.

My fam-bam are fans of green tea so we served big slices of this cheesecake with heaping scoops of green tea ice cream at our last Family Dinner. But if you prefer, you can serve it with dollops of fresh whipped cream or by itself.

Totally Oishii.

_________________________________________

Matcha (Green Tea) Icebox Cheesecake
Serve 8-10

Ingredients:

2½ cups chocolate cookie/wafer crumbs (I used Oreos)
1 cup + 1 heaping tablespoon sugar, divided
4 tablespoons melted butter
1¼ cups chilled heavy cream
16 ounces cream cheese, at room temperature
1 cup milk
1 tablespoon matcha (green tea) powder, more for dusting
2¼ teaspoons gelatin powder
¼ cup water

Preheat oven to 325 degrees F.

Cover a 10-inch springform pan with a light layer of cooking spray. Combine the cookie/wafer crumbs, 1 tablespoon sugar and butter until moistened and resembles the texture of wet sand. Press crumbs into an even layer on the bottom of the pan and up the sides. Bake for 10 minutes and allow to cool completely on a wire rack.

Using a standing mixer fitted with the whisk attachment, whip the chilled heavy cream on high until it just holds stiff peaks. Set the whipped cream aside.

Using a clean bowl, whip the cream cheese using the stand mixer fitted with the paddle attachment until light and fluffy. Gradually add in the remaining sugar, stopping every so now and then to scrape down the sides.

Heat the milk until it is hot but not boiling. Whisk in the matcha until full incorporated. Turn the mixer with the cream cheese on low and slowly stream in the cooled milk mixture. Mix until just combined.

In a small bowl, bloom the gelatin in the water.

Gently fold the whipped cream into the cream cheese mixture. Fold until just combined. Add the gelatin and gently fold in. *If the gelatin has hardened, microwave for 10 seconds until it becomes liquid again before adding into the cheesecake mixture.

Pour the cheesecake filling over the cooled crust. Cover with plastic wrap and refrigerate for at least 8 hours or preferably overnight.

Before serving, gently release the springform pan ring. Dust the top with additional matcha powder and serve.

Adapted from Dessert First

Desserts/Pastries

Fresh Strawberry Cheesecake…because it’s Leap Day!

Fresh Strawberry Cheesecake

It’s Leap Day-–so let there be Cheesecake!

Fresh Strawberry Cheesecake to be exact.

Fresh Strawberry Cheesecake

You may be wondering what Fresh Strawberry Cheesecake and Leap Year have in common. Not much really but I’ll take any excuse to indulge in something yummy and pretty 🙂

Happy Leap Day!

________________________________________

Fresh Strawberry Cheesecake

Ingredients:

Crust:
2½ Cups Graham Cracker Crumbs
3 Tablespoons Sugar
6 Tablespoons Unsalted Butter, melted

Filling:
24 Ounces Cream Cheese, at room temperature
¼ Cup Sour Cream, at room temperature
1 Cup Granulated Sugar
3 Large Eggs, at room temperature
¼ Teaspoon Cornstarch
2 Teaspoons Pure Vanilla Extract
Zest of 1 Lemon

Whipped Cream:
1 Cup Heavy Cream, chilled
2 Tablespoons Sugar

1 Pint Fresh Strawberries, washed and stemmed

Preheat oven to 325 ˚F.

Prepare a 9-inch spring form pan by wrapping the outside with 2-3 sheets of heavy-duty aluminum foil. Spray the inside of the pan with cooking spray. Combine the graham cracker crumbs, sugar and butter until moistened and resembles the texture of wet sand. Pour into the pan and evenly press the crumbs into the bottom of the pan and about one inch up the sides. Bake for 8-10 minutes until golden and cool to room temperature.

Using a standing mixer fitted with the paddle attachment, whip the cream cheese and sour cream until its light and fluffy. Gradually mix in the sugar. Mix in the eggs one at a time, beating well after each addition. Add the vanilla extract, lemon zest and cornstarch until well combined. Pour the filling into the cooled crust.

Place the springform pan in a large roasting pan on the middle rack of the oven. Fill the roasting pan with hot water to come halfway up the sides of springform pan. Bake for 50-60 minutes or until the center is set. Allow the cake to sit in the oven (heat turned off) with the door propped open for about 30 minutes. Remove from the oven and transfer to a wire rack. Allow the cake to cool for an additional 30 minutes. Wrap well with plastic film and foil. Refrigerate for at least 8 hours. Carefully remove the sides of the pan by running a hot knife around the outside of the cake. Carefully release the ring mold.

Prepare the whipped cream. Using a standing mixer fitted with the whisk attachment, whip the chilled heavy cream on high until it just holds stiff peaks. Slowly sprinkle in the sugar until you reach a thick consistency.

Arrange the whole strawberries on top of the cheesecake. Place a piping tip inside of a pastry bag and fill with whipped cream. Pipe decorative patterns of whipped cream on top of the cheesecake.

Desserts/Pastries

White Chocolate Raspberry Cheesecake

White Chocolate Raspberry Cheesecake

Forgive me. This is a HORRIBLE photo.

But the fact of the matter is, you wouldn’t forgive me if I didn’t share this with you. So after weighing out the lesser of two evils, I said— “LET THEM EAT (cheese)CAKE!”

I made this for our family Christmas party and amidst all of the cooking/baking, catching up with the fam, and partaking in holiday cocktails—I totally missed photographing this little number and only caught a quick pic on my phone. I know, I know. The same woman who makes her loved ones eat cold food because I have to take a hundred photos first, totally blew it. DOH!

But I think you’ll forgive me once you try this beauty. Creamy, dense cheesecake studded with white chocolate and swirls of raspberry puree. DEE-LISH. I chose to use ginger snaps for the crust as an homage to the holidays but you can definitely swap them out for graham crackers or even better–chocolate cookies!

Guess I’ll just have to make this again so I can snap some better photos.

Yup–It’s a difficult task but someone has got to do it.

_____________________________________________

White Chocolate Raspberry Cheesecake
One 9-inch cake

Ingredients:

Crust:
2½ Cups Ginger Snap Crumbs (or Graham Cracker Crumbs if you prefer)
3 Tablespoons Sugar
6 Tablespoons Unsalted Butter, melted

Filling:
24 Ounces Cream Cheese, at room temperature
¼ Cup Sour Cream, at room temperature
1 Cup Sugar
3 Large Eggs, at room temperature
¼ Teaspoon Cornstarch
2 Teaspoons Pure Vanilla Extract
6 Ounces White Chocolate, chopped

Raspberry Puree:
10 Ounces Frozen Raspberries
¼ Cup Granulated Sugar
¼ Cup Red Wine
Zest of 1 Lemon
Preheat oven to 325 ˚F.

Prepare the raspberry puree by placing all the ingredients in a small sized, heavy saucepan. Simmer on medium-low until berries have broken down and the wine has cooked off. Approximately 10-15 minutes. Transfer contents to a blender and puree until smooth. Strain through a sieve, using a rubber spatula to help press the puree through. Cover and set puree aside.

Prepare a 9-inch spring form pan by wrapping the outside with 2-3 sheets of heavy-duty aluminum foil. Spray the inside of the pan with cooking spray. Combine the ginger snap crumbs, sugar and butter until moistened and resembles the texture of wet sand. Pour into the pan and evenly press the crumbs into the bottom of the pan and about one inch up the sides. Bake for 8-10 minutes until golden and cool to room temperature.

Using a standing mixer fitted with the paddle attachment, whip the cream cheese and sour cream until its light and fluffy. Gradually mix in the sugar.  Mix in the eggs one at a time, beating well after each addition.  Add the vanilla extract and cornstarch until well combined.  Sprinkle the white chocolate over the cooled crust and pour the filling on top. Spoon dollops of the raspberry puree over the cheesecake. Run the tip of a pairing knife or a toothpick through the raspberry puree to create a marble effect.

Place the springform pan in a large roasting pan on the middle rack of the oven. Fill the roasting pan with hot water to come halfway up the sides of springform pan. Bake for 50-60 minutes or until the center is set. Allow the cake to sit in the oven (heat turned off) with the door propped open for about 30 minutes. Remove from the oven and transfer to a wire rack.  Allow the cake to cool for an additional 30 minutes.  Wrap well with plastic film and foil. Refrigerate for at least 8 hours. Carefully remove the sides of the pan by running a hot knife around the outside of the cake.

Serve with whipped cream and a drizzle of the remaining raspberry puree. Enjoy!

Desserts/Pastries

Key Lime Cheesecake

Key Lime Cheesecake

I know I always harp on about it.

But I freaking love citrus.

In the foods I cook/eat, beverages I like to drink, fragrances for my hand soaps and lotions, and even for decor.

I’m a Citrus-a-holic.

Key Lime Cheesecake

I know. I’ve got issues 🙂

Key Lime Cheesecake

Since Key Lime Pie ranks among one of my top favorite desserts, I wanted to take it’s bright flavors and marry it with one of my other favorite sweet treats—Cheesecake!

If you love citrus and limey things, this dessert is perfect for you! The tartness is fully pronounced but not overwhelming and the citrus-whipped cream is the ideal pairing.

As I mentioned in my post about Key Lime Pie with a Macadamia-Graham Cracker Crust, it’s tough work to squeeze the juice out of those little buggers! But Key Limes have such a distinct flavor that I didn’t want to substitute them with Persian Limes. Lucky for me, my sis had just picked up a bottle of pure Key Lime juice from Williams Sonoma. And since I was intent on packing in as much citrus flavor into this cheesecake as I could, I also used Key Lime Extract. (My sis had given me a bottle as a gift since she knows what a key lime freak I am!)

Key Lime Cheesecake

Sure, if you just “kinda” like the flavors of citrus, you could decrease the amounts of juice, zest, or extract. But what fun would that be?

I myself, just might even try to add more zest next time. 🙂

And with that my friends, thanks for reading and have a WONDERFUL MOTHER’S DAY WEEKEND!

__________________________________________

Key Lime Cheesecake
Makes one 9-inch Cheesecake

Ingredients:

Crust:
2 Cups Graham Cracker Crumbs
3 Tablespoons Sugar
6 Tablespoons Unsalted Butter, melted

Filling:
24 Ounces Cream Cheese, at room temperature
¼ Cup Sour Cream, at room temperature
1 Cup Sugar
3 Large Eggs, at room temperature
3 Tablespoons Key Lime Juice
2 Tablespoons Lime Zest
1½ Teaspoon Key Lime Extract

Whipped Cream:
1 Cup Heavy Cream, chilled
2 Tablespoons Sugar
1 Tablespoons Lime Zest
Preheat oven to 325 ˚F.

Combine the graham cracker crumbs, sugar and butter until moistened and resembles the texture of wet sand. Pour into a 9-inch springform pan and press crumbs into the bottom of the pan and about one inch up the sides. Bake for 8-10 minutes until golden and cool to room temperature.

Using a standing mixer fitted with the paddle attachment, whip the cream cheese and sour cream until its light and fluffy. Gradually mix in the sugar.  Mix in the eggs one at a time, beating well after each addition.  Add the lime juice, lime extract and zest until well combined.  Pour the filling over the cooled crust.

Place the pan on the middle rack of the oven with a pan half full of hot water on the bottom rack of the oven. Bake for 50-60 minutes or until the center is set. Turn off the oven and allow the cake to sit in the oven with the door propped open for about 30 minutes. (To prop the oven door, I use a wooden handled spoon to keep it ajar a few inches). Remove from the oven and transfer to a wire rack.  Allow the cake to cool for an additional 30 minutes.  Wrap well with plastic film and foil. Refrigerate for at least 8 hours. Carefully remove the sides of the pan by running a hot knife around the outside of the cake.

When you are ready to serve, prepare the whipped cream. Using a standing mixer fitted with the whisk attachment, whip the chilled heavy cream on high until it just holds stiff peaks. Slowly sprinkle in the sugar until you reach a thick consistency. Add in the zest and whip until combined.

Pipe the whipped cream on top of the cheesecake and garnish with additional lime slices and zest.

Enjoy!