Vegetables/Vegetarian

Tacos de Papa {Crispy Potato Tacos}

Tacos de Papa

I have something spectacular for y’all to whip up for your Cinco de Mayo festivities tomorrow….

TACOS DE PAPA!!!!

Oh yes, you know you want it.

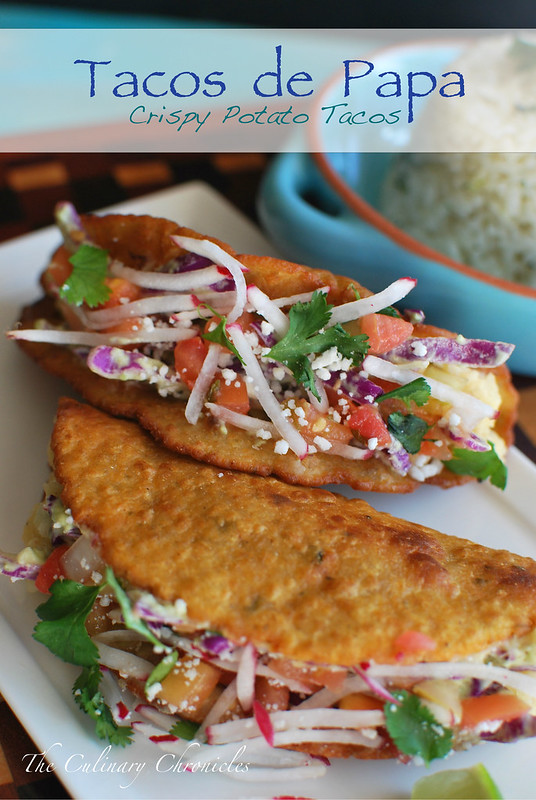
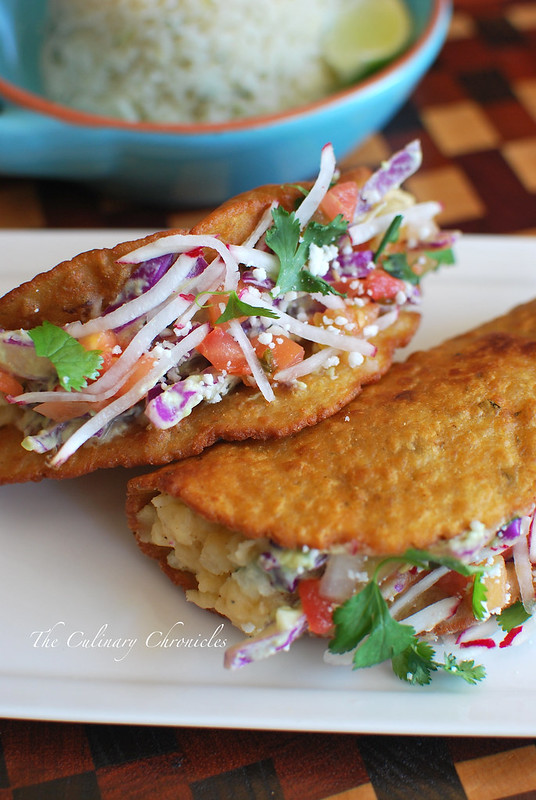
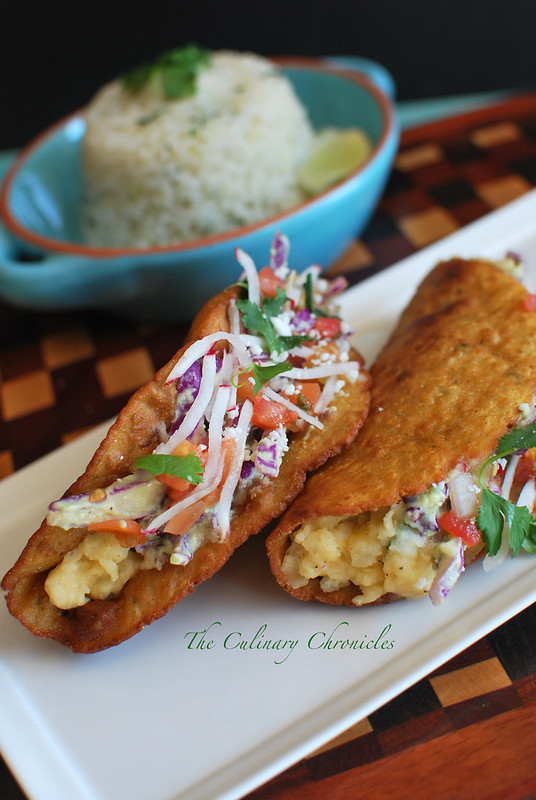
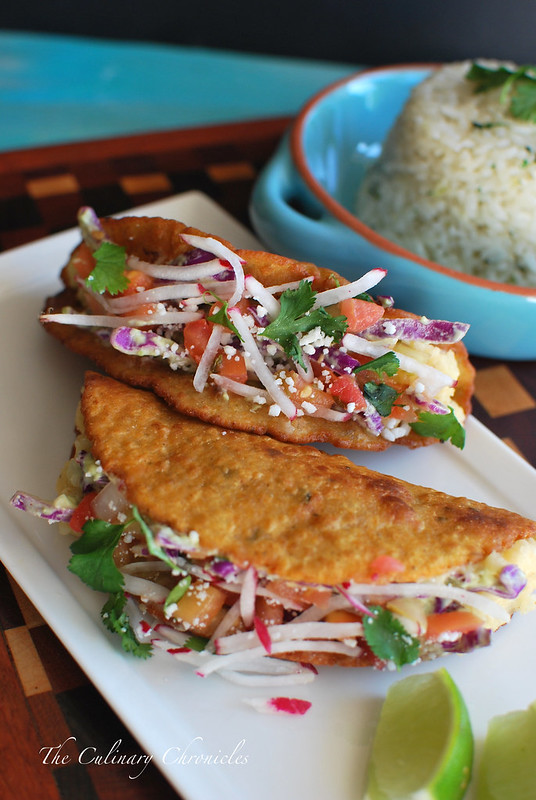
Crispy tacos filled with a spiced, cheesy-potato concoction and then topped with all kinds of perfect fixins’!

Tacos de Papa

Did you really expect anything less from this Potato-Monster?

I told you I love potatoes in all forms. And when you have a love for potatoes and an obsession with tacos, things like this are just bound to make its way into my kitchen.

Tacos de Papa

Though truthfully, the first time I tried Tacos de Papa, I wasn’t really a fan. It was a few years ago when I first moved to San Diego. I strolled into one of the nearby taquerias and saw a huge sign touting that they had the BEST Tacos de Papa around.

So of course, I had to order them.

Tacos de Papa

But when I took a bite….I was totally let down.

Essentially, it was just a taco filled with boiled potatoes with no spices. BLEH! How bland could you get? So naturally, I was hesitant to order them again.

Thankfully, I was at a small Mom and Pop spot a year or so later and saw a plateful of heaven being delivered to a table nearby. I was immediately struck by food envy and had to try it out.

Tacos de Papa

This time around, these Tacos de Papa were a whole different story. The filling were a cheesy, mashed potato with Latin spices. Now this was what I had hoped for the first time around.

And since then, I make them all of the time.

Tacos de Papa

They’re actually quite easy to make and can be topped with any of your favorite fixins’. You can even doctor up leftover mashed potatoes for a quick meal. Though, I don’t know about you, but I rarely ever have leftover mashed taters.

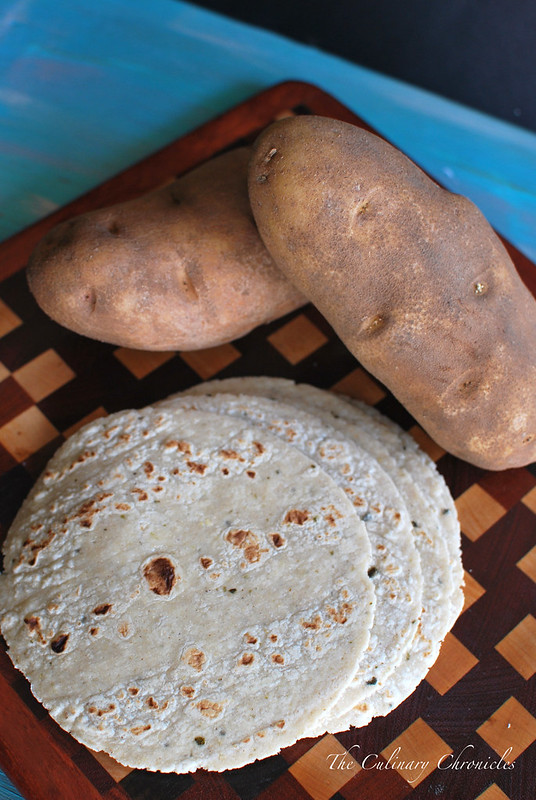
For extra credit, I like to fry up my own crispy taco shells. They tend to have a better texture with just a little bit of extra effort. Though, store-bought is just fine as well.

Tacos de Papa

Looking for other menu ideas to go along with Tacos de Papa for your Cinco de Mayo menu? How about:

Turkey and Peppers Tacos
Fish Tacos with Avocado-Slaw
Grilled Shrimp Tacos with Spicy Avocado Crema
Roasted Poblano Guacamole
Oven-Roasted Tomato Salsa
Fresh Corn Pico de Gallo
Tortillas de Harina
Blended Mango Margarita
Blood Orange Margarita

Have a Happy Cinco de Mayo!

_______________________________________
Tacos de Papa {Crispy Potato Tacos}
Serves 2

Ingredients:

Avocado-Cabbage Slaw
1 cup ripe avocado, diced
¼ cup Mexican crema or sour cream
¼ cup fresh cilantro, chopped
½ jalapeno pepper, finely diced and seeded
1 tablespoon lime juice
½ tablespoon agave or honey
kosher salt
pepper
2 cups shredded cabbage

Filling:
kosher salt
1 large Russett potato, washed, peeled, cubed
3-4 whole garlic cloves
1 cup shredded cheddar or Monterey Jack cheese
½ teaspoon ground cumin
¼ teaspoon chili powder
¼ teaspoon cayenne powder
½ teaspoon onion powder
¼ cup Mexican crema or sour cream
¼ cup chopped scallions
2 heaping tablespoons minced fresh cilantro
black pepper

Other:
4 crispy taco shells (store bought or homemade)
½ cup diced tomatoes
¼ cup radishes, cut into matchsticks
2 heaping tablespoons Cotija cheese
¼ cup cilantro leaves
lime wedges
hot sauce or salsa of your choice
Prepare the Avocado-Cabbage Slaw. In a blender, puree the avocado, crema, cilantro, jalapeno pepper, lime juice and agave until smooth. Season with salt and pepper. In a large bowl, toss the cabbage with a few spoonfuls of the avocado puree until lightly coated. Cover the bowl with plastic wrap and refrigerate.

Prepare the potato filling by bringing a medium sized pot of water to a boil. Add ½ tablespoon kosher salt, potatoes and garlic cloves. Lower the heat to medium. Boil the potatoes until they are tender—about 20 minutes. Drain the pot and add the cheese, spices, and crema. Using a potato masher, mash the items until they are smooth. Stir in the chopped scallions and cilantro. Season with additional salt and black pepper as needed. Set aside.

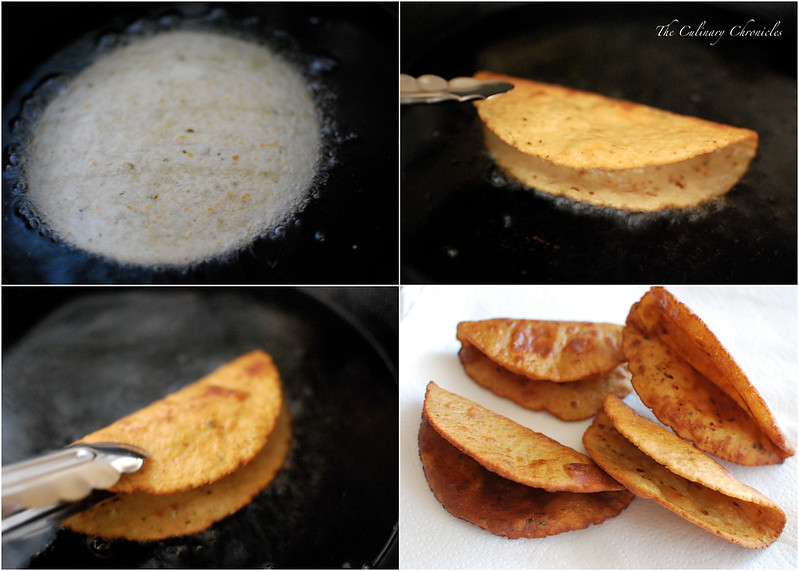
If you’re frying your own taco shells, pour vegetable oil into a deep pan until it is about ½ an inch deep. Heat the oil to medium Taking one tortilla at a time, fry on each side. Once it becomes golden, take tongs to fold the tortilla in half and hold it in place until it becomes crispy and takes on the shape of a taco. Fry until golden brown and drain on a plate covered with paper towels. Continue until all the shells have been made.

Assemble the tacos. Take one crispy shell and fill it with a quarter of the potato mash. Top with spoonfuls of the Avocado-Cabbage Slaw. Top with the tomatoes, radishes, cilantro and a sprinkle of the Cotija cheese. Continue until all the tacos have been assembled and serve with lime wedges, pico de gallo, hot sauce, etc.

Breakfast/Brunch · Sponsored · Vegetables/Vegetarian

Coddled Eggs with Pesto and Potato-Parsnip Purée

Coddled Eggs with Pesto and Potato-Parsnip Puree

We’ve officially entered “shower” season. And by that, I don’t mean April Showers but Wedding Showers and Baby Showers!

My next two months will be weekends filled with shower games, presents galore, tea sandwiches, little bite sized desserts, and sparkling cocktails (I hope!).

Coddled Eggs with Pesto and Potato-Parsnip Puree

What can I say? Love is in the air and my dear friends and loved ones have a lot to be celebrating over these next few months.

So for my latest contribution to Safest Choice™ Darling Dozen, I thought I would make something that would go well on a menu for both bridal and baby showers.

Coddled Eggs with Pesto and Potato-Parsnip Puree

I’ve always been a huge fan of choosing brunch to host parties and celebrations. It’s the perfect time of day where you can serve a variety of foods to please all palates. A few desserts, sandwiches. croissants, scones, preserves, charcuterie boards, and of course–there has to be eggs!

And these adorable coddled eggs served in mason jars will be an absolute hit at your showers.

Coddled Eggs with Pesto and Potato-Parsnip Puree

They start with a luscious, smooth layer of a potato-parsnip purée….which truthfully, are one of my faves these days. They’re a bit lighter than traditional mashed potatoes but are just as delectable.

Next, comes a layer of savory, herbaceous pesto. And c’mon now–who doesn’t love pesto? But for this particular dish, it really does add some much needed brightness to offset the rich, coddled egg and purée. You can also add some sauteed greens as well.

Finally, the whole thing is topped off with a beautiful egg. Heaven.

Coddled Eggs with Pesto and Potato-Parsnip Puree

Your guests will just love these little jars when served. The yolks are unctuous and runny — perfect to dunk toasted little soldiers into. And since Safest Choice™ uses an all-natural egg pasteurization process to eliminate the risk of salmonella, feel at ease when serving them to mamas-to-be.

Want to find out more about their pasteurization process? Click here

Coddled Eggs with Pesto and Potato-Parsnip Puree

These little cuties can be assembled hours before your parties (even the night before!) to give you even more time to spend with your guests.

Adorable? Check! Easy to assemble? Check! Delicious? Check!

Sounds like a slam dunk dish to me. Happy Shower Season, Friends! ❤

______________________________________________________________

Coddled Eggs with Pesto and Potato-Parsnip Purée
Serves 4

Ingredients:

kosher salt
½ pound russet potatoes, peeled and cut into 1 inch chunks
1 medium sized parsnip, peeled and cut into 1 inch chunks
¼ cup heated heavy cream
2 tablespoons unsalted butter, room temperature, divided
1 teaspoon garlic powder
black pepper
4 tablespoons pesto
4 large Safest Choice™ pasteurized eggs
sea salt flakes
chopped parsley
serve with soldiers or other bread of your choice

Prepare the potato-parsnip purée by bringing a medium sized pot of water to a boil. Add ½ tablespoon salt, potatoes and parsnips. Boil until they are tender—about 20 minutes. Drain the root vegetables and either run them through a food mill or ricer. Stir the hot heavy cream, 1 tablespoon butter, and garlic powder into the potato-parsnip mixture. Season with additional salt and black pepper as needed. Set aside.

Take 4 small mason jars or ramekins and use the remaining butter to grease the inside of each jar. Divide and spoon the potato-parsnip purée into the bottom of each of the jars. You can also use a small piping bag to do this. Spread one tablespoon pesto on top of each potato-parsnip purée and then carefully top each with an egg.

Fill a large pot with about 2-3 inches of water and bring to a simmer. Place a steam rack inside of the pot of water and carefully place the filled jars/ramekins on top. Cover the pot and steam the eggs for 8-10 minutes until the whites are set but the yolks are still soft. Alternatively, if using mason jars, screw on the lids of each jar and place directly into the pot to simmer for about 10-12 minutes. If the jars/ramekins that I’m using aren’t very high, I prefer to place them on top of a steam rack.

Once done, top each coddled egg with sea salt flakes and chopped parsley. Serve with soldiers or other bread of your choice.

NPE_DarlingDozenBadges

*DISCLOSURE: As a brand ambassador for the Safest Choice™ Darling Dozen, I was compensated for the creation of this recipe and post. However, as always, all opinions are my own.*

Breakfast/Brunch · Pizzas · Pork · Sponsored

Potato-Egg-Prosciutto Pizza

Potato-Egg-Prosciutto Pizza

The thing is, I rarely ever have any true vested interest with the Super Bowl. Because although my beloved Vikings may be full of heart, we don’t seem to be able to get our act together to make a showing in the big game.

Well, not since the 70’s at least. Ughh…..

Potato-Egg-Prosciutto Pizza

But that’s not to say that I don’t love to partake in all the Super Bowl festivities.

And by festivities, I mean gluttonous food and adult beverages. Hey, it would be un-American not too!

My loved ones and I typically like to get our Super Bowl parties started early so we can have a full day of indulgence. To kick-off the AM shenanigans, I wanted to come up with something that married the spirit of brunch and football. And what does that better than gorgeous eggs and pizza?!

Potato-Egg-Prosciutto Pizza

Which is fantastic because I’ve been tapped this year to be one of the twelve ambassadors for Safest Choice™ Darling Dozen and thought it was the perfect time to whip up a few recipes featuring their delicious and all natural pasteurized eggs.

I’ve sung their praises before but you can rest easy when using their eggs since their pasteurization process eliminates salmonella. Check out more healthful info about their eggs here.

Potato-Egg-Prosciutto Pizza

In my opinion, this pizza really does have all the necessary components for a savory brunch.

Cheese? CHECK!

Potatoes? CHECK!

Runny eggs? CHECK!

Pork? CHECK!

It even has some greens to make us feel a little better.

A Win-NGUYEN for sure….even if my Vikings don’t. Bleh….

___________________________________________________

Potato-Egg-Prosciutto Pizza
Serves 2

Ingredients:

1 whole garlic head
2 tablespoons olive oil, divided
1 cup thinly sliced new potatoes
½ tablespoon minced fresh rosemary
1/8 teaspoon red pepper flakes
¾ teaspoon kosher salt, divided
6 ounces fresh pizza dough, rested and at room temperature
2 tablespoons all-purpose flour
½ tablespoon corn meal
2 large Safest Choice™ pasteurized eggs
1/8 teaspoon black pepper
2 thin slices prosciutto, torn into small pieces
2 ounces goat cheese
1 cup fresh arugula leaves

Prepare the garlic paste by preheating the oven to 400 degrees F. Peel and discard the outer skin from the garlic head. Cut off the very top part of the garlic head so that the cloves are just barely exposed. Place the garlic head on a piece of aluminum foil and drizzle 1 tablespoon of olive oil over it. Bunch the foil together to cover the garlic and roast for about 30 minutes until the cloves are golden brown. Once cooled, squeeze the cloves out of their skins into a small bowl. Using a fork, mash up the garlic so that it becomes a paste. Set aside.

While the garlic roasts, mix the potato slices, rosemary, pepper flakes and ½ teaspoon kosher salt in a small bowl. Set aside.

Once the garlic has roasted and has been removed from the oven, turn up the oven heat to 500 degrees F. Place a baking sheet on the middle rack of the oven while it preheats.

Take the pizza dough and flatten it with your hands on a floured surface. Use a floured rolling pin to gently roll the crust about 1/8 of an inch. Transfer the rolled out dough to a pizza paddle or lightly floured cutting board. Spread a thin layer of the roasted garlic over the entire pizza dough. Place the potato slices, slightly overlapped, over the top of the pizza. You’ll want to leave two small spaces uncovered where the eggs will rest.

Carefully remove the preheated baking sheet from the oven and sprinkle it with the cornmeal. Slide the pizza onto the baking sheet and bake for 20 minutes. Take the pizza from oven and crack 1 egg into each of the predetermined spots. Place the pizza back into the oven and bake for another 5-7 minutes or until the eggs have set and the crust has become golden brown.

Slide the pizza onto a large cutting board and season with the remaining kosher salt and black pepper. Top with the prosciutto pieces, goat cheese and arugula. Serve immediately.


NPE_DarlingDozenBadges

*DISCLOSURE: As a brand ambassador for the Safest Choice™ Darling Dozen, I was compensated for the creation of this recipe and post. However, as always, all opinions are my own.*


Appetizers/Small Plates · Beef · Sunday Family Dinner

Papas Rellenas – Cuban Potato Balls

Papas Rellenas - Cuban Potato Balls

Not gonna lie….I could really use a Papas Rellena right now.

Or two, or three—okay….probably 4. Well, for now at least.

We made Papas Rellenas {Cuban Potato Balls} for our June Sunday Family Dinner as an homage to Porto’s Bakery. Papas Rellenas are incredibly addictive crispy, mashed potato balls that are stuffed with a savory meat filling. At Porto’s Bakery, they fill their Papas with ground beef, veggies, and spices.

Papas Rellenas - Cuban Potato Balls

I had stumbled upon a wonderful recipe for Papas Rellenas from Jonathan over at The Candid Appetite. If you haven’t seen his site, you must check it out. But be warned, whether you read it on a full stomach or not, his posts will leave you drooling!

As for the Papas, not only was his post incredibly informative but his step by step photos were gorgeous! I was so inspired that I had to try and take pics along the way as well. Clearly mine weren’t nearly as stunning but let’s just go with it.

On to the Papas!

After washing, cubing and boiling a ton of potatoes–smash them up to smithereens! Then, get started on the aromatics.

Papas Rellenas - Cuban Potato Balls

You’ll want the aromatics nice and fine. Throwing them into a food processor will definitely make life easier but if you’re a glutton for punishment, take a chefs knife and go at it!

After you pulse each item, you’ll want to drain it through a very fine sieve to get rid of any excess liquid. Sound crazy? Nope, it’s brilliant.

Papas Rellenas - Cuban Potato Balls

After everything is prepped, begin browning the beef in a large skillet. I drain the liquid from the beef before adding in the chopped onions and garlic. Once the onions become translucent, add the red and green peppers into the party.

Papas Rellenas - Cuban Potato Balls

Once the filling has been seasoned and cooked down, you’re ready to start assembling. Lucky for me, I enlisted the help of my niece, Nini, to join the Papas Rellenas Assembly Line. She also served as the hand model for the next series of photos.

Huh…what if this is the catalyst to her budding Hand Modeling career? Um, don’t tell my sister.

Papas Rellenas - Cuban Potato Balls

Back to the Papas……

To get uniformed potato balls, grab an ice cream scoop. Porto’s Bakery make their Papas Rellenas quite large but I opted for a smaller size for a 1-2 bite. Using the gadget of your choice, scoop out a dome of the cooled mashed potato mixture.

Papas Rellenas - Cuban Potato Balls

Using the palm of your hand, try to flatten it out into an even round—about 1/4 – 1/3 inch thick.

Papas Rellenas - Cuban Potato Balls

Place a heaping spoonful of the cooled filling in the center of the potato.

Now let me warn you, despite what every fiber in your body says–DON’T OVER STUFF them! If you do, they won’t seal properly and things will get down right wonky.

Willy Wonky!

Papas Rellenas - Cuban Potato Balls

Carefully fold the sides over the filling.

This is where you’ll kick yourself if you overfill it.

Papas Rellenas - Cuban Potato Balls

Then gently roll it into an even, smooth ball.

Papas Rellenas - Cuban Potato Balls

Once all the potato balls have been filled, start the 3-step process to bread them.

Flour. Egg Wash. Bread Crumbs.

Papas Rellenas - Cuban Potato Balls

After the Papas have chilled for several hours, it’s time for a 3-5 minute “soak” in an oil jacuzzi that’s been heated to 375 degrees F until they’ve become golden brown.

Bada-Bing! Bada-Boom!

That’s it!

On a random note (as if I wasn’t random enough), my other niece, Nina, took over hand modeling for the “completed” Papas pics. What can I say? I’m prepping the kids for the Hand Modeling Olympics.

Papas Rellenas - Cuban Potato Balls

These Papas Rellenas can be served at room temp with a sprinkle of freshly chopped cilantro & a few lime wedges. You can also serve them with a Mojo dipping sauce or by itself.

And the kicker? They can definitely made in advance and frozen so that you can fry them whenever you get a Cuban Hankering! So double the recipe! You’ll thank me…..or maybe you should thank Jonathan since it’s his recipe 🙂

Want to know how to make these golden delicious Papas Rellenas? Pop on over to here.

HAPPY FRIDAY, FRIENDS!

Appetizers/Small Plates · Pork

The Ultimate Baked Potato Dip for Game Day!!

The Ultimate Baked Potato Dip

Man, oh man—I’m ready for some football!

And pizza….and hoagies…and dip…and nachos…and wings…and cocktails…and……..

Yea…I’m ready for a lot of goodness!!!

The Ultimate Baked Potato Dip

If you’re looking for some ehr-my-gawd deliciousness to whip up for Game Day, you’re going to LOVE this Ultimate Baked Potato Dip.

This crowd pleaser is jammed pack with your classic baked potato toppings and is just begging for a crunchy ‘tater chip to scoop it all up. And once your peeps take a bite, they will be so overcome by your awesomeness that they’ll be wearing jerseys with your name on it and cheering you on for days. True Story.

Need some more ideas for game day? Check out these goodies here

Laters, Taters!

________________________________________

The Ultimate Baked Potato Dip

Ingredients:

24 ounces sour cream
1 packet ranch dressing mix
½ teaspoon black pepper
½ teaspoon paprika
¼ teaspoon cayenne powder
1-2 tablespoons hot sauce
1 heaping cup chopped scallions
1½ cups shredded sharp cheddar cheese
½ cup shredded pepper jack cheese
1½ heaping cups chopped crispy bacon

In a large bowl, stir together the sour cream, ranch dressing mix, pepper, paprika, cayenne and hot sauce until combined. Fold in the scallions, cheeses, and bacon. Cover and refrigerate for a minimum of 4 hours.

15 minutes before serving, remove from the refrigerator and stir to take off some of the chill. Garnish with additional cheese, scallions and serve with your choice of chips. Enjoy!

Side Dish · Vegetables/Vegetarian

Korokke (Japanese Potato Croquette)

Korokke (Japanese Potato Croquette)


Okay….my first confession with this is that I had no intention of writing a post about this.  These Korokke were a result of me rummaging around the fridge one day, extremely hungry and wanting to find something quick to make. And then I stumbled upon a tupperware of leftover mashed potatoes—-something I RARELY have leftovers of. I am, after all, a Potato Monster .

I quickly decided upon fixing up some Korokke to eat along side some eggs……a Japanese “hashbrown” if you will. Super quick to make (especially if using mashed potatoes) and delish when lightly flavored with some curry powder. I often order it as a side dish when I’m having ramen for that added bit of texture and crunch.

Then I thought…..there must be tons of potato monsters out there, right? It was decided—I HAD to share my Korokke with you.


Korokke (Japanese Potato Croquette)

My second confession is that I got a little OCD when forming the potato patties. Usually I just free form them in my hands but I suddenly got it into my head that I was going to use my cookie cutters to get more uniformed shapes. Yeah…I have issues.

If you’re a normal person—just go with forming oval patties out of the potato mixture. But if you’re a crazy food blogger like me, gently press the mixture into an even layer on a lightly floured surface.  Then, use a cookie cutter or biscuit cutter to make your shapes.  Trust me….either way results in a crispy and delish potato croquette. 🙂

Potato Monster signing off!

_____________________________________
Korokke (Japanese Potato Croquette)
Makes approximately 4 croquettes

Ingredients:

2 Cups Mashed Potatoes (or boil and mash 2 large potatoes)
1/2 Teaspoon Curry Powder
1 Egg, lightly beaten
1/2 Cup Flour
1 Cup Panko Bread Crumbs
Salt and Pepper
Oil for frying

Heat oil in a skillet to 350 degrees F.

Thoroughly combine the potatoes and curry powder. Season with salt and pepper. Plate the beaten egg, flour, and panko in 3 separate, shallow dishes.

Using the potato mixture, form patties. This can be done by free forming them in your hands or by the cookie cutter method described above. Carefully coat each patty in the flour and gently shake off excess. Dip patty into the egg and then cover in the panko bread crumbs. Use the tips of your fingers to gently press the crumbs into the patty.

When the oil reaches temperature, fry the patties on each side until golden brown—about 2-3 minutes on each side. Remove from skillet and drain on paper towels. Serve immediately with tonkatsu sauce or sauce of your choice.

Breads · Side Dish

Potato Rosemary Rolls

Potato Rosemary Rolls


Ever since I saw these Potato Rosemary Rolls from Two Peas and Their Pod, I just had to have them.

The only reason I waited so long to make them was because I never had extra mashed potatoes on hand—and they are a key component to these whimsical little rolls. But as soon as I got my hands on some, I was all over it!

And although my rolls didn’t turn out half as pretty as theirs (how did they make their clovers so perfect?!) they were delicious! Soft, fluffy, and slightly sweet. The only note I would make was that it took 90 minutes for the dough to double in size during the first proofing—twice as long as the recipe stated. But that always seems to be an issue I have.  🙂


Potato Rosemary Rolls


You’ll just love how your home will smell when these rolls are baking. Just heavenly! And they are just divine right out of the oven—-is there anything better than hot freshly baked bread?

_____________________________________

Potato Rosemary Rolls
From Two Peas and Their Pod

2 1/2 teaspoons of yeast
1/2 cup warm water
3/4 cup shortening
½ cup granulated sugar
2 large eggs, beaten
1 cup mashed potatoes
1 cup scalded milk
5 cups all-purpose flour
1 teaspoon salt
2 tablespoons fresh rosemary, finely chopped

1. In a small bowl, put the yeast in the warm water and stir with a spoon. Let sit for about five minutes or until the yeast starts to bubble.  Scald the milk and let it cool for two minutes.

2. In a large bowl, mix together sugar, shortening, and salt. Add the milk and stir in one cup of the flour. Next, add the yeast mixture and the beaten eggs. Add the mashed potatoes and rosemary and stir. Stir in the remaining flour until the dough comes together.

3. On a lightly floured surface, knead the dough until smooth, about 5 minutes. If the dough is too sticky, add a little more flour. Place the dough in a large greased bowl and let rise in a warm spot for about 45 minutes or until doubled in size.

4. Punch down the dough. To form the rolls, pinch off about a 1/2 tablespoon of dough and roll into a ball. Place three balls into a greased muffin tin. Continue forming rolls until dough is gone. Let the rolls rise until doubled in size, about 30 minutes. Bake rolls at 375 degrees F for about 15-17 minutes or until golden brown. Remove from oven and serve warm.

Makes about 30 rolls