Breakfast/Brunch

Avocado Toast with Smoked Salmon and Poached Egg

Avocado Toast
Early last Sunday morning I found myself rummaging around my seestrah‘s fridge for some breakfast inspiration. I wasn’t in the mood for a laborious dish because I was on the brink of h’angry……

And quite frankly, that’s not a pretty sight.

I ended up pulling out eggs and some leftover smoked salmon and guacamole from the night before. Yup, it was Avocado Toast time! How absolutely trendy of me.

Now usually, when I fix up some Avocado Toast, I smash up some ripe avocado and add a bit of spice. But seeing how I had some delish guac at my disposal, I opted for that route.

Avocado Toast
As for the egg, I had initially wanted to fry it up—I love the crispy edges. But this gal is a sucker for an oozy-goozy poached egg that essentially makes a sauce from itself once you break into it. So wonderfully divine, so deliciously decadent.

And before I even had a chance to take a proper pic on a camera (instead of my phone), I had gobbled it all up.

Oh well, guess I’ll have to make it again to reshoot it.

Happy Saturday! ❤

_____________________________________________

Avocado Toast with Smoked Salmon and Poached Egg
Serves 1

Ingredients:

½ ripe medium sized avocado
½ teaspoon lemon juice
kosher salt
black pepper
red pepper flakes
1 slice bread, toasted
3 ounces smoked salmon
1 tablespoon white vinegar
1 large egg
chopped cilantro to garnish

In a small bowl, mash the avocado with the lemon juice, 2-3 pinches salt, 1-2 pinches black pepper and 1-2 pinches red pepper flakes. Spread the avocado mash (or guacamole if you have it) over the toasted bread and place the smoked salmon slices on top.

Fill a pot ¾ full of water and bring to a rolling boil. Pour in the vinegar and slightly lower the heat. Crack the egg into a small bowl. Take a spoon and swirl it around quickly in the pot to make a whirlpool in the water. Slowly pour the egg into the center of the whirlpool. The movement of the whirlpool will help the egg form but you can also use a spoon to help it along. After about 2-3 minutes, use a slotted spoon to remove the egg. Gently blot it dry with a paper towel and place on top of the toast.

Sprinkle the kosher salt and black pepper over the egg. Garnish with the chopped cilantro and serve immediately.

DIY

DIY Taco Seasoning Blend

Taco Seasoning Blend

Let’s talk about one of my favorite pantry staples — Taco Seasoning.

Taco Seasoning?

Yes! Taco Seasoning!

It’s one of the items I tend to grab for at least once a week. I use it to season all of my taco fillings, in fajitas or enchiladas, when I make huevos rancheros or chilaquiles — and even as a dry rub for chicken, pork, beef, or seafood before grilling it.

Heck– I’ll even throw in a few pinches when I’m scrambling eggs.

Totally versatile.

Taco Seasoning Blend
And if you’re like me, you grew up using the prepackaged envelopes of seasoning. Don’t get me wrong–that stuff’s delicious and completely nostalgic. But the problem I’ve always had is that although I would use the store-bought seasonings, I would still find myself adding cumin or smoked paprika or whatever it was to get the exact flavor profile I liked.

Which lead me to nix the whole thing and start making my own—-and that’s the beauty of homemade taco seasoning. You can add and omit whatever tickles your fancy.

I tend to lean towards a deeply smoky (hence the ancho and smoked paprika), earthy (which explains the heavy hand in cumin) and spicy (cayenne, smoked paprika, red pepper flakes) blend.

Taco Seasoning Blend
I do believe the variations in chili powders and paprikas add a complexity but if you don’t have all of the varieties on hand, just sub as needed (ie. replace standard chili powder for ancho). It won’t have the same flavor but it’ll still be dreamy.

You may also notice that the amount of salt I’ve listed below is fairly low compared to the other proportions–but keep in mind, you’ll likely be salting the rest of your dish at various times, so add accordingly.

If stored in airtight containers, the blend will last for several months–though I seem to end up making a new batch up every month or so. And because of this and the fact that it’s easy to double or triple the recipe, they’ll make for great gifts!

Happy Seasonings!

___________________________________

DIY Taco Seasoning Blend
Makes approximately 8 tablespoons
Ingredients:

½ tablespoon ancho chili powder
2 tablespoons chili powder
1 teaspoon paprika
1 teaspoon smoked paprika
¼ teaspoon cayenne powder
1 teaspoon red pepper flakes
½ tablespoon gochugaru (Korean red pepper powder), omit if you don’t have any
1 tablespoon cumin powder
¼ teaspoon turmeric powder
1 tablespoon garlic powder
1 tablespoon onion powder
2 teaspoons dried Mexican oregano
½ teaspoon garlic salt
½ teaspoon kosher salt
½ teaspoon black pepper

In a bowl, carefully whisk all the ingredients together until well incorporated. The blend can be used right away or stored in an airtight container for 5-6 months.

Desserts/Pastries

Nini’s Sweet 16 Surprise Party

Nini's Sweet 16

On Saturday we somehow managed to successfully throw my niece, Nini (aka Stephanie), a surprise Sweet 16 Birthday Party. It was quite a covert operation since the birthday gal lives in the house where the party was to be held and all of the decorations and prep items were hidden in various nooks and crannies.

But we pulled a fast one on her.

Nini's Sweet 16
It all actually started with her big seester – my eldest niece, Nina. We had been brainstorming ideas for her upcoming birthday but nothing stuck. At one point when Nini was out of the room, Nina suggested that we throw her a surprise party with all of her favorite things. What a good big seester!

Delish Food…..

Her Near and Dear Friends…..

Succulent Plants…..

All things Gold and Copper…..

Photo Booth…..

Her Fav Candies…..

Nini's Sweet 16

Come to think of it, I’m not sure if Nina had “family” on that list…but I’m going to say it was a given.

With a date and theme in mind, we were off to the races — full party planning mode.

Eldest seester gave the thumbs up to have the meal catered to give us a little breathing room. We brought in our local taco caterers who set a taco and nachos station in the backyard. The spread was full of pollo, carne asada, carnitas, bright yellow nacho cheese, guacamole, rice, beans and ALL of the fixings.

Nini's Sweet 16

This freed up our time a bit to focus on a dessert bar….because let’s face it, apparently we can’t throw a party these days without one.

Capitalizing on her recent macaron lesson with me a few weeks ago, Nina made a bunch of Matcha Macarons filled with Chocolate Ganache. Nini loves green tea and loves chocolate–and we all love macs so it was a no-brainer.

Eldest seestrah baked up several batches of New York Times Chocolate Chip Cookies –another one of the birthday gal’s favorites.

Nini's Sweet 16

The dessert bar included her favorites candies such as Peppermint Patties, Reese Peanut Butter Cups, Sour Gummy Straws and Red Vines that guests filled their goodie bags with.

As for me, I was tasked with the birthday cake (more on that later) and even whipped up a couple dozen cake pops at the last minute.

Nini's Sweet 16
And before we knew it, it was time for the birthday girl to come home to her party. I think you can tell from the look on her face below that she was truly surprised! Success!

Version 2

The night was filled with lots of food, laughter, a few games, LOTS of sweets, presents and endless–and I’m talking ENDLESS selfies!

Oh those teenagers….

We even set up a photo “booth” that was well taken advantage of by the dozens and dozens of teenagers. But get this—they would still take selfies while they were having their pictures taken! I kept asking if they wanted me to take the photos for them but they politely declined. Perhaps normal poses just aren’t cool…. I may never understand it.

Nini's Sweet 16

Let’s talk a bit about the cake.

For years, Nini has been obsessed with succulents —she’s absolutely nuts about them!  So when it came time to talk about cakes, the design choice was already made.

Which meant it was time to bust out the fondant. When I mold fondant decorations, I like to start at least a week out before the event to allow ample time for them to air-dry and harden a bit. This helps to keep the figures’ shapes as well as sets the color of the dye.

Below are a few of my previous fondant works:

Nini's Sweet 16
I’ve always kind of enjoyed playing with fondant—it’s essentially Play-Doh! I just wished it tasted better than it does but at least it’s fun to mold.

Nini's Sweet 16

My succulents were not 100% botanically correct, but I think they ended up pretty cute. In addition to coloring the actual fondant, I used powdered food color to paint the tips and edges of some of the leaves for some added depth.

Nini's Sweet 16

As for the cake itself, or “sponge”, I opted for a dense chocolate cake. For stacked cakes, I’ve always had issues with sponges that were too light (chiffon cakes, etc.) or if they were too moist. I find that they just don’t have the structure to hold up to the stacking weight which leads to a giant hot mess.

After the cakes were baked and cooled (I do this the night before I decorate the cake), it became time to level and tort them. And to be honest, this is my least favorite part. It’s tedious and time consuming but if you don’t do it properly, your cakes will be lopsided. Grab a handy leveler to help your cause out.

To fill and frost the cakes, I opted for the tried and true Swiss Meringue Buttercream. Not only is it delicious but it’s a good stable frosting. The layers were filled with a coffee flavored buttercream and the exterior of the cakes were frosted with vanilla buttercream to keep the color white.

Nini's Sweet 16

And if all goes well, all of your hard work and patience while torting will yield beautiful clean layers and lines in the cake.

Nini's Sweet 16

Once each cake layer was frosted and smoothed out, I placed the top tier slightly off centered for a bit of whimsy. I then took a Wilton 2A round tip to pipe an quick pearl pattern at the base of each tier.

Nini's Sweet 16
Next, as my seester said, came the fun part – figuring out the placement of the succulents. This is where I wanted to go a bit nuts and throw them all on. But my inner voice and my eldest seester talked me out of it.

Nini's Sweet 16
All in all, I was quite pleased with the final look of the cake and Nini really loved it –which if that doesn’t earn me the auntie of the year award, I don’t know what will……

Nini's Sweet 16
Happy Sweet Sixteen, Nini Love! ❤

Nini's Sweet 16

Sunday Family Dinner

Sunday Family Dinner with All of the Crew

December 2015 SFD
About two times a year we can wrangle all five Nguyễn siblings at our monthly Family Dinners. It’s not for lack of desire but with one brother in New York, one seester in San Francisco, two seesters in Orange County and me in San Diego–it can be a logistical nightmare.

But when it does happen, it’s chaotically wonderful.

December 2015 SFD

With all of the sibs in town last month, we managed to squeeze Fam Din in between our Cousin’s wedding, multiple Christmas parties, and the most important— the release of Star Wars.

All very, VERY important events for us.

I’m not kidding gang–although I was off from work for the last two weeks of December, I was up in Orange County the entire time with some type of event each day. Let’s just say, at the end of my vacation–I needed a vacay from my vacay.

December 2015 SFD

But back to our Fam Din!

We held it the next day after our younger cousin’s amazing wedding. He’s been like a little brother to the five of us so it was extremely special to witness his truly perfect day. And because we knew it was going to be a fantastic party, we planned ahead for a very low key but comforting menu for dinner.

A nod to rustic Italian and Tuscan fare.

December 2015 SFD
And since I’m me, I couldn’t resist snapping away at some pics of the fam bam. How often do I get all of my kiddos (minus the fur babies) in one shot?

This particular one is freaking hilarious. Maya, Lucas, Nini and Nina are pros having been subjected to my photo shoots every month but the youngest three munchkins’ faces below have me DYING!

Leonidas is rocking the ultimate pouty face.

Kaelani has the petrified “Is this really my family?!?!?” look.

And Luna is giving me the “Hurry up before I flip over!” face.

Classic.

December 2015 SFD

Then at some point, I channeled the inner prom-photographer in me and snapped a couple of the sibbies.

Representing Tustin…..

December 2015 SFD
Representing San Francisco…..

Wait! How did Kaelani sneak in this one?

December 2015 SFD
Representing New York…..

Or is technically Manhattan?

Um. You get the picture.

December 2015 SFD
And finally, Representing Fullerton…..

December 2015 SFD
Somewhere along the lines, my two eldest munchkins, who are now both taller than me, decided to lick my face.

Gross.

But I probably would have done the same to them. Where do you think they’ve learned it from?

December 2015 SFD
And since our Leo was turning four a few days later, we decided to make Fam Din into a little party for him.

How can he be four already?!?!?

December 2015 SFD
Before dinner, we snacked on an overflowing tray of Antipasti from a local Italian market named Claro’s. They’ve got tons and tons of wonderful imported goods as well as delish cold cuts, cheeses, olives, sandwich counter and plenty of premade dishes you can take home.

Below is their sampling of Asiago cheese, Gorgonzola, bocconcini, salami, prosciutto sticks, olives and cherry tomatoes.

December 2015 SFD
For the main course, we had Roasted Rosemary-Garlic Whole Chickens with new potatoes. Seester marinated the chickens overnight and roasted two of them in the oven and one outdoor in her rotisserie oven. You just can’t beat a wonderfully flavored, juicy roasted chicken.

December 2015 SFD
And you just can’t have an Italian menu without a big ol’ bowl of pasta.

I whipped up a ginormous bowl of Cacio e Pepe using bucatini pasta–because I adore bucatini.

Butter, black pepper, Pecorino, and Parmesan.

December 2015 SFD

Eldest seestrah made Souffle al Formaggio Facile – a Tuscan cheese souffle with mixed greens. We’ve never had an Italian dish like this but heck –how could you go wrong with a cheese souffle???

In fact, this would be a great brunch dish with perhaps a poached egg nestled on top of the greens.

December 2015 SFD

As for dessert, the birthday boy wanted Chocolate Cupcakes and what birthday boy wants, he gets. Well, at least with desserts that is.

Seester P recruited the little munchkins to help bake up a batch of chocolaty cuppies with chocolate frosting –using our go to recipe from Ina.

The kids loved helping out–especially since they got to pipe the frosting on top.

December 2015 SFD

I mean, c’mon. Look at that face.

Could anything be cuter????

December 2015 SFD

Okay…maybe these faces below.

Hey, it was his birthday– and the kid loves chocolate!

December 2015 SFD
And that friends, was only day 2 of my 14-day “vacation” in Orange County.

I’m still recovering. ❤

This Month’s Family Dinner Menu

Cocktails: Vino Galore!!!
Appetizers: Anitpasti – Asiago cheese, Gorgonzola, bocconcini, salami, prosciutto sticks, olives and cherry tomatoes
Entrees: Rosemary Garlic Roast Chicken, Roast Potatoes, Cacio e Pepe, Souffle al Formaggio Facile
Dessert: Rich Chocolate Cupcakes with Chocolate Buttercream

Drinks

Jingle Bell Juice – Happy Holidays!

Jingle Bell Juice

Admit it.

At some time in your life (most likely those college days), you guzzled more than a few red SOLO cups filled with “Jungle Juice”.

Don’t hide it…you know what I’m talking about.

Jingle Bell Juice

That ubiquitous red party “punch” that was likely served from one of those huge 5 gallon-orange-water cooler-dispensers.

And by “punch”, it was more like a red Kool-Aid and terribly cheap booze that tasted like a mix of some serious rubbing alcohol and turpentine.

GAG….

Jingle Bell Juice
But we drank it along with the throngs of other collegiate party go-ers because it was ridiculously cheap to make and it did the trick.

We weren’t so smart back then….

But it was fun.

Jingle Bell Juice
For the holidays, I thought it would be a hoot to make a vat of the stuff. But since I’m a big girl now–how about we class it up a bit?

Nothing overboard…just a smidgen. So what does that mean? Quality fruit juices, fresh citruses and top shelf booze. Trust me, it’s worth it.

And in case you’re worried–it still packs one heck of a punch so sip cautiously.

HAPPY HOLIDAYS FRIENDS! ❤

_______________________________
Jingle Bell Juice

Ingredients:

64 ounces cranberry juice
16 ounces pomegranate juice
12 ounces pineapple juice
8 ounces orange juice
4 ounces lemon juice
4 ounces lime juice
1 (750 milliliter) bottle top shelf vodka
16 ounces top shelf white rum
8 ounces Cointreau or other orange liqueur
2 large orange, sliced (more for garnish)
2 limes, sliced (more for garnish)
1 lemon, sliced (more for garnish)
1 cup mixed fresh berries (blackberries, cranberries, raspberries)
1 (750 milliliter) bottle chilled sparkling wine

In a very large vessel, combine everything but the sparkling wine. Stir well and refrigerate for 4-6 hours. Before serving, slowly stir in the sparkling wine. Garnish with extra slices of citrus. CHEERS!

Poultry

20-ish Minute Chicken Parmigiana

Chicken Parmigiana

A couple of days ago I was playing around with a variation of my tried and true marinara recipe. I didn’t really have any particular purpose for the marinara but just felt a tugging compulsion to make some.

So what does one do when one finds themselves with a pot full of wonderful sauce?

Make some Chicken Parmigiana, of course!

It also may have helped that I was scrolling through IG while the sauce was simmering and saw a rich plate of Chicken Parmigiana that someone had posted. And since I hadn’t made some in a very long time, I decided to put my newly made marinara sauce to some delicious use.

Chicken Parmigiana
Chicken Parmigiana
is typically breaded and pan fried. And although it’s delicious, that step does take some extra time and if you don’t serve it soon after it’s made, the crust can get soggy. Let’s face it–what’s the point of taking the extra effort to have a crispy crust/breading only to have it get all soggy?

So I usually just skip it!

I like to make a very simple and quick version of this Italian-American dish which makes it a perfect weeknight meal. After a quick browning in the skillet (since I nix the breading/frying), I smother the chicken in marinara (homemade or store bought) and cheese before it bakes for several minutes.

Chicken Parmigiana
Super easy, super quick!

The sauce seeps into the chicken while it finishes cooking in the oven so it’s wonderfully juicy and flavorful. Serve it alongside some pasta, potatoes, veggies or even in a sandwich and you’ll be all set!

You can also make a very large dish/tray of it to serve during the holidays. Since there’s no crust, you won’t need to worry about it getting soggy.

That’s totally NGUYEN-ing!

__________________________________

20-ish Minute Chicken Parmigiana
Serves 4

Ingredients:

4 skinless boneless chicken breast
1 teaspoon dried onion powder
½ teaspoon dried basil
½ teaspoon dried fennel seeds, crushed
½ teaspoon red pepper flakes
¼ teaspoon paprika
2 garlic cloves, minced
2 tablespoon lemon juice
zest of 1 lemon
kosher salt
black pepper
olive oil
2 cups marinara sauce (homemade or store-bought)
8 ounces fresh mozzarella, thinly sliced
¼ grated Parmesan
2 tablespoons chopped parsley


Preheat oven to 400 degrees F.

Using a kitchen mallet or bottom of a heavy pan, pound each of the chicken breasts to an even thickness. Place the chicken in a dish and add the onion powder, basil, fennel seeds, red pepper flakes, paprika, garlic, lemon juice and zest, ½ teaspoon kosher salt, ¼ teaspoon black pepper and 3 tablespoons olive oil. Flip the chicken around a few times to coat evenly.

Heat a large heavy bottom skillet with 2 tablespoons olive oil. Cook the chicken breasts over medium-high heat until golden—about 2 minutes each side.

Spread ½ cup marinara sauce on the bottom of a baking dish. Place the browned chicken breasts in the dish and top each breast with the remaining marinara sauce. Top each breast with sliced mozzarella and parmesan. Bake for 7-8 minutes until the chicken has cooked through and the cheeses have melted and browned. If needed, turn on the broiler briefly to brown the cheese.

Remove the dish from the oven and sprinkle the tops with chopped parsley. Serve warm.

Desserts/Pastries

Almond-Whiskey Chocolate Bites

Almond Whiskey Chocolates
Want to know the best way to win people over?

Almond Whiskey Chocolates

With Chocolates…..

And Booze……

But better yet– with Chocolate AND Booze!!!

Almond Whiskey Chocolates
When I saw Sprinkle Bakes’ post about 5-Minute Bourbon Balls, I knew they were in my future.

Almond Whiskey Chocolates
Heather’s
recipe contains just a few ingredients and can be whipped up in minutes. Melted chocolate, honey, vanilla wafers, walnuts, and bourbon…. YES PLEASE!

Almond Whiskey Chocolates

I followed her recipe fairly close but used almonds instead of walnuts (I’m not that much of a walnut fan) though I’m sure they would be SPLENDIFEROUS with hazelnuts or pistachios as well. I also added a few splashes of vanilla extract and used whiskey since I was out of bourbon.

Though…aren’t all bourbons whiskey? But not all whiskeys are bourbon?

I won’t mind if you use either….or both!

Almond Whiskey Chocolates

Since you do not add heavy cream or milk, these bites wouldn’t technically be a “truffle” but heck–they’re lovely nonetheless and require no baking at all. Which during the craziness of the season can be a much needed break.

Added bonus? They can be made well in advance!

Almond Whiskey Chocolates

I’ll be making a few more dozen of these little bites for my family’s Christmas shindig and think they’d be a great addition to your holiday celebrations!

For the original recipe, please click here.

Miscellaneous

My Fur Baby

Bella 8th Birthday
Alright y’all…

I don’t know how it happened–but somehow over the  years, I became THAT person.

Bella 8th Birthday

Maybe it’s because my human children are technically my nieces and nephews….

Perhaps it’s because my parents never allowed us to have pups as pets….

But somehow along the way I adopted a fur baby who sleeps in the bed, gets homemade treats, wears Yoda costumes & USC cheerleader outfits, has her paws & booty cleaned with baby wipes after every walk….and has birthday parties.

I know…I have issues.

So it’s no surprise that when my little puggle, Bella, turned 8 last week, we had a little puppy party at Fiesta Island Dog Beach with her buddies.

Oh yes… #SquadGoals

Bella 8th Birthday
Bo
(poodle-schnauzer mix)–her cuzzie and Aspen (also a puggle)–her boo, joined Bella for some birthday shenanigans. The pups spent 2+ hours running around galore while dipping their paws in the water.

Although the bday gal, who used to love to swim, only ran by the water line while she pranced around wearing her birthday bow. Apparently she couldn’t be bothered with swimming for fear that it would mess up her hair—I mean, fur.

Bella 8th Birthday

After all the running around, we went back to mi casa to give the pups a good bath. The below pic is of Bo and Bella sunning themselves after their baths.

Two things:

  1. Bella REALLY is my child. She loves lying around in the sun and napping;
  2. Please don’t judge how dirty the windows are. Wet puppy noses pressed upon the glass 24/7 makes it impossible to have clean windows.

Bella's 8th Birthday

After the baths and a bit of nap, it was time for Bella’s birthday cake!

Okay, okay…it’s less of a “cake” and more of a steak.

Bella 8th Birthday

Here’s the thing…up til her 5th bday, I really DID bake pupcakes for Bella.

Bella 8th Birthday

She gobbled them up–every year! But the girl LOVES meat. So a few years back, I nixed the PUPcakes and grilled her up a nice steak and shoved a candle in it.

It’s usually a grass-fed NY strip or rib-eye.

Don’t be jelly…it’s her birthday!

Bella 8th Birthday

Of course it was torture having to wait for me to light the candle and sing before she could inhale her steak.

And sometimes I even make her wear some ridiculous things.

She loves it!

Okay…she really hates it but the promise of steak is great motivation for her.

Bella 8th Birthday

Yes…I’m rather smitten with my puppy. But in my defense, it’s not just me.

A few days ago, big seestrah sent me the pic below. And yes, you’re seeing it correctly. Princess Leia has her own Christmas tree this year!

We’re a family of enablers.

Quite frankly, I wouldn’t have it any other way.

Leia

As for the birthday girl–

Well, let’s just say she partied like a Rock Star for her birthday and passed out all the next day. I tried to explain to her that the recovery time nearly doubles when we get older but she didn’t listen.

Oh well…we’ve all been there.

Happy Birthday, Bella-love ❤

Bella 8th Birthday

Sunday Family Dinner

Homemade Soup Dumplings & Tonkotsu Ramen–Because We’re Insane…

Nov 2015 Fam Din

It’s been two weeks since Thanksgiving and I think I’ve finally recovered from the madness.

Just in time for 15 full days of holiday craziness with my family.

Pray for me.

Nov 2015 Fam Din

At the close of Thanksgiving and 15+ hours of shopping, we held our monthly Family Dinner. When we had chatted about potential menu options a few weeks prior, my seesters and I agreed that we wanted dishes that were low-key and stress-free since we would have been so wiped out from Thanksgiving.

So obviously, we chose a menu that took hours and hours of preparation, that needed to be started days in advance and was highly laborious.

Apparently our strategy was slightly flawed.

We never learn…..

But as always, we started with some cocktails….. Pomegranate-Raspberry Saketinis!

I muddled a bunch of fresh raspberries with pomegranates in a pitcher. Added sake, a few glugs of vodka, several splashes of Cointreau, some fresh lime juice, pomegranate juice and then topped it off with a bit of pomegranate-berry soda.

Nov 2015 Fam Din

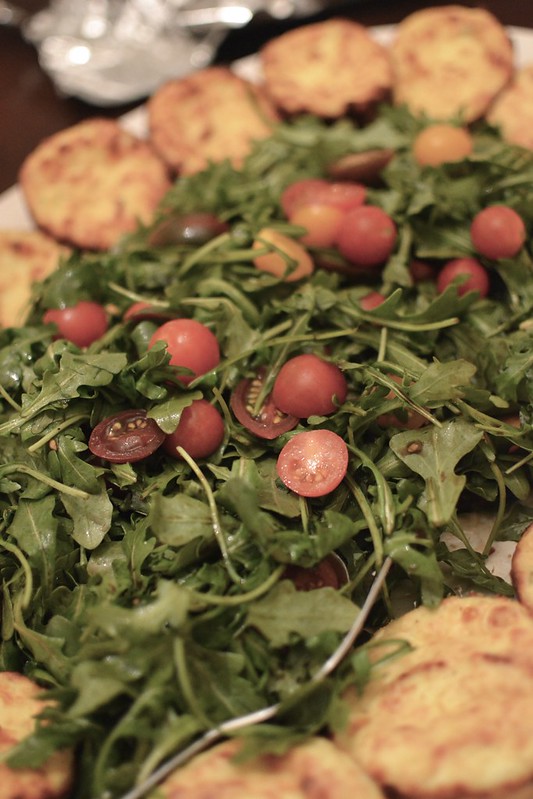
Then came the appetizers – Xiao Long Bao or “Shanghai Soup Dumplings”. Normally I would say that dumplings aren’t typically too difficult to make. In fact, I usually love making them and find the folding process rather relaxing.

Not these buggers! We’re all still traumatized!

Nov 2015 Fam Din

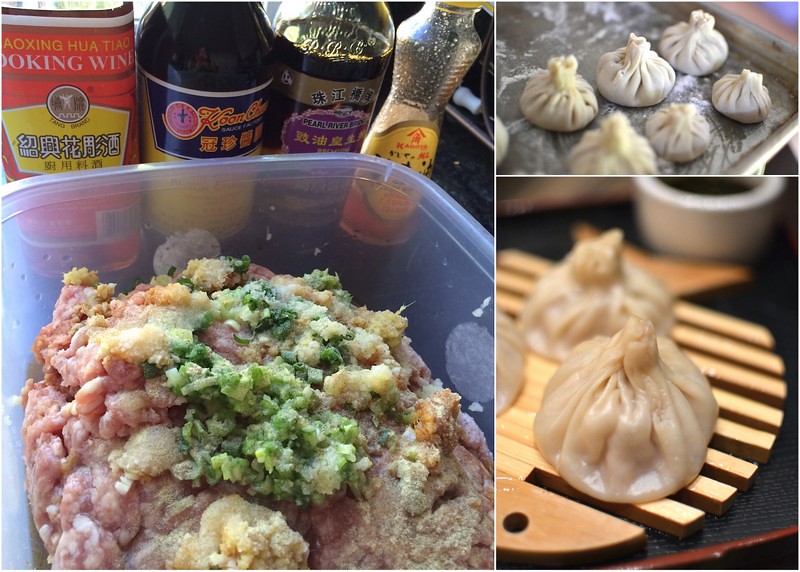
Xiao Long Bao are a Shanghainese dumpling with a very thin skin/wrapper. They’re filled with a variety of ground proteins and an aspic that once steamed, becomes soupy–thus the name Soup Dumplings! Dumplings and Soup all in one? BRILLIANT!

Seester T took the lead with these and man, did they take some prep work! Using The Woks of Life recipe, she started with the aspic. Vegans beware because essentially, it’s a natural meat gelatin.

Yes…as in J-E-L-L-O.

Pork bones and other porky bits are thrown into a pot with water and several aromatics. Everything simmers for a few hours and then is strained and chilled.

Voila—Aspic!

Nov 2015 Fam DinShe then made a ground pork filling and threw in some shrimp because surf and turf is always a good idea. Once done, the aspic was cubed up and folded into the filling.

Next, we enlisted our niece Nini to help out with the assembly. Seestrah made the dough according to The Woks of Life’s recipe and used my pasta roller to make thin sheets for the dumpling wrappers.

Remember when I said laborious? It definitely was!

Hand cranking out the sheets so that they were paper thin and then cutting them into perfect circles with a biscuit cutter. Nini then meticulously filled and folded the dumplings to ensure they were all sealed up tightly so that none of the soup would run out during the steaming process. It took about 3 hours for us to make the wrappers and fill them all. Granted, it was our very first time but I will never, NEVER take it for granted next time I have Xiao Long Bao. Those folks can make them in lighting speed!

The XLB had good flavor and paired well with the black vinegar sauce–plus they were fun to eat! If we do ever make them again (and let’s be honest, it’ll be a very LONG time in the future), I’d like to play around with the dough. It was pretty good but I think it could be even thinner, especially on the top where it all purses together so that it’s less dense and chewy.

But heck–for our first time, it was awesome!

Nov 2015 Fam Din
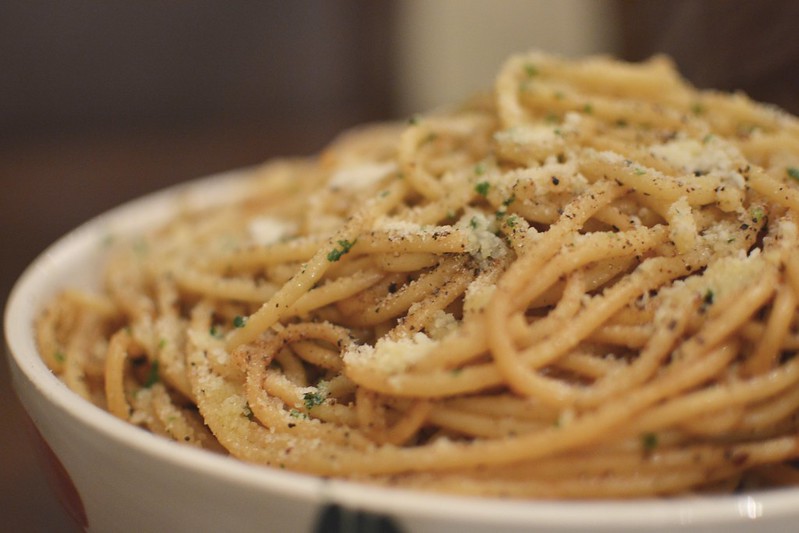
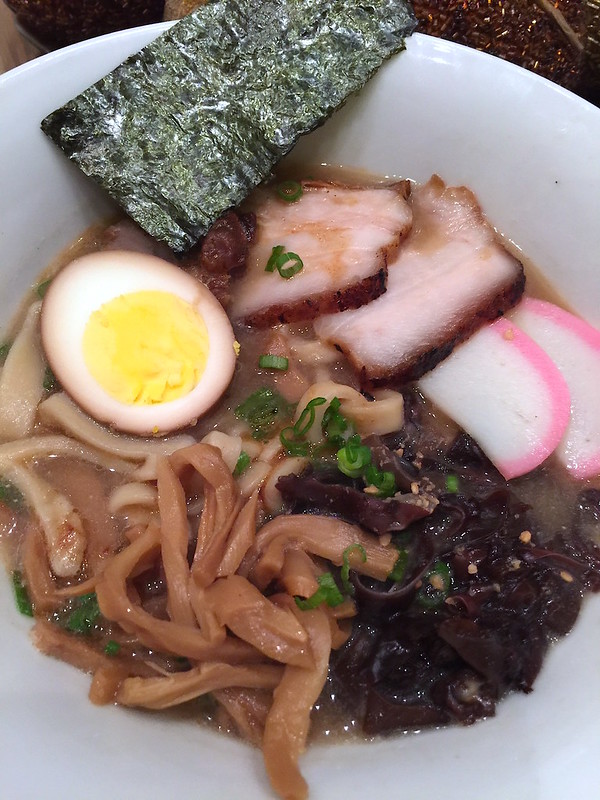
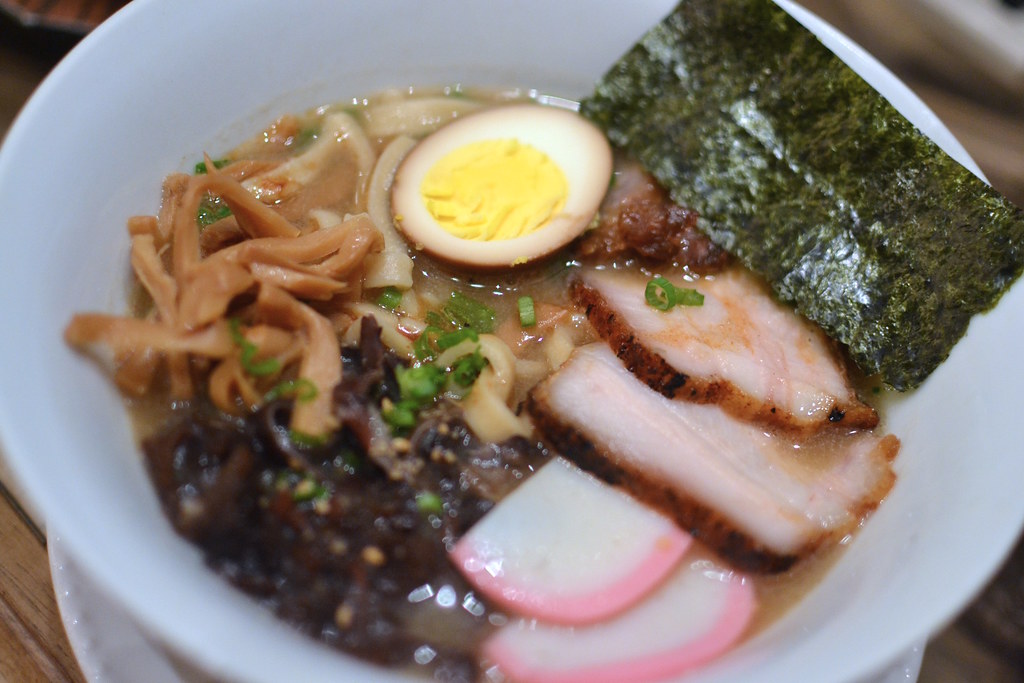
For the main dish, we chose Tonkotsu Ramen where we made everything but the menma and kamboko from scratch.  And if you’re keeping tally, that means the Tonkotsu Broth, Chasu, Ajitsuke Tamago, Mayu and Ramen Noodles—ALL HOMEMADE!

By chance do you recall when I said we wanted a low-fuss Family Dinner?

We’re insane.

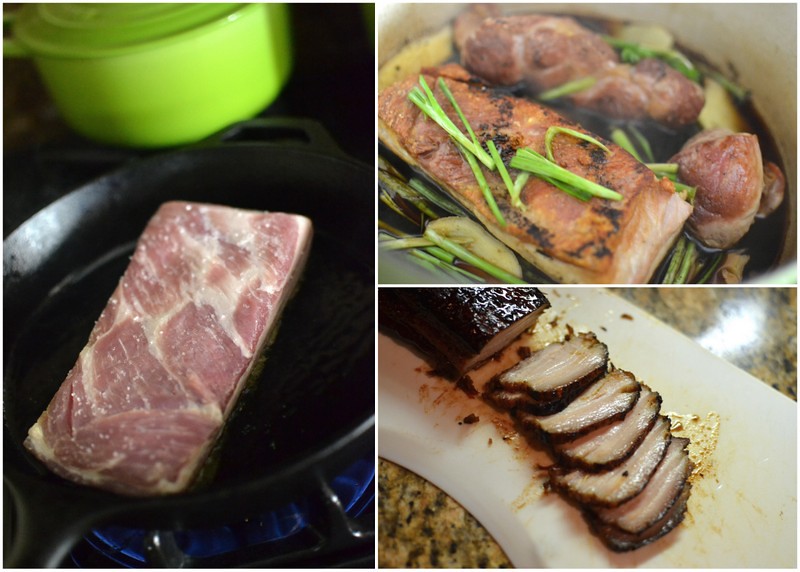
A few days prior to Fam Din, Seestrah N started on the Tonkotsu broth because it needs hours upon hours of simmering.  She went with Marc’s route from No Recipe and pretty much followed it to the T.

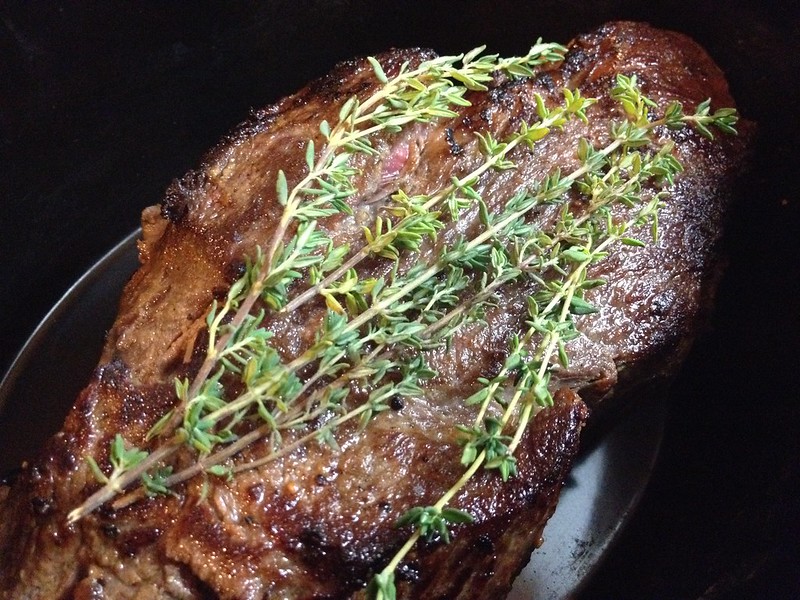
On the day of Fam Din, she made the Chasu –braised pork belly from Nami at Just One Cookbook. She also threw in an extra few pieces of pork shoulder for some added protein. And let me tell you….that chasu was beautiful, unctuous, pork heaven.

Nov 2015 Fam Din

The night before Fam Din, I prepped Nami’s Ajitsuke Tamago (shoyu eggs) since it’s best to allow them to marinate overnight. They were really easy to make and would be great just atop some steamed rice.

Nov 2015 Fam Din

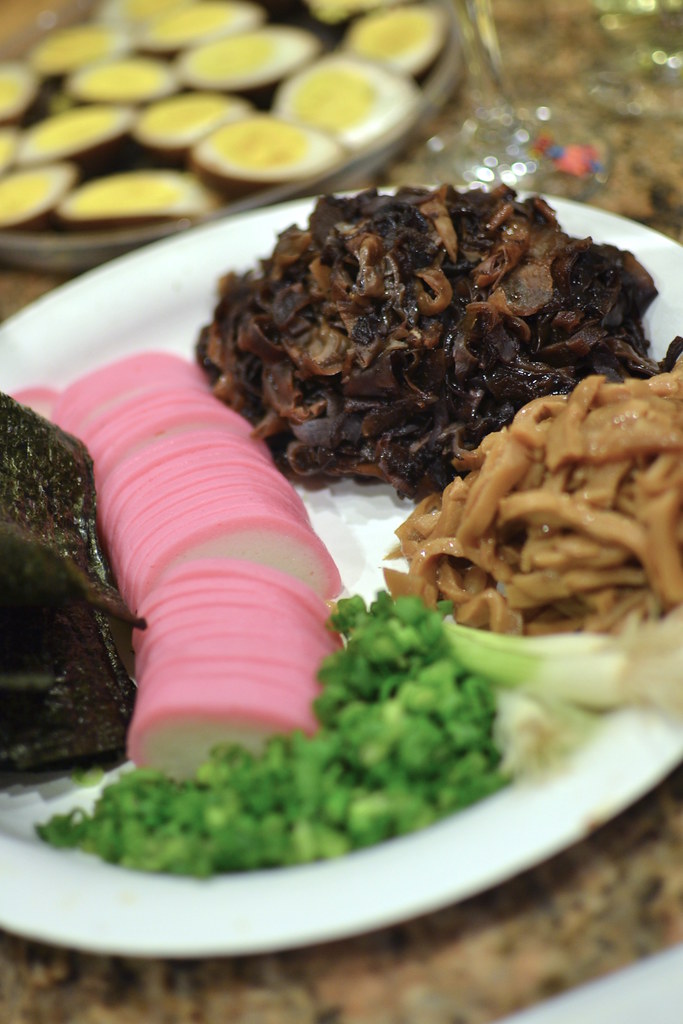
In addition to the Chasu and Ajitsuke Tamago, we topped our ramen bowls with:

  • Toasted Nori (seaweed) Strips
  • Menma (marinated bamboo shoots)
  • Kamboko (fish cake)
  • Kikurage (fresh wood ear mushrooms)
  • Scallions

I also made Mayu which is a black garlic oil that was drizzled on top of our bowls of ramen.

Nov 2015 Fam Din

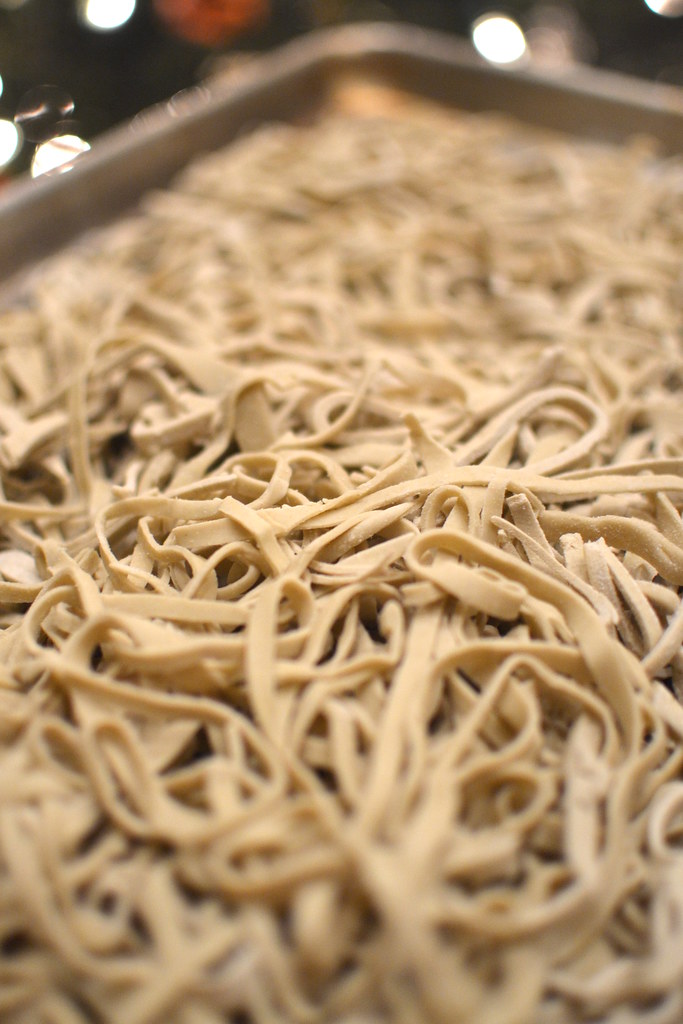
Now let’s talk a bit about my adventure with the homemade ramen noodles.

I spend a lot and I mean A LOT of time in the kitchen. As such, I’m pretty comfortable with baking breads, working with yeast dough and making pastas. I don’t have the pasta attachment for my KitchenAid but I’ve gotten by pretty well with my hand crank pasta roller over the years. So when I was nominated (was this because I’m the youngest!?) to make the noodles, I just went with it.

I did tons and tons of research and went with Marc’s ramen noodles as well. He was detailed in account and his pictures really captured the process. If you decide to give this recipe a try, note that he was not lying that this dough is extremely dry. You’ll likely want to keep adding water but just go with it and press it all together until it forms a ball. Trust me, it eventually does.

But here’s where I start to kick myself for attempting this method without an electric pasta machine/KitchenAid attachment. Before allowing the dough to rest for several hours, you have to run it through your pasta roller a few times so that it forms smooth rectangular sheets. Sounds easy right? Well I’m sure it would have been had I not used a hand crank roller with a dry dough. It was crumbling everywhere!

I was sweating bullets trying to shove the crumbling dough into the roller….Add the fact that I tripled the recipe and now you’ll have an idea why my biceps were on fire!

Nov 2015 Fam Din

When it came time to cut them into noodles, a piece of me cried inside knowing that my arms were going to get another work out since I would need to pass the dough through the roller several more times. Another wrench was thrown into the situation when the attachment blade that cuts the noodles got stuck. I ended up hand-cutting the noodles which wasn’t ideal since I couldn’t get it as thin as I had wanted to—but it got the job done.

Moral of the story? If you’re not a pro, use a KitchenAid pasta attachment or similar thing-a-ma-bob if you make fresh ramen noodles.

Nov 2015 Fam Din

But once assembled, we were all pretty darn proud of ourselves.

It tasted LEGIT! Like, TOO-LEGIT-TO-QUIT!

Every component had a role and although laborious, had a distinct purpose to the ramen.

Nov 2015 Fam DinAnd just like the Xiao Long Bao, I will never, never underestimate or take for granted the folks who make my ramen.

Heck–they’re freaking amazing in my book.

Nov 2015 Fam Din

After polishing off our noodles and a bit of kitchen clean up, we actually took off for a little more shopping. Why? Who knows….we were delirious.

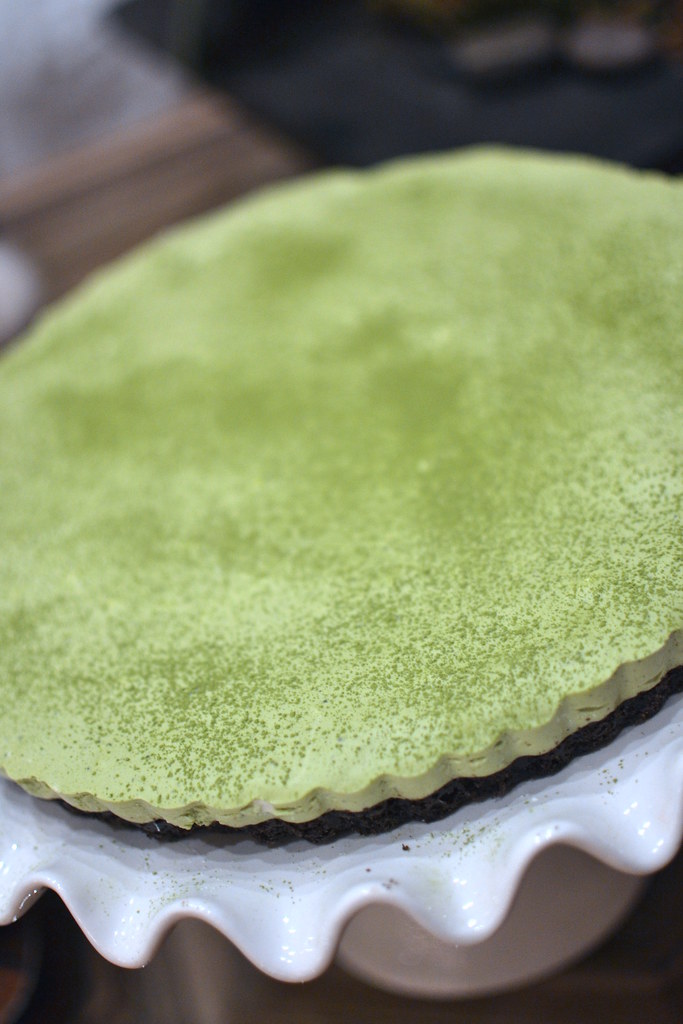
But when we came home, we tucked right into dessert.

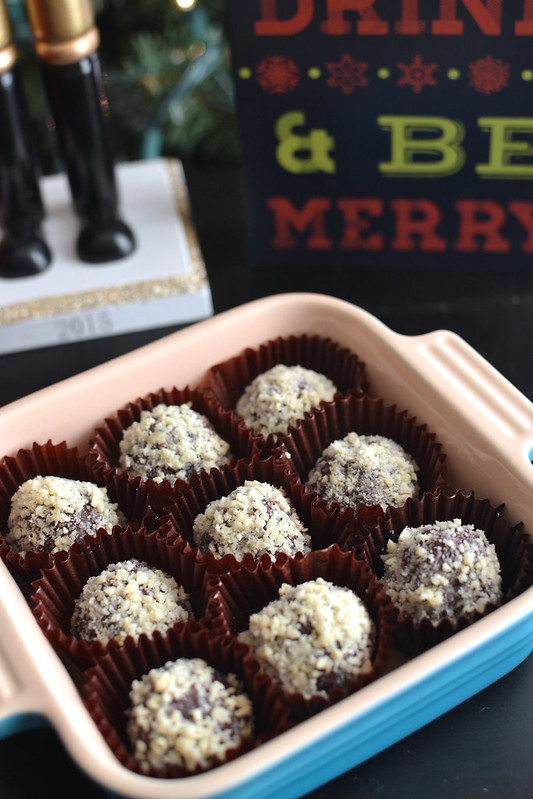
I had made a simple Matcha Mousse-Chocolate Tart. The base was made out of crushed Oreo Cookies and filled with a fluffy matcha mousse. We’re green tea monsters, so a light and matcha-filled dessert suited us just fine.

Nov 2015 Fam DinWas dinner easy and low maintenance?

HECK NO!

Did I perhaps lose a few months off my life from the stress?

WOULDN’T DOUBT IT!

Did my sis say she needed therapy because of the XLB?

YOU BET!

But were we happy with how things turned out over all?

ABSOLUTELY!

It was a true and deep Labor of Love.

And the cherry on top?

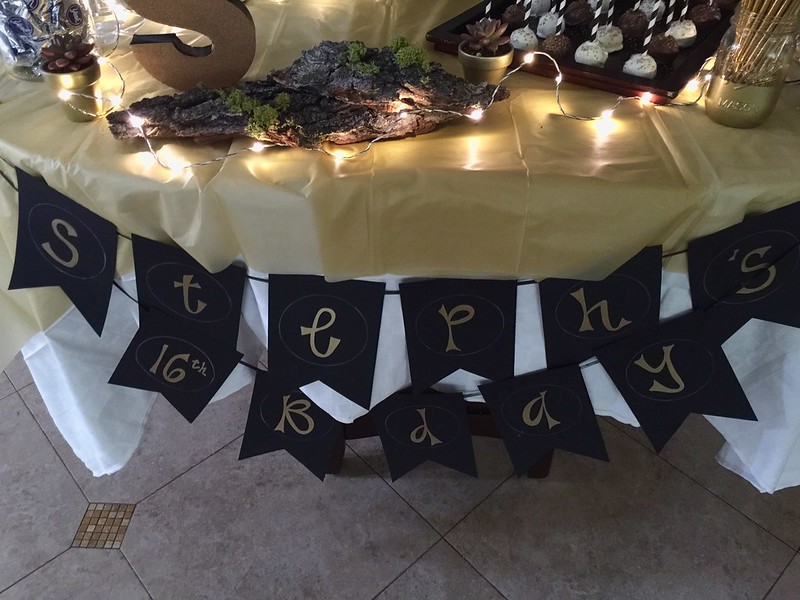
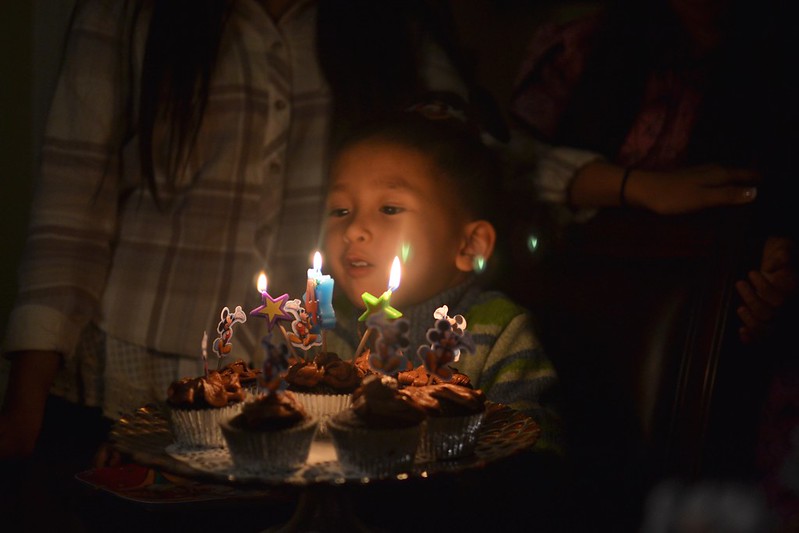
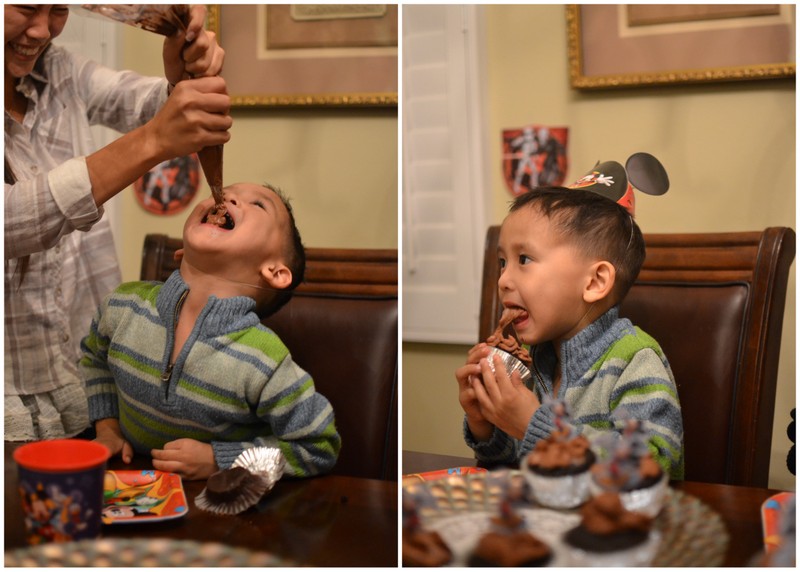
My Trojans whooped the Bruins that day and brought back home the Victory Bell!! Aren’t my kiddos adorable in their gear???? ❤

Total Proud Auntie.

Nov 2015 Fam Din

Oh–in case you’re wondering, we went to Target and World Market after dinner/before dessert.

What did I pick up?

A few more additions to my ever growing Nutcracker collection. Priorities people, priorities.

Nov 2015 Fam Din

This Month’s Family Dinner Menu

Cocktails: Pomegranate-Raspberry Sake-tinis
Appetizers: Pork & Shrimp Xiao Long Bao {Soup Dumplings}
Entrees: Tonkotsu Ramen with Chasu, Shoyu Egg, Menma, Kamaboko, Kikurage
Dessert: Matcha Mousse and Chocolate Tart

Beef

Slow Cooker Pot Roast Sandwiches

Pot Roast Sandwiches

Are your Twitter-Facebook-Instagram feeds full of Thanksgiving posts?

Because mine are overflowing with them!

And at first, they’re wonderful because they spark deliciously new ideas and give some great tips to face the big feast.

Pot Roast Sandwiches
But if you’re like me, you’ve already had your dishes planned out for weeks…….So the constant barrage of new ideas started freaking me out!

Should I use hazelnuts instead of pistachios?

My standard potato gratin or that deconstructed one from Pinterest?

Do I make my pie the regular way or try out one of those braided crusts or leaves-patterns?

It’s all too much!

Pot Roast

For my own sanity, I’m stepping away from Thanksgiving dishes today to share with you something that I know you’re going to SWOON for–especially after all of the laborious cooking and shenanigans that you’ll be enduring over the next couple days.

SLOW. COOKER. POT. ROAST. SANDWICHES.

<pause for dramatic effect>

These beauties are what dreams are made of. Juicy, tender beef—dripping with wondrous goodness. All piled up on a soft potato bread bun with melty cheese and sweet caramelized onions.

Sorry—-did I just drool over the computer?

Pot Roast Sandwiches

And guess what? Your slow cooker does all the work!

All you need to do is sear the beef a bit and then throw it in the cooker. Once done, the beef just falls apart…..kind of like how I will be after all of the shopping we do on Friday.

So although you may have a ton of turkey and ham leftovers, do yourselves a favor and throw a seared chuck roast in your slow cooker Thursday night. You’ll wake up to the most scrumptious aromas and will have plenty of sustenance ready to tackle post-festivities clean-up, Black Friday sales, and lingering family members.

HAPPY THANKSGIVING FOLKS! ❤

__________________________________________

Slow Cooker Pot Roast Sandwiches
Make 6-8 Sandwiches

Ingredients:

1 boneless, beef chuck roast (approximately 2½-3lbs.), trimmed and cleaned
black pepper
kosher salt
1 tablespoon garlic powder
1 tablespoon onion powder
½ cup all-purpose flour
4 tablespoons vegetable oil
1 cup dry red wine
1¼ cup beef stock, divided
6 sprigs fresh thyme
1 tablespoon unsalted butter
2 tablespoons olive oil
2 yellow onions, thinly sliced to about 1/8 inch thick
2-3 dashes balsamic vinegar
6-8 potato bread buns (or bread of your choice)
2 cups shredded cheese such as Provolone, Swiss, Havarti, Gruyere, etc.


Heavily season the beef with kosher salt and black pepper. Rub the garlic powder and onion powder over the beef. Roll the chuck roast in flour and dust off any excess. Heat the oil in a dutch oven or other heavy bottom pot. Once the oil reaches medium heat, sear each side of the beef until golden brown, about 3-4 minutes each side. Once browned, remove and place the beef inside the bowl of your slow cooker.

Carefully pour the wine into the dutch oven. Using a wooden spoon, scrape the bits off the bottom of the pot and allow the wine to boil and reduce by half. Pour the reduced wine with browned bits and 1 cup beef stock over the browned beef. Add the thyme sprigs and place the lid on your slow cooker. Cook the beef on low until the meat falls apart and can easily be shred apart with two forks—about 8 hours depending on the weight of your chuck roast and your slow cooker.

When your pot roast is nearly done and you’re almost ready to serve your sandwiches, start caramelizing your onions. This can take about 40-50 minutes and shouldn’t be rushed or else the onions will burn. Melt the butter into the olive oil in a large skillet over medium-low heat. Add the onions and stir to ensure they’re well coated. Stir the onions every few minutes to ensure they do not burn—lower the heat if necessary. Continue cooking, stirring low and slow until the onions become deep brown. Add the remaining beef broth and use a wooden spoon to stir the onions and scrape up any goodies that have formed on the bottom. Once the broth has evaporated, taste and add salt and pepper as needed. Stir in the balsamic vinegar and remove the skillet from the burner.

Once the pot roast has cooked and essentially falls apart, take two forks and shred the beef into bit sized pieces. Allow the pan juices to soak into the beef. Taste and add additional salt as needed.

Assemble each sandwich by placing a large mound of shredded pot roast with the drippings on the bottom half of a potato bread bun (or bread of your choice). Top with a few spoonfuls of caramelized onions and shredded cheese. The heat from the shredded beef should start melting the cheese but if not, place under the broiler for a bit. Place the other half of the bun on top and serve with hot sauce, chips, fries, etc.

Enjoy!