Drinks

Toasting the 86th Oscars with an “Aye-Aye Captain”!

Aye-Aye Captain

Hollywood’s biggest night is nearly upon us with the Oscars just a few days away. And like every year, I cannot wait to see all the gorgeous gowns! The glitz the glam – I love it!

This year I’m keeping things pretty low key but it would not be an Oscars Night if I didn’t shake up a few special-themed craft cocktails. Last year in honor of Life of Pi, I made the Sparkling Tangerine Tiger that was bright and dangerously delicious. For this year’s 86th Academy Awards, my cocktail is created in honor of Captain Phillips and is called the Aye -Aye Captain!

DSC_Aye-Aye Captain

And let me tell ya…you’re going to love this one. Fresh oranges, limes, mint, Captain Morgan Spiced Rum and ginger beer. The spiced rum and ginger beer offer a great bite while the fresh citrus rounds out this delightful cocktail. But be warned, these beauties go down incredibly smooth.

If you’re hosting a shindig for the event, finger foods and small bites are definitely the way to go. Below are a few suggestions that would definitely win the hearts & tummies of your guests:

Aye-Aye Captain

Enjoy the Oscars!

_______________________________

Aye -Aye Captain
Serves 1

Ingredients:

½ small orange, cut into small wedges (I used Cara Caras that are incredibly sweet & juicy)
½ lime, cut into small wedges
5 fresh mint leaves (more to garnish)
1 teaspoon raw sugar
1½  ounces Captain Morgan Spiced Rum
ice
3-4 ounces ginger beer

In a shaker, muddle ¼ of the oranges, 2-3 lime wedges, mint and sugar. Add the rum and shake well.

Fill a tumbler with ice. Strain and pour the liquid from the shaker into the glass. Top with ginger beer and garnish with citrus wedges and mint leaves. Cheers!

Vietnamese

Xôi Lạp Xưởng {Sticky Rice with Chinese Sausage}

Xôi Lạp Xưởng {Sticky Rice with Chinese Sausage}

It seems almost silly that I’m writing a post on Xôi Lạp Xưởng {Sticky Rice with Chinese Sausage} because it’s incredibly easy and so common. But if you grew up in a Vietnamese family like I did, then you can appreciate what a staple this humble dish is.

Xôi Lạp Xưởng {Sticky Rice with Chinese Sausage}

It starts with xôi –sticky, glutinous sweet rice (gạo nếp) that is best soaked before you cook it. I use a bamboo steamer to cook the rice but if you’ve got a nifty electric rice cooker that has the right settings, you can also go with that method. Unfortunately my rice cooker isn’t that snazzy and often burns my xôi, so I opt for the old school method.

Xôi Lạp Xưởng {Sticky Rice with Chinese Sausage}

The sticky and slighty chewy xôi then gets topped with slices of lạp xưởng, which are Chinese sausages. They’re a smoked sausage typically made from pork or chicken and has a salty and slightly sweet flavor profile. Our mom used to pan-fry the lạp xưởng or even throw it in the rice cooker while the xôi cooked. But these days I’ve adopted my eldest seester’s method – broiling them in the toaster oven. They make the lạp xưởng wonderfully crisp and makes for easy clean up.

You can also find Xôi Lạp Xưởng topped with thịt chà bông/ruốc (a dried and shredded pork), eggs, small dried shrimp or chicken. But we grew up eating it pretty simple and I like to have it with a small side of Maggi Seasoning Sauce and fresh chiles.

Xôi Lạp Xưởng {Sticky Rice with Chinese Sausage}

Xôi Lạp Xưởng can be eaten warm or at room temperature– which is why I think it always had a presence in our home for quick meals, road trips, picnics and was the perfect way to feed a crowd on a budget.

I still enjoy Xôi Lạp Xưởng to this day but it will always be a taste of my childhood…..and that’s a delicious thing.

Ăn Ngon, Friends!

____________________________________________________________

Xôi Lạp Xưởng (Sticky Rice with Chinese Sausage)
Serves 4-6

Ingredients:

2 cups sweet glutinous rice
1 teaspoon kosher salt
¼ cup vegetable oil
½ cup chopped scallions
4 lạp xưởng links (Chinese sausage)
1 cup fried shallots
Maggi Seasoning Sauce or soy sauce
fresh chiles or sambal paste

Rinse the rice until the water runs clear. Fill a large bowl with cool water, add the rice and soak it overnight. Once the rice has been properly soaked, drain the rice and shake off any excess water. With a clean kitchen towel, gently pat the rice dry, sprinkle in the salt and mix until combined.

Line the bottom of your steamer with a sheet of cheesecloth and then spread the rice mixture evenly on top of the cloth. Depending on how large your stacked steamer is, you may need to add a second layer. Steam, covered, for about 20-25 minutes or until rice is fully cooked. *Alternatively, you can use an electric rice cooker if it has the correct settings.

While the rice is steaming, place the lạp xưởng links (Chinese sausage) on a foil lined baking sheet. Broil for 3-4 minutes in your oven or in a toaster oven until all sides have been crisped. Cut the lạp xưởng into thin slices.

Prepare the hành mỡ (scallion oil). In a sauté pan, slowly heat the vegetable oil. Add the chopped scallions. Cook the scallions on very low heat until they are wilted but still bright green. Approximately 2-3 minutes. Pull from heat and set aside.

To assemble, place a few scoops of the cooked rice in a bowl or shallow plate. Brush the rice with the hành mỡ (scallion oil) and top with several slices of lạp xưởng. Sprinkle each serving with fried shallots and serve with Maggi seasoning or soy sauce and fresh chiles/sambal paste.

Enjoy!

Desserts/Pastries

Ch-ch-ch-Chia Seed Pudding!

Chia Seed Pudding

Ch-ch-ch-Chia!

Terra cotta statuettes sprouting into fuzzy green pets?!  What’s not to love? Of course if you’re not into the responsibility of having to care for a Chia lamb, Chia Hello Kitty, Chia Scooby or even Chia Obama, you can always jump on the chia seed healthy bandwagon instead.

Since they’re bountiful in Omega-3s, fiber, antioxidants and all that jazz, I like to sprinkle chia seeds into my morning smoothies, muffin batters, or over greek yogurt. And since they take on somewhat of a “gel-like” consistency when mixed into water, they’re the perfect little ingredient to make a cheat pudding with.

There are so many variations on Chia Seed Puddings out there but I like to keep things simple with just a few ingredients: ripe bananas, almond milk, agave or honey, a dash of vanilla and of course–chia seeds. The actually consistency after it sets is like tapioca pudding and is delish when topped with fresh fruits, nuts or even granola.

And if you really want to get a little crazy, add a bit of cocoa powder to the party for a Chocolate Chia Seed Pudding. Because chocolate makes EVERYTHING better!

_______________________________________

Chia Seed Pudding
Serves 2

Ingredients:

2 medium sized ripe bananas
1 cup almond milk
1 tablespoon agave
1/4 teaspoon vanilla extract
2 heaping tablespoons chia seeds
fresh mango slices (or other fresh fruit)

In a blender, add the bananas, almond milk, agave and vanilla extract. Puree until smooth and then transfer to a resealable container. Stir in the chia seeds and cover. Refrigerate the mixture for 4-6 hours, or overnight.

Spoon the pudding into two cups and top with fresh mango slices. Serve chilled.

Desserts/Pastries

Valentine’s Rice Cereal Pops…Because I Heart You.

Rice Cereal Pops

Rice Cereal Treats….

Coated in melted candy….

Covered with tons of sprinkles…..

On a stick.

If that doesn’t scream LOVE, than I don’t know what the heck does.

Rice Cereal Pops

Sometimes, simplicity is best. So don’t fret over laborious desserts today — instead, consider making these whimsical Rice Cereal Pops for your loved ones.

Rice Cereal Pops

They come together quite easily and are much less cumbersome than their Cake Pops cousins. Man…those Cake Pops can be the bane of my existence at times. But these Rice Cereal Pops will be the sprinkly sunshine of our lives.

Rice Cereal Pops

And in case you still need help planning a special {and delicious} Valentine’s Day meal, check out my proposed menu below:

Cocktails: Love Actually
Appetizer: Oysters with Asian inspired Mignonette
Entree: Sriracha Crab Cakes and Filet Mignon
Desserts: Rice Cereal Pops or Double Chocolate Tart with Fresh Raspberries

And with that dear friends, HAPPY VALENTINE’S DAY!

_____________________________________

Valentine’s Rice Cereal Pops
Makes 24 pops

Ingredients:

cooking spray
1½ tablespoons unsalted butter
6 ounces marshmallows (approx. 20 large marshmallows)
1 pinch salt
½ tablespoon vanilla extract
5 cups rice cereal
20 ounces candy melts
2 dozen lollipop sticks
TONS of sprinkles

Line a 9 x 9 inch square pan with parchment paper. Cover the inside of the pan with cooking spray. Set aside.

In a large pot, slowly melt the butter over medium-low heat. Add the marshmallows and stir until completely melted. Remove the pot from the heat. Stir in the salt and vanilla extract until smooth. Add the rice cereal and stir until well coated. Quickly transfer the rice cereal mixture into the greased pan and firmly press it into an even layer. Refrigerate the pan for one hour.

Using the parchment paper to assist, carefully transfer the rice cereal to a cutting board. Take a serrated knife and cut the rice cereal into 24 even bars. Place a few candy melts into a bowl. In intervals of 15 seconds (stirring in between), melt the candy in the microwave until smooth. Dip the tip of a lollipop stick into some of the melted candy and insert it into the bottom of one of the rice cereal bars. Place it on a baking sheet and continue the process with the rest of the rice cereal pops. Refrigerate the entire sheet for one hour.

Place the remaining candy melts into the bowl and melt them in the microwave using the same method above. Take one rice cereal pop out of the refrigerator. Using a small offset spatula, spread a thin layer of the melted candy all over the rice cereal pop. Quickly add the sprinkles and stand the pop upright in a styrofoam block to dry.

Repeat the process with the remaining pops. You may need to reheat the candy melts in the microwave from time to time if it becomes too stiff to spread over the rice cereal.

Allow the rice cereal pops to dry for at least 2 hours before sharing them with your sweetie.

Appetizers/Small Plates · Sunday Family Dinner

French Bistro inspired Family Dinner – C’est Délicieux!

January 2014 Family Dinner

Bonjour! Pour notre dîner de famille, nous avons préparé un menu français.

Yup–that’s what 4 years of French classes at Diamond Bar High School got me. Monsieur Kirkeby would’ve been so proud. Although I can’t be 100% sure that it’s grammatically correct 🙂

January 2014 Family Dinner

Our most recent monthly Family Dinner adventures swept us away to a French Bistro theme. They’re dishes that were meant for casual dining although I’ve also heard bistro cuisine referred to as “glamorous comfort food”. However you define it – it’s délicieux!

We like to have a plentiful selection of items to nosh on for our Sunday Family Dinners but as they were only 10 of us that night, we had to make some concessions. The biggest challenge was trying to narrow down which dishes we’d prepare…. Poulet Rôti? Steak Tartare? Salade Frisée aux Lardons? Escargots?

So much good food, so little time!

January 2014 Family Dinner

As always, we started off with some adult beverages. Although this time around, I opted not to prepare any mixed cocktails and served chilled sparkling vin from the Loire Valley in central France and a Côtes du Rhône.

While we prepped, we nibbled on an Abbaye de Belloc which is a French sheep’s milk frommage that we picked up earlier that day from Center Street Cheese Shop.
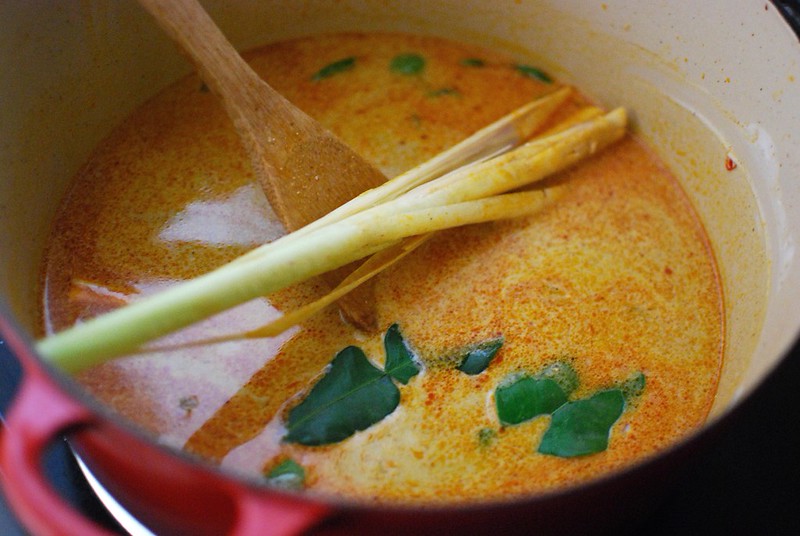
Frommage

Next, we had a hearty Soupe à l’oignon French Onion Soup.

French Onion Soup is rather nostalgic for me. The first “fancy dining” memory I have is eating French Onion Soup with my parents at a restaurant in Minnesota. I couldn’t have been more than a few years old but the fact that none of my siblings were there makes me believe that I must have crashed one of their very few “date meals”.

French Onion Soup

There was a Salade Niçoise overflowing with goodies like olive oil preserved tuna, haricot verts, olives, eggs, and grape tomatoes. My sister took the lead on this and adapted Tyler Florence’s version that can be found here. It was incredibly satisfying and could have been a meal in itself–but we’re gluttons.

Salad Niçoise

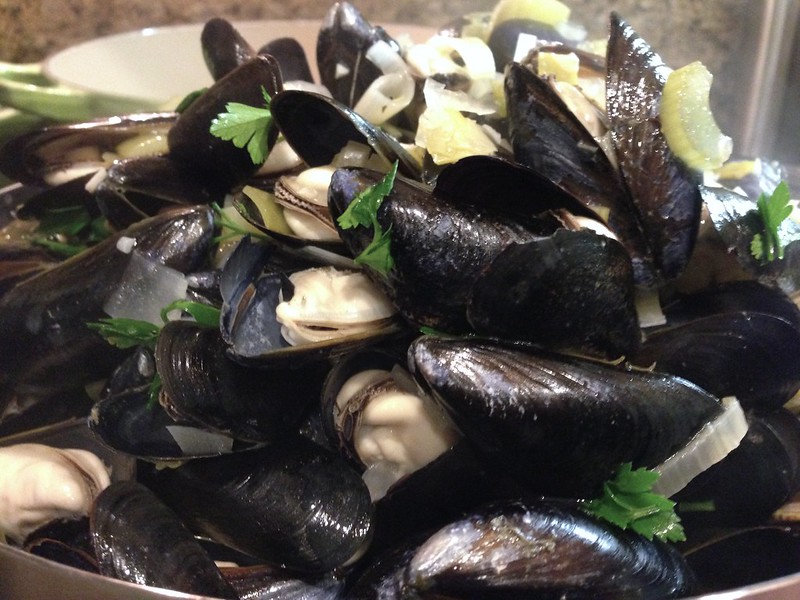
I can’t imagine a bistro themed menu without some version of mussels. Our sister prepared her Moules with lots of wine, leeks, celery and fresh herbs. She used P.E.I. mussels that were so plump and were sweet and tender. They took on a creamy texture that was out of this world.

Moules

And then our deep carnivore side took over and we threw down some serious Steak Frites. We opted to go with simply seasoned grilled steaks (ribeyes and T-bones) and then topped them with an herb butter I had made with tarragon, parsley, thyme, lemon zest, salt and pepper.

To go with the Moules and Steaks, we put our niece, Nini, to work with double frying our Frites. You first fry the potatoes at a lower heat to cook them through to a translucent stage. Then, you crank up the heat and fry them up again so that become crisp and perfectly golden.

This Potato Monster totally approves.

Steak avec Frites

As for dessert, we had an apple Tarte Tatin with ice cream and it was a FLOP!

Seriously!

So for those of you who ask if we never mess up on any dishes — you better believe it! And this Tarte Tatin was a prime example of how you can follow a recipe word for word and still have a disaster. My caramel didn’t set, the puff pastry was a soggy mess…I was SO bummed! It didn’t look terribly bad but trust me, looks can be deceiving.

But I survived and will live to make more desserts. Plus there was still lots of vin left so we commiserated with booze like all honest cooks do.

Tarte Tatin

Despite my failed dessert, it was a fantastic meal! And like I said, with so many other Bistro classics that we didn’t have the time (or enough room in our stomach) to make, there may be a Part Deux to come!

In the meanwhile, fix yourself up the delightful Salade Niçoise that our seester made. You’ll adore it–especially with some baguette and a crisp white wine.

À bientôt!

This Month’s Family Dinner Menu

Cocktails: Côtes du Rhône, French Sparkling Wine from Loire
Appetizers: Soupe à l’oignon, Frommage, Salade Nicoise
Entrees: Moules, Steak Frites
Dessert: Tarte Tatin

___________________________________________

Salade Niçoise

Ingredients:
½ tablespoon minced garlic
2 heaping teaspoons Dijon mustard
3 tablespoons red wine vinegar
2 tablespoons lemon juice
2 heaping tablespoons minced fresh tarragon
½ cup quality extra virgin olive oil
kosher salt
black pepper
½ pound petit new potatoes, scrubbed and cleaned
1/4 pound haricots verts, trimmed
10 to 12 ounces canned or jarred Italian tuna packed in olive oil
8 ounces mesclun, washed and dried
½ pint grape tomatoes
4 hard boiled eggs, quartered lengthwise
6 ounces pitted Niçoise olives

Prepare the vinaigrette. Place the garlic, Dijon mustard, vinegar, lemon juice, tarragon and olive oil in a small jar.  Add ¼ teaspoon of kosher salt and ¼ teaspoon of black pepper into the jar before tightly securing the lid back on. Shake the jar vigorously for 15-20 seconds. Taste and adjust for seasonings as needed. Set aside.

Bring a small pot of water to a boil. Stir in a few pinches of salt before adding in the potatoes. Depending on the size of your potatoes, cut them into halves or quarters before adding them into the water. Allow the potatoes to boil for about 8-10 minutes, until tender. Using a slotted spoon, remove the potatoes and place them in a large bowl. Toss the warm potatoes with 1-2 tablespoons of the vinaigrette to coat lightly.

Add the haricots verts to the same pot of boiling water. Blanch the haricots verts for 1-2 minutes and then drain them into a colander. Immediately transfer them to a bowl of ice water and allow them to cool for a few minutes. Shocking the haricots verts will stop the cooking process to stock and allow them to maintain their bright color. Drain them and set aside.

Drain the olive oil from the tuna and use a fork to flake the fish into large pieces. Season with kosher salt and pepper.

Arrange the mesclun on to a large platter. Arrange the dressed potatoes, haricot verts, tomatoes, eggs and olives over the top of the greens. Drizzle the vinaigrette over the salad and serve.

Poultry

Braised Sage Chicken with Kale & Chickpeas

Braised Sage Chicken with Kale & Chickpeas

I adore “one-pot” meals.

Not only do you cut down on the extra dirty dishes (I detest washing dishes!) but it also gives me a great excuse to use some of my fab dutch ovens, braisers, and other pots that can go straight from the stove/oven and directly to the serving table.

These types of cooking gear are fantastic to braise proteins in as they allow for an even, slow cooking process. And since I happened to catch a great deal on chicken thighs and drumsticks at the grocery store the other week, I decided to throw them into one of my fav Le Creuset Braisers for an easy Sunday night meal.

Braised Sage Chicken with Kale & Chickpeas

After browning the chicken for a few minutes, I cooked down some onions, garlic and chopped sage–an herb that pairs wonderfully with poultry. A bit of white wine and a few cups of chicken stock go into the braiser. And then the chicken goes back into the liquids for a slow, bubbling bath in the oven.

Finally, with just a few minutes left of braising, I throw in fresh kale leaves and chickpeas for that extra level of earthiness.

Braised Sage Chicken with Kale & Chickpeas

The chicken is super tender, flavorful and plays off well with the kale and chickpeas. The final touch of fresh lemon juice adds a bit of brightness to round out the hearty dish.

All in all, a winning one-pot meal that’s easy to pull together and totally satisfying.

I’m all about it.

____________________________________________________

Braised Sage Chicken with Kale & Chickpeas
Serves 4-5

Ingredients:

3-4 pounds bone-in chicken (I prefer thighs and drumsticks)
kosher salt
black pepper
2 tablespoons olive oil
1 small white onion, thinly sliced
2 garlic cloves, minced
½ teaspoon red chili flakes
8 fresh sage leaves, minced
1 cup dry white wine
2 cups chicken stock
1 can (15 ounces) garbanzo beans, rinsed and drained
4 heaping cups chopped kale leaves
juice ½ lemon

Preheat oven to 350 degrees F.

Liberally season the chicken with salt and pepper. In a large dutch oven (or other oven proof pot with a lid), heat olive oil to medium. In batches, brown the chicken pieces on both sides and transfer to a plate. Discard all but 1 tablespoon of the leftover grease.

Add the onions and cook until they have softened and are translucent. Add the garlic, chili flakes, sage and sauté for an additional minute.  Pour in the wine and with a wooden spoon, scrape the brown bits from the bottom of the pot. Continue cooking until the wine has reduced by half. Pour in the chicken stock and bring to a boil.

Return the chicken to the pot with the skin side up. Place the lid on and transfer to the oven.

Bake for 25 minutes and remove from the oven. Carefully remove the lid and use a spoon to skim off and discard any excess fat and grease. Add the kale and chickpeas to the pot, cover with the lid, and place it back into the oven. Continue cooking for 5-10 minutes until the meat is tender and pulls away from the bone.

Remove the pot from the oven. Taste the broth and adjust for seasonings as needed. Squeeze the fresh lemon juice over the dish and serve warm.

Appetizers/Small Plates

Pan-Fried Ginger Chicken Dumplings – Happy Lunar New Year!

Pan-Fried Ginger Chicken Dumplings

Today marks the first day of Tết {Vietnamese Lunar New Year} – so allow me to say Chúc Mừng Năm Mới!!

Like the good Vietnamese gal I am, I’ve spent the past several days cleaning up the house, running to the bank to get “new money” to stuff in the red envelopes for lì xi (lucky money), paying off my bills and finishing everything else Mom used to tell us to do in preparation for Tết. Hey- I do what I can to deflect any bad ju-ju!

I expect that our clan’s Tết celebration on Sunday will be filled with a lot of shenanigans, new year’s wishes, a bit of gambling and a whole lot of eating! Braised bamboo, crab, sticky rice, roast pork, stuffed rice cakes and a ton more. I CAN’T WAIT!

Pan-Fried Ginger Chicken Dumplings

To get in the new year’s spirit, I decided to make some dumplings. Truthfully, this style of dumpling isn’t traditional for Tết but they’re quite common for Chinese New Year celebrations. Dumplings are eaten because they symbolize wealth & richness as their shape resembles Chinese gold ingots.

This time around I decided to fill the dumplings primarily with ground chicken, shiitake mushrooms, cabbage, some aromatics and a TON of fresh ginger. I often use a pork & shrimp filling as well but you could use almost anything that tickles your fancy. Just one thing, you’ll want to cook a bit of the filling before you start assembling the dumplings so that you can adjust the seasonings. Trust me, you don’t want to stuff 100 dumplings before you discover that your filling is bland.

Pan-Fried Ginger Chicken Dumplings

As for the dumpling skins/wrappers, let me be the first to admit that I never make my own and I’m happy to just grab a package of the pre-made ones. I’m sure there’s a lot of pros of going 100% homemade but the thought of rolling out all of those super thin rounds is just too daunting. But one day I’ll give it a try— ya know….bragging rights and all.

If you opt to buy the packaged skins, I’d recommend the egg-less Shanghai style wrappers. But if you’re in a bind or live in an area where it’s difficult to procure Shanghai style wrappers, you could use wonton skins. The texture and flavor will be a bit different though as those are typically are made with eggs.

Pan-Fried Ginger Chicken Dumplings

Once you’ve mixed up the filling, you’re ready to assemble the little dumplings.

  • Wet the edges to help seal the edges,
  • Add a heaping teaspoon of filling,
  • Fold in half and pinch the center,
  • Fold 3-4 pleats to the right and then pinch and crease the end to seal,
  • Fold 3-4 pleats to the left and then pinch and crease the end to seal.

And that’s it! The filled dumplings should form a slight crescent shape and be able to sit upright. Alternatively you can fold the dumplings so that they lay flat. Instructions on how to fold a flat dumpling can be found here.

Man…I have the most wrinkly fingers and desperately need a manicure— but I digress.

Pan-Fried Ginger Chicken Dumplings

Keep on filling, folding, and pleating…..don’t worry, it gets faster once you get the rhythm down.

At this point, you can either pan-fry the dumpling right away or freeze them so that you can have them whenever you have a dumpling hankering. If you do choose to freeze them, be sure to freeze them in a single layer on a baking sheet for a few hours before stacking them in a container. If you don’t, they’ll clump up together while they freeze.

Pan-Fried Ginger Chicken Dumplings

Once you’re ready to cook up these little buggers, grab a skillet that has a fitted lid and fry them in a single layer for a minute or two. You’ll then want to add a bit of water and slap on the lid to allow the dumplings to steam and finish cooking.

Pan-Fried Ginger Chicken Dumplings

And that’s it! Deliciously juicy and flavorful dumplings that are ready to be dunked into a quickly made sauce of soy, rice wine vinegar and a few other goodies.

Pan-Fried Ginger Chicken Dumplings

Well Friends, let me again say – Chúc Mừng Năm Mới!! I wish you all an incredible Year of the Horse filled with health, prosperity, wisdom, and joy!!

____________________________________________

Pan-Fried Ginger Chicken Dumplings
Makes approximately 50 dumplings

Ingredients:

Dumplings:
2 cups finely chopped Napa cabbage
1/2 teaspoon salt
1 pound ground chicken
1 cup minced shiitake mushrooms
1/2 cup chopped scallions, plus more for garnish
2 tablespoons finely minced shallots
1 tablespoon finely minced garlic
2 tablespoons finely minced ginger
2 tablespoons soy sauce (more, if needed)
1 tablespoon rice wine
2 teaspoons toasted sesame seed oil
1/2 teaspoon black pepper
1 package Shanghai-style dumpling skins (50 count)
water
vegetable oil
1/4 teaspoon toasted sesame seeds, plus more for garnish

Dipping Sauce:
1/2 cup soy sauce
1/4 cup rice wine vinegar
1/2 tablespoons toasted sesame seed oil
1/2 teaspoon sugar
1 scallion, chopped
1 garlic clove, finely minced
1/2 teaspoon finely minced ginger
1/4 teaspoon chili powder
1/4 teaspoon toasted sesame seeds

Place the cabbage in a large bowl, sprinkle it with salt and let sit for about 20 minutes. Wrap the cabbage in a cheesecloth or clean kitchen towel. Squeeze out and discard the excess liquid and place the drained cabbage back in the bowl.

Add the ground chicken, mushrooms, scallions, shallots, ginger, garlic, soy sauce, rice wine, sesame seed oil, and black pepper to the bowl. Using cleans hands, mix the filling until thoroughly combined. To test for seasoning, take a small spoonful of the mixture and pan fry in a non stick skillet for 1-2 minutes on each side. Taste and if needed, add more soy sauce to the uncooked filling.

Begin assembly of the dumplings. Lay one dumpling wrapper on a flat surface. Dip your finger in water and moisten the edge of the wrapper. Place about 1 heaping teaspoon of the filling in the center of the dumpling skin. Pick up the dumpling, fold it in half and pinch the center together. Starting from the center, make about 3-4 pleats on the right side of the dumpling. Repeat with the left side of the dumpling so that all the pleats point towards the center. This will also create a flat bottom to allow the dumpling to sit upright and form a slight crescent shape. Place the dumpling on a baking sheet and continue until all the filling/wrappers have been used.

Prepare the dipping sauce by whisking together all the sauce ingredients. Set aside.

To cook the dumplings, heat a large frying pan to medium-high heat with 1 tablespoon of oil. Place a single layer of the dumplings in the pan. Fry the dumplings for 1-2 minutes until the bottoms are golden. Carefully pour in about 1/4 cup of water and immediately place a tight fitting lid on the pan. Lower the heat to medium-low and allow the dumplings  to steam for 4-5 minutes. Remove the lid and cook until all the water has evaporated. Transfer the dumplings to a platter and sprinkle the tops with scallions and toasted sesame seeds. If you need to fry the dumplings in batches, use a paper towel to wipe the frying pan clean before repeating the above process. Serve warm with the dipping sauce.

*If you would like to freeze the dumplings, place the baking sheet directly into freezer for 4-5 hours after you have assembled them. Be sure that the dumplings are in a single layer and are not touching each other. Once the dumplings have froze, you may transfer them to a sealed container. They can be kept in the freezer for a few months and should be cooked frozen. Add 1-2 additional minutes to the cooking time when pan-frying frozen dumplings.*

Appetizers/Small Plates

Hot Buffalo Chicken Dip for Game Day

Hot Buffalo Chicken Dip

This upcoming weekend will be jammed packed with events. I’ve got our niece’s 9th birthday party Saturday morning with her school friends, our monthly Family Dinner that evening, Tết (Lunar New Year) celebration with the clan on Sunday, and of course– the Super Bowl later that afternoon.

I’m exhausted just thinking about it.

Hot Buffalo Chicken Dip

By the time the game rolls around on Sunday, all I will have the energy to do is plop myself on the couch with an iced cold brewskie and have delish snackies within an arm’s reach away from me. I’m hoping for the usual suspects like pizzas, ribs, nachos, tacos, and wings. Mmmm…..buffalo wings. I love buffalo wings.

But as tasty as buffalo wings are, they are just a mess to eat. I pretty much go through a few trees worth of napkins every time I have them. So instead…..

SAVE THE TREES and MAKE DIP!

Hot Buffalo Chicken Dip

My Hot Buffalo Chicken Dip is a nod to the lip-smacking, scrumptious wings. It’s made with lots of chicken (leftover rotisserie is great in this), hot sauce (I like Frank’s® RedHot® Original Cayenne Pepper Sauce), tons of cheeses and a few other goodies. Once it comes out of the oven, the dip is super bubbly and is just waiting for a potato chip or celery stick to be dunked into it. It is sinfully cheesy so don’t even bother to count calories while you’re inhaling it.

Need some other Super Bowl menu ideas? Here are a few other bites that are sure to please a crowd:

Whatever you choose to fix up, enjoy the Super Bowl!

_____________________________________________

Hot Buffalo Chicken Dip
Serves 6-8

Ingredients:

8 ounces cream cheese, softened
1/4 cup sour cream
2 tablespoon ranch salad dressing
3 tablespoons (or more) hot sauce
2 garlic cloves, finely minced
2 scallions, chopped and divided
4 tablespoons blue cheese crumbles, divided
1/2 cup shredded Monterey Jack cheese
1/4 teaspoon black pepper
1/8 teaspoon cayenne pepper
10 ounces cooked chicken, roughly chopped
celery sticks
potato chips

Preheat the oven to 350 degrees F.

In a bowl, mix together the cream cheese, sour cream and ranch salad dressing until well combined. Stir in the hot sauce, garlic and all but 1/2 tablespoon of the chopped scallions. Mix in 3 tablespoons blue cheese crumbles, Monterey Jack cheese, pepper, cayenne and chicken.

Spoon the mixture into a baking dish and sprinkle the remaining blue cheese crumbles on top. Place the baking dish on top of a baking sheet. Bake the dip for 25 minutes and then turn on the broiler to allow the top to become bubbly and turn golden brown.

Sprinkle the remaining scallions on top of the dip and serve hot with celery sticks and chips.

Poultry · Soups/Stews · Vietnamese

Cà Ri Gà (Vietnamese Chicken Curry)

Cà Ri Gà

Vietnamese is easily one of the top requested foods people ask me to post recipes for. Of course it’s one of my favorite cuisines but to actually quantify measurements in Vietnamese dishes is really tricky. Like Mom and our aunties, I kind of throw a bit of this and a couple of more dashes of that until I like the flavor results.

So please bear with me as I try to share more delish Vietnamese dishes this year and know that you can always adjust amounts (more heat, less nước mắm…) to your hearts content.

Cà Ri Gà

Cà Ri Gà is the Vietnamese version of a chicken curry stew and I LOVE IT. It’s hearty, incredibly aromatic and the flavors get better over time. The rich Cà Ri Gà can be served with jasmine rice or over rice noodles. However my preferred carb accompaniment is with crusty, toasted baguette so that you can dunk pieces in the sauce and gobble it on up.

Cà Ri Gà

I kind of think of Cà Ri Gà as the Vietnamese approach to fusion as a lot of components pull from various cultures. The curry spices itself are from South India – the Vietnamese call it “Cà Ri Ấn Độ“. I like to use a Madras curry blend–a paste in fact but Madras curry powder will also do the trick. As for the coconut milk and kaffir limes – I think of those as classic Thai flavors. And of course the baguette comes from the very heavy French influence in Việt Nam.

Cà Ri Gà

Cà Ri Gà is not difficult to make but like so many other memorable dishes, it does take some time to layer flavors. And trust me, it’s completely worth the few extra steps.

Start off by taking a chicken (it is chicken curry after all) and break it down into 8 pieces. Of course you can use whatever cuts you prefer but I would suggest leaving the skin on and bone-in for more flavor. Mo’ flavor, mo’ better!

Slather the chicken in some of the curry paste and other aromatics –then allow it marinate for several hours.

Cà Ri Gà

After the chicken has had ample time to steep in all the delicious aromatics, lightly brown the meat on both sides.

Browned goodness = Awesome flavor

Tip: Before browning the chicken, wipe off some of the aromatics as they can burn from the high heat in the pot.

Burned garlic/ginger = No bueno flavor

Cà Ri Gà

Remove the chicken after it has browned and saute some other goodies. I’m telling ya, Cà Ri Gà is an aromatic party!

Cà Ri Gà

Then add in a few dollops of the Madras curry paste and cook it down for a minute or two. The heat will release the natural oils from the spices that will add magic to your sauce.

Flavor Magic.

Cà Ri Gà

At some point you’ll also want to smash up some lemongrass stalks. But do me a favor and be careful while you’re hacking away.

Cà Ri Gà

In goes the coconut milk, chicken stock, beaten up lemongrass, kaffir lime leaves and a few dashes of Vietnamese Liquid Gold (fish sauce)……..

Cà Ri Gà

Then the taters, carrots and chicken…………

Cà Ri Gà

And then about an hour later you’ll be ready to get down on some honest to goodness Cà Ri Gà! The chicken should be fork tender and swathed in the luscious curry sauce that is incredibly fragrant from the lemongrass, ginger and kaffir.

Should you find yourself with leftovers, take a tortilla and spoon some basmati rice in the center. Top the rice with the Cà Ri Gà, a few spoonfuls of the sauce and you’ll have an insane Cà Ri Gà Wrap! It also freezes really well.

Cà Ri Gà

And with that dear Friends – Ăn Ngon!

____________________________________________

Cà Ri Gà (Vietnamese Chicken Curry)
Serves 4-5

Ingredients:

1 whole chicken (4-5lbs), broken down into 8 pieces
4 tablespoons vegetable oil, divided
2 tablespoons minced shallots
2 tablespoons minced garlic, divided
1 tablespoon finely minced lemongrass
1 tablespoon finely minced fresh ginger
1 teaspoon black pepper
1 teaspoon sugar
3 tablespoons fish sauce, divided (*more to taste)
5 tablespoons Madras curry paste, divided
1 cup diced white onions
1 inch fresh garlic, sliced into thin matchsticks
2 whole red Thai chilies, minced (*more to taste)
1 13.5-ounce can unsweetened coconut milk
3 cups chicken stock
2 stalks lemongrass
6-8 fresh kaffir lime leaves (2-3 bay leaves can be substituted if needed)
1 pound peeled potatoes, washed and cut into large pieces
3-4 medium sized peeled carrots, cut into 2-3 inch pieces
1 cup fresh cilantro leaves
toasted baguettes

In a large bowl, add the chicken pieces, 2 tablespoons vegetable oil, shallots, minced garlic, minced lemongrass, minced ginger, black pepper, sugar, 1 tablespoon fish sauce, and 2 tablespoons of curry paste. Thoroughly coat the chicken and cover the bowl with plastic wrap. Place the chicken in the refrigerator and allow to marinate for 6-8 hours.

In a large heavy bottomed pot, heat the remaining oil to medium. Brush off the larger shallots/garlic/ginger pieces from the chicken (to prevent it from burning) and in batches, lightly brown the chicken on both sides—about 5-6 minutes. Place the browned chicken on a large plate.

Once all the chicken has been browned, discard all but 1 tablespoon of the oil/grease from the pot. Throw in the diced onions and cook for 2-3 minutes until softened. Add the garlic, chilies and saute for 1 minute before adding in the remaining curry paste. Cook for an additional 30-40 seconds to allow the aromatics and spices to release their oils and bring out their flavors.

Pour in the coconut milk and chicken stock. Take the back of a knife and smash the lemongrass stalks several times to bruise the stalks and release its oils. Add the bruised lemongrass, kaffir leaves, and remaining fish sauce to the pot. Place the potatoes and carrots in the pot and add the chicken. The items should mostly be submerged in the liquids.

Bring the liquids to a boil and then reduce to a simmer. Cook the curry, partially covered, on a low simmered heat for 50-60 minutes. Once done, the chicken should be very tender and the sauce has reduced by about ½.  Taste and adjust with additional fish sauce and black pepper as needed.

Garnish with fresh cilantro leaves and serve hot with toasted baguettes (or rice, noodles, etc.).